 Magnific Popup を使ってみる
2014年2月7日
Youtube の動画を Lightbox のようなモーダルウィンドウで表示できるプラグインを探していたところ見つけた「Magnific Popup」。レスポンシブ・デザインに対応している上に機能も豊富で Goole map なども表示可能。使い方などに関するメモ。

目次
Magnific Popup のダウンロードと読み込み
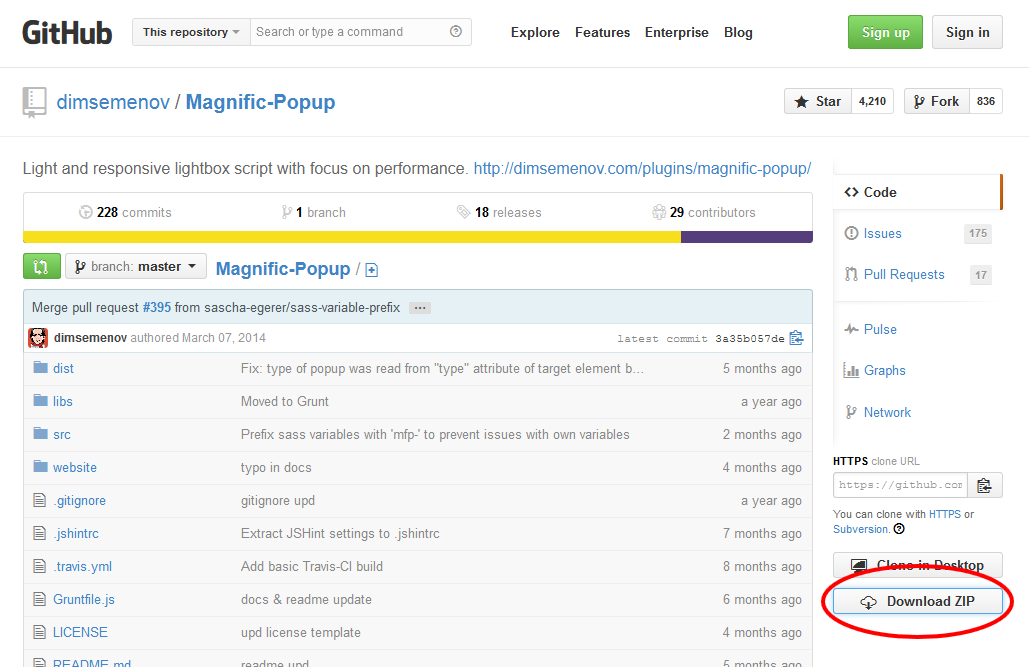
Magnific Popup を「配布ページ」からダウンロード(ページ右側の「Download ZIP」から)
ダウンロードすると「dist」というフォルダがあるのでその中の「jquery.magnific-popup.min.js」と「magnific-popup.css」をコピーして適当なフォルダに配置。
headタグの中で CSS 「magnific-popup.css」を読み込む
<head>
・・・省略・・・
<link rel="stylesheet" href="css/magnific-popup.css">
・・・省略・・・
jQuery と「jquery.magnific-popup.min.js」を、body の閉じタグ直前で読み込む
<script src="http://code.jquery.com/jquery-1.10.1.min.js"></script>
<script src="js/jquery.magnific-popup.min.js"></script>
<script>
jQuery(function($){
  ここに設定を記述
});
</script>
</body>
</html>
Magnific Popup の機能を有効化
ドキュメント:「Magnific Popup Documentation」
サンプル:「Magnific Popup Examples」
以下のような3種類の方法がある。
1. HTML 要素を直接指定
a 要素に任意の class 名や id 名を付与して、href 属性にモーダルウィンドウで表示したい画像などのパスを記述。
HTML
<a class="test-popup-link" href="path-to-image.jpg">Open popup</a>
HTML で記述した class 名 id 名に対してプラグインを実行。
jQuery
jQuery(function($){
    $('.test-popup-link').magnificPopup({
        type: 'image'
        // その他のオプション(必要であれば)
    });
});
「type」:表示するコンテンツの形式を指定するオプション
2. 複数の要素を含む1つの親要素に対して指定
- 複数の要素の親要素に対して指定する場合、それぞれの子要素の href 属性に表示したい画像のパスなどを指定。
- 親要素に任意の class 名や id 名を付与。
HTML
<div class="parent-container">
  <a href="path-to-image-1.jpg">Open popup 1</a>
  <a href="path-to-image-2.jpg">Open popup 2</a>
  <a href="path-to-image-3.jpg">Open popup 3</a>
</div>
親要素の class や id に対してプラグインを実行
delegate:それをクリックするとモーダルウィンドウを開く要素のセレクタ
jQuery
$('.parent-container').magnificPopup({
  delegate: 'a', // 子要素のセレクタ
  type: 'image'
  // other options
});
このままだと1番目のオプション同様、1つ1つが別々にポップアップする。ギャラリーのようにするには、gallery:{enabled:true} オプションを追加する必要がある。
$('.parent-container').magnificPopup({
  delegate: 'a',
  type: 'image',
  gallery: {  //ギャラリーオプション
    enabled:true
  }
});
特定のリンクを除外
前述の例の場合、div 要素(class=”parent-container”)にある a 要素全てが対象になるので、もし通常のリンクを記述してあるとそれもポップアップ表示しようとして「Loading…」や「The image could not be loaded」などのメッセージが表示される。
特定のリンクを除外するには「:not()」を使用することができる。
例えば通常のリンクには「nopopup」というクラスをつけて以下のように指定する。
$('.parent-container').magnificPopup({
  delegate: 'a:not(.nopopup)',
  type: 'image',
  gallery: {  //ギャラリーオプション
    enabled:true
  }
});
参考ページ:Question: How can I exclude isotope-hidden items?
3. 「items」オプションで指定
「items」オプションではポップアップさせる項目を指定(定義)する。(その際 Magnific Popup はターゲットの DOM 要素の属性を全て無視する。)
1つの要素(オブジェクト)を指定する例
$('#some-button').magnificPopup({
    items: {
      src: 'path-to-image-1.jpg'
    },
    type: 'image' // デフォルトの「type」を指定(1つなので、その要素のタイプを指定)
});
複数の要素(オブジェクト)を指定する例。異なるタイプを指定できる。
$('#some-button').magnificPopup({
    items: [
      {
        src: 'path-to-image-1.jpg'
      },
      {
        src: 'http://vimeo.com/123123', //動画
        type: 'iframe' // デフォルトの type をオーバーライド
      },
      {
        src: $('<div>Dynamically created element</div>'), // 動的に要素を生成
        type: 'inline' // デフォルトの type をオーバーライド
      },
      {
        src: '<div>HTML string</div>',
        type: 'inline' // デフォルトの type をオーバーライド
      },
      {
        src: '#my-popup', // CSS のセレクタ
        type: 'inline' // デフォルトの type をオーバーライド
      }
    ],
    gallery: {
      enabled: true
    },
    type: 'image' // デフォルトの type
});
コンテント・タイプ(Content Types)
Magnific Popup には以下のような4つのコンテントタイプがある。URL などから自動的に検出する機能はないので、必ず指定する(デフォルトは inline )。
- image :画像
- iframe:Youtubeなど
- inline
- ajax
コンテントタイプの指定は次の2つの方法がある。
type オプションを使って指定
今までの例で使用してきた指定方法。
$('.image-link').magnificPopup({type:'image'})
mfp-TYPE CSS クラスを使って指定
mfp-TYPE:TYPE は指定したいタイプ(image, iframe, inline, ajax)
以下はコンテントタイプ「image」を指定する例。
<a class="mfp-image image-link">Open image</a>,
$('.image-link').magnificPopup();
2つ目のオプションが1つ目のオプションをオーバーライドする。
ポップアップさせるコンテンツのソース src の指定
ポップアップさせるコンテンツのソース(画像へのパス、HTMLファイルへのパス、ビデオページへのパス・URLなど)を指定(定義)するには次の3つの方法がある。
1. href 属性を使用する方法
今までの例(「items」オプション以外)で使用してきた方法。
<a href="image-for-popup.jpg">Open image</a>
2. data-mfp-src 属性を使う方法
1番目の方法をオーバーライドする。
<a href="some-image.jpg" data-mfp-src="image-for-popup.jpg">Open image</a>
3. 「items」オプションを使う方法
$.magnificPopup.open({
  items: {
    src: 'some-image.jpg'
  },
  type: 'image'
});
CSS
Magnific Popup のスタイルは「magnific-popup.css」に記述されている。Firefox や Chrome などの要素を検証する機能を使って調べて必要に応じてスタイルを指定するとよいと思う。
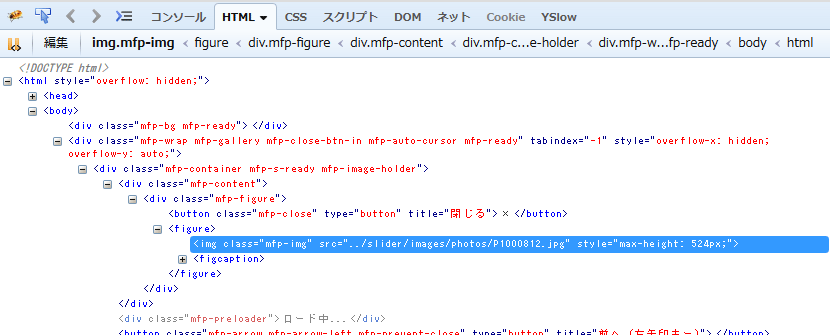
例えば type: ‘image’ の場合、img 要素には「mfp-img」というクラスが付いている。必要に応じて直接修正するか、後から読み込む CSS で値を上書きする等して調整可能。
magnific-popup.css
/* Main image in popup */
img.mfp-img {
  width: auto;
  max-width: 100%;
  height: auto;
  display: block;
  line-height: 0;
  -webkit-box-sizing: border-box;
  -moz-box-sizing: border-box;
  box-sizing: border-box;
  padding: 40px 0 40px;
  margin: 0 auto; }
画像の周りに白い縁取りみたいなものを表示したい場合、上記のクラスに background-color などを指定する。但し、キャプションや閉じるX印の文字色が白なので、それらも変更する必要がでてくる。
以下は直接「magnific-popup.css」を編集するのではなく、後から読み込む CSS にスタイルを追加して画像の周りに白い縁取り(?)を加え、文字色も変更する例。
img.mfp-img {
  padding: 40px 30px 80px;
  background-color: #EEE;
}

.mfp-title {
  color: #666;
  text-shadow: -1px 1px rgba(255, 255, 255, 1);
  padding-left: 1em;
  margin-top: -1em;
  }

.mfp-counter {
  top: .5em;
  right: 1em;
  color: #777;
 }

.mfp-image-holder .mfp-close, .mfp-iframe-holder .mfp-close {
  color: #333;
 }
オプション
Magnific Popup には多数の機能があり、オプションもいろいろある。
オプションの指定例
$('.some-link').magnificPopup({
  // メインオプション
  disableOn: 480,
  key: 'some-key',

  gallery: {
    // ギャラリーオプション
    enabled: true
  },
  image: {
    // image コンテントタイプのオプション
    titleSrc: 'title' // キャプションに使用する a 要素の属性
  }

});
disableOn
ウィンドウ幅がこのオプションで指定した値より小さい場合、モーダルウィンドウは開かずその要素のデフォルトの指定が実行される。
disableOn に「480」と指定して、ウィンドウ幅がそれ以下の場合モーダルウィンドウは開かず、href 属性が指定されていれば、そのページへ移動する。
以下のようにパラメータに関数を指定することも可能。モーダルウィンドウで開く場合は「true」を返すようにする。
disableOn: function() {
  if( $(window).width() < 480 ) {
    return false;
  }
  return true;
}

<!-- ###表示の調整(無視してください)### -->
titleSrc
コンテント・タイプが image の場合、 image: {} の中で「titleSrc」に a 要素の属性を指定すると、その属性の値がタイトル(キャプション)として表示される。
a 要素の属性以外をタイトルとして表示したい場合は、titleSrc に function(item) {...}を使って他の要素などの値を返すようにする。
image: {
    titleSrc: function(item) {
        return item.el.attr('title') + '<small>by Marsel Van Oosten</small>';
    }
}
「item.el」はこの場合、a 要素(jQuery オブジェクト)に該当するので jQuery のメソッド find() 等を使って他の要素の属性や text() 等を取得して返すことも可能。
img 要素の alt 属性をタイトルとして表示する場合の例。
image: {
    titleSrc: function(item) {
        return item.el.find('img').attr('alt');
    }
}
コンテント・タイプが iframe の場合のサンプル:Add title to iframe(video)
参考:
Custom title for Magnific Popup
Magnific Popup: source title from span
アニメーション
Magnific Popup にアニメーションを追加する例。(追記)
参考:http://codepen.io/dimsemenov/pen/GAIkt
上記リンクの CSS は SCSS で記述されているので、必要に応じて目のようなアイコンをクリックしてコンパイルすると通常の CSS を取得できる。
以下の例は画像を Magnific Popup で表示する場合。インライン要素等については上記リンクに掲載されている。
HTML
リンク要素(a 要素)に「data-effect」属性を追加して、値にアニメーションのクラス(mfp-zoom-in, mfp-newspaper 等適用したいアニメーション)を指定。
<div id="list">
    <a href="images/works/001.jpg" data-effect="mfp-zoom-in"><img src="images/works/thumb/001.jpg" alt="" ></a>
・・・
</div>
CSS
以下のアニメーションの設定を CSS に追加。
/*
====== Zoom effect ======
*/
.mfp-zoom-in {
  /* start state */
  /* animate in */
  /* animate out */
}
.mfp-zoom-in .mfp-with-anim {
  opacity: 0;
  transition: all 0.3s ease-in-out;
  transform: scale(0.8);
}
.mfp-zoom-in.mfp-bg {
  opacity: 0;
  transition: all 0.3s ease-out;
}
.mfp-zoom-in.mfp-ready .mfp-with-anim {
  opacity: 1;
  transform: scale(1);
}
.mfp-zoom-in.mfp-ready.mfp-bg {
  opacity: 0.8;
}
.mfp-zoom-in.mfp-removing .mfp-with-anim {
  transform: scale(0.8);
  opacity: 0;
}
.mfp-zoom-in.mfp-removing.mfp-bg {
  opacity: 0;
}

/*
====== Newspaper effect ======
*/
.mfp-newspaper {
  /* start state */
  /* animate in */
  /* animate out */
}
.mfp-newspaper .mfp-with-anim {
  opacity: 0;
  -webkit-transition: all 0.2s ease-in-out;
  transition: all 0.5s;
  transform: scale(0) rotate(500deg);
}
.mfp-newspaper.mfp-bg {
  opacity: 0;
  transition: all 0.5s;
}
.mfp-newspaper.mfp-ready .mfp-with-anim {
  opacity: 1;
  transform: scale(1) rotate(0deg);
}
.mfp-newspaper.mfp-ready.mfp-bg {
  opacity: 0.8;
}
.mfp-newspaper.mfp-removing .mfp-with-anim {
  transform: scale(0) rotate(500deg);
  opacity: 0;
}
.mfp-newspaper.mfp-removing.mfp-bg {
  opacity: 0;
}

/*
====== Move-horizontal effect ======
*/
.mfp-move-horizontal {
  /* start state */
  /* animate in */
  /* animate out */
}
.mfp-move-horizontal .mfp-with-anim {
  opacity: 0;
  transition: all 0.3s;
  transform: translateX(-50px);
}
.mfp-move-horizontal.mfp-bg {
  opacity: 0;
  transition: all 0.3s;
}
.mfp-move-horizontal.mfp-ready .mfp-with-anim {
  opacity: 1;
  transform: translateX(0);
}
.mfp-move-horizontal.mfp-ready.mfp-bg {
  opacity: 0.8;
}
.mfp-move-horizontal.mfp-removing .mfp-with-anim {
  transform: translateX(50px);
  opacity: 0;
}
.mfp-move-horizontal.mfp-removing.mfp-bg {
  opacity: 0;
}

/*
====== Move-from-top effect ======
*/
.mfp-move-from-top {
  /* start state */
  /* animate in */
  /* animate out */
}
.mfp-move-from-top .mfp-content {
  vertical-align: top;
}
.mfp-move-from-top .mfp-with-anim {
  opacity: 0;
  transition: all 0.2s;
  transform: translateY(-100px);
}
.mfp-move-from-top.mfp-bg {
  opacity: 0;
  transition: all 0.2s;
}
.mfp-move-from-top.mfp-ready .mfp-with-anim {
  opacity: 1;
  transform: translateY(0);
}
.mfp-move-from-top.mfp-ready.mfp-bg {
  opacity: 0.8;
}
.mfp-move-from-top.mfp-removing .mfp-with-anim {
  transform: translateY(-50px);
  opacity: 0;
}
.mfp-move-from-top.mfp-removing.mfp-bg {
  opacity: 0;
}

/*
====== 3d unfold ======
*/
.mfp-3d-unfold {
  /* start state */
  /* animate in */
  /* animate out */
}
.mfp-3d-unfold .mfp-content {
  perspective: 2000px;
}
.mfp-3d-unfold .mfp-with-anim {
  opacity: 0;
  transition: all 0.3s ease-in-out;
  transform-style: preserve-3d;
  transform: rotateY(-60deg);
}
.mfp-3d-unfold.mfp-bg {
  opacity: 0;
  transition: all 0.5s;
}
.mfp-3d-unfold.mfp-ready .mfp-with-anim {
  opacity: 1;
  transform: rotateY(0deg);
}
.mfp-3d-unfold.mfp-ready.mfp-bg {
  opacity: 0.8;
}
.mfp-3d-unfold.mfp-removing .mfp-with-anim {
  transform: rotateY(60deg);
  opacity: 0;
}
.mfp-3d-unfold.mfp-removing.mfp-bg {
  opacity: 0;
}

/*
====== Zoom-out effect ======
*/
.mfp-zoom-out {
  /* start state */
  /* animate in */
  /* animate out */
}
.mfp-zoom-out .mfp-with-anim {
  opacity: 0;
  transition: all 0.3s ease-in-out;
  transform: scale(1.3);
}
.mfp-zoom-out.mfp-bg {
  opacity: 0;
  transition: all 0.3s ease-out;
}
.mfp-zoom-out.mfp-ready .mfp-with-anim {
  opacity: 1;
  transform: scale(1);
}
.mfp-zoom-out.mfp-ready.mfp-bg {
  opacity: 0.8;
}
.mfp-zoom-out.mfp-removing .mfp-with-anim {
  transform: scale(1.3);
  opacity: 0;
}
.mfp-zoom-out.mfp-removing.mfp-bg {
  opacity: 0;
}
Magnific Popup のイニシャライズ(有効化・初期化)
removalDelay, callbacks(beforeOpen)を追加。
$('#list').magnificPopup({
  delegate: 'a',
  type: 'image',
  removalDelay: 500, //delay removal アウトする際のアニメーションの遅延
  callbacks: {
    beforeOpen: function() {
      // mfp-with-anim クラスをマークアップに追加
       this.st.image.markup = this.st.image.markup.replace('mfp-figure', 'mfp-figure mfp-with-anim');
       this.st.mainClass = this.st.el.attr('data-effect');
    }
  },
  closeOnContentClick: true,
  midClick: true // allow opening popup on middle mouse click.
});
上記サンプルを開いて、画像をクリックして拡大表示する際、初回はオープン時アニメーションが実行されないのは、画像がキャッシュされていないためと思われる。拡大用の画像をプリロードしておけば、初回でもアニメーションが実行される。
関連ページ:「jQuery で画像をプリロード」
また、 Magnific Popup のオプションにも「preload」がある。
preload: [1,3]
最初の数値:現在表示されている画像の前の画像をいくつプリロードするか
2番目の数値:現在表示されている画像の後の画像をいくつプリロードするか
この機能を使用しない場合は、以下のようにして無効にできる。
preload:0.
言語(Translating)
デフォルトは英語だが、デフォルトの値を拡張することで簡単に表示する言語を変更できる。
いくつかのプロパティは「%keys%」を含むが、これはそのままにしておく(場合によっては順番を入れ替えたり削除する)。
Magnific Popup 全てで一部を日本語で表示する例。Magnific Popup を有効化する前に記述する。
$.extend(true, $.magnificPopup.defaults, {
  tClose: '閉じる', // Alt text on close button
  tLoading: 'ロード中...', // Text that is displayed during loading. Can contain %curr% and %total% keys
  gallery: {
    tPrev: '前へ (左矢印キー)', // Alt text on left arrow
    tNext: '次へ (右矢印キー)', // Alt text on right arrow
    tCounter: '%curr% の %total%' // Markup for "1 of 7" counter
  }
});

$('#yt_link').magnificPopup({
  delegate: 'a',
  type: 'iframe',
  ・・・省略・・・
Magnific Popup の個々について日本語にする例(有効化する際にオプションで指定)。
$('.some-button').magnificPopup({
  tClose: '閉じる',
  tLoading: 'ロード中...',
  gallery: {
    tPrev: '前へ (左矢印キー)',
    tNext: '次へ (右矢印キー)',
    tCounter: '%curr% の %total%'
  }

  // その他のオプション

});
サンプル
type: ‘iframe’ / Youtube
Youtube をギャラリーで表示する例。
a 要素の title 属性を記述してタイトルとして左下に表示。
HTML
<div id="yt_link">
<div class="video_image">
<a href="http://www.youtube.com/watch?v=wuaD9yG4Fdw" title="Pat Metheny & Jim Hall ">
<img src="images/jimpat.jpg" alt="">
</a>
</div>
<div class="video_image">
<a href="http://www.youtube.com/watch?v=hLWlqBH9nrU" title="Wes Montgomery - Live '65 ">
<img src="images/wes.jpg" alt="">
</a>
</div>
<div class="video_image">
<a href="http://www.youtube.com/watch?v=jj0HTcSKX1Q" title="John Coltrane Live 1960">
<img src="images/coltrane.jpg" alt="">
</a>
</div>
</div><!--end of #yt_link-->
head 内で CSS を読み込む。
<link rel="stylesheet" href="css/magnific-popup.css">
CSS ではタイトルの設定(.mfp-title)を指定
.video_image {
  margin-bottom: 20px;
}
.mfp-title {
  position:absolute;
  padding: 5px;
  color: #FFF;
}
タイトルを表示する方法は「add title to iframe (video)」を参照。
jQuery と jquery.magnific-popup.min.js を読み込む。
jQuery
<script src="http://code.jquery.com/jquery-1.10.1.min.js"></script>
<script src="js/jquery.magnific-popup.min.js"></script>
<script>
jQuery(function($){
  $.extend(true, $.magnificPopup.defaults, {
    tClose: '閉じる',
    tLoading: 'ロード中...',
    gallery: {
      tPrev: '前へ (左矢印キー)',
      tNext: '次へ (右矢印キー)',
      tCounter: '%curr% / %total%'
    }
  });

  $('#yt_link').magnificPopup({
    delegate: 'a',
    type: 'iframe',
    iframe: {
      markup: '<div class="mfp-iframe-scaler">'+
      '<div class="mfp-close"></div>'+
      '<iframe class="mfp-iframe" frameborder="0" allowfullscreen></iframe>'+
      '<div class="mfp-title">Some caption</div>'+
      '</div>'
    },
    gallery: {
      enabled:true
    },
    callbacks: {
      markupParse: function(template, values, item) {
        values.title = item.el.attr('title');
      }
    },
    disableOn: function() {
      if( $(window).width() < 480 ) {
        return false;
      }
      return true;
    }
  });
});

</script>
サムネイル画像を取得して表示する場合
上記の例では、キャプチャした画像を用意する必要があるが、YouTube のサムネイル画像を取得して表示することもできる。
YouTube のサムネイル画像 (src)
サムネイルのサイズ
- mqdefault.jpg ( 320×180 ) 通常使用されるサイズ
- hqdefault.jpg または 0.jpg ( 480×360 ) 4:3 のサイズ。
- default.jpg ( 120×90 )
- 1.jpg または 2.jpg または 3.jpg ( 120×90 ) 場面を YouTube 側で取ったサムネイル
- maxresdefault.jpg ( 1280×720 ) 最大サイズ。但し元の動画が HD 以上でないと生成されない
HTML のキャプチャした画像の部分を Youtube のサムネイル画像に変更するだけ。あとは同じ。
HTML
<div id="yt_link">
<div class="video_image">
<a href="http://www.youtube.com/watch?v=wuaD9yG4Fdw" title="Pat Metheny & Jim Hall ">
<img src="http://i.ytimg.com/vi/wuaD9yG4Fdw/mqdefault.jpg" alt="">
</a>
</div>
<div class="video_image">
<a href="http://www.youtube.com/watch?v=45ryhFK-kpQ" title="Pat Metheny Trio ">
<img src="http://i.ytimg.com/vi/45ryhFK-kpQ/mqdefault.jpg" alt="">
</a>
</div>
</div><!--end of #yt_link-->
type: ‘iframe’ / Google Maps
Google Maps を表示する例。これが正しい方法かどうかは定かではないが、一応機能する。
以下のような a 要素を HTML に記述。
<a class="map" data-mfp-src="" href=""><span class="address">東京都港区芝公園4−2−8</span></a>
この例の場合以下のような構成になっている
- a 要素のクラス:map
- href 属性:空
- data-mfp-sr 属性:空
- span 要素のクラス:address (ここに表示する地図の住所を記述)
jQuery に以下を記述
<script src="http://code.jquery.com/jquery-1.10.1.min.js"></script>
<script src="js/jquery.magnific-popup.min.js"></script>
<script>
jQuery(function($){

  if($('a.map').length > 0) {
    $('a.map').each(function() {
      var address = $(this).find('span.address').text();
      address = $.trim(address);
      address = address.replace(/\s+/g, '+');
      var map_param = $.param({
        'q': address
      });
      $(this).attr('data-mfp-src', "https://maps.google.com/maps?" + map_param);
      $(this).attr('href', "https://maps.google.com/maps?" + map_param);
    });

    $('.map').magnificPopup({
      disableOn: 600,
      type: 'iframe'
    });
  }
});
</script>
概要
クラスが「map」の a 要素があれば以下を実行
- クラスが「address」の span 要素のテキスト(住所)を変数「address」に取得
- 取得したテキスト(住所)の前後の空白を取り除き、内部の空白を「+」で置換。
- $.param()を使って値を、URLクエリ文字列の形式でシリアライズ
- それを「”https://maps.google.com/maps?”」に加えたものを URL とする
- URL は a 要素の「data-mfp-src 属性」に設定。
- 「href 属性」にも URL を設定。(600px 未満の場合、Google Maps のページへ移動)
以下は住所のリストを表示して「map」というリンクをクリックすると地図を表示させる例。
- リストに span 要素(class=”address”)が指定されていれば、「map」という地図を表示させるリンクを追加
- ブラウザの幅が 600px 以上の場合、「map」をクリックすると Google Map をポップアップで表示
- ブラウザの幅が 600px 未満の場合、「map」をクリックすると Google Map のページで表示
住所の部分を span 要素(class=”address”)で囲む。
HTML
<ul id="location">
    <li>Blue Note <span class="address">131 West 3rd St. New York, NY 10012</span></li>
    <li>Smalls <span class="address">183 W 10th St New York, NY 10014</span></li>
    <li>Cleopatra's Needle <span class="address">2485 Broadway, New York, NY 10025 </span></li>
</ul>
検索文字列に場所の名前も含める場合はそれらも含めて span 要素(class=”address”)で囲む(情報ウィンドウに場所の名前も表示される)
HTML
<ul id="location">
    <li><span class="address">Blue Note 131 West 3rd St. New York, NY 10012</span></li>
    <li><span class="address">Smalls 183 W 10th St New York, NY 10014</span></li>
    <li><span class="address">Cleopatra's Needle 2485 Broadway, New York, NY 10025 </span></li>
</ul>
head 内で CSS を読み込む。
<link rel="stylesheet" href="css/magnific-popup.css">
span 要素(class=”address”)が存在する場合に以下を実行。
- li 要素に対して、span 要素(class=”address”)が存在すれば、「map」というリンクを追加
- 追加した「map」というリンクの「data-mfp-src 属性」に Google Map 用の URL を設定
- 「disableOn: 600」で600px 未満の場合、 Magnific Popup を無効にするので、「href 属性」にも Google Map 用の URL を設定
- 「href 属性」のみに URL を設定するとエラーとなりうまく行かなかった
ドキュメントによるとデフォルトでは Google Map 用の URL は以下のような形式とのこと。
// Google Maps
“https://maps.google.com/maps?q=221B+Baker+Street,+London,+United+Kingdom&hl=en&t=v&hnear=221B+Baker+St,+London+NW1+6XE,+United+Kingdom”
- span 要素(class=”address”)のテキストを取得して前後の空白を取り除いた後、内部の空白を「+」で置換。
- その後、$.param()を使って値を、URLクエリ文字列の形式でシリアライズ
- それを「”https://maps.google.com/maps?”」に加えたものを URL とする
- URL は a 要素の「data-mfp-src 属性」に設定。
- 「href 属性」にも URL を設定。(600px 未満の場合、Google Maps のページへ移動)
jQuery
<script src="http://code.jquery.com/jquery-1.10.1.min.js"></script>
<script src="js/jquery.magnific-popup.min.js"></script>
<script>
jQuery(function($){

  if($('#location li span.address').length > 0 ) {
    //span 要素(class=”address”)が存在すれば、「map」というリンクを追加
    $('#location li').each(function() {
      var span_address$ = $(this).find('span.address');
      if(span_address$.length > 0 ) {
        $(this).append('<a href="#" class="map" data-mfp-src=""> map</a>');
      }
    });

    $('a.map').each(function() {
      var address = $(this).closest('li').find('span.address').text();
      address = $.trim(address);
      address = address.replace(/\s+/g, '+');
      var map_param = $.param({
        'q': address
      });
      $(this).attr('data-mfp-src', "https://maps.google.com/maps?" + map_param);
      $(this).attr('href', "https://maps.google.com/maps?" + map_param);
    });

    $('.map').magnificPopup({
      disableOn: 600,
      type: 'iframe'
    });
  }
});
</script>
パラメータを追加して地図の表示を変更する場合の例
以下は URL パラメータの例
| 情報ウィンドウ(iwloc=値) | A:情報ウィンドウを表示 J:マーカーのみ表示 |
|---|---|
| 縮尺(z=数値) | 数値は0 ~ 22 0:最小 22:最大 |
| 言語(hl=言語) | ja:日本語 en:英語 fr:フランス語 |
| 地図の種類(t=種類) | m :市街地図 k :航空写真 h :地図+写真 e :Google Earth(Google Earthのプラグインが必要) p :地形図 |
これらのパラメータを追加するには、$(‘.map’).magnificPopup() の部分を以下のように変更
- 「src:」 にパラメータを追加(%id% に id: で指定した値が入る)
- 「src:」 ‘%id%&output=embed’ がデフォルト(このままだと前述と同じ)
- 「src:」 ‘%id%&iwloc=J&hl=en&z=18&output=embed’ として「iwloc=J&hl=en&z=18」を追加(マーカーのみ表示、言語を英語、ズームレベルを18)
- ついでに「markup:」で「閉じる」と言う文字列を追加して CSS でスタイルを指定
参考:Iframe Type
$('.map').magnificPopup({
  disableOn: 600,
  type: 'iframe',
  iframe: {
    markup: '<div class="mfp-iframe-scaler">'+
        '<div class="mfp-close"></div><p class="close_string">閉じる</p>'+
        '<iframe class="mfp-iframe" frameborder="0" allowfullscreen></iframe>'+
        '</div>',

    patterns: {
      gmaps: {
        id:$(this).attr('data-mfp-src'),
        src: '%id%&iwloc=J&hl=ja&z=18&output=embed'
      }
    }
  }
});
600px 未満の場合の href 属性にもパラメータを追加。
$(this).attr('href', "https://maps.google.com/maps?" + map_param + '&iwloc=J&hl=en&z=18');
CSS
.close_string {
  position: absolute;
  font-size: 13px;
  top: -17px;
  right: 50px;
  color: #FFF;
}
type: ‘inline’ / Google Maps
Google Maps を「type: ‘inline’」で表示する例。これも正しい方法かどうかは定かではないが、一応機能する。
Google Maps の埋め込み用のコードを取得
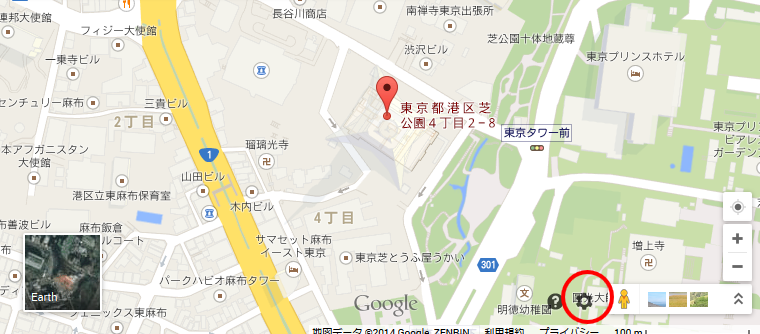
- Google Maps で表示したい場所の住所を入力して地図を表示
- 右下の歯車のようなアイコンをクリック

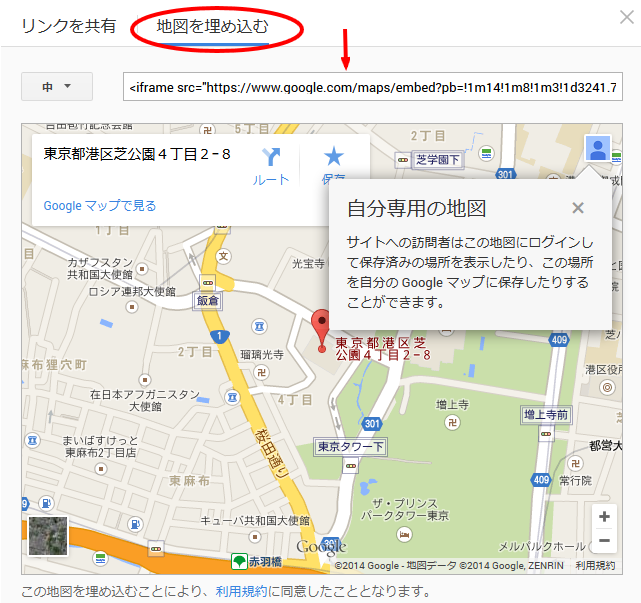
- 「地図を共有/埋め込む」をクリック
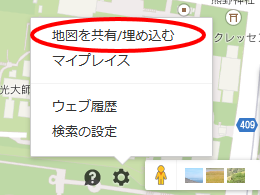
- 「地図を埋め込む」のタブをクリック
- ソースをコピー(埋め込み用のコードを取得)
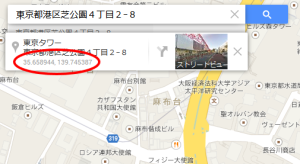
Google Maps で場所の緯度と経度(座標)を取得
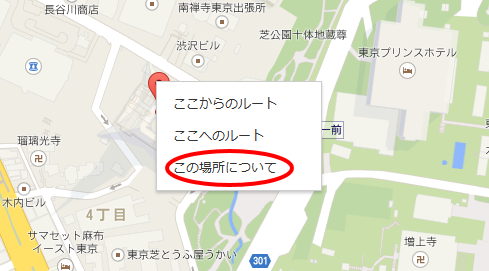
- Google Maps でマーカーを右クリック
- 「この場所について」をクリック

- 左上に場所の情報が表示され、そこに緯度と経度(座標)が表示されているのでコピー(リンクの href 属性に使用)

HTML の記述
クリックするとポップアップするリンクのクラスを「map」として、href 属性に Google Maps のリンクを指定。(600px 未満の場合、ポップアップさせずそのリンクへジャンプ)
「http://maps.google.com/maps?z=16&daddr= + 緯度と経度(座標)」
(z=16 はズームレベルの指定。値は0 ~ 22 最小は0、最大は22)
埋め込み用のコード(iframe)を div 要素で囲む。
クラス
mfp-iframe-scaler:iframe 用のクラス(おそらく)
mfp-hide:「type: ‘inline’」で指定する場合、始めは非表示にしておく要素
ID
gmap_popup:「items」を使って、その src で使用するための ID
HTML
<p>東京都港区芝公園4−2−8 <a class="map" href="http://maps.google.com/maps?z=16&daddr=35.658704,139.745408">地図を表示</a></p>

<div class="mfp-iframe-scaler mfp-hide" id="gmap_popup">
    <iframe class="gmap" src="https://www.google.com/maps/embed?pb=!1m14!1m8!1m3!1d3241.74296 中略 jp!4v1400860417030" width="600" height="450" frameborder="0" style="border:0">
    </iframe>
</div>
スタイルを指定。
.mfp-content :地図を囲む div 要素のクラス
CSS (closeBtnInside: false を指定する場合)
.mfp-content {
  max-width: 85%;
}
CSS (closeBtnInside: true を指定する場合)
.mfp-content {
  max-width: 85%;
}

.mfp-close-btn-in .mfp-close {
  color: #fff !important;
  background: #333;
  border-radius: 22px;
  top: 0;
  right: 0;
}
closeBtnInside:「閉じる」のボタンを内側に表示するかどうか
jQuery
<script src="http://code.jquery.com/jquery-1.10.1.min.js"></script>
<script src="js/jquery.magnific-popup.min.js"></script>
<script>
jQuery(function($){

  if($('a.map').length > 0) {
    $('a.map').magnificPopup({
      items: {
      src: '#gmap_popup'
      },
      disableOn: 600,
      type: 'inline',
      closeBtnInside: true //または false
    });
  }
});
</script>
type: ‘image’ ギャラリー表示
画像をギャラリーで表示する例。
- a 要素の href 属性に画像のパスを指定
- a 要素の title 属性に表示するタイトルを指定
HTML
<div id="photo_list" class="jp">
    <ul>
      <li><a href="images/photos/12.jpg" title="夕方のオアハカの街">
        <img src="images/thumbnails/812.jpg" alt="夕方のオアハカの街の写真">
      </a></li>
      <li><a href="images/photos/822.jpg" title="夜のオアハカの街">
        <img src="images/thumbnails/822.jpg" alt="夜のオアハカの街の写真">
      </a></li>
      <li><a href="images/photos/250.jpg" title="オアハカの遺跡">
        <img src="images/thumbnails/250.jpg" alt="オアハカの遺跡の写真">
      </a></li>
    </ul>
</div><!--end of #photo_list-->
head 内で CSS を読み込む。
<link rel="stylesheet" href="css/magnific-popup.css">
jQuery と jquery.magnific-popup.min.js を読み込む。
- 日本語変換の記述は、他のページでも使用したりする場合のために関数にしておく
- ギャラリーとして表示するため「gallery」を「enabled:true」に
- カーソルをマイナス印のついたものではなく、default タイプのものに
- a 要素の title 属性の値をタイトルとして表示
jQuery
<script src="http://code.jquery.com/jquery-1.10.1.min.js"></script>
<script src="js/jquery.magnific-popup.min.js"></script>
<script>
jQuery(function($){
  //magnificPopup の日本語変換
  function translate_magnificPopup() {
    $.extend(true, $.magnificPopup.defaults, {
        tClose: '閉じる',
        tLoading: 'ロード中...',
        gallery: {
          tPrev: '前へ (左矢印キー)',
          tNext: '次へ (右矢印キー)',
          tCounter: '%curr% / %total%'
        },
        image: {
          tError: '<a href="%url%">画像</a> を読み込めませんでした。'
        }
      });
  }

  //もし #photo_list が存在すれば
  if($('#photo_list').length > 0) {
    //もし .jp であれば、Prev, Next などを日本語に
    if($('.jp').length > 0) {
      translate_magnificPopup();
    }
    $('#photo_list').magnificPopup({
      delegate: 'a',
      type: 'image',
      gallery: {
        enabled:true
      },
      image: {
        cursor: null,   //カーソルを通常のものに
        titleSrc: 'title'   //a 要素の title 属性の値をタイトルとして表示
      }
    });
  }
});
</script>
type: ‘image’ 画像のリンクを表示
ポップアップ表示した際タイトルに、表示されている画像のリンクを出力する例。
例えば地図の画像をポップアップ表示させた場合、それを印刷しようとするとポップアップした画像の背景のページまで印刷されてしまうので、画像のリンクを表示して印刷用にはそのリンクをクリックしてもらう方法。
Adds “view original image” link to caption that just opens image via default browser method.
HTML
<p><a class="print_map" href="../images/common/map2014.png" title="地図:"><img src="../images/common/map2014.png" alt="地図"></a></p>
オプションの「titleSrc」を使って a 要素のタイトル「item.el.attr(‘title’)」と画像のリンクを出力。(この場合、a 要素の title 属性を指定しておかないと undefined と表示される)
a 要素のタイトルが不要な場合は単にリンクのみを出力するとよい。(その場合は、「item.el.attr(‘title’)」は不要)
$('a.print_map').magnificPopup({
    type: 'image',
    image: {
        cursor: null,
        verticalFit: true,
        titleSrc: function(item) {
            return item.el.attr('title') + ' <a class="image-print-link" href="'+item.src+'" target="_blank" rel="noopener noreferrer"> 印刷用に別ウィンドウで開く</a>';
        }
    }

});
a 要素の title 属性の代わりに、img 要素の alt 属性を使う(表示する)場合は以下のようにする。
$('a.print_map').magnificPopup({
    type: 'image',
    image: {
        cursor: null,
        verticalFit: true,
        titleSrc: function(item) {
            return item.el.find('img').attr('alt') + ' <a class="image-print-link" href="'+item.src+'" target="_blank" rel="noopener noreferrer"> 印刷用に別ウィンドウで開く</a>';
        }
    }

});
New Web 制作リファレンス
![]()