 jQuery Waypoints を使ってみる
2013年11月24日
スクロールイベントを制御(ページ内の特定のスクロール位置で関数を実行するなど)できる「jQuery Waypoints v2.0.3 」を使った際のメモ(使い方)。
「Infinite Scroll(ページ下部まで移動すると、次のページを自動的に読み込んで表示)」、「Sticky Elements(特定の要素をある位置に固定して表示)」などのショートカットが用意されている。
ダウンロード
以下のリンク先の「Download」をクリックしてダウンロード。
http://imakewebthings.com/jquery-waypoints/
解凍すると「waypoints.min.js」とショートカット(waypoints-infinite.min.js、waypoints-sticky.min.js)やサンプルなどが入っている。
ショートカットのサンプルは以下のページの各項目をクリック。
http://imakewebthings.com/jquery-waypoints/#shortcuts-examples
jQuery Waypoints の読み込み
jQuery を読み込んだ後にダウンロードした「waypoints.min.js」を読み込む。
<script src="/path/to/jquery.min.js"></script>
<script src="/path/to/waypoints.min.js"></script>
Infinite Scroll
ページ下部(または、ある特定の要素)までスクロールすると、次のページを自動的に読み込んで表示する場合。
http://imakewebthings.com/jquery-waypoints/shortcuts/infinite-scroll/
ショートカットのスクリプト(waypoints-infinite.min.js)を読み込む。
<script src="/path/to/jquery.min.js"></script>
<script src="/path/to/waypoints.min.js"></script>
<script src="/path/to/waypoints-infinite.min.js"></script>
デフォルトの使い方
$('.infinite-container').waypoint('infinite');
この場合、スクロールして「.infinite-container」というクラスを付けた要素の下部に達したら以下の様なステップが取られる。
- オプションの「onBeforePageLoad」で指定したコールバック関数が呼び出される。
- 「infinite-loading」というクラスがコンテナに付加される。このクラスを利用して「ロード中」のスタイルを指定することができる。
- 「infinite-more-link」というクラスの付いたリンク(a 要素)を探し、その「href」属性の値を元に AJAX リクエストを行う。
- AJAX リクエストは「infinite-item」というクラスの付いた HTML 要素を探して取得する。
- 取得した HTML 要素をコンテナに追加する。取得した要素にさらに「infinite-more-link」というクラスの付いたリンク(a 要素)があれば、同様に繰り返す。
- 取得する要素がなくなれば、コンテナから「infinite-loading」というクラスを削除し、オプションの「onAfterPageLoad」で指定したコールバック関数があれば呼び出される。
以下はデフォルトのオプション
$('.infinite-container').waypoint('infinite', {
  container: 'auto',
  items: '.infinite-item',
  more: '.infinite-more-link',
  offset: 'bottom-in-view',
  loadingClass: 'infinite-loading',
  onBeforePageLoad: $.noop,  //何もしない
  onAfterPageLoad: $.noop  //何もしない
});
簡単な例
HTML
<div class="infinite-container">

 この部分の後に取得した要素が追加される。

</div><!--end of .infinite-container-->

<p><a class="infinite-more-link" href="more1.html">more</a></p>
more1.html が取得先のリンク
取得先のHTML(この例の場合 more1.html)
<div class="infinite-item">

この部分が取得されてコンテナ(.infinite-container)に追加される

</div><!--end of .infinite-item-->

<p><a class="infinite-more-link" href="more2.html">more</a></p>
更に取得する必要がなければこのリンクは不要。
jQuery
jQuery(function($){
  //コールバック関数
  function afterinfinite() {
    $('a.infinite-more-link').css('display', 'none');
  }

  $('.infinite-container').waypoint('infinite', {
    onAfterPageLoad: afterinfinite
  });
});
Sticky Elements
特定の要素をある位置に固定して表示する場合。
http://imakewebthings.com/jquery-waypoints/shortcuts/sticky-elements/
ショートカットのスクリプト(waypoints-sticky.min.js)を読み込む。
<script src="/path/to/jquery.min.js"></script>
<script src="/path/to/waypoints.min.js"></script>
<script src="/path/to/waypoints-sticky.min.js"></script>
デフォルトの使い方
以下はナビゲーションを固定して表示するごく簡単なサンプル。
$('.my-sticky-element').waypoint('sticky');
固定する要素に「.my-sticky-element」というクラスを付ける。
<div id="navi" class="my-sticky-element">
    <ul>
      <li><a class="disabled" href="#">Top</a></li>
      <li><a href="chedule.html">Schedule</a></li>
      <li><a href="profile.html">Profile</a></li>
      <li><a href="contact1.php">Contact</a></li>
    </ul>
  </div><!-- end of #navi -->
CSS では「.my-sticky-element.stuck」というクラスに「position:fixed;」を指定する。画面トップに固定するには「top:0;」と指定。その他必要に応じてスタイルを指定。
固定する要素に「position: relative;」が指定してあるとうまくいかない。
CSS
.my-sticky-element.stuck {
  position:fixed;
  top:0;
}

#navi {
  /*position: relative; この指定があると動かない*/
  width: 100%;
  margin: 0;
}
これだけで、ナビゲーションを常に画面上部に固定して表示できる。
但し、ナビゲーションのようなページに1つしかない要素にクラスを使って処理するのは、無駄な気がするのでデフォルトのクラス「my-sticky-element」は使わずに以下のようにする。
クラス「my-sticky-element」は使わず、id(#navi)を利用。
<div id="navi">
    <ul>
      <li><a class="disabled" href="#">Top</a></li>
      <li><a href="chedule.html">Schedule</a></li>
      <li><a href="profile.html">Profile</a></li>
      <li><a href="contact1.php">Contact</a></li>
    </ul>
  </div><!-- end of #navi -->
$(‘#navi’)に .waypointを。
$('#navi').waypoint('sticky');
#navi.stuck にスタイルを指定。
#navi.stuck {
  position:fixed;
  top:0;
}
offset の指定
ある要素がトップではなく、トップからのある指定の距離に達した時「.waypoint 」をトリガさせるには「offset」の値を指定する。デフォルトの単位はピクセル。
以下の様なサイドバーのリンクを、サイドバーの要素の高さ以上にスクロールした場合、固定して表示させる場合。
<div id="side" class="shcedule">
<div id="summary">
<h3>リンク</h3>
<ul>
  <li><a href="#link1">link #1</a></li>
  <li><a href="#link2">link #2</a></li>
  <li><a href="#link3">link #3</a></li>
</ul>
</div><!--end of #summary-->
・・・他の項目(省略)・・・
</div><!--end of #side-->
サイドバーの要素(#side.shcedule)の高さ以上にスクロールした場合というのは、サイドバーの要素(#side.shcedule)の下辺に達した場合になるので、マイナスの値を指定する。
$('#summary').waypoint('sticky', {
      offset: - $('#side.shcedule').height()
  });
CSS に「.stuck」を指定。ナビゲーションと異なり、トップからの距離を「50px」に指定。
#summary.stuck {
  position:fixed;
  top:50px;
  width : 23.25%
}
取り敢えず、複数の要素に設定可能。
その他の基本的な使い方
http://imakewebthings.com/jquery-waypoints/#get-started
一番単純な例
ある要素に「.waypoint 」を呼び出して(第1パラメータに)処理や関数などを指定すると、その要素の上部がブラウザの最上部に達すると、処理や関数が実行される。
これはスクロールアップとスクロールダウンに対して適用される。
$('#example-basic').waypoint(function() {
  notify('Basic example callback triggered.');
});
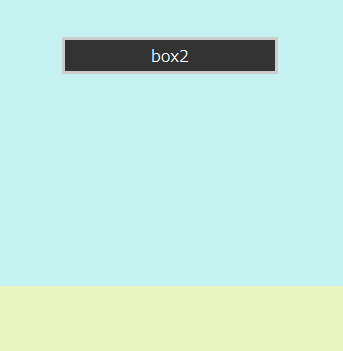
具体的な例
CSS と HTML
<style>
#wrapper {
  height: 2000px;
  position: relative;
}
#box1, #box2, #box3 {
  height: 300px;
}
#box1 {
  background-color: #E1E0E0;
}
#box2 {
  background-color: #C6F1F1;
}
#box3 {
  background-color: #EAF5C2;
}
#message {
  width: 100%;
  text-align: center;
  display: none;
}
#message p {
  width: 200px;
  background-color: #333;
  color: #FFF;
  border: solid 3px #CCC;
  padding: 5px;
  margin: 0 auto;
}

</style>

<body>
<div id="wrapper">
<div id="box1"></div>
<div id="box2"></div>
<div id="box3"></div>
<div id="message"><p></p></div>
</div>
jQuery
jQuery(function($){
  //メッセージを表示する関数
  function showMessage(that, extra) {
    if(!extra) {
       extra = '';
    }else{
       extra = ' :  ' + extra;
    }
    $('#message').css({display: 'block', position:'fixed', top: '50px'}).find('p').text(that.attr('id') + extra);
  }

  //'#box2'がトップに達するとメッセージを表示
  $('#box2').waypoint(function() {
    showMessage($(this));
  });

});
メッセージを表示する関数 showMessage():
.waypoint を利用する要素の id を表示するため、第1引数にその要素自身($(this))、第2引数(オプション)にエキストラのメッセージを指定
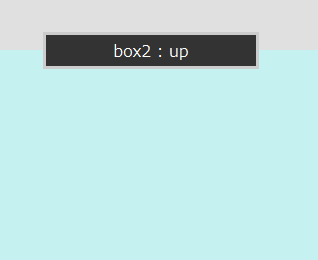
コールバックに「direction」を指定
スクロール方向(アップまたはダウン)により、処理を変更するにはコールバックのパラメータに「direction」を指定する。
$('#example-direction').waypoint(function(direction) {
  notify('Direction example triggered scrolling ' + direction);
});
上記の場合、”Direction example triggered scrolling down” または “Direction example triggered scrolling up”が表示される。
具体的な例
CSS と HTMLは同じ
jQuery(function($){
  //showMessage()も前述と同じ
  function showMessage(that, extra) {
    if(!extra) {
       extra = '';
    }else{
       extra = ' :  ' + extra;
    }
    $('#message').css({display: 'block', position:'fixed', top: '50px'}).find('p').text(that.attr('id') + extra);
  }

  //パラメータに「direction」を指定
  $('#box2').waypoint(function(direction) {
    showMessage($(this), direction);
  });

});
スクロールダウンすると「box2 : down」と表示されスクロールアップすると「box2 : up」と表示される。
スクロールダウンすると「box2 : down」と表示され、スクロールアップするとフェードアウトする例
$('#box2').waypoint(function(direction) {
    if(direction == 'up') {
      $('#message').fadeOut(500);
    }else{
      showMessage($(this), direction);
    }
  });
オフセットの指定
「.waypoint 」の第2パラメータにオプションオブジェクトを指定することができ、そのうちの1つにオフセットがある。
ある要素がトップではなく、トップからのある指定の距離に達した時「.waypoint 」をトリガさせるには以下のように指定する。デフォルトの単位はピクセル。
$('#example-offset-pixels').waypoint(function() {
  notify('100 pixels from the top');
}, { offset: 100 });
「%」でも指定可能。(クオートで囲む)
$('#example-offset-percent').waypoint(function() {
  notify('25% from the top');
}, { offset: '25%' });
さらに「関数」も指定可能。但し、その関数は数値を返す必要がある。
下記の例の場合、その要素の下辺に達した際に処理が実行される。
(注意)その要素の下辺の場合、オフセットはマイナスの値となる。
$('#example-offset-function').waypoint(function() {
  notify('Element bottom hit window top');
}, {
  offset: function() {
    return -$(this).height();
  }
});
スクロール領域内での指定
「overflow:scroll」を指定した div 要素内でスクロールが発生した場合に何らかの処理を実行させるには、「context」オプションを使用する。
CSS と HTML
.scroll_div {
  overflow: scroll;
  height: 100px;
}

<div class="scroll_div">
    <div id="inside_scroll">
        <p>Lorem ipsum dolor sit amet, consectetur adipisicing elit. Aut, ipsa, .....</p>
        <p>Adipisci, itaque nemo incidunt esse repellendus at autem odio rerum ......</p>
    </div>
</div>
<div id="message"><p></p></div>
「overflow:scroll」を指定する要素には「クラス」を指定。
jQuery
//メッセージを表示する関数
function showMessage(that, extra) {
    if(!extra) {
       extra = '';
    }else{
       extra = ' :  ' + extra;
    }
    $('#message').css({display: 'block', position:'fixed', top: '50px'}).find('p').text(that.attr('id') + extra);
  }

$('#inside_scroll').waypoint(function(direction) {
    showMessage($(this), direction);
    }, { context: '.scroll_div' });
「direction」の指定も可能。
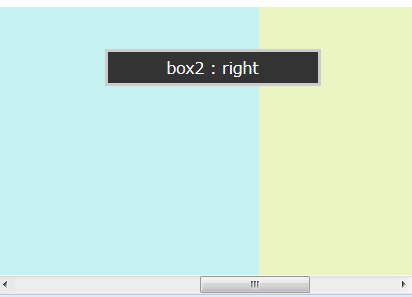
水平方向へのスクロール
デフォルトでは、垂直方向へのスクロールに対してだが、「horizontal」オプションを「true」に設定すると、水平方向へのスクロールに対して実行される。
$('.panel').waypoint(function(direction) {
  $body.toggleClass(this.id + '-visible', direction === 'right');
}, {
  offset: '50%',
  horizontal: true
});
例
CSS, HTML
<style>
#wrapper {
  height: 300px;
  position: relative;
  width: 100%;

}
#box1, #box2, #box3 {
  height: 300px;
  width: 100%;
  position: absolute;
}
#box1 {
  background-color: #E1E0E0;
  left: 0;
}
#box2 {
  background-color: #C6F1F1;
  left: 100%;
}
#box3 {
  background-color: #EAF5C2;
  left: 200%;
}
#message {
  width: 100%;
  text-align: center;
  display: none;
}
#message p {
  width: 200px;
  background-color: #333;
  color: #FFF;
  border: solid 3px #CCC;
  padding: 5px;
  margin: 0 auto;
}
</style>

<body>
<div id="wrapper">
    <div id="box1"></div>
    <div id="box2"></div>
    <div id="box3"></div>
    <div id="message"><p></p></div>
</div>
jQuery
function showMessage(that, extra) {
    if(!extra) {
       extra = '';
    }else{
       extra = ' :  ' + extra;
    }
    $('#message').css({display: 'block', position:'fixed', top: '50px'}).find('p').text(that.attr('id') + extra);
  }

  $('#box2').waypoint(function(direction) {
    if(direction == 'up') {
      $('#message').fadeOut(500);
    }else{
      showMessage($(this), direction);
    }
  //「horizontal」オプションを「true」に設定
  }, { horizontal: true }

  );
デフォルトのオプション
http://imakewebthings.com/jquery-waypoints/#doc-options
$.fn.waypoint.defaults = {
  context: window,
  continuous: true,
  enabled: true,
  horizontal: false,
  offset: 0,
  triggerOnce: false
}
New Web 制作リファレンス
![]()