 Google Map をレスポンシブ対応に
2014年2月25日
Google Map をレスポンシブに対応させる方法のメモ。
2018年7月16日から「Google Maps Platform」という新しいサービスになり、API の使い方等が変更になりました。新しい API の使い方等については「Google Maps API の使い方」をご覧ください(2018年7月30日)
目次
概要
参考サイト:「How to Make the New Google Maps Embeds Responsive」
基本的な構造の HTML
<div class="map_wrapper">
    <div class="googlemap">
      <!-- 地図埋め込み用 HTML コードをペースト -->
    </div><!--end of .googlemap-->
</div><!--end of .map_wrapper-->
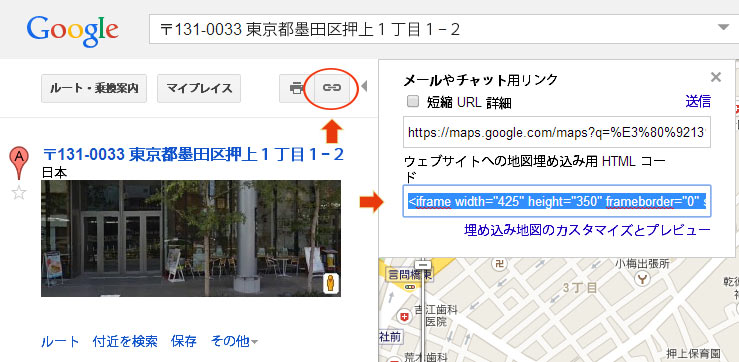
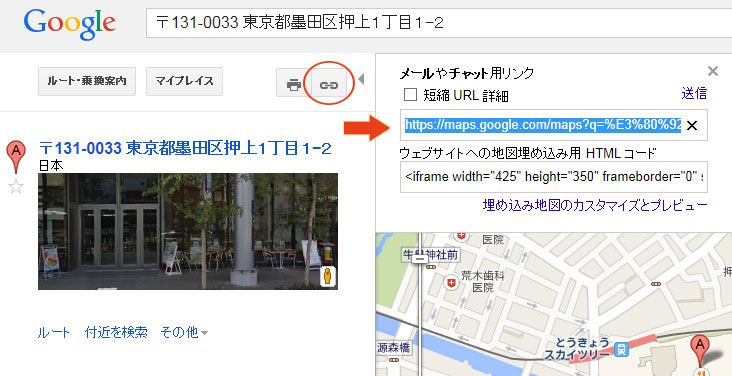
https://maps.google.com で住所を入力して、鎖のようなアイコン(リンク)をクリックし、「ウェブサイトへの地図埋め込み用 HTML コード」を取得する。(カスタマイズしたい場合は、「埋め込み地図のカスタマイズとプレビュー」をクリック)
追加情報
現在は Google Map が変更されてこれを書いたときとは少し違っています。「新しいバージョンの地図の場合」に少し追記しました。
取得したコードを HTML に貼り付ける。
<div class="map_wrapper">
<div class="googlemap">
<iframe width="425" height="350" frameborder="0" scrolling="no" marginheight="0" marginwidth="0" src="https://maps.google.co.jp/maps?f=q&・・・省略・・・output=embed"></iframe><br /><small><a href="https://maps.google.co.jp/maps?・・・省略・・・" style="color:#0000FF;text-align:left">大きな地図で見る</a></small>
</div><!--end of .googlemap-->
</div><!--end of .map_wrapper-->
<br /><small><a href="・・・省略・・・" >大きな地図で見る</a></small> の部分は不要なので削除
また、このままだと「情報ウィンドウ」が表示されてしまい、小さい画面では邪魔なのでパラメータの最後の「&output=embed」の前に「&iwloc=J」を追加して、「情報ウィンドウ」を非表示に。
<div class="map_wrapper">
<div class="googlemap">
<iframe width="425" height="350" frameborder="0" scrolling="no" marginheight="0" marginwidth="0" src="https://maps.google.co.jp/maps?f=q&source・・・省略・・・z=14&iwloc=J&output=embed"></iframe>
</div><!--end of .googlemap-->
</div><!--end of .map_wrapper-->
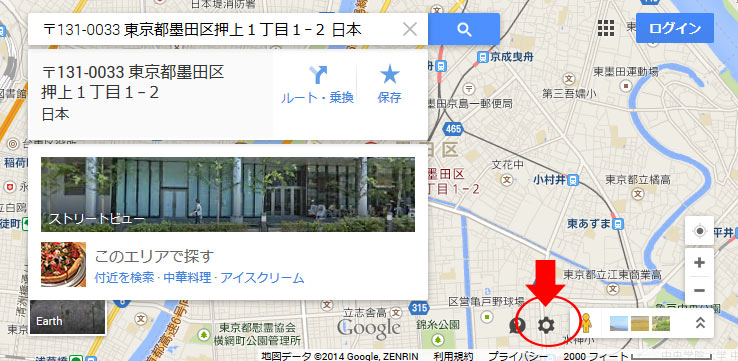
新しいバージョンの地図の場合
https://maps.google.com で住所を入力して、右下にあるギアようなアイコンをクリック。
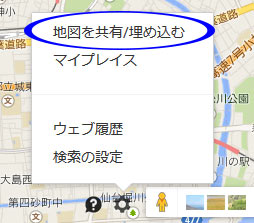
「地図を共有/埋め込む」をクリック。
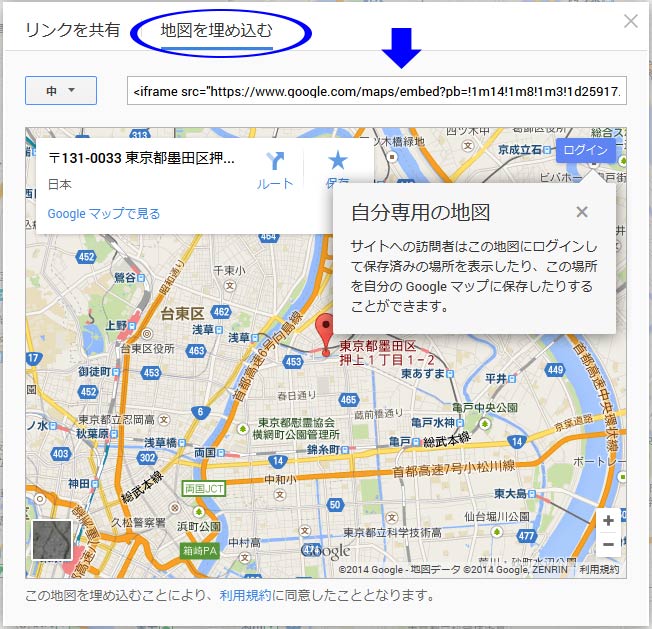
「地図を埋め込む」のタブを選択してコードをコピー。
取得したコードを HTML に貼り付ける。
<div class="map_wrapper">
    <div class="googlemap">
      <iframe src="https://www.google.com/maps/embed?pb=!1m14!1m8!1m3!1d25917.26392771948!2d139.810716!3d35.710033000000024!3m2!1i1024!2i768!4f・・・省略・・・!4v1400417010577" width="600" height="450" frameborder="0" style="border:0"></iframe>
    </div><!--end of .googlemap-->
</div><!--end of .map_wrapper-->
以下の CSS を記述
.map_wrapper {
  max-width: 640px;
  min-width: 280px;
  margin: 20px auto;
  padding: 4px;
  border: 1px solid #CCC;
}

.googlemap {
    position: relative;
    padding-bottom: 56.25%;
    height: 0;
    overflow: hidden;
}
.googlemap iframe {
    position: absolute;
    top: 0;
    left: 0;
    width: 100% !important;
    height: 100% !important;
}
.map_wrapper
地図全体のレイアウト用(必須ではない)
最大及び最小幅を指定
上下マージンを20pxにして中央寄せ
パディングを4pxにしてボーダーを追加
.googlemap
position: relative
子要素の基準とする
padding-bottom: 56.25%
縦横比:幅の 56.25% を高さとする場合(16:9 → 9 ÷ 16 x 100 = 56.25% )
height: 0
古い IE のレイアウト用の指定(おそらく)
.googlemap iframe
position: absolute
親要素(.googlemap)のパディング領域に配置するために、絶対配置を指定
top: 0
トップに配置
left: 0
左に配置
width: 100% !important
親コンテナの幅いっぱいに表示(!importantはなくても大丈夫みたい)
height: 100% !important
親コンテナの高さいっぱいに表示(!importantはなくても大丈夫みたい)
「大きな地図で見る」というリンクを表示
追加情報
現在は Google Map が変更されてこれを書いたときとは異なり、「Google マップ で見る」というリンクが表示されるので、「大きな地図で見る」というリンクは不要になりました。
https://maps.google.com で住所を入力して、鎖のようなアイコン(リンク)をクリックし、「リンクの URL」を取得する。
取得した「リンクの URL」でリンクを作成。必要であれば a 要素に「target=”_blank”」を追加。
<div class="map_wrapper">
<div class="googlemap">
<iframe width="425" height="350" frameborder="0" scrolling="no" marginheight="0" marginwidth="0" src="・・・省略・・・amp;iwloc=J&output=embed"></iframe>
</div><!--end of .googlemap-->
<p><a href="https://maps.google.com/maps?q=・・・省略(取得したURL)・・・&z=16" target="_blank">大きな地図で見る</a></p>
</div><!--end of .map_wrapper-->
CSS を追加。
.map_wrapper p {
  text-align: center;
  font-size: 12px;
}
.map_wrapper a {
  text-decoration: none;
  color: #999;
}
.map_wrapper a:hover {
  text-decoration: none;
  color: #E18830;
}
また、iOS 6 以降は Google Maps が標準の地図アプリではなくなったので、ユーザーエージェントに iPhone, iPad, iPod を含んでいたら「https://maps.google.com/maps?」を「maps:」に書き換える。
jQuery(function($){
  if(navigator.userAgent.indexOf('iPhone') > 0 ||
  navigator.userAgent.indexOf('iPad') > 0 ||
  navigator.userAgent.indexOf('iPod') > 0 ) {
    $('.map_wrapper p a').attr("href",$('.map_wrapper p a').attr("href").replace("https://maps.google.com/maps?","maps:"));
  }
});
ブレークポイントにより高さを変更
ブレークポイントにより高さを変更する場合の例。
.googlemap の padding-bottom をピクセルで指定。(600px 未満のスモールデバイス用)
.googlemap {
    position: relative;
    padding-bottom: 300px;
    height: 0;
    overflow: hidden;
}
以下のメディアクエリを追加。
- 600px ~ 959px :高さ 400px
- 960px 以上:高さ 500px
@media only screen and (min-width:  600px) {
  .googlemap {
    padding-bottom: 400px;
  }
}

@media only screen and (min-width:  960px) {
  .googlemap {
    padding-bottom: 500px;
  }
}
JavaScript を使ってレスポンシブ対応にする
Google Map API V3 を使って iframe を使用しないで地図を表示して、JavaScript を使ってレスポンシブ対応にする場合の例。
参考サイト:「How to make Responsive Google Map with Google Map API」
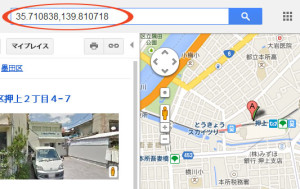
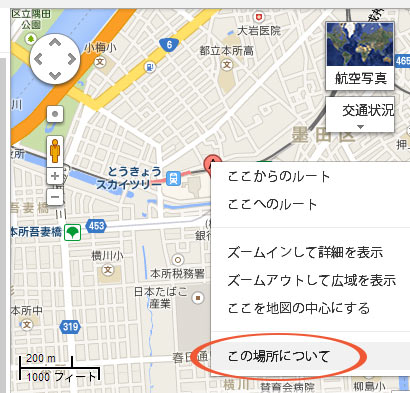
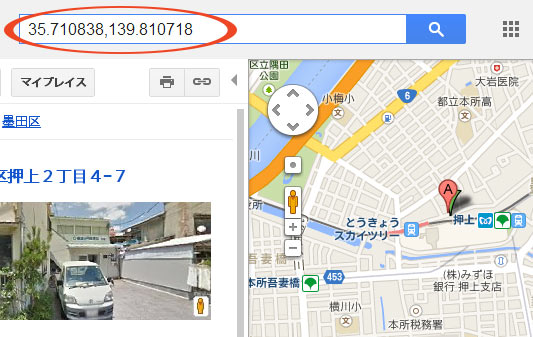
準備(緯度・経度の取得)
- https://maps.google.com で緯度・経度を求めたい住所を入力して表示
- 緯度・経度を求めたい場所(マーカーの場所)で右クリックして「この場所について」を選択

- 検索ウィンドウに緯度・経度が表示される
地図を表示する div 要素に id(”map-canvas”)を指定する
HTML
<div id="canvas_wrapper">
  <div id="map-canvas"></div>
</div>
- Google Map API を読み込む。
- センサーパラメータ(ユーザーの位置情報を使用するかどうか)は必須。ここでは「sensor=true」と指定
- var latlng = new google.maps.LatLng()に取得した緯度・経度を指定
- 地図のオプション(zoom 等)を設定
- map = new google.maps.Map() で地図の div 要素(”map-canvas”)と地図のオプションを指定
- 「load」と「resize」のイベントを設定
- 「resize」では「panTo」関数を利用して中心を表示
JavaScript
<script  src="http://maps.google.com/maps/api/js?v=3.10&sensor=true"></script>  //Google Map API の読み込み
<script>
var map, mapOptions;
function initialize() {
  var latlng = new google.maps.LatLng(35.712336,139.808811);
  mapOptions = {
       zoom: 14,
       center: latlng,
      mapTypeId: google.maps.MapTypeId.ROADMAP,
      navigationControlOptions: {
        style: google.maps.NavigationControlStyle.SMALL
      }
     };

  map = new google.maps.Map(document.getElementById("map-canvas"), mapOptions);

  var marker = new google.maps.Marker({
    position: latlng,
    map: map
  });
}

google.maps.event.addDomListener(window, 'load', initialize);
google.maps.event.addDomListener(window, 'resize', function(){
  map.panTo(mapOptions.center);
});
</script>
- CSS では #map-canvas で地図の幅を 100% に指定
- #canvas_wrapper にレイアウトなどを指定
- img 要素に max-width: 100% を指定してあると、コントロールがちゃんと表示されないので、この部分は max-width: none を設定
CSS
#canvas_wrapper {
  max-width: 90%;
  min-width: 280px;
  padding: 4px;
  border: 1px solid #CCC;
  margin: auto;
}

#canvas_wrapper img {
  max-width: none;
}

#map-canvas {
  height:300px;
  width:100%;
}
ブレークポイントにより高さを変更
以下のメディアクエリを追加。
- 600px ~ 959px :高さ 400px
- 960px 以上:高さ 500px
@media only screen and (min-width:  600px) {
  #map-canvas {
    height: 400px;
  }
}

@media only screen and (min-width:  960px) {
  #map-canvas {
    height: 500px;
  }
}
ジオコーディングを使って住所を元に表示
複数の場所のリストを表示して、それぞれの「地図を表示」というリンクをクリックすると地図を表示するようにする。(初期状態では地図は非表示)
HTML
<div class="map_info">
    <p class="venue">東京スカイツリー</p>
    <p class="address">〒131-0045 東京都墨田区押上1−1−2</p>
    <p class="web"><a href="http://www.tokyo-skytree.jp/" target="_blank">www.tokyo-skytree.jp</a></p>
    <p class="show_map"><a href="#">地図を表示</a></p>
</div>

<div class="map_info">
    <p class="venue">東京タワー</p>
    <p class="address">〒105-0011 東京都港区芝公園4−2−8</p>
    <p class="web"><a href="http://www.tokyotower.co.jp/index.html" target="_blank">www.tokyotower.co.jp</a></p>
    <p class="show_map"><a href="#">地図を表示</a></p>
</div>

<div class="map_info">
    <p class="venue">東京駅</p>
    <p class="address">東京都千代田区丸の内1丁目</p>
    <p class="web"><a href="http://www.jreast.co.jp/estation/station/info.aspx?StationCd=1039" target="_blank">www.jreast.co.jp</a></p>
    <p class="show_map"><a href="#">地図を表示</a></p>
</div>

<div id="map_container">
    <div id="map_canvas"></div>
</div>
CSS ではメディアクエリを使って高さを変更する
CSS
#map_container {
  clear: both;
  width: 90%;
  padding: 4px;
  border: 1px solid #CCC;
  display: none;   /* 最初は非表示 */
}

/* img 要素に max-width: 100% を指定してあると、コントロールがちゃんと表示されない */
#map_container img {
  max-width: none;
}

#map_canvas {   /* 幅と高さを指定しないと地図は表示されない */
  width: 100%;
  height: 300px;
  display: none;   /* 最初は非表示 */
}

.map_info p.web {
  display: none;
}

/* 情報ウィンドウ(マーカーをクリックすると表示される領域)内 */
#map_content{
  width:250px;
  height: 70px;
}

#map_content p {
  font-size: 12px;
}

@media only screen and (min-width:  600px) {
  #map_canvas {
    height: 350px;
  }
}

@media only screen and (min-width:  960px) {
  #map_canvas {
    height: 400px;
  }
}
関数 showMap(_address, _title, _url, _map_canvas) を作成し「地図を表示」がクリックされたらこの関数を使って地図を表示。
パラメータ
- _address:ジオコーディング サービスへのリクエストをする際に使用する住所(必須)
- _title:マーカーにマウスオーバー時と情報ウィンドウ(InfoWindow)に表示するタイトル(必須)
- _url:情報ウィンドウに表示するタイトルのリンクの URL(省略可。省略した場合はタイトルをリンクなしで表示)
- _map_canvas:地図を生成する際に指定する div 要素の id(デフォルトは map_canvas 省略可)
- 変数 map, map_center は関数の外でも使用するので、外で宣言
関連リンク
<script src="http://code.jquery.com/jquery-1.10.1.min.js"></script>
<script  src="http://maps.google.com/maps/api/js?sensor=true"></script>
<script>
jQuery(function($){
  var map, map_center;
  function showMap(_address, _title, _url, _map_canvas) {

    var map_canvas = _map_canvas ? _map_canvas : "map_canvas";
    var map_target = 'div#' + map_canvas;
    //CSS で非表示にしてあるので表示に
    $(map_target).css('display', 'block');

    var opts = {
      //初期のズーム レベル
      zoom: 16,
      //初期マップ タイプ
      mapTypeId: google.maps.MapTypeId.ROADMAP,
      //その他のコントロール
      mapTypeControl: true,
      mapTypeControlOptions: {
        //地図の種類はドロップダウンで
        style: google.maps.MapTypeControlStyle.DROPDOWN_MENU
      },
      panControl: true,
      zoomControl: true,
      zoomControlOptions: {
        style: google.maps.ZoomControlStyle.SMALL
      },
      scaleControl: true
    };

    map = new google.maps.Map(document.getElementById(map_canvas), opts);

    //google.maps.Geocoder オブジェクトを使用して Google Maps API ジオコーディング サービスにアクセス
    var geocoder = new google.maps.Geocoder();

    //Geocoder.geocode() メソッドはジオコーディング サービスへのリクエストを開始
    geocoder.geocode( { 'address': _address}, function(results, status) {
      if (status == google.maps.GeocoderStatus.OK) {
        //中心の位置(ジオコーディングされた緯度と経度の値)
        map_center = results[0].geometry.location;
        map.setCenter(map_center);
        var marker = new google.maps.Marker({
          //マーカーを配置する Map オブジェクトを指定
          map: map,
          //マーカーの初期の場所を示す LatLng を指定
          position: map_center,
          //マーカーをアニメーションで表示
          animation: google.maps.Animation.DROP,
          title:_title
        });

        //情報ウィンドウの要素を作成
        var _content = _title;
        if (_url) {
          _content = '<div id="map_content"><p><a href="' + _url + '" target="_blank"> ' + _title + '</a><br />' + _address + '</p></div>';
        }else {
          _content = '<div id="map_content"><p>' + _title + '<br />' + _address + '</p></div>';
        }

        var infowindow = new google.maps.InfoWindow({
          content: _content,
        });
        //最初から情報ウィンドウを表示する場合は次の行のコメントアウトを外す
        //infowindow.open(map,marker);
        //marker をクリックすると情報ウィンドウを表示(リスナーの登録)
        google.maps.event.addListener(marker, 'click', function() {
          infowindow.open(map,marker);
        });

      } else {
        alert("Geocode was not successful for the following reason: " + status);
      }
    });
  }
  //リサイズイベントのリスナーを登録(中心位置を保持)
  google.maps.event.addDomListener(window, 'resize', function(){
    map.panTo(map_center);
  });

  $('p.show_map a').click(function() {
    if($(this).hasClass('close')) {
      $('#map_canvas').css('display', 'none');
      $('#map_container').css('border-width', 0).fadeOut(500);
      $('p.show_map a').removeClass('close').text('地図を表示');
    }else{
      $(this).addClass('close').text('地図を閉じる');
      var map_info$ = $(this).closest('.map_info');
      map_info$.append($('#map_container'));
      var address = map_info$.find('p.address').text();
      var my_reg = /〒\s?\d{3}(-|ー)\d{4}/;
      //郵便番号を含めるとおかしくなる場合があったので、郵便番号は削除
      address = address.replace(my_reg, '');
      console.log(address);
      if(map_info$.find('p.web').text() != '') {var url = map_info$.find('p.web a').attr('href');}
      //次の fadeIn の記述を showMap() の後に置くと、2度目以降に「地図を表示」をクリックするとうまく地図が表示されない
      $('#map_container').css('border-width', '1px').fadeIn(1000);
      showMap(address, map_info$.find('p.venue').text(), url);
    }
    return false;
  });
});
</script>
New Web 制作リファレンス
参考サイト
![]()