WordPress ページネーション ページャー
前後の投稿や一覧ページ、分割されたページへのリンクを出力するページャーやページネーションの使い方や設定方法についての覚え書きです。
基本的な関数の使い方から前後の投稿へのリンクを表示する際にアイキャッチ画像を表示したり、ページネーションでの出力を Bootstrap の形式に変換する方法、the_post_navigation() などで自動的に出力されるナビゲーションマークアップのカスタマイズ方法なども掲載しています。
更新日:2024年05月13日
作成日:2019年06月24日
投稿の個別ページで前後の投稿へリンクする関数
投稿の個別ページで前後の投稿へのリンクを表示するには以下のような方法があります。
- previous_post_link() と next_post_link() を使う方法
- the_post_navigation() を使う方法(バージョン 4.1.0 から導入)
通常は個別ページ(single.php など)のループ内で使用します。
<?php if(have_posts()) : ?>
<?php while(have_posts()) : the_post(); ?>
・・・中略・・・
<?php the_content(); ?>
・・・中略・・・
<?php
//リンクを出力:the_post_navigation() を使う場合の例
the_post_navigation( array(
  'prev_text' => '前へ: %title',
  'next_text' => '%title: 次へ',
) );
?>
<?php endwhile; ?>
<?php endif; ?>
previous_post_link() と next_post_link() を使う方法
previous_post_link() と next_post_link() を使って前後の投稿へのリンクを個々に出力します。
以下は nav 要素と ul li 要素でマークアップする例です。
« は「«」、» は「»」の文字参照です。
<nav class="navigation post-navigation" role="navigation">
<ul class="nav-links">
<li class="nav-previous"><?php previous_post_link('%link', '« %title'); ?></li>
<li class="nav-next"><?php next_post_link('%link', '%title »'); ?></li>
</ul>
</nav>
以下は nav 要素と div 要素でマークアップする例です。
<nav class="navigation post-navigation" role="navigation">
<div class="nav-links">
<div class="nav-previous"><?php previous_post_link('%link', '« %title'); ?></div>
<div class="nav-next"><?php next_post_link('%link', '%title »'); ?></div>
</div>
</nav>
先頭のページでは next_post_link() による次の(より新しい)投稿へのリンクは出力されず、最後のページでは previous_post_link() による前の(より古い)投稿へのリンクは出力されません。
そのため、空の div 要素が出力されないようにするには get_previous_post_link() と get_next_post_link() を使って以下のように記述することができます。
<nav class="navigation post-navigation" role="navigation">
<div class="nav-links">
<?php if( get_previous_post_link() ) : ?>
<div class="nav-previous"><?php previous_post_link('%link', '« %title'); ?></div>
<?php endif; ?>
<?php if( get_next_post_link() ) : ?>
<div class="nav-next"><?php next_post_link('%link', '%title »'); ?></div>
<?php endif; ?>
</div>
</nav>
previous_post_link() と next_post_link() を使う場合、上記のように div 要素などを使って自前で HTML をマークアップする必要がありますが、バージョン 4.1.0 から導入された the_post_navigation() ではその必要がありません。
the_post_navigation() を使う方法
バージョン 4.1.0 から導入された the_post_navigation() を使うと、前後の投稿へのリンクをまとめて出力できます。
少ないマークアップで記述できるのと、パラメータの指定も連想配列形式なので簡潔に記述できます。
以下は、前の投稿のリンクに「« 前の投稿のタイトル」、次の投稿のリンクに「次の投稿のタイトル »」と表示する例です。%title にはそれぞれの投稿のタイトルが入ります。
<?php the_post_navigation( array( 'prev_text' => '« %title', 'next_text' => '%title »', ) ); ?>
以下のような HTML が出力されます。
<nav class="navigation post-navigation" role="navigation">
  <h2 class="screen-reader-text">投稿ナビゲーション</h2>
  <div class="nav-links">
    <div class="nav-previous">
      <a href="http://localhost/news/sample-1/" rel="prev">« サンプル1</a>
    </div>
    <div class="nav-next">
      <a href="http://localhost/news/sample-3/" rel="next">サンプル3 »</a>
    </div>
  </div>
</nav>
以下はリンクを左右にフロートさせるスタイルの指定例です。
/* スクリーンリーダー限定テキスト: the_post_navigation() 用 */
.screen-reader-text {
  position: absolute;
  width: 1px;
  height: 1px;
  padding: 0;
  overflow: hidden;
  clip: rect(0, 0, 0, 0);
  white-space: nowrap;
  border: 0;
}
/* 前の投稿へのリンクを左寄せ */
.nav-previous {
  float: left;
}
/* 次の投稿へのリンクを右寄せ */
.nav-next {
  float: right;
}
/* リンクが長い場合に重ならないように */
.nav-previous, .nav-next {
  max-width: 45%;
  overflow: hidden;
  white-space: nowrap;
  text-overflow: ellipsis;
}
それぞれの関数の詳細は以下をご覧ください。
previous_post_link
現在の投稿の一つ前の投稿(古い投稿)へのリンクを表示します。
previous_post_link( $format, $link, $in_same_term, $excluded_terms, $taxonomy )
- パラメータ
-
パラメータは全てオプション パラメータ
(型)意味 初期値 $format
(文字列)リンクを含めた表示する文字列全体の書式を指定。%link というキーワードでリンク(<a>リンク文字列</a>)を表すことができます '« %link'
(« は «)$link
(文字列)リンク部分(a 要素で囲まれた部分:リンク文字列)を指定。%title(投稿のタイトル)や %date(投稿の日付)というキーワードが使えます '%title'
投稿のタイトル$in_same_term
(真偽値)現在の投稿と同じカテゴリー(ターム)の投稿に限定するかどうかを指定。カスタムタクソノミーを使用していて true(同一のタームに限定)を指定する場合は、$taxonomy で適切なタクソノミーを指定。 false
限定しない$excluded_terms
(文字列/配列)表示させたくない投稿のカテゴリー ID(ターム ID)を指定。複数のカテゴリー(ターム)を除外する場合は配列またはコンマで区切りで指定。 '' $taxonomy
(文字列)$in_same_term を true にした場合に指定するタームのタクソノミー 'category'
- 戻り値
- なし
- 利用可能箇所
- 個別ページ(single.php など)のテンプレート
デフォルト
パラメータを指定しない場合は、「 «投稿のタイトル 」のようなリンクが表示されます。
「投稿のタイトル」の部分には現在表示されている投稿の1つ前の実際の投稿のタイトルが入り、その投稿へのリンクが付きます。
<?php previous_post_link(); ?>
//以下と同じこと
<?php previous_post_link('« %link', '%title'); ?>
上記のようにテンプレートに記述すると、例えば以下のようなリンクが表示されます。「テスト」は1つ前の投稿のタイトルです。
« <a href="http://localhost/news/test/" rel="prev">テスト</a>
第1パラメータと第2パラメータの初期値(デフォルト)は以下のようになっています。
- $format(表示する文字列の書式)→ « %link
« は « の文字参照で、%link は <a href=...>$link</a> のリンクを表します。 - $link(リンク文字列)→ %title(前の投稿のタイトル文字列)
%link という部分に、2つ目のパラメータ($link)の内容が入り、href 属性に前の投稿の URL が設定されリンクが生成されます。
結果として「« <a href=...>タイトル文字列</a>」が表示されます。
出力形式
どのような内容を表示するかは第1パラメータ($format)と第2パラメータ($link)で指定します。
以下は $format に '前へ: %link'、$link に '%title (<span>%date</span>)' を指定する例です。
%date は投稿の日付を表示します。
<?php previous_post_link('前へ: %link', '%title (<span>%date</span>)'); ?>

<!-- 出力例 -->
前へ: <a href="http://localhost/column/sample/" rel="prev">サンプル (<span>2019年1月7日</span>)</a>
以下は前述と表示される内容は同じですが、全て a 要素で囲まれて出力されます。
<?php previous_post_link('%link', '前へ:%title (<span>%date</span>)'); ?>

<!-- 出力例 -->
<a href="http://localhost/column/sample/" rel="prev">前へ:サンプル (<span>2019年1月7日</span>)</a>
以下は $format に %link を指定し、$link に画像を指定してリンクを画像で表示する例です。alt 属性に %title で投稿のタイトルを出力しています。
<?php previous_post_link('%link', '<img src="'. get_theme_file_uri('/images/prev.png'). '" alt="%title へ移動(リンク)">'); ?>

<!-- 出力例 -->
<a href="http://localhost/column/sample/" rel="prev"><img src="http://localhost/wp-content/themes/mytheme/images/prev.png" alt="サンプル へ移動(リンク)"></a>
以下はリンク文字列(%title)の前に矢印の画像(arrow_left.png)を挿入する例です。
<?php previous_post_link('<img src="'. get_theme_file_uri('/images/arrow_left.png') . '" alt="前の投稿へ"> %link', ' %title '); ?>

<!-- 出力例(画像はリンク内に含まれない) -->
<img src="http://localhost/wp-content/themes/mytheme/images/arrow_left.png" alt="前の投稿へ"> <a href="http://localhost/column/sample/" rel="prev"> サンプル </a>
以下は Font Awesome のアイコンフォントをリンク文字列(%title)の前に挿入する例です。
<?php previous_post_link('%link', '<i class="fas fa-angle-left"></i>  %title '); ?>

<!-- 出力例(アイコンもリンク内に含まれる) -->
<a href="http://localhost/column/sample/" rel="prev"><i class="fas fa-angle-left"></i> サンプル </a>
同一カテゴリー(ターム)限定
第3パラメータ($in_same_term)に「true」を指定すると、現在の投稿と同じカテゴリー(ターム)に属する前の投稿へのリンクを出力します。
デフォルト(何も指定しない)または「false」を指定すれば、ブログ全体を通して時系列順に前の投稿へのリンクを出力します。
第3パラメータを「true」に指定する場合、第1及び第2パラメータは省略できないので、第1及び第2パラメータをデフォルトにして、かつ同じカテゴリーの中でのリンクにするには以下のように記述します。
<p><?php previous_post_link('« %link', '%title', true); ?></p>
カスタム投稿タイプのカスタムタクソノミー(同一ターム限定)
カスタム投稿タイプの個別ページで第3パラメータ($in_same_term)に「true」を指定して同一タームに限定する場合は、第5パラメータ $taxonomy に register_taxonomy() で登録したカスタムタクソノミー名を指定する必要があります。
以下は rental_cat と言うカスタムタクソノミーの同一のタームに限定する例です。
<?php previous_post_link('« %link', '%title', true, '', 'rental_cat' ); ?>
特定のカテゴリー(ターム)を除外
第4パラメータ $excluded_terms で、カテゴリー ID(ターム ID )を指定すると、そのカテゴリー(ターム)の投稿を除外することができます。
以下は特定の1つのカテゴリーを除外する例です。
ID を直接指定する他に、get_cat_ID() や get_category_by_slug() を使って指定することもできます。
//カテゴリー ID が 3 のカテゴリーを除外
<?php previous_post_link('%link', ' %title ', false, 3); ?>

//カテゴリー名が「コラム」のカテゴリーを除外
<?php previous_post_link('%link', ' %title ', false, get_cat_ID('コラム')); ?>

//カテゴリーのスラッグが「column」のカテゴリーを除外
//スラッグからオブジェクトを取得してそのプロパティ term_id から ID を取得)
<?php previous_post_link('%link', ' %title ', false, get_category_by_slug('column')->term_id); ?>
カスタムタクソノミーの場合は、get_term_by() を使って指定することができます。
//ターム名が「大型」のタームを除外
<?php previous_post_link('%link', ' %title ', false, get_term_by('name', '大型', 'rental_cat')->term_id); ?>

//タームのスラッグが「large」のタームを除外
<?php previous_post_link('%link', ' %title ', false, get_term_by('slug', 'large', 'rental_cat')->term_id); ?>
以下は複数のカテゴリーを除外する例です。
//カテゴリー ID が 3, 35, 36 のカテゴリーを除外(配列)
<?php previous_post_link('%link', ' %title ', false, array(3, 35, 36)); ?>

//カテゴリー ID が 3, 35, 36 のカテゴリーを除外(カンマ区切り)
<?php previous_post_link('%link', ' %title ', false, '3, 35, 36'); ?>

//カテゴリー名が「コラム」とスラッグが「column」のカテゴリーを除外
<?php previous_post_link('%link', ' %title ', false, array(get_cat_ID('コラム'), get_category_by_slug('news')->term_id)); ?>
以下は previous_post_link() のソースです。
get_previous_post_link() の実行結果を出力しています。
function previous_post_link( $format = '« %link', $link = '%title', $in_same_term = false, $excluded_terms = '', $taxonomy = 'category' ) {
  echo get_previous_post_link( $format, $link, $in_same_term, $excluded_terms, $taxonomy );
}
next_post_link
現在の投稿の次の投稿(新しい投稿)へのリンクを表示します。
next_post_link( $format, $link, $in_same_term, $excluded_terms, $taxonomy )
- パラメータ
-
パラメータは全てオプション パラメータ
(型)意味 初期値 $format
(文字列)リンクを含めた表示する文字列全体の書式を指定。%link というキーワードでリンク(<a>リンク文字列</a>)を表すことができます '%link »'
(» は »)$link
(文字列)リンク部分(a 要素で囲まれた部分:リンク文字列)を指定。%title(投稿のタイトル)や %date(投稿の日付)というキーワードが使えます '%title'
投稿のタイトル$in_same_term
(真偽値)現在の投稿と同じカテゴリー(ターム)の投稿に限定するかどうかを指定。カスタムタクソノミーを使用していて true(同一のタームに限定)を指定する場合は、$taxonomy で適切なタクソノミーを指定。 false
限定しない$excluded_terms
(文字列/配列)表示させたくない投稿のカテゴリー ID(ターム ID)を指定。複数のカテゴリー(ターム)を除外する場合は配列またはコンマで区切りで指定。 '' $taxonomy
(文字列)$in_same_term を true にした場合に指定するタームのタクソノミー 'category'
- 戻り値
- なし
- 利用可能箇所
- 個別ページ(single.php など)のテンプレート
使い方やパラメータの指定方法は previous_post_link() とほぼ同じです。
第1パラメータ $format や第2パラメータ $link の指定では位置の関係上アイコンや文字の配置(順序)を previous_post_link() と変える場合もあります。
// %link の前後で異なる例
<?php previous_post_link('« %link', '%title'); ?>
<?php next_post_link('%link »', '%title'); ?>
// %title の前後で異なる例
<?php previous_post_link('%link', '<i class="icon-caret-left"></i> %title'); ?>
<?php next_post_link('%link', '%title <i class="icon-caret-right"></i>'); ?>
以下は next_post_link() のソースです。
get_next_post_link() の実行結果を出力しています。
function next_post_link( $format = '%link »', $link = '%title', $in_same_term = false, $excluded_terms = '', $taxonomy = 'category' ) {
  echo get_next_post_link( $format, $link, $in_same_term, $excluded_terms, $taxonomy );
}
投稿の一覧ページで前後の一覧ページへリンクする関数
一覧(アーカイブ)ページでは、表示設定で設定した「1ページに表示する最大投稿数」以上の投稿がある場合は、ページが分割されます。
分割後の前後のページに移動するリンクを出力するには以下のような方法があります。
- previous_posts_link() と next_posts_link() を使う方法
- the_posts_navigation() を使う方法(バージョン 4.1.0 から導入)
- ページネーションを出力(次項)
アーカイブページなどのテンプレートで使用します。
<?php if(have_posts()) : ?> <?php while(have_posts()) : the_post(); ?> ・・・中略・・・ <?php endwhile; ?> <?php the_posts_navigation(); //リンクを出力 ?> <?php else : ?> ・・・中略・・・ <?php endif; ?>
※個別ページで前後の投稿へのリンクを表示する際に使用する以下の関数と名前が似ているので紛らわしいです(posts と post の違い)。
- 前の投稿へのリンクを表示する previous_post_link()
- 次の投稿へのリンクを表示する next_post_link()
- 前後の投稿へのリンクを表示する the_post_navigation()
previous_posts_link() と next_posts_link() を使う方法
previous_posts_link() と next_posts_link() を使って前後の一覧ページへのリンクを個々に出力します。
- previous_posts_link() :分割後の前の(より最近の)一覧ページへのリンクを出力
- next_posts_link() :分割後の次の(より過去の)一覧ページへのリンクを出力
(参考:個別ページで使う関数と previous と next の方向が違います。)
以下はパラメータなし(デフォルト)で使用する例です。
previous_posts_link() と next_posts_link() はリンク(a 要素)を出力するだけなので div 要素や ul li 要素などでマークアップします。
以下は div 要素でマークアップする例です。
<nav class="navigation posts-navigation" role="navigation">
<div class="nav-links">
<div class="nav-previous"><?php previous_posts_link(); ?></div>
<div class="nav-next"><?php next_posts_link(); ?></div>
</div>
</nav>
一覧ページが3つのページに分割されている場合、先頭のページでは以下のような出力になります。
先頭のページでは previous_posts_link() による出力はありません。
<nav class="navigation posts-navigation" role="navigation">
<div class="nav-links">
<div class="nav-previous"></div><!-- 出力なし -->
<div class="nav-next"><a href="http://localhost/page/2/">次ページへ »</a></div>
</div>
</nav>
一覧ページが3つのページに分割されている場合、2番目のページでは以下のような出力になります。
<nav class="navigation posts-navigation" role="navigation">
<div class="nav-links">
<div class="nav-previous"><a href="http://localhost/">« 前ページへ</a></div>
<div class="nav-next"><a href="http://localhost/page/3/">次ページへ »</a></div>
</div>
</nav>
一覧ページが3つのページに分割されている場合、最後のページでは以下のような出力になります。
最後のページでは next_posts_link() による出力はありません。
<nav class="navigation posts-navigation" role="navigation">
<div class="nav-links">
<div class="nav-previous"><a href="http://localhost/page/2/">« 前ページへ</a></div>
<div class="nav-next"></div><!-- 出力なし -->
</div>
</nav>
先頭や最後のページで空の div 要素を出力しない
上記の例のように先頭や最後のページでは空の div 要素が残ってしまいます。
空の div 要素を出力しないようにするには get_previous_posts_link() や get_next_posts_link() を使って以下のように記述します。
<nav class="navigation posts-navigation" role="navigation">
<div class="nav-links">
<?php if( get_previous_posts_link() ) : ?>
<div class="nav-previous"><?php previous_posts_link(); ?></div>
<?php endif; ?>
<?php if( get_next_posts_link() ) : ?>
<div class="nav-next"><?php next_posts_link(); ?></div>
<?php endif; ?>
</div>
</nav>
以下は、1ページに表示する件数を取得して、例えば「« 前の10件へ」や「次の10件へ »」のように表示する例です。
<nav class="navigation posts-navigation" role="navigation">
<div class="nav-links">
<?php if( get_previous_posts_link() ) : ?>
<div class="nav-previous"><?php previous_posts_link('« 前の'. get_query_var( 'posts_per_page') . '件へ'); ?></div>
<?php endif; ?>
<?php
if( get_next_posts_link() ) : ?>
<div class="nav-next"><?php next_posts_link('次の'. get_query_var( 'posts_per_page') . '件へ »'); ?></div>
<?php endif; ?>
</div>
</nav>
the_posts_navigation() を使う方法
バージョン 4.1.0 から導入された the_posts_navigation() を使うと、少ない記述で前後の一覧ページへのリンクをまとめて出力できます。
パラメータなしで以下のように記述するだけで
<?php the_posts_navigation(); ?>
以下のような HTML が出力されます。
出力される HTML は nav 要素のクラス posts-navigation 以外は the_post_navigation() と同じです。
<nav class="navigation posts-navigation" role="navigation">
<h2 class="screen-reader-text">投稿ナビゲーション</h2>
<div class="nav-links">
<div class="nav-previous"><a href="http://localhost/page/3/">過去の投稿</a>
</div>
<div class="nav-next"><a href="http://localhost/">新しい投稿</a>
</div>
</div>
</nav>
パラメータを指定すれば、リンクやスクリーンリーダー用の文字を変更することができます。
the_posts_navigation() の出力をカスタマイズするには、get_the_posts_navigation() で HTML を取得して必要に応じて変換などします。
それぞれの関数の詳細は以下をご覧ください。
previous_posts_link
一覧ページが分割されている場合に、表示中の一覧ページで前の(より最近の)一覧ページへのリンクを表示します。先頭ページの場合は何も表示されません。
previous_posts_link( $label )
- パラメータ
- $label(文字列):(オプション)リンクのテキスト。初期値: '« Previous Page'(日本語の場合は '« 前ページへ')
- 戻り値
- なし
- 利用可能箇所
- アーカイブ(一覧)ページのテンプレートやサブループを使っているページなど
リンクのテキスト($label)
第1パラメータ $label を指定することで出力されるリンクのテキストを変更することができます。
以下はリンクのテキストを「< Previous」と表示する例です。
<?php previous_posts_link('< Previous'); ?>
以下のようなリンク(a 要素)が出力されます。
<a href="http://localhost/">< Previous</a>
以下は get_query_var() を使って一ページに表示する件数(posts_per_page)を取得して、例えば「« 前の5件へ」と表示する例です。
<?php previous_posts_link('« 前の'. get_query_var( 'posts_per_page') . '件へ'); ?>
以下は矢印の画像と「前へ」と言うテキストをリンクとして表示する例です。
<?php previous_posts_link('<img src="'. get_theme_file_uri('/images/arrow_left.png'). '" alt="前へ" 前へ'); ?>
以下は Font Awesome のアイコンフォントと「前へ」と言うテキストをリンクとして表示する例です。
<?php previous_posts_link('<i class="fas fa-angle-left"></i> 前へ'); ?>
以下は previous_posts_link() のソースです。
get_previous_posts_link() の実行結果を出力しています。
function previous_posts_link( $label = null ) {
echo get_previous_posts_link( $label );
}
以下は get_previous_posts_link() のソースです。
function get_previous_posts_link( $label = null ) {
global $paged;
if ( null === $label ) {
$label = __( '« Previous Page' );
}
if ( ! is_single() && $paged > 1 ) {
/**
* Filters the anchor tag attributes for the previous posts page link.
* @since 2.7.0
* @param string $attributes Attributes for the anchor tag.
*/
$attr = apply_filters( 'previous_posts_link_attributes', '' );
return '<a href="' . previous_posts( false ) . "\" $attr>" . preg_replace( '/&([^#])(?![a-z]{1,8};)/i', '&$1', $label ) . '</a>';
}
}
next_posts_link
一覧ページが分割されている場合に、表示中の一覧ページで次の(より過去の)一覧ページへのリンクを表示します。最後(一番過去)の一覧ページの場合は何も表示されません。
next_posts_link( $label, $max_pages )
- パラメータ
-
- $label(文字列):(オプション)リンクのテキスト。初期値: 'Next Page »'(日本語の場合は '次ページへ »')
- $max_pages(整数):(オプション)リンクを表示するページの上限。初期値:0(上限なし)
- 戻り値
- なし
- 利用可能箇所
- アーカイブ(一覧)ページのテンプレートやサブループを使っているページなど
リンクのテキスト($label)
リンクのテキストには HTML を使用できるので画像やアイコンフォントなども表示することができます。
以下は「次へ」というテキストとアイコンフォントを表示する例です。
<?php next_posts_link('次へ <i class="fas fa-angle-right"></i>'); ?>
以下は get_query_var() を使って一ページに表示する件数(posts_per_page)を取得して、例えば「次の5件へ »」と表示する例です。
<?php next_posts_link('次の'. get_query_var( 'posts_per_page') . '件へ »'); ?>
表示するページの上限($max_pages)
以下は最大で5つの一覧ページを表示する例です。それ以上に分割されていてもリンクは表示されません。
<?php next_posts_link('Next >', 5); ?>
WP_Query を使ったループの場合
WP_Query を使ったループの場合は、next_posts_link() に $max_pages パラメータを指定するようにと Codex には書かれています。
総ページ数を取得するには WP_Query オブジェクトの 'max_num_pages' プロパティを使います。
また、WP_Query を使ったループの場合 paged を指定しないとページ送りが有効にならないようです。(ページ送りパラメータ)
<?php // 静的フロントページの場合は 'paged' の代わりに 'page' を使う $paged = ( get_query_var( 'paged' ) ) ? get_query_var( 'paged' ) : 1; // クエリ(paged を指定) $the_query = new WP_Query( 'cat=1&paged=' . $paged ); ?> <?php if ( $the_query->have_posts() ) : ?> <?php while ( $the_query->have_posts() ) : $the_query->the_post(); ?> <?php the_title(); ?> <?php endwhile; ?> <?php // next_posts_link() に max_num_pages を指定 next_posts_link( '次の10件へ', $the_query->max_num_pages ); previous_posts_link( '前の10件へ' ); ?> <?php // グローバル変数 $post をリセット wp_reset_postdata(); ?> <?php else: ?> <p><?php _e( 'Sorry, no posts matched your criteria.' ); ?></p> <?php endif; ?>
以下は next_posts_link() のソースです。
get_next_posts_link() の実行結果を出力しています。
function next_posts_link( $label = null, $max_page = 0 ) {
echo get_next_posts_link( $label, $max_page );
}
以下は get_next_posts_link() のソースです。
function get_next_posts_link( $label = null, $max_page = 0 ) {
global $paged, $wp_query;
if ( ! $max_page ) {
$max_page = $wp_query->max_num_pages;
}
if ( ! $paged ) {
$paged = 1;
}
$nextpage = intval( $paged ) + 1;
if ( null === $label ) {
$label = __( 'Next Page »' );
}
if ( ! is_single() && ( $nextpage <= $max_page ) ) {
/**
* Filters the anchor tag attributes for the next posts page link.
* @since 2.7.0
* @param string $attributes Attributes for the anchor tag.
*/
$attr = apply_filters( 'next_posts_link_attributes', '' );
return '<a href="' . next_posts( $max_page, false ) . "\" $attr>" . preg_replace( '/&([^#])(?![a-z]{1,8};)/i', '&$1', $label ) . '</a>';
}
}
ページネーション
バージョン 4.1.0 から導入された the_posts_pagination() を使うと簡単にページネーション(分割されたページへの番号の付いたリンク)を表示することができます。
また、同様にバージョン 4.1.0 から導入された get_the_posts_pagination() でページネーションのマークアップ(HTML)を取得して出力をカスタマイズすることもできます。
get_the_posts_pagination() を使えば Bootstrap のページネーション用に出力をカスタマイズすることも可能です(Bootstrap の形式に変換)。
the_posts_pagination
ページネーションを出力します。バージョン 4.1.0 から導入されました。
この関数は内部では paginate_links() を使用しています。また、ページネーションの出力の値を取得するには get_the_posts_pagination() を使用します。
the_posts_pagination( $args )
- パラメータ
- $args(配列):(オプション)以下を連想配列で指定します。paginate_links() で指定できるパラメータも使用することができます。但し type に array を指定すると plain が適用されます。
キー 意味(型) 初期値 'mid_size' 現在のページの左右に表示するページ番号の数。(整数) 1 'prev_text' 前の一覧ページへのリンク文字列。(文字列) 'Previous'(前へ) 'next_text' 次の一覧ページへのリンク文字列。(文字列) 'Next'(次へ) 'screen_reader_text' 読み上げ(スクリーンリーダー)用のテキスト。h2 要素で表示されます。(文字列) 'Posts navigation'(投稿ナビゲーション)
- 戻り値
- なし
- 利用可能箇所
- アーカイブ(一覧)ページのテンプレートやサブループを使っているページなど
関連項目:nav 要素のカスタマイズ
以下はアーカイブページのテンプレートでパラメータなしで実行する例です。
<?php if(have_posts()) :?> <?php while(have_posts()) : the_post(); ?> <div> <h3><?php the_title(); ?></h3> <a href="<?php the_permalink(); ?>"><?php the_post_thumbnail(); ?></a> <?php the_excerpt(); ?> </div> <?php endwhile; ?> <?php the_posts_pagination(); ?> <!-- パラメータなしで実行 --> <?php endif; ?>
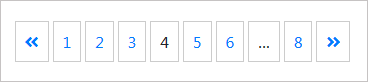
以下のような HTML が出力されます。以下は8ページに分割されていて、4ページ目(★)が表示されている状態の例です。
mid_size のデフォルトは1なので、現在のページ(4)の前後のページ番号(3と5)が表示されています。最初のページ(1)と最後のページ(8)は内部のパラメータ end_size が1となっているため表示されるようになっています。
<nav class="navigation pagination" role="navigation">
<h2 class="screen-reader-text">投稿ナビゲーション</h2>
<div class="nav-links">
<a class="prev page-numbers" href="http://example.com/page/3/">前へ</a>
<a class="page-numbers" href="http://example.com/">1</a>
<span class="page-numbers dots">…</span>
<a class="page-numbers" href="http://example.com/page/3/">3</a>
<span aria-current="page" class="page-numbers current">4</span><!--★-->
<a class="page-numbers" href="http://example.com/page/5/">5</a>
<span class="page-numbers dots">…</span>
<a class="page-numbers" href="http://example.com/page/8/">8</a>
<a class="next page-numbers" href="http://example.com/page/5/">次へ</a>
</div>
</nav>
読み上げ(スクリーンリーダー)用のテキストは、デフォルトでは「投稿ナビゲーション(英語の場合は Posts navigation)」と h2 要素でマークアップされて表示されます。
スクリーンリーダー限定テキストとして、スクリーンリーダには読み上げられるが画面には表示しないようにするには「screen_reader_text(the_post_navigation)」を参照ください。
例えば、以下のようなスタイルを指定すると、
.screen-reader-text {
  position: absolute;
  width: 1px;
  height: 1px;
  padding: 0;
  overflow: hidden;
  clip: rect(0, 0, 0, 0);
  white-space: nowrap;
  border: 0;
}
.page-numbers {
font-size: 18px;
border: 1px solid #ccc;
padding: 10px;
}
以下のような表示になります。

以下は表示されるページ番号の数(mid_size)とリンクのテキスト(prev_text/next_text)を指定して変更する例です。以下ではアイコンフォントを指定しています。
<?php the_posts_pagination( array(
  'mid_size' => 2,
  'prev_text' => '<i class="fas fa-angle-double-left"></i>',
  'next_text' => '<i class="fas fa-angle-double-right"></i>',
) ); ?>
以下のように表示されます。mid_size を2に指定したので、現在のページ(4)の前後それぞれ2ページずつ表示されています。
リンクのテキスト(prev_text/next_text)は空文字を指定すると非表示にすることができます。
<?php the_posts_pagination( array(
  'prev_text' => '',
  'next_text' => '',
) ); ?>
この例の場合は、スタイルでボーダーを付けているので、リンク文字だけはボーダーなしの指定にします。
.page-numbers {
  font-size: 18px;
  border: 1px solid #ccc;
  padding: 10px;
}

.prev.page-numbers, .next.page-numbers{
  border: none;
  padding: 0;
}
以下は the_posts_pagination() のソースです。
get_the_posts_pagination() の実行結果を出力しています。
function the_posts_pagination( $args = array() ) {
    echo get_the_posts_pagination( $args );
}
全件数と現在表示している件数を表示
マッチする投稿の全件数や現在表示している投稿の件数を表示するには、以下のように記述することができます。
現在表示しているページの投稿の件数は $post_count プロパティで取得でき、現在のクエリにマッチする投稿の全件数は $found_posts で取得できます。
関連項目:$post_count と $found_posts
<?php if(have_posts()) :?>
<?php while(have_posts()) : the_post(); ?>
  <!-- ループ処理 -->
<?php endwhile; ?>
  <!-- ページネーションの出力 -->
<?php the_posts_pagination(); ?>

<!-- 「全 24 件中 6 件目から 5 件を表示」のように出力 -->
<?php
global $paged;  //ページ分割時のページ番号
if(empty($paged)) $paged = 1;

$my_post_count = $wp_query->post_count;  //投稿の取得件数
$my_found_posts = $wp_query->found_posts; //投稿の全件数
$my_posts_per_page = get_query_var('posts_per_page');  //1ページに表示する最大投稿数
$my_post_range = ($paged -1) * $my_posts_per_page +1 ;
echo "<p> 全 " . $my_found_posts . " 件中 " . $my_post_range . ' 件目から '. $my_post_count . " 件を表示</p>";
?>

<?php endif; ?>
get_the_posts_pagination
ページネーション(分割されたページへの番号の付いたリンク)の HTML(マークアップ)を返します。バージョン 4.1.0 から導入されました。
get_the_posts_pagination($args)
- パラメータ
- $args(配列):(オプション)以下を連想配列で指定します。paginate_links() で指定できるパラメータも使用することができます。但し type に array を指定すると plain が適用されます。
キー 意味(型) 初期値 'mid_size' 現在のページの左右に表示するページ番号の数。(整数) 1 'prev_text' 前の一覧ページへのリンク文字列。(文字列) 'Previous'(前へ) 'next_text' 次の一覧ページへのリンク文字列。(文字列) 'Next'(次へ) 'screen_reader_text' 読み上げ(スクリーンリーダー)用のテキスト。h2 要素で表示されます。(文字列) 'Posts navigation'(投稿ナビゲーション)
- 戻り値
- ページネーションの HTML(マークアップ)。1ページしかない場合は空文字列。
- 利用可能箇所
- アーカイブ(一覧)ページのテンプレートやサブループを使っているページなど
パラメータの指定方法は the_posts_pagination() と同じで、get_the_posts_pagination() を使って出力するには echo を使います。
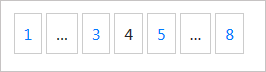
$my_pagenation = get_the_posts_pagination( array(
  'prev_text' => 'Prev',
  'next_text' => 'Next',
) );

echo $my_pagenation;
以下は8ページに分割されていて、現在のページが4の場合の出力例です。「…」は「…」です。
<nav class="navigation pagination" role="navigation">
<h2 class="screen-reader-text">投稿ナビゲーション</h2>
<div class="nav-links"><a class="prev page-numbers" href="http://example.com/page/3/">Prev</a>
<a class='page-numbers' href='http://example.com/'>1</a>
<span class="page-numbers dots">…</span>
<a class='page-numbers' href='http://example.com/page/3/'>3</a>
<span aria-current='page' class='page-numbers current'>4</span>
<a class='page-numbers' href='http://example.com/page/5/'>5</a>
<span class="page-numbers dots">…</span>
<a class='page-numbers' href='http://example.com/page/8/'>8</a>
<a class="next page-numbers" href="http://example.com/page/5/">Next</a>
</div>
</nav>
取得した値をそのまま出力する場合は the_posts_pagination() を使えば良いのですが、例えば独自のクラスなどを指定した ul li でマークアップして出力するには strtr() などを使って以下のようにすることができます。
単純に ul li でマークアップして出力するには 'type' => 'list' と言うパラメータを指定します。
<?php
$my_pagenation = get_the_posts_pagination( array(
  'prev_text' => 'Prev',
  'next_text' => 'Next',
) );

$replace = array(
  '<div class="nav-links">' => '<div class="nav-links"><ul class="foo">',
  '<a ' => '<li class="bar-a"><a ',
  '<span ' => '<li class="bar-span"><span ',
  '</a>' => '</a></li>',
  '</span>' => '</span></li>',
  '</div>' => '</ul></div>'
);

$my_list_pagenation =  strtr($my_pagenation, $replace);
echo $my_list_pagenation;
?>
以下のような出力になります。
<nav class="navigation pagination" role="navigation">
  <h2 class="screen-reader-text">投稿ナビゲーション</h2>
  <div class="nav-links">
    <ul class="foo">
      <li class="bar-a">
        <a class="prev page-numbers" href="http://example.com/page/3/">Prev</a>
      </li>
     ・・・中略・・・
      <li class="bar-span">
        <span aria-current='page' class='page-numbers current'>4</span>
      </li>
      ・・・中略・・・
      <li class="bar-a">
        <a class="next page-numbers" href="http://example.com/page/5/">Next</a>
      </li>
    </ul>
  </div>
</nav>
以下は get_the_posts_pagination() のソースです。
リンクの生成には paginate_links() が使用されています。
function get_the_posts_pagination( $args = array() ) {
  $navigation = '';

  // Don't print empty markup if there's only one page.
  if ( $GLOBALS['wp_query']->max_num_pages > 1 ) {
    $args = wp_parse_args(
      $args,
      array(
        'mid_size'           => 1,
        'prev_text'          => _x( 'Previous', 'previous set of posts' ),
        'next_text'          => _x( 'Next', 'next set of posts' ),
        'screen_reader_text' => __( 'Posts navigation' ),
      )
    );

    // Make sure we get a string back. Plain is the next best thing.
    if ( isset( $args['type'] ) && 'array' == $args['type'] ) {
      $args['type'] = 'plain';
    }

    // Set up paginated links.
    $links = paginate_links( $args );

    if ( $links ) {
      $navigation = _navigation_markup( $links, 'pagination', $args['screen_reader_text'] );
    }
  }

  return $navigation;
}
Bootstrap の形式に変換
get_the_posts_pagination() で取得するマークアップのままでは Bootstrap 4 のページネーションのスタイルが適用できないので変換する必要があります。
変換するのではなく独自にページネーションを出力する方法もあります(後述:Bootstrap 用にページネーションを出力する関数)
変換の際に気をつける点としては、get_the_posts_pagination() の戻り値のマークアップのクラス属性はダブルクォートだけではなくシングルクォートで囲まれている場合もあるので注意が必要です。
Firefox などのインスペクタ(要素を検証)で確認するとブラウザの機能で全てダブルクォートに変換されていたりするので、実際のソースを確認する必要があります。
以下は get_the_posts_pagination() の戻り値を echo で出力した例です。
<nav class="navigation pagination" role="navigation">
<h2 class="screen-reader-text">投稿ナビゲーション</h2>
<div class="nav-links"><a class="prev page-numbers" href="http://example.com/page/3/">Prev</a>
<a class='page-numbers' href='http://example.com/'>1</a>
<span class="page-numbers dots">…</span>
<a class='page-numbers' href='http://example.com/page/3/'>3</a>
<span aria-current='page' class='page-numbers current'>4</span>
<a class='page-numbers' href='http://example.com/page/5/'>5</a>
<span class="page-numbers dots">…</span>
<a class='page-numbers' href='http://example.com/page/8/'>8</a>
<a class="next page-numbers" href="http://example.com/page/5/">Next</a>
</div>
</nav>
以下は Bootstrap 4 のページネーションのスタイルを適用させるマークアップの例です。
ul li 要素でマークアップすることを前提にスタイルが指定されています。
<nav aria-label="ページナビゲーション">
  <ul class="pagination">
    <li class="page-item disabled"><span class="page-link">Previous</span></li>
    <li class="page-item"><a class="page-link" href="#">1</a></li>
    <li class="page-item active"><span class="page-link">2</span></li>
    <li class="page-item"><a class="page-link" href="#">3</a></li>
    <li class="page-item"><a class="page-link" href="#">Next</a></li>
  </ul>
</nav>
get_the_posts_pagination() や the_posts_pagination() は内部で paginate_links() を使用しているので、例えば 'type' => 'list' と言うようなパラメータも指定できます。
以下のように指定すると ul li でマークアップされます。
<?php
$my_pagenation = get_the_posts_pagination( array(
  'prev_text' => 'Prev',
  'next_text' => 'Next',
  'type' => 'list',
) );

echo $my_pagenation;
?>
以下のようなマークアップが出力されます。
<nav class="navigation pagination" role="navigation">
<h2 class="screen-reader-text">投稿ナビゲーション</h2>
<div class="nav-links">
<ul class='page-numbers'>
<li><a class="prev page-numbers" href="http://example.com/page/3/">Prev</a></li>
<li><a class='page-numbers' href='http://example.com/'>1</a></li>
<li><span class="page-numbers dots">…</span></li>
<li><a class='page-numbers' href='http://example.com/page/3/'>3</a></li>
<li><span aria-current='page' class='page-numbers current'>4</span></li>
<li><a class='page-numbers' href='http://example.com/page/5/'>5</a></li>
<li><span class="page-numbers dots">…</span></li>
<li><a class='page-numbers' href='http://example.com/page/8/'>8</a></li>
<li><a class="next page-numbers" href="http://example.com/page/5/">Next</a></li>
</ul>
</div>
</nav>
また、get_the_posts_pagination() や paginate_links() のソースを見ると、nav 要素や screen-reader-text クラスの h2 要素及び nav-links クラスの div 要素は _navigation_markup() と言うシステム関数で生成されているのがわかります。
Bootstrap 用にカスタマイズして出力する関数
以下は get_the_posts_pagination() のソースを基にBootstrap のページネーション用にカスタマイズして出力する独自の関数の例です。functions.php などに記述します。
Bootstrap の場合、nav 要素に aria-label 属性を指定しているので、the_posts_pagination() で出力される screen_reader_text クラスの h2 要素は出力せず、screen_reader_text のテキストを aria-label の値に設定しています。
マークアップの変換は正規表現で文字列を置換する PHP 関数 preg_replace() を使っています(検索を行う正規表現パターンはもっと良いパターンがあると思います)。
関連項目:nav 要素のカスタマイズ
また、現在のページを示す li 要素には Bootstrap の sr-only クラスを指定した span 要素を追加しています(34行目)。
function my_bs4_posts_pagination( $args = array() ) {
  $navigation = '';

  // 1ページのみの場合は出力しない
  if ( $GLOBALS['wp_query']->max_num_pages > 1 ) {
    $args = wp_parse_args(
      $args,
      array(
        'mid_size'           => 1,
        'prev_text'          => _x( 'Previous', 'previous set of posts' ),
        'next_text'          => _x( 'Next', 'next set of posts' ),
        'screen_reader_text' => __( 'Posts navigation' ),
        'type' => 'list',  //リストとしてマークアップ
      )
    );

    // type に list 以外が指定されていたら list に強制
    $args['type'] = 'list';

    // paginate_links() を使ってリンクを生成
    $links = paginate_links( $args );

    if ( $links ) {

      $patterns = array(
        '#<li><a class=([\'\"]([^\'\"]*)[\'\"]) ([^>]*>[^<]*)</a></li>#',
        '#<li><span class=([\'\"]([^\'\"]*)[\'\"])\s?([^>]*>[^<]*)</span></li>#',
        '#<li><span (aria-current=[\'\"]([^\'\"]*)[\'\"]) class=([\'\"]([^\'\"]*)[\'\"])\s?([^>]*>[^<]*)</span></li>#',
      );

      $replacements = array(
        '<li class="page-item"><a class="$2 page-link" $3</a></li>',
        '<li class="page-item disabled"><span class="$2 page-link" $3</span></li>',
        '<li class="page-item active"><span $1 class="$4 page-link" $5</span><span class="sr-only">(現在のページ)</span></li>',
      );

      ksort($patterns);
      ksort($replacements);
      $links = preg_replace($patterns, $replacements, $links);

      //_navigation_markup() は使わずに nav 要素でマークアップ
      $navigation = '
      <nav class="navigation %s" role="navigation" aria-label="%s">
        <div class="nav-links">%s</div>
      </nav>';
      //nav 要素の aria-label の値には screen_reader_text の値を設定
      $navigation = sprintf( $navigation, 'pagination', esc_html( $args['screen_reader_text'] ), $links );
    }
  }
  echo $navigation;
}
使い方は the_posts_pagination() と同じです。
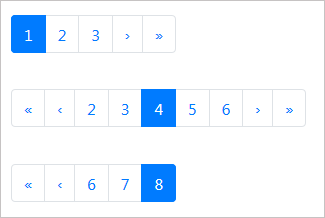
以下は使用例です。※ Bootstrap のスタイルを適用するには Bootstrap 4 を読み込んでおく必要があります(Bootstrap 4 WordPress での読み込み)。
my_bs4_posts_pagination(array(
  'mid_size' => 2,
  'prev_text' => 'Prev',
  'next_text' => 'Next',
  'screen_reader_text' => 'ページナビゲーション',
) );
以下は出力の例です。出力は常に ul li 要素でマークアップされます。
<nav class="navigation pagination" role="navigation" aria-label="ページナビゲーション">
<div class="nav-links">
<ul class='page-numbers'>
<li class="page-item">
<a class="prev page-numbers page-link" href="http://example.com/page/3/">Prev</a>
</li>
<li class="page-item">
<a class="page-numbers page-link" href='http://example.com/'>1</a>
</li>
<li class="page-item">
<a class="page-numbers page-link" href='http://example.com/page/2/'>2</a>
</li>
<li class="page-item">
<a class="page-numbers page-link" href='http://example.com/page/3/'>3</a>
</li>
<li class="page-item active">
<span aria-current='page' class="page-numbers current page-link">4</span><span class="sr-only">(現在のページ)</span>
</li>
<li class="page-item">
<a class="page-numbers page-link" href='http://example.com/page/5/'>5</a>
</li>
<li class="page-item">
<a class="page-numbers page-link" href='http://example.com/page/6/'>6</a>
</li>
<li class="page-item disabled">
<span class="page-numbers dots page-link">…</span>
</li>
<li class="page-item">
<a class="page-numbers page-link" href='http://example.com/page/8/'>8</a>
</li>
<li class="page-item">
<a class="next page-numbers page-link" href="http://example.com/page/5/">Next</a>
</li>
</ul>
</div>
</nav>
上記の例の場合、以下のような表示になります。

スタイルの追加
必要に応じて、以下をスタイルに追加します。
.nav-links ul { /* または ul.page-numbers など*/
  list-style-type:none;
  display: flex;
}

.sr-only {
  border: 0;
  clip: rect(1px, 1px, 1px, 1px);
  clip-path: inset(50%);
  height: 1px;
  margin: -1px;
  overflow: hidden;
  padding: 0;
  position: absolute !important;
  width: 1px;
  word-wrap: normal !important;
}
以下はアクティブなリンクの色を変更する場合のスタイルの例です。
.page-item.active .page-link {
  background-color: #198831;
  border-bottom-color: #15742A;
  border-left-color: #15742A;
  border-right-color: #15742A;
  border-top-color: #15742A;
}
固定ページ(front-page.php)でカスタム投稿タイプのページネーションを出力
front-page.php などの固定ページでカスタム投稿タイプの一覧表示する場合は、$max_num_pages と $paged を引数に取るようにします。
//ページネーション(固定ページでカスタム投稿タイプの一覧表示する場合)
function my_bs4_posts_pagination2( $max_num_pages=0, $paged = 1 , $args = array() ) {
  $navigation = '';
  if ( $max_num_pages > 1 ) {
    $args = wp_parse_args(
      $args,
      array(
        'mid_size'           => 1,
        'prev_text'          => _x( 'Previous', 'previous set of posts' ),
        'next_text'          => _x( 'Next', 'next set of posts' ),
        'screen_reader_text' => __( 'Posts navigation' ),
        'type' => 'list',
        'total'    => $max_num_pages, //追加
        'current' => max( 1, $paged ), //追加
      )
    );
    $args['type'] = 'list';
    $links = paginate_links( $args );
    if ( $links ) {
      $patterns = array(
        '#<li><a class=([\'\"]([^\'\"]*)[\'\"]) ([^>]*>[^<]*)</a></li>#',
        '#<li><span class=([\'\"]([^\'\"]*)[\'\"])\s?([^>]*>[^<]*)</span></li>#',
        '#<li><span (aria-current=[\'\"]([^\'\"]*)[\'\"]) class=([\'\"]([^\'\"]*)[\'\"])\s?([^>]*>[^<]*)</span></li>#',
      );
      $replacements = array(
        '<li class="page-item"><a class="$2 page-link" $3</a></li>',
        '<li class="page-item disabled"><span class="$2 page-link" $3</span></li>',
        '<li class="page-item active"><span $1 class="$4 page-link" $5</span><span class="sr-only">(現在のページ)</span></li>',
      );
      ksort($patterns);
      ksort($replacements);
      $links = preg_replace($patterns, $replacements, $links);
      $navigation = '
      <nav class="navigation %s" aria-label="%s">
        <div class="nav-links">%s</div>
      </nav>';
      $navigation = sprintf( $navigation, 'pagination', esc_html( $args['screen_reader_text'] ), $links );
    }
  }
  echo $navigation;
}
使用例
<?php
$paged = (get_query_var('page')) ? get_query_var('page') : 1;
$args = array(
  'post_type' => 'tune',
  'posts_per_page' => '3',
  'paged' => $paged,
);
$my_query = new WP_Query($args);
?>
<?php if ($my_query->have_posts()) : ?>
  <?php while ($my_query->have_posts()) : $my_query->the_post(); ?>
    /* ループ */
  <?php endwhile; ?>
  <?php
    // 引数に $my_query->max_num_pages, $paged を追加で渡す
    my_bs4_posts_pagination2($my_query->max_num_pages, $paged, array(
      'mid_size' => 2,
      'prev_text' => 'Prev',
      'next_text' => 'Next',
      'screen_reader_text' => 'ページナビゲーション',
    ) );
  ?>
<?php endif; ?>
<?php wp_reset_postdata(); ?>
Bootstrap 用にページネーションを出力する関数
以下は、HOW TO BUILD A WORDPRESS POST PAGINATION WITHOUT PLUGIN に掲載されているページネーションを出力する独自関数を基にBootstrap 用に変更した関数の例です。
各ページへのリンクは get_pagenum_link() を使って URL を取得して出力しています。
通常のアーカイブページではパラメータなしで呼び出せば、Bootstrap の形式でページネーションを出力します。必要に応じてオプションを指定可能です。
WP_Query クラスを使ったサブループなどの場合は、pages パラメータを指定する必要があります。
function my_bs4_pagination($args = array()) {
  //パラメータのデフォルト値
  $defaults = array(
    'pages' => '',  //サブループを使用する場合は指定
    'range' => 2, //前後に表示するリンクの数
    'aria_label' => 'ページナビゲーション',
    'nav_id' => '',  //nav 要素に付与する ID
    'nav_class' => '',  //nav 要素に付与するクラス
    'ul_class' =>'pagination',  //ul 要素に付与するクラス
    'li_class' => 'page-item',  //li 要素に付与するクラス
    'li_active_class' => 'page-item active',  //アクティブな li 要素に付与するクラス
    'a_class' => 'page-link',  //a 要素に付与するクラス
    'span_class' => 'page-link',  //span 要素に付与するクラス
    'start_text' =>'«',  //「先頭へ」のリンクの文字
    'prev_text' =>'‹',  //「前へ」のリンクの文字
    'next_text' => '›',  //「次へ」のリンクの文字
    'end_text' => '»',  //「最後へ」のリンクの文字
  );
  //引数の値とデフォルトをマージ
  $args = wp_parse_args( $args, $defaults );
  extract( $args, EXTR_SKIP );

  //マージした値を元に出力するかどうかを設定
  $aria_label = $aria_label ? ' aria-label="' .$aria_label . '" ' : '';
  $nav_id = $nav_id ? ' id="' .$nav_id . '" ' : '';
  $nav_class = $nav_class ? ' class="' .$nav_class . '" ' : '';
  $ul_class = $ul_class ? ' class="' .$ul_class . '" ' : '';
  $li_class = $li_class ? ' class="' .$li_class . '" ' : '';
  $li_active_class = $li_active_class ? ' class="' .$li_active_class . '" ' : '';
  $a_class = $a_class ? ' class="' .$a_class . '" ' : '';
  $span_class = $span_class ? ' class="' .$span_class . '" ' : '';

  //表示する項目(リンク)の最大数
  $showitems = ($range * 2) + 1;

  //現在のページ番号を取得(現在のページにはリンクを付けない)
  global $paged;
  //$paged が取得できない場合は 1 に設定
  if(empty($paged)) $paged = 1;

  //$pages: ページ総数。サブループの場合はパラメータで指定されなければならない
  //通常のループの場合は $wp_query->max_num_pages から取得
  if($pages == '') {
    global $wp_query;
    $pages = $wp_query->max_num_pages;
    if(!$pages) {
      //取得できない場合は 1 を設定(リンクは表示されない)。
      $pages = 1;
    }
  }

  //ページ総数が1でなければリンクを出力
  if(1 != $pages) {
    echo '<nav'.$nav_id.$aria_label.'><ul' .$ul_class.'>' ;
    if($paged > 2 && $paged > $range+1 && $showitems < $pages) echo '<li'.$li_class.'><a'.$a_class.' href="'.get_pagenum_link(1). '">'.$start_text.'</a></li>';
    if($paged > 1 && $showitems < $pages) echo '<li'.$li_class.'><a'.$a_class.' href="'.get_pagenum_link($paged - 1).'">'.$prev_text.'</a></li>';

    for ($i=1; $i <= $pages; $i++) {
      if (1 != $pages &&( !($i >= $paged+$range+1 || $i <= $paged-$range-1) || $pages <= $showitems )) {
        if($paged == $i) {
          echo '<li'.$li_active_class.'><span' .$span_class. '>' .$i . '</span></li>' ;
        }else{
          echo '<li'.$li_class.'>'.'<a href="'.get_pagenum_link($i). '"' .$a_class.'>'.$i.'</a></li>';
        }
      }
    }

    if ($paged < $pages && $showitems < $pages) echo '<li'.$li_class .'>'.'<a href="'.get_pagenum_link($paged + 1). '"' .$a_class.'>'.$next_text.'</a></li>';
    if ($paged < $pages-1 &&  $paged+$range-1 < $pages && $showitems < $pages) echo '<li'.$li_class.'>'.'<a href="'.get_pagenum_link($pages). '"' .$a_class.'>'.$end_text.'</a></li>';
    echo '</ul></nav>';
  }
}
使い方はアーカイブページのテンプレートでページネーションを表示する場所に以下を記述します。
<?php my_bs4_pagination(); ?>
以下のようなページネーションが表示されます(デフォルトの場合)。
WP_Query クラスを使ったサブループなどの場合は、以下のようにパラメータ pages に生成したオブジェクトの max_num_pages プロパティを指定する必要があります。
<?php
$paged = ( get_query_var('paged') ) ? get_query_var('paged') : 1;
// $paged = ( get_query_var('page') ) ? get_query_var('page') : 1; //静的フロントページの場合
$args = array(
  'posts_per_page' => 5,
  'post_type' => 'rental', //カスタム投稿タイプ
  'paged' => $paged, //ページ分割時のページ(この例の場合必須)
);
$my_query = new WP_Query( $args );
?>
<?php if($my_query->have_posts()): ?>
  <?php while($my_query->have_posts()): $my_query->the_post(); ?>
    <p><?php the_title(); ?></p>
  ・・・
  <?php endwhile; ?>
<?php endif; ?>
<?php my_bs4_pagination(array('pages'=>$my_query->max_num_pages)); ?>
<?php wp_reset_postdata(); ?>
以下は元にさせていただいた関数のソースです。上記のコードは出力のマークアップやパラメータを変更しただけで機能的には以下と同じです。
/*** HOW TO BUILD A WORDPRESS POST PAGINATION WITHOUT PLUGIN ***
* https://kriesi.at/archives/how-to-build-a-wordpress-post-pagination-without-plugin
* $pages : サブループの場合にのみ指定。 通常のループ内ではページ総数は max_num_pages で取得可能。
* $range : 現在のページの前後に表示するリンクの数を決める値。
*/
function kriesi_pagination($pages = '', $range = 2) {
//表示する項目(リンク)の最大数
$showitems = ($range * 2) + 1;
//現在のページ番号を取得(現在のページにはリンクを付けない)
global $paged;
//$paged が取得できない場合は 1 に設定
if(empty($paged)) $paged = 1;
//$pages: ページ総数。サブループの場合はパラメータで指定されなければならない
//通常のループの場合は $wp_query->max_num_pages から取得
if($pages == '') {
global $wp_query;
$pages = $wp_query->max_num_pages;
if(!$pages) {
//取得できない場合は 1 を設定(リンクは表示されない)。
$pages = 1;
}
}
//ページ総数が1でなければリンクを出力
if(1 != $pages) {
echo "<div class='pagination'>";
if($paged > 2 && $paged > $range+1 && $showitems < $pages) echo "<a href='".get_pagenum_link(1)."'>«</a>";
if($paged > 1 && $showitems < $pages) echo "<a href='".get_pagenum_link($paged - 1)."'>‹</a>";
for ($i=1; $i <= $pages; $i++) {
if (1 != $pages &&( !($i >= $paged+$range+1 || $i <= $paged-$range-1) || $pages <= $showitems )) {
echo ($paged == $i)? "<span class='current'>".$i."</span>":"<a href='".get_pagenum_link($i)."' class='inactive' >".$i."</a>";
}
}
if ($paged < $pages && $showitems < $pages) echo "<a href='".get_pagenum_link($paged + 1)."'>›</a>";
if ($paged < $pages-1 && $paged+$range-1 < $pages && $showitems < $pages) echo "<a href='".get_pagenum_link($pages)."'>»</a>";
echo "</div>\n";
}
}
paginate_links
一覧ページなどでページネーションリンク(ページ番号付きのリンク)を取得します。
paginate_links( $args )
- パラメータ
- $args(配列):(オプション)以下を連想配列で指定します。
キー
(値の型)意味 初期値 'base'
(文字列)ページネーションリンクを生成する際に参照されるベースの URL。この部分は 'format' により置き換わる。 '%_%' 'format'
(文字列)ページネーションの構造を指定する書式。デフォルトは '?page=%#%' で、Pretty パーマリンク使用時は '/page/%#%' となり、'%#%' 部分はページ番号に置き換わる '?page=%#%' 'total'
(整数)全体のページ数 1 'current'
(整数)現在のページ番号 0 'aria_current'
(文字列)現在のページに対応する span 属性に指定される aria-current 属性の値。指定可能な値は 'page', 'step', 'location', 'date', 'time', 'true', 'false' 'page' 'show_all'(真偽値) 全てのページ番号を表示するかどうか。 false 'end_size'
(整数)ページ番号のリストの両端(最初と最後)に表示するページ番号の数 1 'mid_size'
(整数)現在のページの左右に表示するページ番号の数 2 'prev_next'
(真偽値)前後の一覧ページへのリンクを含むかどうか true 'prev_text'
(文字列)前の一覧ページへのリンク文字列。日本語の場合の初期値:'« 前へ' '« Previous' 'next_text'
(文字列)次の一覧ページへのリンク文字列。日本語の場合の初期値:'次へ »' 'Next »' 'type'
(文字列)戻り値の形式。次のタイプを指定可能。 - 'plain' :改行を含む HTML 文字列
- 'array' :配列
- 'list' :ul li でマークアップされた HTML
'plain' 'add_args'
(配列)URL に追加するクエリパラメータの配列 false 'add_fragment'
(文字列)各リンクの最後に追加する文字列 なし 'before_page_number'
(文字列)各ページ番号の前に追加する文字列 なし 'after_page_number'
(文字列)各ページ番号の後に追加する文字列 なし
- 戻り値
- 'type' で指定した形式のページネーションのリンク
- 利用可能箇所
- 通常はアーカイブなどの一覧ページのテンプレート。
固定ページにページネーションを表示
paginate_links() を使えば、固定ページでもページネーションを表示することができます。
アーカイブページなどデフォルトのループを使って一覧を表示しているページでは、パラメータの指定なしでもページネーションは表示されます。
但し、WP_Query を使ったループ(固定ページなど)の場合は、パラメータの投稿を取得するための条件に paged を指定しないとページ送りが有効になりません。
また、paginate_links() に total(ページ総数)を指定します。ページ総数はループ内では以下の場合、$my_query->max_num_pages で取得できます。
<?php
$paged = ( get_query_var( 'paged' ) ) ? get_query_var( 'paged' ) : 1;
$args = array(
  'post_type' => 'rental',
  'posts_per_page' => '3',
  'paged' => $paged, //paged に2行目で取得した値を指定
);
$my_query = new WP_Query( $args );
?>

<?php if ( $my_query->have_posts() ) : ?>
<h2>最近のポートフォリオ</h2>
  <?php while ( $my_query->have_posts() ) : $my_query->the_post(); ?>
    <h3><a href="<?php the_permalink(); ?>"><?php the_title(); ?></a></h3>
  <?php endwhile; ?>
<?php
echo paginate_links(array(
  'total'=>$my_query->max_num_pages, //ページ総数
));
?>;
<?php endif; ?>
<?php wp_reset_postdata(); ?>
静的フロントページで WP_Query を使ったループの場合は、クエリに page を使う必要があります。
また、paginate_links() には以下のパラメータを指定しないとうまく機能しません。
- total(ページ総数): $my_query->max_num_pages(WP_Query オブジェクトのプロパティ)
- current(現在のページ番号):get_query_var('page') の値。この例では $paged に格納されています。最初のページの場合 0 ですがその場合うまく機能しないので max( 1, $paged ) としています。
<?php
//静的フロントページ内のクエリの場合は 'page' を使う
$paged = ( get_query_var('page') ) ? get_query_var('page') : 1;
$args = array(
  'post_type' => 'rental',
  'posts_per_page' => '3',
  'paged' => $paged, //3行目で取得した値を paged に指定
);
$my_query = new WP_Query( $args );
?>

<?php if ( $my_query->have_posts() ) : ?>
<h2>最近のポートフォリオ</h2>
  <?php while ( $my_query->have_posts() ) : $my_query->the_post(); ?>
    <h3><a href="<?php the_permalink(); ?>"><?php the_title(); ?></a></h3>
  <?php endwhile; ?>
<?php
  echo paginate_links(array(
    'total'=>$my_query->max_num_pages,  //ページ総数
    'current' => max( 1, $paged ),  //現在のページ番号
  ));
?>
<?php endif; ?>
<?php wp_reset_postdata(); ?>
paginate_links() のソースの冒頭の部分に以下のような記述があります。
最初に現在の URL を元にデフォルトの値をセットアップして、その後パラメータに指定された値とデフォルト値を結合しています。
function paginate_links( $args = '' ) {
  global $wp_query, $wp_rewrite;

  // 現在の URL を元にデフォルトの値をセットアップ
  $pagenum_link = html_entity_decode( get_pagenum_link() );
  $url_parts    = explode( '?', $pagenum_link );

  // 可能であればページ総数と現在のページ(番号)をクエリから取得
  $total   = isset( $wp_query->max_num_pages ) ? $wp_query->max_num_pages : 1;
  $current = get_query_var( 'paged' ) ? intval( get_query_var( 'paged' ) ) : 1;

  // ベース URL に書式(フォーマット)のプレースホルダーを追加
  $pagenum_link = trailingslashit( $url_parts[0] ) . '%_%';

  // URL base はパーマリンクの設定に依存する.
  $format  = $wp_rewrite->using_index_permalinks() && ! strpos( $pagenum_link, 'index.php' ) ? 'index.php/' : '';
  $format .= $wp_rewrite->using_permalinks() ? user_trailingslashit( $wp_rewrite->pagination_base . '/%#%', 'paged' ) : '?paged=%#%';

  ・・・以下省略・・・
5行目は get_pagenum_link() を使って取得した現在の URL を html_entity_decode() で HTML エンティティ文字を変換して、変数 $pagenum_link に格納しています。
6行目は取得した URL を ? 記号に続くクエリ部分と分割して配列 $url_parts に格納しています。
9行目はグローバル変数 $wp_query の max_num_pages プロパティからページ総数を取得、10行目では get_query_var( 'paged' ) で現在のページ番号を取得しています。
13行目は URL のクエリ文字より前の部分の最後にスラッシュと付けてフォーマット用のプレースフォルダ '%_%' を付加しています。
そしてリライトルールなどパーマリンク設定によりフォーマットを決定し、デフォルトの値($pagenum_link、$format、$total、$current)をセットアップして、その後指定されたパラメータとマージしています。
パラメータなしで実行した場合、デフォルトの値($pagenum_link、$format、$total、$current)がうまく取得できていれば機能しますが、そうでない場合は適切なパラメータを指定する必要があるようです。
以下は paginate_links() のソースです。
function paginate_links( $args = '' ) {
global $wp_query, $wp_rewrite;
// Setting up default values based on the current URL.
$pagenum_link = html_entity_decode( get_pagenum_link() );
$url_parts = explode( '?', $pagenum_link );
// Get max pages and current page out of the current query, if available.
$total = isset( $wp_query->max_num_pages ) ? $wp_query->max_num_pages : 1;
$current = get_query_var( 'paged' ) ? intval( get_query_var( 'paged' ) ) : 1;
// Append the format placeholder to the base URL.
$pagenum_link = trailingslashit( $url_parts[0] ) . '%_%';
// URL base depends on permalink settings.
$format = $wp_rewrite->using_index_permalinks() && ! strpos( $pagenum_link, 'index.php' ) ? 'index.php/' : '';
$format .= $wp_rewrite->using_permalinks() ? user_trailingslashit( $wp_rewrite->pagination_base . '/%#%', 'paged' ) : '?paged=%#%';
$defaults = array(
'base' => $pagenum_link, // http://example.com/all_posts.php%_% : %_% is replaced by format (below)
'format' => $format, // ?page=%#% : %#% is replaced by the page number
'total' => $total,
'current' => $current,
'aria_current' => 'page',
'show_all' => false,
'prev_next' => true,
'prev_text' => __( '« Previous' ),
'next_text' => __( 'Next »' ),
'end_size' => 1,
'mid_size' => 2,
'type' => 'plain',
'add_args' => array(), // array of query args to add
'add_fragment' => '',
'before_page_number' => '',
'after_page_number' => '',
);
$args = wp_parse_args( $args, $defaults );
if ( ! is_array( $args['add_args'] ) ) {
$args['add_args'] = array();
}
// Merge additional query vars found in the original URL into 'add_args' array.
if ( isset( $url_parts[1] ) ) {
// Find the format argument.
$format = explode( '?', str_replace( '%_%', $args['format'], $args['base'] ) );
$format_query = isset( $format[1] ) ? $format[1] : '';
wp_parse_str( $format_query, $format_args );
// Find the query args of the requested URL.
wp_parse_str( $url_parts[1], $url_query_args );
// Remove the format argument from the array of query arguments, to avoid overwriting custom format.
foreach ( $format_args as $format_arg => $format_arg_value ) {
unset( $url_query_args[ $format_arg ] );
}
$args['add_args'] = array_merge( $args['add_args'], urlencode_deep( $url_query_args ) );
}
// Who knows what else people pass in $args
$total = (int) $args['total'];
if ( $total < 2 ) {
return;
}
$current = (int) $args['current'];
$end_size = (int) $args['end_size']; // Out of bounds? Make it the default.
if ( $end_size < 1 ) {
$end_size = 1;
}
$mid_size = (int) $args['mid_size'];
if ( $mid_size < 0 ) {
$mid_size = 2;
}
$add_args = $args['add_args'];
$r = '';
$page_links = array();
$dots = false;
if ( $args['prev_next'] && $current && 1 < $current ) :
$link = str_replace( '%_%', 2 == $current ? '' : $args['format'], $args['base'] );
$link = str_replace( '%#%', $current - 1, $link );
if ( $add_args ) {
$link = add_query_arg( $add_args, $link );
}
$link .= $args['add_fragment'];
/**
* Filters the paginated links for the given archive pages.
* @since 3.0.0
* @param string $link The paginated link URL.
*/
$page_links[] = '<a class="prev page-numbers" href="' . esc_url( apply_filters( 'paginate_links', $link ) ) . '">' . $args['prev_text'] . '</a>';
endif;
for ( $n = 1; $n <= $total; $n++ ) :
if ( $n == $current ) :
$page_links[] = "<span aria-current='" . esc_attr( $args['aria_current'] ) . "' class='page-numbers current'>" . $args['before_page_number'] . number_format_i18n( $n ) . $args['after_page_number'] . '</span>';
$dots = true;
else :
if ( $args['show_all'] || ( $n <= $end_size || ( $current && $n >= $current - $mid_size && $n <= $current + $mid_size ) || $n > $total - $end_size ) ) :
$link = str_replace( '%_%', 1 == $n ? '' : $args['format'], $args['base'] );
$link = str_replace( '%#%', $n, $link );
if ( $add_args ) {
$link = add_query_arg( $add_args, $link );
}
$link .= $args['add_fragment'];
/** This filter is documented in wp-includes/general-template.php */
$page_links[] = "<a class='page-numbers' href='" . esc_url( apply_filters( 'paginate_links', $link ) ) . "'>" . $args['before_page_number'] . number_format_i18n( $n ) . $args['after_page_number'] . '</a>';
$dots = true;
elseif ( $dots && ! $args['show_all'] ) :
$page_links[] = '<span class="page-numbers dots">' . __( '…' ) . '</span>';
$dots = false;
endif;
endif;
endfor;
if ( $args['prev_next'] && $current && $current < $total ) :
$link = str_replace( '%_%', $args['format'], $args['base'] );
$link = str_replace( '%#%', $current + 1, $link );
if ( $add_args ) {
$link = add_query_arg( $add_args, $link );
}
$link .= $args['add_fragment'];
/** This filter is documented in wp-includes/general-template.php */
$page_links[] = '<a class="next page-numbers" href="' . esc_url( apply_filters( 'paginate_links', $link ) ) . '">' . $args['next_text'] . '</a>';
endif;
switch ( $args['type'] ) {
case 'array':
return $page_links;
case 'list':
$r .= "<ul class='page-numbers'>\n\t<li>";
$r .= join( "</li>\n\t<li>", $page_links );
$r .= "</li>\n</ul>\n";
break;
default:
$r = join( "\n", $page_links );
break;
}
return $r;
}
分割されたページへのリンク
投稿や固定ページの編集画面のコードエディタで <!--nextpage--> と記述すると、記事を複数のページに分割することができます。
nextpage の前後に空白などが入っていると機能しないので注意が必要です。
<!--nextpage-->
ビジュアルエディタではブロックの追加で「レイアウト要素」から「改ページ」を選択します(一度選択すると「よく使うもの」に表示されるようになります)。
ビジュアルエディタでは以下のように表示されます。
<!--nextpage--> を記述したり、「改ページ」のブロックを挿入した場合、それ以降のコンテンツは非表示になるので、分割された部分にアクセスするためのリンクを個別ページのテンプレートに記述します。
分割された部分にアクセスするためのリンクは wp_link_pages() で出力することができます。
以下のように個別ページのテンプレート(single.php や page.php など)でループ内に wp_link_pages() を記述します。
<?php if(have_posts()) : ?>
<?php while(have_posts()) : the_post(); ?>
<div <?php post_class(); ?>>
  <h3><?php the_title(); ?></h3>
  <?php the_content(); ?>
</div>
  <?php wp_link_pages(); ?><!-- リンクの出力 -->
<?php endwhile; ?>
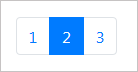
上記のようにパラメータなしで記述した場合、例えばページが2つに分割されていると以下のようなリンクが出力されます(news と言うカテゴリーの divided-page と言うスラッグの投稿の例)。
<p class="post-nav-links">ページ:
  <span class="post-page-numbers current" aria-current="page">1</span>
  <a href="http://example.com/news/divided-page/2/" class="post-page-numbers">2</a>
</p>
ページが3つに分割されていて現在2ページ目が表示されている場合は、以下のようなリンクが出力されます。
<p class="post-nav-links">ページ:
  <a href="http://example.com/news/divided-page/" class="post-page-numbers">1</a>
  <span class="post-page-numbers current" aria-current="page">2</span>
  <a href="http://example.com/news/divided-page/3/" class="post-page-numbers">3</a>
</p>
詳細は以下をご覧ください。
wp_link_pages
ページ分割された投稿のページリンクを出力(または取得)します。ループ内で使用します。
wp_link_pages( $args )
- パラメータ
- $args(配列):(オプション)以下を連想配列で指定します。
キー
(値の型)意味 初期値 'before'
(文字列)リンクの前に表示する HTML やテキスト。 <p class="post-nav-links">ページ: 'after'
(文字列)リンクの後に表示する HTML やテキスト。 </p> 'link_before'
(文字列)リンクテキストの前に表示するテキスト '' 'link_after'
(文字列)リンクテキストの後に表示するテキスト '' 'aria_current'
(文字列)現在のページに対応する span 属性に指定される aria-current 属性の値。指定可能な値は 'page', 'step', 'location', 'date', 'time', 'true', 'false' 'page' 'next_or_number'
(文字列)リンクをページ番号で表示するか「前のページへ」「次ページへ」のような文字で表示するか。指定できるのは'next'または'number' 'number' 'separator'
(文字列)ページ番号を区切る文字列。'next_or_number' が 'number' の場合。 ' ' 'nextpagelink'
(文字列)次のページへのリンクのテキスト。'next_or_number' が 'next' の場合。 次ページへ 'previouspagelink'
(文字列)前のページへのリンクのテキスト。'next_or_number' が 'next' の場合。 前のページへ 'pagelink'
(文字列)ページ番号のフォーマット。文字列内の % が番号に置き換えられる。例えば Page % は「Page 1」、「Page 2」など。 % 'echo'
(整数|真偽値)HTML を出力するか、値を返すかの指定。1 または true で出力。0 または false で値として返す 1(true)
- 戻り値
- echo が true (デフォルト)の場合、NULL を返してページリンクを出力。echo が false または 0 の場合はリンクの HTML。
- 利用可能箇所
- ループ内
以下はページリンクをデフォルトの p 要素ではなく、post-nav-links と言うクラスを付与した div 要素で囲み、表示するテキストを Page: にして、ページ番号を | で区切って表示する例です。
<?php
wp_link_pages(array(
  'before'   => '<div class="post-nav-links"> Page:',
  'after' => '</div>',
  'separator' => ' | ',
));
?>
以下は div 要素で囲み、テキストを非表示にして [ 1 ] [ 2 ] [ 3 ] のように表示する例です。
<?php
wp_link_pages(array(
  'before'   => '<div class="post-nav-links">',
  'after' => '</div>',
  'link_before'      => '[ ',
  'link_after'       => ' ]',
));
?>
以下はページ番号のリンクではなく、「前のページへ」「次のページへ」と表示するリンクを出力する例です。
<?php
wp_link_pages(array(
  'before'   => '<div class="post-nav-links">',  //ここの文字は表示させない
  'after' => '</div>',
  'next_or_number' => 'next',  //文字で表示
  'nextpagelink' => '<span class="next-page-link">次のページへ</span>',
  'previouspagelink' => '<span class="prev-page-link">前のページへ</span>',
));
?>
以下のようにスタイルを指定すれば、「前のページへ」「次のページへ」と表示するリンクを左右に配置することもできます。
span.next-page-link {
  float: right;
}
span.prev-page-link {
  float: left;
}
以下は wp_link_pages() のソースです。
function wp_link_pages( $args = '' ) {
  global $page, $numpages, $multipage, $more;

  $defaults = array(
    'before'           => '<p class="post-nav-links">' . __( 'Pages:' ),
    'after'            => '</p>',
    'link_before'      => '',
    'link_after'       => '',
    'aria_current'     => 'page',
    'next_or_number'   => 'number',
    'separator'        => ' ',
    'nextpagelink'     => __( 'Next page' ),
    'previouspagelink' => __( 'Previous page' ),
    'pagelink'         => '%',
    'echo'             => 1,
  );

  $params = wp_parse_args( $args, $defaults );

  /**
   * Filters the arguments used in retrieving page links for paginated posts.
   * @since 3.0.0
   * @param array $params An array of arguments for page links for paginated posts.
   */
  $r = apply_filters( 'wp_link_pages_args', $params );

  $output = '';
  if ( $multipage ) {
    if ( 'number' == $r['next_or_number'] ) {
      $output .= $r['before'];
      for ( $i = 1; $i <= $numpages; $i++ ) {
        $link = $r['link_before'] . str_replace( '%', $i, $r['pagelink'] ) . $r['link_after'];
        if ( $i != $page || ! $more && 1 == $page ) {
            $link = _wp_link_page( $i ) . $link . '</a>';
        } elseif ( $i === $page ) {
            $link = '<span class="post-page-numbers current" aria-current="' . esc_attr( $r['aria_current'] ) . '">' . $link . '</span>';
        }
        /**
         * Filters the HTML output of individual page number links.
         * @since 3.6.0
         * @param string $link The page number HTML output.
         * @param int    $i    Page number for paginated posts' page links.
         */
        $link = apply_filters( 'wp_link_pages_link', $link, $i );

        // Use the custom links separator beginning with the second link.
        $output .= ( 1 === $i ) ? ' ' : $r['separator'];
        $output .= $link;
      }
      $output .= $r['after'];
    } elseif ( $more ) {
      $output .= $r['before'];
      $prev    = $page - 1;
      if ( $prev > 0 ) {
        $link = _wp_link_page( $prev ) . $r['link_before'] . $r['previouspagelink'] . $r['link_after'] . '</a>';

        /** This filter is documented in wp-includes/post-template.php */
        $output .= apply_filters( 'wp_link_pages_link', $link, $prev );
      }
      $next = $page + 1;
      if ( $next <= $numpages ) {
        if ( $prev ) {
          $output .= $r['separator'];
        }
        $link = _wp_link_page( $next ) . $r['link_before'] . $r['nextpagelink'] . $r['link_after'] . '</a>';

        /** This filter is documented in wp-includes/post-template.php */
        $output .= apply_filters( 'wp_link_pages_link', $link, $next );
      }
      $output .= $r['after'];
    }
  }

  /**
   * Filters the HTML output of page links for paginated posts.
   * @since 3.6.0
   * @param string $output HTML output of paginated posts' page links.
   * @param array  $args   An array of arguments.
   */
  $html = apply_filters( 'wp_link_pages', $output, $args );

  if ( $r['echo'] ) {
    echo $html;
  }
  return $html;
}
Bootstrap の形式に変換
wp_link_pages() で出力されるマークアップのままでは Bootstrap 4 のページネーションのスタイルが適用できないので変換する方法です。
wp_link_pages() のパラメータをカスタマイズするフィルタ wp_link_pages_args と HTML 出力をカスタマイズするフィルタ wp_link_pages を利用します。
wp_link_pages_args の関数では引数には wp_link_pages()の パラメータ($params)を受け取り、カスタマイズして返します。
以下の場合、aria_current 以外のパラメータは全て以下の値に設定され、ページリンクは nav 要素と ul 要素でマークアップされます。
function my_link_pages_args ($params) {
  return array(
    'before'           => '<nav aria-label="ページナビゲーション">'. "\n" .'<ul class="pagination">'. "\n",
    'after'            => '</ul>'. "\n" .'</nav>',
    'link_before'      => '',
    'link_after'       => '',
    'aria_current'     => $params['aria_current'],
    'next_or_number'   => 'number',
    'separator'        => ' ',
    'nextpagelink'     => __( 'Next page' ),
    'previouspagelink' => __( 'Previous page' ),
    'pagelink'         => '%',
    'echo'             => 1,
  );
}
add_filter('wp_link_pages_args', 'my_link_pages_args');
例えば以下のような出力になります。
<nav aria-label="ページナビゲーション">
  <ul class="pagination">
    <a href="http://example.com/news/divided-page/" class="post-page-numbers">1</a>
    <span class="post-page-numbers current" aria-current="page">2</span>
    <a href="http://example.com/news/divided-page/3/" class="post-page-numbers">3</a>
  </ul>
</nav>
各リンク項目を li 要素でマークアップし、各要素に Bootstrap で使用するクラスを付与するために wp_link_pages フィルタを使います。
引数にはリンクのマークアップ($output)を受け取ることができます。
PHP 関数 preg_replace() を使って a 要素や span 要素にクラス(page-link)を追加して page-item クラスを付与した li 要素で囲みます。
function my_bs4_link_pages ($output) {

  $patterns = array(
    '#<a ([^>]*) class=([\'\"]([^\'\"]*)[\'\"])>(\d*)</a>#',
    '#<span class=([\'\"]([^\'\"]*)[\'\"])\s?([^>]*)>(\d*)</span>#',
  );

  $replacements = array(
    '<li class="page-item"><a $1 class="$3 page-link">$4</a></li>'. "\n",
    '<li class="page-item active"><span class="$2 page-link" $3>$4</span><span class="sr-only">(現在のページ)</span></li>'. "\n",
  );

  ksort($patterns);
  ksort($replacements);
  return preg_replace($patterns, $replacements, $output);

}
add_filter('wp_link_pages', 'my_bs4_link_pages');
実際に使用する際はパラメータなしで実行します。aria_current のパラメータのみ指定できますが、他のパラメータを指定しても無視されます。
<?php
wp_link_pages(array(
  //'aria_current'   => 'step', 必要に応じて指定
));
?>
以下のような出力になり、Bootstrap のページネーションのスタイルが適用されるようになります。※ Bootstrap のスタイルを適用するには Bootstrap 4 を読み込んでおく必要があります(Bootstrap 4 WordPress での読み込み)。
<nav aria-label="ページナビゲーション">
  <ul class="pagination">
   <li class="page-item">
     <a href="http://example.com/news/divided-page/" class="post-page-numbers page-link">1</a>
    </li>
   <li class="page-item active">
     <span class="post-page-numbers current page-link" aria-current="page">2</span>
     <span class="sr-only">(現在のページ)</span>
    </li>
   <li class="page-item">
     <a href="http://example.com/news/divided-page/3/" class="post-page-numbers page-link">3</a>
    </li>
  </ul>
</nav>
ページが3つに分割されていて現在のページが2ページ目の場合、以下のような表示になります。