 WordPress Gutenberg ブロック開発の環境構築
以下は部分的に古い情報になっています。
最新のブロック開発関連に関しては以下を御覧ください。
Gutenberg のブロックを作成する際に、JSX を使う場合は JSX 構文をブラウザが理解できるように構文を変換する必要があるため、JavaScript ビルド環境のセットアップが必要になります。
ビルド環境のセットアップは通常、webpack と Babel などを使いますが自分で設定するとなると割と手間がかかります。そのため WordPress では環境構築を簡単に行うためのパッケージとして @wordpress/scripts(wp-script)と @wordpress/create-block を提供しています。
以下はそれらのパッケージを使って JavaScript ビルド環境をセットアップする方法の覚書です。以下はすでに Node.js がインストールされていて、WordPress のローカル環境(この例では MAMP を使用)があることを前提にしています。また、コマンドの実行例は Mac のターミナルを使用しています。
更新日:2024年12月30日
作成日:2020年09月08日
- WordPress 関連リンク
- npm 関連リンク
このページ以外にも以下のようなブロックの作成に関するページがあります。
- ブロック作成関連ページ
create-block を使って構築
以下は WordPress が公式にサポートする @wordpress/create-block を使ってビルド環境を構築する方法です。create-block は内部では @wordpress/scripts を使っていて、簡単なコマンドでブロック作成に必要なひな形のファイル(PHP、JS、CSS など)を生成して環境を構築してくれます。
React の Create React App のように、webpack や Babel、ESLint、CSS や Sass のローダーなどが自動的に裏側でインストールされ、それらの知識がほとんどなくても使用できるようになっています。
例えば、ブロックをプラグインとして作成する場合、以下のようなブロック用のスクリプトやスタイル及びメインのプラグインファイルなどを作成する必要があります。
wp-content
└── plugins
    └── my-es5-blocks //ブロックのプラグインのディレクトリ
        ├── my-es5-block-sample.php  //プラグインファイル(PHP)
        ├── block_es5_sample.js  //ブロック用のスクリプト(JavaScript)
        ├── editor.css  //エディタ用スタイルシート
        └── style.css  //フロント用スタイルシート
<?php
/*
Plugin Name: My ES5 Block Sample
*/
defined( 'ABSPATH' ) || exit;

function my_es5_block_sample_enqueue() {
  //ブロック用のスクリプトを登録
  wp_register_script(
    'my-es5-block-sample-script',
    plugins_url( 'block_es5_sample.js', __FILE__ ),
    array( 'wp-blocks', 'wp-element')
  );

  //ブロックのエディター用のスタイルシートの登録
  wp_register_style(
    'my-es5-block-editor',
    plugins_url( 'editor.css', __FILE__ ),
    array( 'wp-edit-blocks' ),
    filemtime( plugin_dir_path( __FILE__ ) . 'editor.css' )
  );

  //ブロックのフロント用のスタイルシートの登録
  wp_register_style(
    'my-es5-block-front',
    plugins_url( 'style.css', __FILE__ ),
    array(),
    filemtime( plugin_dir_path( __FILE__ ) . 'style.css' )
  );

  //ブロックタイプを登録
  register_block_type(
    'my-es5-blocks/sample-01',
    array(
      'editor_script' => 'my-es5-block-sample-script',
      'editor_style' => 'my-es5-block-editor',
      'style' => 'my-es5-block-front',
    )
  );
}
add_action( 'init', 'my_es5_block_sample_enqueue' );
//JSX を使わない場合の例
( function( blocks, element ) {
  var el = element.createElement;
  //registerBlockType でブロックを登録(定義)
  blocks.registerBlockType(
    'my-es5-blocks/sample-01',
    {
      title: 'My ES5 Block Sample',
      icon: 'universal-access-alt',
      category: 'layout',
      edit: function() {
        return el(
          'p',
          { },
          'Hello World! (エディタ用).'
        );
      },
      save: function() {
        return el(
          'p',
          { },
          'Hello World! (フロントエンド用).'
        );
      },
    }
  );
}(
  window.wp.blocks,
  window.wp.element
) );
create-block を使うと、これらのブロックの作成に必要なファイルの雛形が生成され、同時に JavaScript のビルド環境が構築されます。生成される雛形のファイルには単純なブロックのサンプルが記述されているので、それらを元に開発を始められます。
create-block のオプション
以下が create-block を実行する書式です。
$ npx @wordpress/create-block [options] [slug]
- slug
-
ファイルの出力先ディレクトリ名及びプラグイン名に使用される文字列を指定できます。但し、プラグイン名はオプションの --title を指定すると、そちらの値が使用されます。
例えば、slug に my-sample と指定すると my-sample という名前のディレクトリが作成され、プラグインの名前は My Sample になります。メインのプラグインファイルは my-sample.php になります。
slug を指定しない場合、コマンドは対話モードで実行されます。
- options
- 以下のオプションを設定できます(省略すればデフォルトの値が設定されます)。
| オプション | 説明 |
|---|---|
| -V, --version | バージョン番号の出力。デフォルトは 0.1.0。 |
| -t, --template <name> | テンプレートタイプ( es5 または esnext)を指定。デフォルトは esnext。ESNext や JSX サポートを有効化するビルド手順を実行したくない場合は es5 を指定。 |
| --namespace <value> | ブロック名の内部名前空間(namespace) |
| --title <value> | ブロックの表示タイトル及びプラグイン名(プラグインヘッダの Plugin Name 及び registerBlockType の第2パラメータの title)。省略すると slug で指定した値が使用されます。 |
| -short-description <value> | ブロックの短い説明。デフォルトは「Example block ...(以下省略)」 |
| --category <name> | ブロックのカテゴリー名。デフォルトは widgets。 |
| -h, --help | 使用方法の出力 |
対話モードで実行
slug を指定しないでコマンドを実行すると対話モードになります。表示されるそれぞれの問いに対して値を入力して return キーを押すことでオプションを設定することができます。
何も値を入力せず return キーを押せば、表示されているデフォルト値が設定されます。これらのオプションは雛形のファイルを生成後、ファイル上で変更することができます。
| オプション | 説明 | デフォルト |
|---|---|---|
| slug | ファイルの出力先ディレクトリ名に使用される文字列 | esnext-example |
| namespace | 名前空間。ブロックをユニークに識別できる文字列 | create-block |
| title | プラグインの名前(プラグインヘッダの Plugin Name)及びブロックの表示タイトル(registerBlockType の第2パラメータの title) | ESNext Example |
| description | ブロックの短い説明を指定。プラグインヘッダの Description 及び egisterBlockType の第2パラメータの description。 | Example block written with ESNext ...(省略) |
| dashicon | ブロックのアイコン。registerBlockType の第2パラメータの icon。 | smiley |
| category | カテゴリー。registerBlockType の第2パラメータの category。 | widgets |
| plugin author | プラグインヘッダに記載されるプラグインの作者。 | The WordPress Contributors |
| plugin's license | プラグインヘッダに記載されるプラグインのライセンス(short name) | GPL-2.0-or-later |
| link to license | プラグインヘッダに記載されるライセンスの全文へのリンク | https://www.gnu.org/licenses/gpl-2.0.html |
| version | プラグインヘッダに記載されるプラグインのバージョン | 0.1.0 |
create-block の実行
まず、ターミナルでプラグインのディレクトリ(wp-content/plugins)に移動します。
//プラグインのディレクトリへ移動(パスは環境に合わせて適宜変更)
$ cd /Applications/MAMP/htdocs/blocks/wp-content/plugins    return
以下の create-block コマンドを実行すると、slug に指定した my-sample というディレクトリが作成され、その中にブロックの作成に必要なファイルが出力されてビルド環境が構築されます。また、最後に利用可能なコマンドが表示されます。
以下では、--namespace オプションで名前空間(namespace)を wdl に指定しています。
作成されたディレクトリに移動してファイルを確認すると以下のようになっています。
$ cd my-sample  return  //作成されたディレクトリに移動

$ ls -al   return  //リスト表示
total 1240
drwxr-xr-x    12 username  admin     384  9  6 10:21 .
drwxr-xr-x@   11 username  admin     352  9  6 10:21 ..
-rw-r--r--     1 username  admin     403  9  6 10:21 .editorconfig
-rw-r--r--     1 username  admin     388  9  6 10:21 .gitignore
-rw-r--r--     1 username  admin     386  9  6 10:21 block.json
drwxr-xr-x     6 username  admin     192  9  6 10:21 build
-rw-r--r--     1 username  admin    1811  9  6 10:21 my-sample.php
drwxr-xr-x  1001 username  admin   32032  9  6 10:21 node_modules
-rw-r--r--     1 username  admin  608416  9  6 10:21 package-lock.json
-rw-r--r--     1 username  admin     552  9  6 10:21 package.json
-rw-r--r--     1 username  admin    1904  9  6 10:21 readme.txt
drwxr-xr-x     7 username  admin     224  9  6 10:21 src
この例の場合、以下のような構成が作成されます。
my-sample //作成されたプラグインのディレクトリ
├── block.json  //ブロックディレクトリの登録で使用されるファイル(?)
├── build //ビルドで出力されるファイルのディレクトリ
│   ├── index.asset.php //依存関係のリストとファイルバージョンが記載されるファイル
│   ├── index.css  //editor.scss がビルドで変換された CSS
│   ├── index.js  //ビルドされたブロック用のスクリプト
│   └── style-index.css // style.scss がビルドで変換された CSS
├── node_modules //関連パッケージのディレクトリ
├── my-sample.php  //メインのプラグインファイル
├── package-lock.json
├── package.json //パッケージの設定ファイル
├── readme.txt
└── src  //開発用ディレクトリ(この中のファイルを編集)
    ├── edit.js
    ├── editor.scss
    ├── index.js  //ブロック用のスクリプト
    ├── save.js
    └── style.scss
- build ディレクトリ
- ビルドの実行で出力されるファイルが入っています。開発用の src ディレクトリで編集したファイルをビルドすると自動的に必要なファイルがバンドルされてこのディレクトリに出力されます。デフォルトでは、この中の index.js がビルドされたブロック用のスクリプトです。
- my-sample.php
- メインのプラグインファイルです。プラグインヘッダやブロック用のスクリプトやスタイルを読み込む(登録する)記述があるファイルです。
- package.json
- インストールされたパッケージに関する情報が記述された npm のファイルです(package.json)。
- src ディレクトリ
- 開発用のファイルが格納されているディレクトリです。この中のファイルを使ってブロックを作成します。デフォルトでは、この中の index.js が ブロック用のメインのスクリプトです。ビルドを実行すると、ブラウザが理解できる構文に変換され、必要な関連ファイルと共に build ディレクトリに出力されます。
たったコマンド1つでブロック開発に必要な雛形のファイルが生成され、ビルド環境が構築されます。
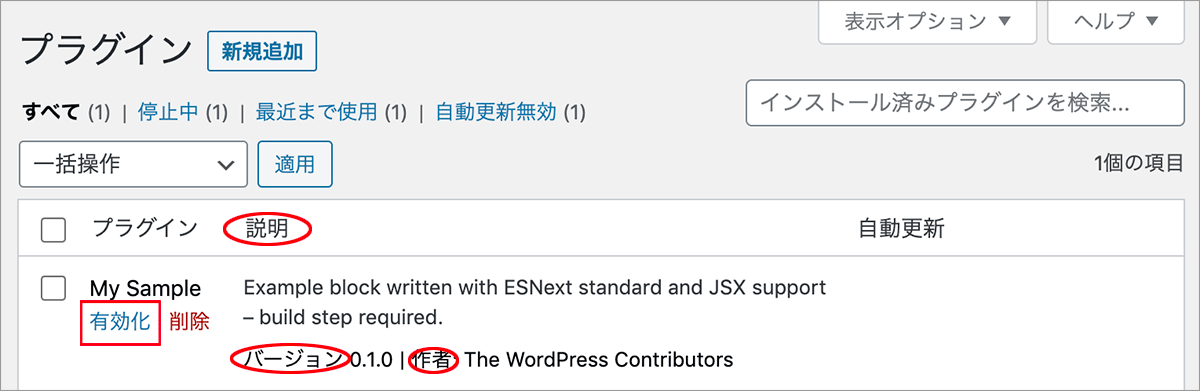
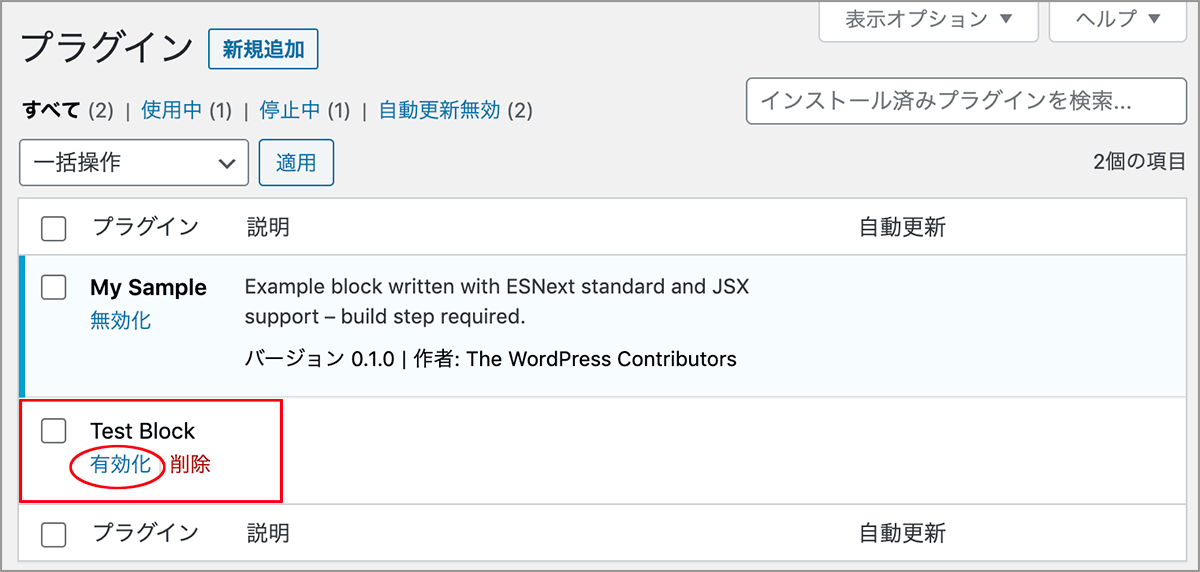
インストールされたプラグインの確認
生成されたファイルにより、プラグインが WordPress 管理画面のプラグインページに表示されます。この例の場合、create-block コマンドの slug に my-sample と指定したので、My Sample というプラグインが作成されています。
その他のオプションは指定しなかったので、「説明」や「バージョン」などにはデフォルトの値が表示されています。有効化します。
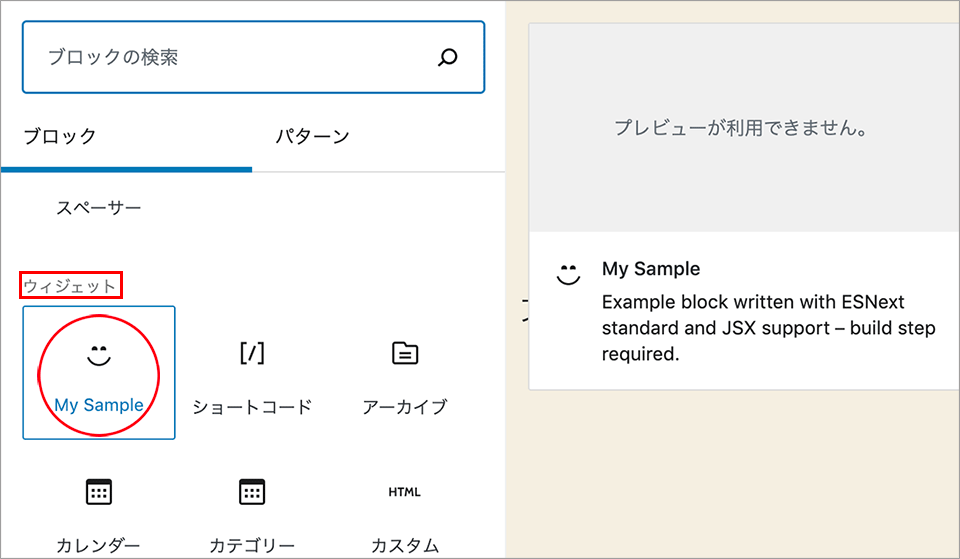
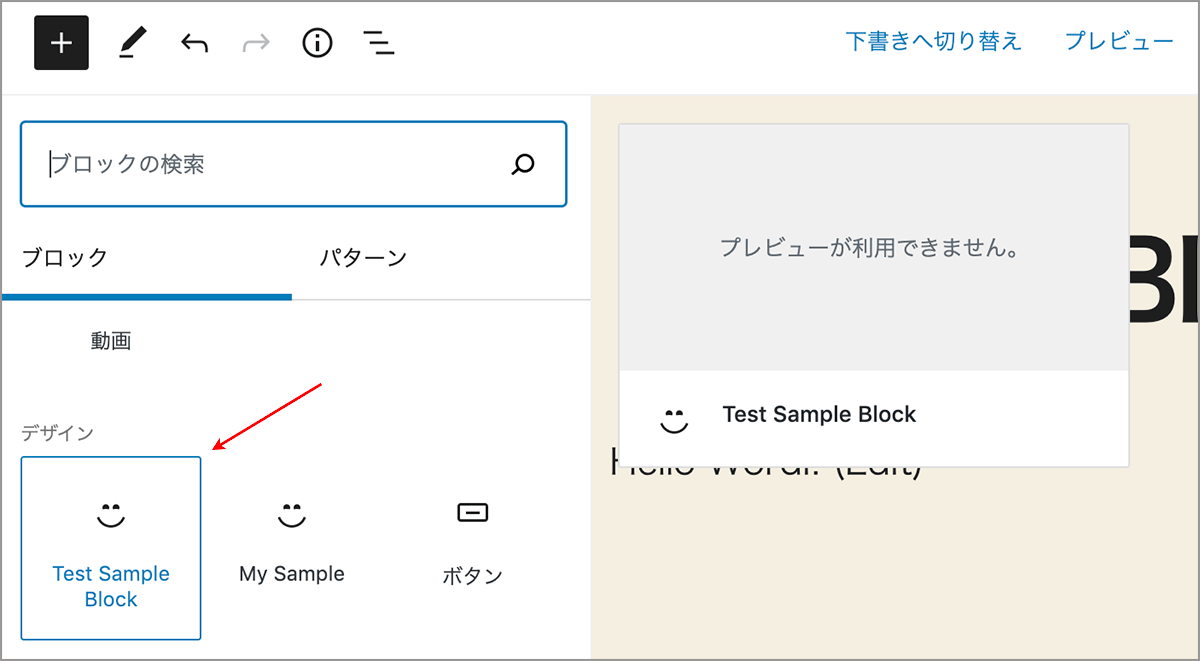
ブロックエディタを使って投稿の新規作成または編集画面を開いて作成したブロックを挿入します。インサータに表示されない場合は、「すべて表示」をクリックしてブロックを表示します。
この例の場合は、create-block コマンドのオプションの category や dashicon(対話モードで指定可能)を指定していないので、デフォルトの widgets(ウィジェット)に表示され、smiley のアイコンが表示されています。
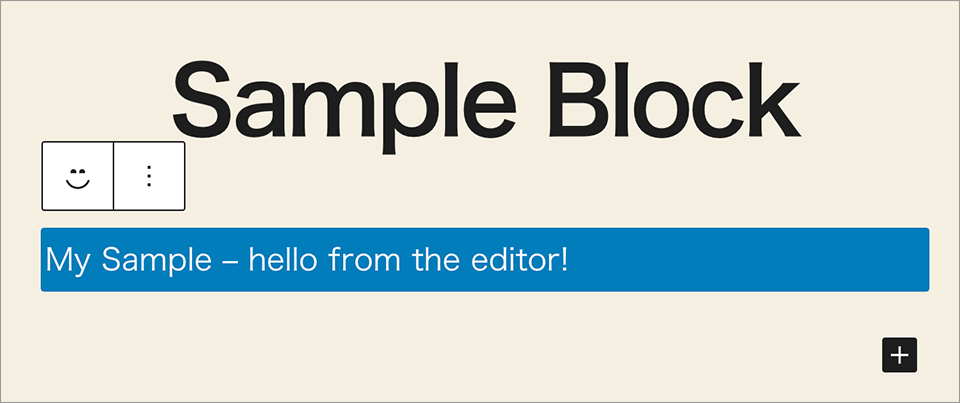
以下はエディター画面でのブロックを挿入した表示です。
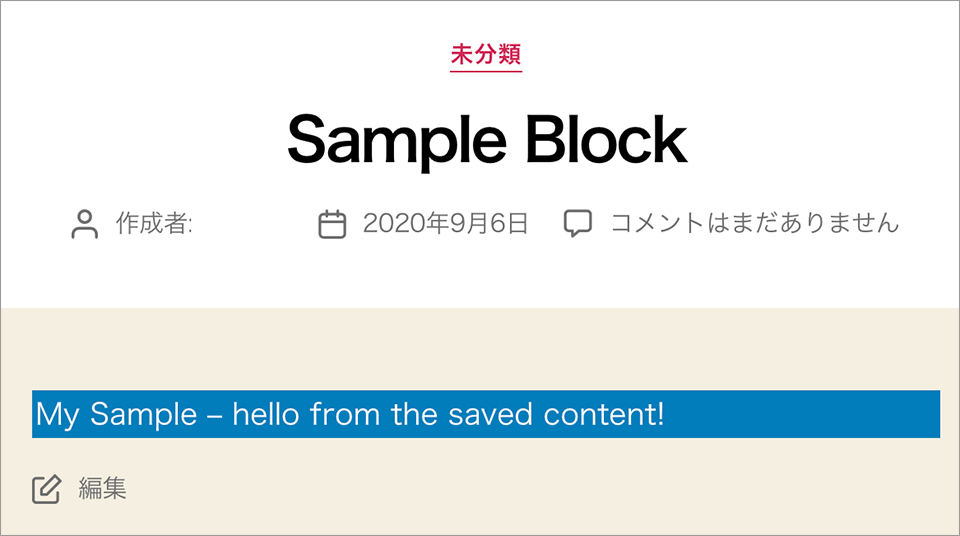
以下はフロントエンド側の表示です。
問題がなければ、生成されたファイルを元にブロック開発を始められます。
以下は create-block により生成された各ファイルについての確認です。生成された各ファイルにはコメントでファイルの詳細が(英語で)記述されています。
メインのプラグインファイル
この例の場合、create-block コマンドの slug に my-sample と指定したので、my-sample.php というメインのプラグインファイルが自動的に生成されます。
このファイルの先頭部分には、以下のようなプラグインを定義するプラグインヘッダーコメントブロックがあります。
この例では、create-block コマンドのオプションで --namespace に wdl を指定しただけなので、その他の部分はデフォルトの値が設定されています。必要に応じて変更します。
/**
 * Plugin Name:     My Sample
 * Description:     Example block written with ESNext standard and JSX support – build step required.
 * Version:         0.1.0
 * Author:          The WordPress Contributors
 * License:         GPL-2.0-or-later
 * License URI:     https://www.gnu.org/licenses/gpl-2.0.html
 * Text Domain:     my-sample
 *
 * @package         wdl
 */
また、このファイルのプラグインヘッダーコメントの下には、init フックを使ったブロック用のスクリプトやスタイルを読み込む(登録する)記述があります。
ブロック用のスクリプトは build/index.js、ブロックのエディター用スタイルは build/index.css、フロントとエディター用スタイルは build/style-index.css が登録され、register_block_type() を使ってそれぞれブロックに関連付けられています。この部分は、生成された雛形のファイルを使う場合は特に変更する必要はないかと思いますが、ファイルを追加したり、ファイル名を変更した場合は変更します。
function wdl_my_sample_block_init() {
  $dir = dirname( __FILE__ );

  //自動的に生成される依存ファイルとバージョンの情報を持つ index.asset.php へのパス
  $script_asset_path = "$dir/build/index.asset.php";
  if ( ! file_exists( $script_asset_path ) ) {
    //index.asset.php が存在しない場合、ビルドが実行されていないのでエラーとする
    throw new Error(
      'You need to run `npm start` or `npm run build` for the "wdl/my-sample" block first.'
    );
  }
  $index_js     = 'build/index.js'; //ブロックを作成するためのメインのスクリプト
  $script_asset = require( $script_asset_path );
  wp_register_script(
    'wdl-my-sample-block-editor',
    plugins_url( $index_js, __FILE__ ),
    $script_asset['dependencies'], //依存するスクリプト
    $script_asset['version'] //スクリプトのバージョン
  );
  wp_set_script_translations( 'wdl-my-sample-block-editor', 'my-sample' );

  $editor_css = 'build/index.css';  //エディター用スタイル
  wp_register_style(
    'wdl-my-sample-block-editor',
    plugins_url( $editor_css, __FILE__ ),
    array(),
    filemtime( "$dir/$editor_css" )
  );

  $style_css = 'build/style-index.css';  //フロント&エディター用スタイル
  wp_register_style(
    'wdl-my-sample-block',
    plugins_url( $style_css, __FILE__ ),
    array(),
    filemtime( "$dir/$style_css" )
  );

  register_block_type( 'wdl/my-sample', array(
    'editor_script' => 'wdl-my-sample-block-editor',
    'editor_style'  => 'wdl-my-sample-block-editor',
    'style'         => 'wdl-my-sample-block',
  ) );
}
add_action( 'init', 'wdl_my_sample_block_init' );
ビルドのプロセスでは、依存関係のリストとタイムスタンプに基づくファイルバージョンが記述されたアセットファイル build/index.asset.php が自動的に作成されます。
上記の wp_register_script を使ったブロック用スクリプトの登録では、index.asset.php の値を使って第3引数の依存スクリプトのハンドル名の配列と第4引数のスクリプトのバージョンを指定しています。これらの値はビルドや再ビルドの際に自動的に更新されます。
<?php return array('dependencies' => array('wp-blocks', 'wp-element', 'wp-i18n', 'wp-polyfill'), 'version' => 'c48c1f3fade3eeff1ff7b78ab02e6780');
wp_set_script_translations()
メインのプラグインファイル 18行目の wp_set_script_translations() は、もし存在するならスクリプトの翻訳をロードするよう WordPress に伝える関数です(国際化)。
package.json
package.json は WordPress 固有のものではなく、インストールされたパッケージに関する設定情報などが記述された npm のファイルです。
package.json は create-block コマンドを実行すると自動的に作成されるファイルで、依存パッケージやタスク処理のコマンド(npm scripts)などが定義されています。
以下はこの例の場合に生成された package.json です。
devDependencies には開発時の依存パッケージとして @wordpress/scripts がリストされています。
{
  "name": "my-sample",
  "version": "0.1.0",
  "description": "Example block written with ESNext standard and JSX support – build step required.",
  "author": "The WordPress Contributors",
  "license": "GPL-2.0-or-later",
  "main": "build/index.js",
  "scripts": {
    "build": "wp-scripts build",
    "format:js": "wp-scripts format-js",
    "lint:css": "wp-scripts lint-style",
    "lint:js": "wp-scripts lint-js",
    "start": "wp-scripts start",
    "packages-update": "wp-scripts packages-update"
  },
  "devDependencies": {
    "@wordpress/scripts": "^12.2.0"
  }
}
コマンド
package.json の scripts フィールドには開発時や production ビルドの際に使用できるコマンド(npm scripts)が登録されています。
npm run xxxx のように xxxx に scripts フィールドのキー名を指定して実行すると、登録されているスクリプトが実行されます。
これらのコマンドは create-block を実行した際に、以下のようにターミナルに表示されます。
Inside that directory, you can run several commands:
  //ターミナルで実行できるコマンド
  $ npm start
    Starts the build for development.

  $ npm run build
    Builds the code for production.

  $ npm run format:js
    Formats JavaScript files.

  $ npm run lint:css
    Lints CSS files.

  $ npm run lint:js
    Lints JavaScript files.

  $ npm run packages-update
    Updates WordPress packages to the latest version.
以下の2つがメインのスクリプトで、build は本番用にビルドする際に、start は開発時に使用します。
"scripts": {
  "build": "wp-scripts build",
  "start": "wp-scripts start"
},
build は npm run build で、start は npm run start で実行することができます。start は特別な予約されたスクリプト名なので npm start と run を省略して実行することができます。
デフォルトではこれらのビルドスクリプトはビルドする対象のファイルとして src/index.js を探し、ビルドしたファイルを build/index.js に保存します(webpack.config.js)。
- npm run build
-
実行すると「production ビルド」を build ディレクトリに作成(出力)してコマンドは終了します。
通常、最終の配布用(production ビルド)としてビルド(コンパイル)する際に使用します。出力されるファイルは圧縮されるため、ブラウザツールやエディターを使用してコードを読むのには適していません。
npm run build でビルドを実行すると、例えば build/index.js は以下のように圧縮されます。
- npm start(または npm run start)
-
通常、開発時に使用します。実行すると「development ビルド」を build ディレクトリに作成(出力)し、待機してファイルの変更を監視します(watch モード)。
そして、src フォルダ内のブロック用スクリプトやスタイル(Sass)のファイルが更新されるたびに自動的にリビルドします。そのため、ファイルを変更するごとにコマンドを実行する必要はありません。
Sass はビルドされると CSS に変換されて build ディレクトリに出力されます。
終了するには control + c を押します。
コードは圧縮されないため、ブラウザツールを使用しても読みやすいようになっています。
npm start を実行すると開発モードになり、例えば build/index.js は以下のように出力されます。JSX がコンパイルされ、createElement を使った記述に変換されているのが確認できます(意識する必要はないと思いますが)。
webpack.config.js
あまり意識する必要はないと思いますがビルドには裏側で webpack が使われています。
以下は webpack の設定ファイル webpack.config.js です。エントリーポイント(src/index.js)や出力先(build/index.js)の設定、どのようなローダーやプラグインが使用されているかが確認できます。
ブロック用のスクリプト
以下は src ディレクトリに生成されるブロック用のスクリプトの雛形のファイル index.js です。
先頭では、必要なモジュール(パッケージ)などをインポートしています。create-block では webpack を使用しています。そのため、npm でインストールしたモジュールは webpack のモジュール解決の仕組みがあるので通常のローカルファイルのインポートとは異なりパスや拡張子を省略することができます。
import の後の { } は機能の名前を指定してインポートする名前付きインポートです。例えば、1行目は registerBlockType を @wordpress/blocks パッケージからインポートしています。
フロント&エディター用スタイルの Sass ファイルもインポートで読み込まれています。
registerBlockType() の title や description などのプロパティは create-block コマンドのオプションで指定した値(指定していない場合はデフォルトの値)が設定されています。
//コメントは削除(実際のファイルのコメントには詳細な説明が英語で記述されています)
import { registerBlockType } from '@wordpress/blocks';
import { __ } from '@wordpress/i18n'; //翻訳に使用する関数 __() をインポート
import './style.scss'; //Sass をインポート
import Edit from './edit'; //edit 関数をインポート
import save from './save'; //save 関数をインポート

registerBlockType( 'wdl/my-sample', {
  title: __( 'My Sample', 'my-sample' ),
  description: __(
    'Example block written with ESNext standard and JSX support – build step required.',
    'my-sample'
  ),
  category: 'widgets',
  icon: 'smiley',
  supports: {
    html: false,
  },
  edit: Edit,
  save,  //save: save, と同じこと(プロパティの短縮構文)
  } );
デフォルトでは、edit 関数と save 関数は別のファイルに保存されていて import しています。
edit 関数(Edit コンポーネント)にはエディタ用のスタイル(editor.scss)がインポートされています。
仮引数には props.className を分割代入を使って className で受け取っています。
import { __ } from '@wordpress/i18n';
import './editor.scss';  //エディタ用のスタイルをインポート

// Edit をデフォルトエクスポート
export default function Edit( { className } ) {
  return (
    <p className={ className }>
      { __( 'My Sample – hello from the editor!', 'my-sample' ) }
    </p>
  );
}
import { __ } from '@wordpress/i18n';

// save() をデフォルトエクスポート
export default function save() {
  return (
    <p>
      { __( 'My Sample – hello from the saved content!', 'my-sample' ) }
    </p>
  );
}
基本的には src ディレクトリに生成されたこれらのファイルを使ってブロック開発を行っていくことになるかと思います。既存のファイルを部分的に書き換えても良いですし、全て削除して書き換えることもできます。必要に応じてファイルやディレクトリを追加することもできます(その場合はプラグインファイルのファイルの登録部分も更新する必要があります)。
デフォルトでは、上記以外に src フォルダには、エディター用の Sass フォイル(editor.scss)とエディター及びフロント用の Sass フォイル(style.scss)があります。
npm start(または npm run start)を実行すると、watch プロセスが始まり、いずれかのファイルを編集(変更して保存)すると自動リビルドが行われます。
配布用としてビルド(コンパイル)するには npm run build コマンドを実行します。配布に必要なファイルは以下のファイルになります。
my-sample //作成されたプラグインのディレクトリ
    ├── build //ビルドで出力されるファイルのディレクトリ
    │   ├── index.asset.php
    │   ├── index.css
    │   ├── index.js  //ブロック用のスクリプト
    │   └── style-index.css
    └── my-sample.php  //メインのプラグインファイル
block.json
create-block コマンドを実行すると、block.json という以下のようなプロパティが記述されたファイルも自動的に生成されます。
{
  "name": "wdl/my-sample",
  "title": "My Sample",
  "category": "widgets",
  "icon": "smiley",
  "description": "Example block written with ESNext standard and JSX support – build step required.",
  "textdomain": "my-sample",
  "supports": {
    "html": false
  },
  "editorScript": "file:./build/index.js",
  "editorStyle": "file:./build/index.css",
  "style": "file:./build/style-index.css"
}
以下は ブロックの詳細 からの抜粋です。
注意: プラグインと一緒に block.json ファイルも生成されます。このファイルはブロックディレクトリの登録で使用され、プロパティを変更する際は両方のファイルを更新する必要があります。1か所の変更で済むようこのプロセスを簡素化する開発が継続中です。
block.json に関する記述を検索すると、wp-includes/blocks.php と wp-includes/js/dist/block-directory.js に以下がありました。
wp-scripts を使って構築
以下は @wordpress/scripts パッケージ(wp-script)を使って、JavaScript ビルド環境をセットアップする方法です。@wordpress/create-block とは異なり、ビルド環境の構築のみを行います。
そのため、package.json の生成やコマンドの追加、各ファイルなどの作成は自分で行う必要がありますが、その分、create-block に比べてより柔軟な環境や構成の構築が可能だと思います。
以下の例ではプラグインとしてブロックを作成する環境を構築します(テーマで拡張する方法は後述)。
ターミナルで wp-content/plugins/ に移動して、任意の作業用のディレクトリを作成します。
//プラグインディレクトリへ移動(パスは環境に合わせます)
$ cd /Applications/MAMP/htdocs/blocks/wp-content/plugins  return

//ディレクトリを作成(この例では block-dev)
$ mkdir block-dev  return

//作成したディレクトリに移動
$ cd block-dev  return
npm init -y を実行して package.json というファイルを生成します。package.json は npm を使ってインストールするパッケージに関する設定情報が記述されるファイルで、npm init コマンドに -y オプションを指定するとデフォルトの設定値で package.json というファイルが生成されます。
$ npm init -y  return //package.json を生成

//生成される package.json の場所と内容が表示される
Wrote to /Applications/MAMP/htdocs/blocks/wp-content/plugins/block-dev/package.json:

{
  "name": "block-dev",
  "version": "1.0.0",
  "description": "",
  "main": "index.js",
  "scripts": {
    "test": "echo \"Error: no test specified\" && exit 1"
  },
  "keywords": [],
  "author": "",
  "license": "ISC"
}
@wordpress/scripts をインストール
npm install コマンドで @wordpress/scripts をインストールします。
--save-dev は開発環境で使う(開発時に依存する)パッケージに指定するオプションで、--save-exact は正確なバージョンのみを依存の対象とするオプションです(npm install)。
インストールが完了すると、node_modules ディレクトリが作成されその中に関連パッケージがコピーされ、作業用のディレクトリは以下のような構成になります。
block-dev
  ├── node_modules //関連パッケージ(モジュール)のディレクトリ
  ├── package-lock.json
  └── package.json //パッケージの設定ファイル
package.json
package.json を確認すると、devDependencies に @wordpress/scripts が追加されています。
{
  "name": "block-dev",
  "version": "1.0.0",
  "description": "",
  "main": "index.js",
  "scripts": {
    "test": "echo \"Error: no test specified\" && exit 1"
  },
  "keywords": [],
  "author": "",
  "license": "ISC",
  "devDependencies": {
    "@wordpress/scripts": "12.2.0"
  }
}
@wordpress/scripts の依存パッケージは node_modules/@wordpress/scripts/package.json の dependencies フィールドで確認できます(参考まで)。
※ 以下は上記の package.json とは別のファイルです。
ビルド用コマンドの追加
本番用のビルド(production ビルド)や開発モードをコマンドラインから実行できるように package.json の scripts フィールドにコマンド(npm script)を追加します。
以下のように scripts フィールド(6〜9行目)を書き換えます。
{
  "name": "block-dev",
  "version": "1.0.0",
  "description": "",
  "main": "index.js",
  "scripts": {
    "start": "wp-scripts start",
    "build": "wp-scripts build"
  },
  "keywords": [],
  "author": "",
  "license": "ISC",
  "devDependencies": {
    "@wordpress/scripts": "12.2.0"
  }
}
これでターミナルで npm run build で本番用のビルドを、npm start で開発モードを実行できるようになります。
npm run build は通常、本番用のビルドを行う際に使います。このコマンドはその都度、コンパイルを実行する必要があるので、開発時には npm start で開発モードを実行します。npm start を実行すると監視モードになりファイルに変更が発生すると検知して自動的にコンパイルを実行してくれます。
start や build 以外にもリント用やテスト用のコマンド(npm script)を scripts フィールドに追加することができます。それぞれのコマンドの詳細は Available Scripts を参照ください。
{
  "scripts": {
    "build": "wp-scripts build",
    "check-engines": "wp-scripts check-engines",
    "check-licenses": "wp-scripts check-licenses",
    "format:js": "wp-scripts format-js",
    "lint:css": "wp-scripts lint-style",
    "lint:js": "wp-scripts lint-js",
    "lint:md:docs": "wp-scripts lint-md-docs",
    "lint:md:js": "wp-scripts lint-md-js",
    "lint:pkg-json": "wp-scripts lint-pkg-json",
    "packages-update": "wp-scripts packages-update",
    "start": "wp-scripts start",
    "test:e2e": "wp-scripts test-e2e",
    "test:unit": "wp-scripts test-unit-js"
  }
}
webpack.config.js
wp-scripts で構築した環境では、デフォルトではコンパイル対象のファイルの場所は src/index.js で、コンパイルした結果は build/index.js に出力されます。
これは webpack.config.js で設定されています。必要に応じてこれらの設定は変更、追加することができます(webpack 設定の拡張)。
以下は対象のファイル(エントリーポイント)と出力ファイルの設定部分の抜粋です。
entry: { //エントリーポイント
  index: path.resolve( process.cwd(), 'src', 'index.js' ),
},
output: { //出力ファイル
  filename: '[name].js',
  path: path.resolve( process.cwd(), 'build' ),
},
/**
 * External dependencies
 */
const { BundleAnalyzerPlugin } = require( 'webpack-bundle-analyzer' );
const LiveReloadPlugin = require( 'webpack-livereload-plugin' );
const MiniCSSExtractPlugin = require( 'mini-css-extract-plugin' );
const TerserPlugin = require( 'terser-webpack-plugin' );
const { CleanWebpackPlugin } = require( 'clean-webpack-plugin' );
const path = require( 'path' );

/**
 * WordPress dependencies
 */
const DependencyExtractionWebpackPlugin = require( '@wordpress/dependency-extraction-webpack-plugin' );
const postcssPlugins = require( '@wordpress/postcss-plugins-preset' );

/**
 * Internal dependencies
 */
const { hasBabelConfig, hasPostCSSConfig } = require( '../utils' );
const FixStyleWebpackPlugin = require( './fix-style-webpack-plugin' );

const isProduction = process.env.NODE_ENV === 'production';
const mode = isProduction ? 'production' : 'development';

const cssLoaders = [
  {
    loader: MiniCSSExtractPlugin.loader,
  },
  {
    loader: require.resolve( 'css-loader' ),
    options: {
      sourceMap: ! isProduction,
    },
  },
  {
    loader: require.resolve( 'postcss-loader' ),
    options: {
      // Provide a fallback configuration if there's not
      // one explicitly available in the project.
      ...( ! hasPostCSSConfig() && {
        ident: 'postcss',
        plugins: postcssPlugins,
      } ),
    },
  },
];

const config = {
  mode,
  entry: {
    index: path.resolve( process.cwd(), 'src', 'index.js' ),
  },
  output: {
    filename: '[name].js',
    path: path.resolve( process.cwd(), 'build' ),
  },
  resolve: {
    alias: {
      'lodash-es': 'lodash',
    },
  },
  optimization: {
    // Only concatenate modules in production, when not analyzing bundles.
    concatenateModules:
      mode === 'production' && ! process.env.WP_BUNDLE_ANALYZER,
    splitChunks: {
      cacheGroups: {
        style: {
          test: /[\\/]style\.(sc|sa|c)ss$/,
          chunks: 'all',
          enforce: true,
          automaticNameDelimiter: '-',
        },
        default: false,
      },
    },
    minimizer: [
      new TerserPlugin( {
        cache: true,
        parallel: true,
        sourceMap: ! isProduction,
        terserOptions: {
          output: {
            comments: /translators:/i,
          },
        },
        extractComments: false,
      } ),
    ],
  },
  module: {
    rules: [
      {
        test: /\.js$/,
        exclude: /node_modules/,
        use: [
          require.resolve( 'thread-loader' ),
          {
            loader: require.resolve( 'babel-loader' ),
            options: {
              // Babel uses a directory within local node_modules
              // by default. Use the environment variable option
              // to enable more persistent caching.
              cacheDirectory:
                process.env.BABEL_CACHE_DIRECTORY || true,

              // Provide a fallback configuration if there's not
              // one explicitly available in the project.
              ...( ! hasBabelConfig() && {
                babelrc: false,
                configFile: false,
                presets: [
                  require.resolve(
                    '@wordpress/babel-preset-default'
                  ),
                ],
              } ),
            },
          },
        ],
      },
      {
        test: /\.svg$/,
        use: [ '@svgr/webpack', 'url-loader' ],
      },
      {
        test: /\.css$/,
        use: cssLoaders,
      },
      {
        test: /\.(sc|sa)ss$/,
        use: [
          ...cssLoaders,
          {
            loader: require.resolve( 'sass-loader' ),
            options: {
              sourceMap: ! isProduction,
            },
          },
        ],
      },
    ],
  },
  plugins: [
    // During rebuilds, all webpack assets that are not used anymore
    // will be removed automatically.
    new CleanWebpackPlugin(),
    // The WP_BUNDLE_ANALYZER global variable enables a utility that represents
    // bundle content as a convenient interactive zoomable treemap.
    process.env.WP_BUNDLE_ANALYZER && new BundleAnalyzerPlugin(),
    // MiniCSSExtractPlugin to extract the CSS thats gets imported into JavaScript.
    new MiniCSSExtractPlugin( { esModule: false, filename: '[name].css' } ),
    // MiniCSSExtractPlugin creates JavaScript assets for CSS that are
    // obsolete and should be removed. Related webpack issue:
    // https://github.com/webpack-contrib/mini-css-extract-plugin/issues/85
    new FixStyleWebpackPlugin(),
    // WP_LIVE_RELOAD_PORT global variable changes port on which live reload
    // works when running watch mode.
    ! isProduction &&
      new LiveReloadPlugin( {
        port: process.env.WP_LIVE_RELOAD_PORT || 35729,
      } ),
    // WP_NO_EXTERNALS global variable controls whether scripts' assets get
    // generated, and the default externals set.
    ! process.env.WP_NO_EXTERNALS &&
      new DependencyExtractionWebpackPlugin( { injectPolyfill: true } ),
  ].filter( Boolean ),
  stats: {
    children: false,
  },
};

if ( ! isProduction ) {
  // WP_DEVTOOL global variable controls how source maps are generated.
  // See: https://webpack.js.org/configuration/devtool/#devtool.
  config.devtool = process.env.WP_DEVTOOL || 'source-map';
  config.module.rules.unshift( {
    test: /\.js$/,
    exclude: [ /node_modules/ ],
    use: require.resolve( 'source-map-loader' ),
    enforce: 'pre',
  } );
}

module.exports = config;
CSS の出力設定
wp-script のデフォルトの webpack の設定では、エディター用スタイルは以下のような MiniCSSExtractPlugin の設定により entry プロパティで指定したキーの名前 [name] の CSS ファイル [name].css が出力されるようになっています。デフォルトの entry プロパティで指定したキーの名前は index なので、デフォルトでは index.css が出力されます。
new MiniCSSExtractPlugin( { esModule: false, filename: '[name].css' } )
フロントエンド用スタイルは、デフォルトでは以下のように splitChunks を使ってエントリポイントで共通のモジュール(ファイル)を別のファイルとして出力する設定になっています。
内容としては、style という cacheGroups が設定されて、test で指定された style.scss や style.css などが対象のファイルとなっています。
そのため、style.scss や style.css を src フォルダに作成してエントリーポイントで読み込めば、ビルドの際に style-index.css という名前の CSS ファイルが出力されます(style とエントリーポイントのキー index がハイフンで連結されたファイル名になります)。
optimization: {
  ・・・
  splitChunks: { //(複数の)エントリポイントで共通のモジュールを別のファイルとして分離
    cacheGroups: {
      style: {
        test: /[\\/]style\.(sc|sa|c)ss$/, //対象のファイル(style.scss)
        chunks: 'all',
        enforce: true,
        automaticNameDelimiter: '-', //名前を連結する文字
      },
      default: false, //デフォルトの cacheGroups を無効に
    },
  },
  ・・・
},
サンプルの作成
必要なファイルやディレクトリを作成してサンプルのブロックを作成することで、セットアップした JavaScript ビルド環境を確認します。以下がおおまかな手順です。
- src フォルダを作成し、その中にブロック用スクリプトを作成します。
- ビルドを実行します。ビルドを行うと出力先の build フォルダが作成され、その中にコンパイルされたブロック用スクリプトが出力されます。
- コンパイルされたブロック用スクリプトを読み込むためのプラグインファイルを作成します。
- プラグインを有効化して作成したブロックを確認します。
src フォルダを作成
webpack の設定によりデフォルトでは src ディレクトリの index.js をコンパイルするようになっているので、src フォルダを作成してその中に index.js というブロック用スクリプトを作成します。
block-dev
  ├── node_modules
  ├── package-lock.json
  ├── package.json
  └── src  //追加
      └── index.js  //ブロック用のスクリプト
この例では、以下のような JSX を使った単純なブロックのスクリプトを作成します。
先頭で、registerBlockType を @wordpress/blocks(パッケージ)からインポートしています。
registerBlockType() の第1パラメータは namespace/bloc-kname の形式で記述します。
import { registerBlockType } from '@wordpress/blocks';

registerBlockType( 'wdl/test-block', {
  title: 'Test Sample Block',
  icon: 'smiley',
  category: 'layout',
  edit: () => <div>Hello Wordl! (Edit)</div>,
  save: () => <div>Hello Wordl! (Save)</div>,
} );
ビルドコマンドを実行
作業ディレクトリで npm run build を実行してブロック用のスクリプトをコンパイル(ビルド)します。
$ npm run build  return //ビルドコマンドを実行

> block-dev@1.0.0 build /Applications/MAMP/htdocs/blocks/wp-content/plugins/block-dev
> wp-scripts build

Hash: 445bbb824aae288c5dd7
Version: webpack 4.44.1
Time: 1009ms
Built at: 2020/09/07 15:05:53
          Asset       Size  Chunks             Chunk Names
index.asset.php  135 bytes       0  [emitted]  index
       index.js   1.32 KiB       0  [emitted]  index
Entrypoint index = index.js index.asset.php
[0] external {"this":["wp","element"]} 42 bytes {0} [built]
[1] external {"this":["wp","blocks"]} 42 bytes {0} [built]
[2] ./src/index.js 403 bytes {0} [built]
ビルドを実行すると、src/index.js がコンパイルされ、build ディレクトリが作成されてその中に出力されます。また、同時に index.asset.php という依存ファイルとバージョンの情報が記述されたアセットファイルも自動的に生成されます。
block-dev
  ├── build // 初回のビルドコマンドで作成されるディレクトリ
  │   ├── index.asset.php //自動生成されるアセットファイル
  │   └── index.js  //コンパイルされたブロック用のスクリプト
  ├── node_modules
  ├── package-lock.json
  ├── package.json
  └── src
      └── index.js
build/index.js を確認すると、以下のようにコンパイルされて圧縮されています。
index.asset.php(アセットファイル)
ビルドのプロセスで同時に生成された index.asset.php には依存スクリプトの配列とバージョンに使用するためのタイムスタンプが記述されています。このアセットファイルを使用すると、エンキューするスクリプトの依存リストとバージョンを自動的に設定できます。
この例で生成された index.asset.php は以下のような内容です。ビルドする度に自動的に生成され、内容が更新されます。
<?php return array('dependencies' => array('wp-blocks', 'wp-element', 'wp-polyfill'), 'version' => '653cf472e78f37c65b7daa3b54008aba');
アセットファイルのファイル名
※ この例ではデフォルトの設定で、src/index.js をビルドしているので、index.asset.php というファイル名になりますが、設定を変更して src/foo.js をエントリポイントとすると、foo.asset.php という名前のアセットファイルが生成されます。
プラグインファイルの作成
プラグインファイルを作成して、ブロックをプラグインとして登録できるようにします。
block-dev
  ├── block-dev.php // プラグインファイル
  ├── build
  │   ├── index.asset.php
  │   └── index.js
  ├── node_modules
  ├── package-lock.json
  ├── package.json
  └── src
      └── index.js
以下のようなプラグインヘッダとブロック用のスクリプトの読み込みを記述したファイルを作成します。
ブロック用のスクリプトの URL は plugins_url() を使って build/index.js を指定します。
wp_register_script() を使ったブロック用スクリプトの登録では、依存スクリプトとバージョンには index.asset.php を利用します。
register_block_type() の第1パラメータは、ブロック用スクリプトの registerBlockType() の第1パラメータと合わせています。
<?php
/*
Plugin Name: Test Block
*/

//直接このファイルにアクセスされた場合は exit(セキュリティ対策)
defined( 'ABSPATH' ) || exit;

function test_block_enqueue() {
  //依存スクリプトの配列とバージョンが記述された index.asset.php をインクルード
  $asset_file = include( plugin_dir_path( __FILE__ ) . 'build/index.asset.php');

  //ブロック用のスクリプト build/index.js を登録
  wp_register_script(
    'test-block-script',
    plugins_url( 'build/index.js', __FILE__ ),
    $asset_file['dependencies'], //依存スクリプトの配列
    $asset_file['version'] //バージョン
  );

  //ブロックタイプの登録
  register_block_type(
    'wdl/test-block',
    array(
      //エディター用スクリプトにブロック用スクリプトのハンドル名を指定して関連付け
      'editor_script' => 'test-block-script',
    )
  );
}
add_action( 'init', 'test_block_enqueue' );
プラグインの有効化
プラグインの管理ページを開くと、プラグインが登録されているので有効化します。
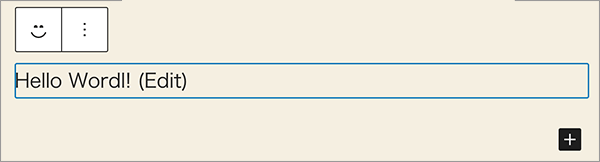
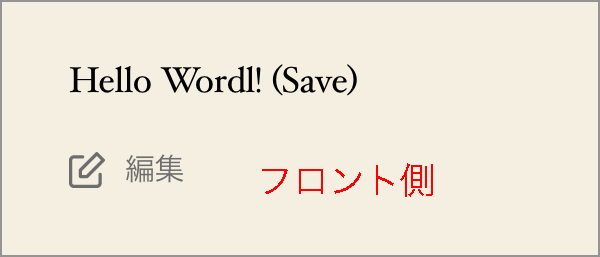
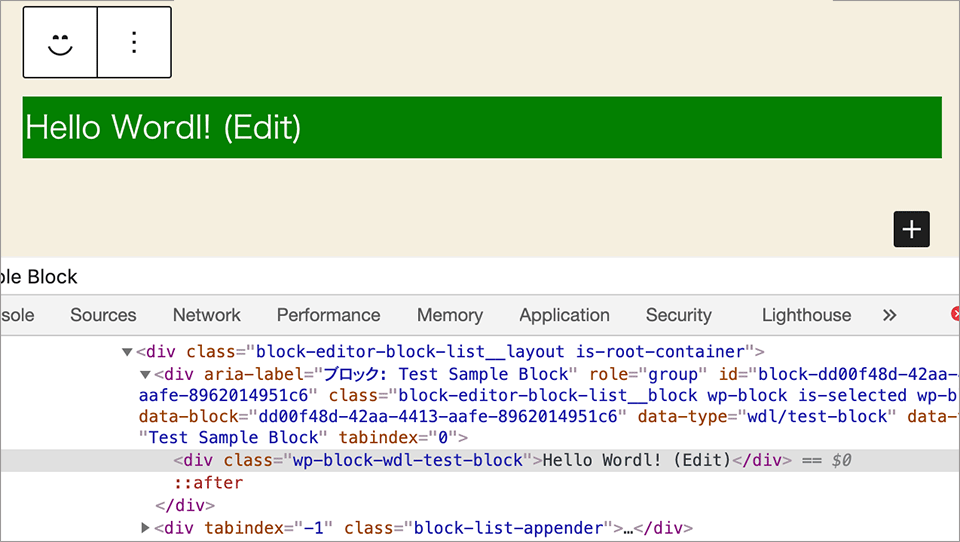
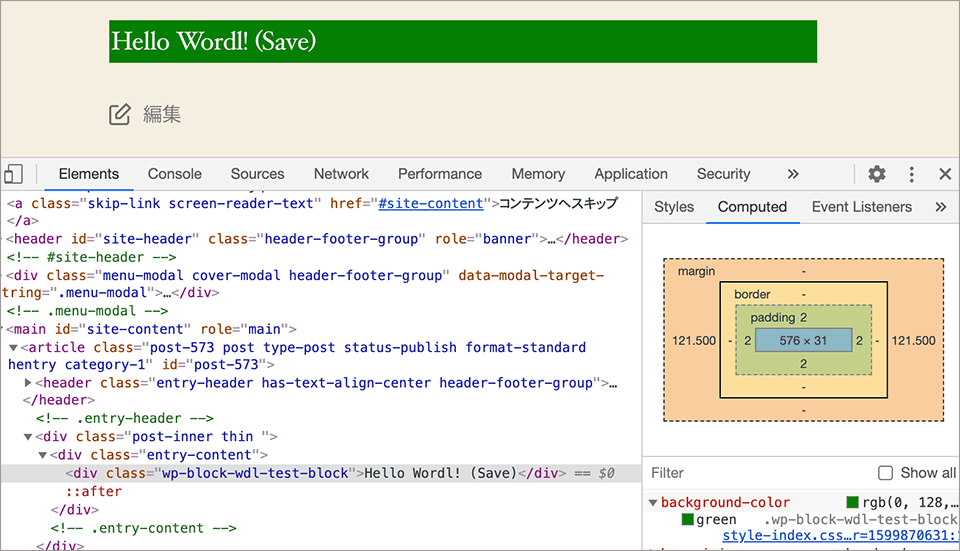
投稿にブロックを挿入して確認します。この例の場合、src/index.js でブロックのカテゴリーは layout、タイトルは「Test Sample Block」、アイコンは smiley を指定しています。
この例の場合、エディター側では edit 関数で指定した「Hello Wordl! (Edit)」が表示され、フロント側では save 関数で指定した「Hello Wordl! (Save)」という文字が div 要素として表示されます。
問題なくブロックが表示されれば、基本的なセットアップは完了です。
スタイル(Sass)の追加
ブロックにスタイルを適用できるように Sass のスタイルシートを追加してみます。Sass はビルドの際に wp-scripts の webpack の設定(webpack.config.js の sass-loader)で CSS に変換されるようになっています。
デフォルトでは(エントリポイントが index.js の場合)、フロントエンド及びエディター用スタイルは style.scss という名前で src フォルダに作成すると、ビルドの際に build フォルダに style-index.css として出力され、エディター用スタイルは editor.scss という名前で src フォルダに作成すると、ビルドの際に build フォルダに index.css として出力されます。
スタイルシートの読み込みはブロックのスクリプト(src/index.js)で import を使って読み込みます。
また、エディタ画面にも自動的に生成されるクラス名を使ってスタイルを指定するので、ブロックのスクリプト(src/index.js)の edit 関数に props を使って className 属性を追加します。
import { registerBlockType } from '@wordpress/blocks';
//フロントエンド及びエディター用スタイルをインポート
import './style.scss';

registerBlockType( 'wdl/test-block', {
  title: 'Test Sample Block',
  icon: 'smiley',
  category: 'layout',
  // className を追加
  edit: ({className}) => <div className={className}>Hello Wordl! (Edit)</div>,
  save: () => <div>Hello Wordl! (Save)</div>,
} );
フロントエンド及びエディター用スタイルの Sass ファイル(style.scss)を作成して src フォルダに配置します。セレクタは自動的に生成されるクラス名を使っています。
.wp-block-wdl-test-block {
  background-color: green;
  color: #fff;
  padding: 2px;
}
プラグインファイルで wp_register_style を使ってスタイルシートを登録し、register_block_type の style にスタイルシートを指定します。
<?php
/*
Plugin Name: Test Block
*/

defined( 'ABSPATH' ) || exit;

function test_block_enqueue() {
  $asset_file = include( plugin_dir_path( __FILE__ ) . 'build/index.asset.php');

  wp_register_script(
    'test-block-script',
    plugins_url( 'build/index.js', __FILE__ ),
    $asset_file['dependencies'],
    $asset_file['version']
  );

  //フロント&エディター用スタイル(追加)
  wp_register_style(
    'test-block-style',
    //style.scss は build ディレクトリに style-index.css として出力される
    plugins_url( 'build/style-index.css', __FILE__ ),
    array(),
    filemtime( plugin_dir_path( __FILE__ ) . 'build/style-index.css' )
  );

  register_block_type(
    'wdl/test-block',
    array(
      'editor_script' => 'test-block-script',
      //フロントとエディター用スタイルのハンドル名を style に指定(追加)
     'style' => 'test-block-style',
    )
  );
}
add_action( 'init', 'test_block_enqueue' );
ターミナルで npm run build を実行します。
$ npm run build return //ビルドを実行
npm run build でビルドを実行すると、style.scss は style-index.css に変換されて build ディレクトリに出力されます。
block-dev
  ├── block-dev.php
  ├── build
  │   ├── index.asset.php
  │   ├── index.js
  │   └── style-index.css //ビルドで CSS に変換される
  ├── node_modules
  ├── package-lock.json
  ├── package.json
  └── src
      ├── index.js
      └── style.scss  //追加した Sass
ブラウザを再読込するとスタイルが適用されているのが確認できます。以下はエディター画面です。
以下はフロントエンド側です。
エディター用スタイルの追加
毎回変更後に npm run build でビルドするのは、面倒なので、npm start を実行して開発モードにして変更があれば自動的に修正されるようにしておきます。開発モードを終了するには control + c を押します。
$ npm start return //開発モードを実行
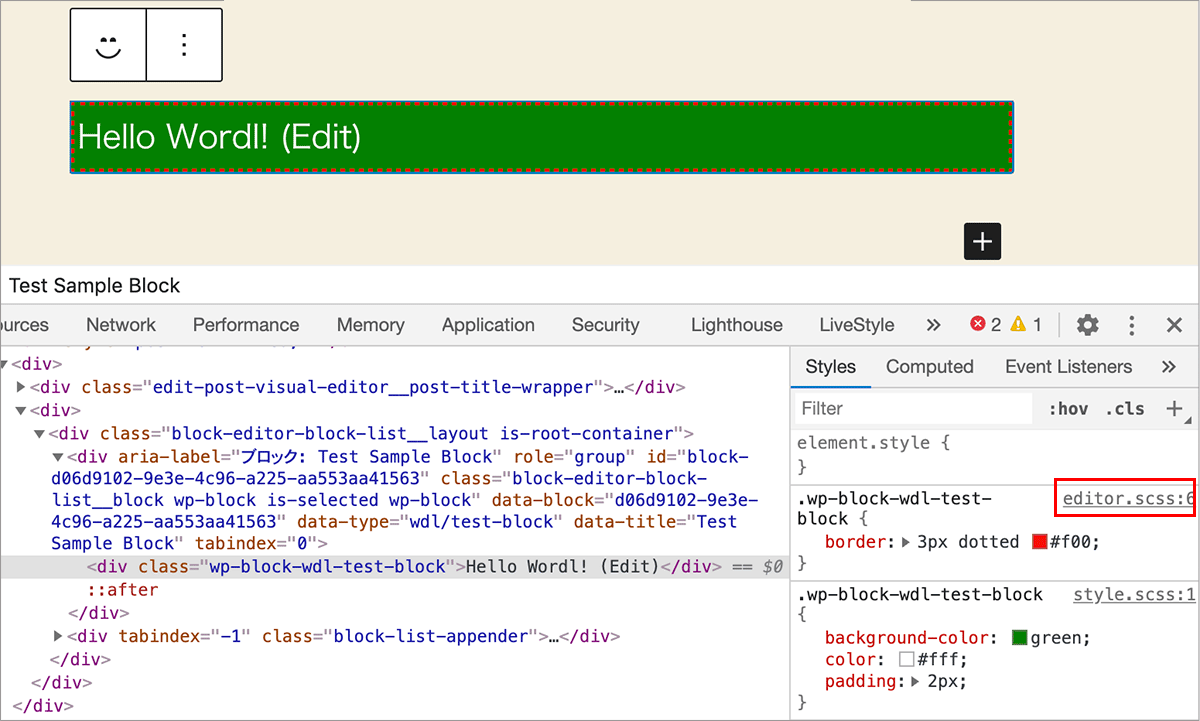
src フォルダにエディター画面用のスタイルシート editor.scss を作成します。
.wp-block-wdl-test-block {
  border: 3px dotted #f00;
}
ブロックのスクリプト(src/index.js)で import を使って editor.scss を読み込みます。
import { registerBlockType } from '@wordpress/blocks';
import './style.scss';
//エディター画面用のスタイルシートを読み込む
import './editor.scss';

registerBlockType( 'wdl/test-block', {
  title: 'Test Sample Block',
  icon: 'smiley',
  category: 'layout',
  // className を追加
  edit: ({className}) => <div className={className}>Hello Wordl! (Edit)</div>,
  save: () => <div>Hello Wordl! (Save)</div>,
} );
開発モードになっているので、変更が検知されて自動的に、build フォルダに index.css が出力されますが、この時点ではまだスタイルは適用されません。
プラグインファイルにエディター画面用のスタイルシートの登録を追加します。
<?php
/*
Plugin Name: Test Block
*/

defined( 'ABSPATH' ) || exit;

function test_block_enqueue() {
  $asset_file = include( plugin_dir_path( __FILE__ ) . 'build/index.asset.php');

  wp_register_script(
    'test-block-script',
    plugins_url( 'build/index.js', __FILE__ ),
    $asset_file['dependencies'],
    $asset_file['version']
  );

  wp_register_style(
    'test-block-style',
    plugins_url( 'build/style-index.css', __FILE__ ),
    array(),
    filemtime( plugin_dir_path( __FILE__ ) . 'build/style-index.css' )
  );

  //エディター用スタイル(追加)
  wp_register_style(
    'test-block-editor-style',
    //editor.scss は build ディレクトリに index.css として出力される
    plugins_url( 'build/index.css', __FILE__ ),
    array(),
    filemtime( plugin_dir_path( __FILE__ ) . 'build/index.css' )
  );

  register_block_type(
    'wdl/test-block',
    array(
      'editor_script' => 'test-block-script',
      'style' => 'test-block-style',
      //エディター用スタイルのハンドル名を editor_style に指定(追加)
      'editor_style' => 'test-block-editor-style',
    )
  );
}
add_action( 'init', 'test_block_enqueue' );
編集画面を確認すると、スタイルが適用されているのが確認できます。
開発モード
npm start を実行委すると開発モードになり、ファイルの変更が検知されて自動的にビルドされます。その際にファイルはミニファイ(圧縮)されません。
また、開発モードではソースマップファイルが生成されるので、ブラウザの開発ツールでの確認が簡単になります。
前述の例の場合、npm run build でビルドを実行すると以下のようなファイルが build ディレクトリに出力されます。
block-dev
  ├── block-dev.php
  ├── build
  │   ├── index.asset.php
  │   ├── index.js
  │   ├── index.css
  │   └── style-index.css
  ├── node_modules
  ├── package-lock.json
  ├── package.json
  └── src
      ├── editor.scss
      ├── index.js
      └── style.scss
npm start を実行して開発モードにすると、build ディレクトリにはソースマップファイルが生成されます。
block-dev
  ├── block-dev.php
  ├── build
  │   ├── index.asset.php
  │   ├── index.js
  │   ├── index.js.map  //追加されるソースマップファイル
  │   ├── index.css
  │   ├── index.css.map  //追加されるソースマップファイル
  │   ├── style-index.css
  │   └── style-index.css.map  //追加されるソースマップファイル
  ├── node_modules
  ├── package-lock.json
  ├── package.json
  └── src
      ├── editor.scss
      ├── index.js
      └── style.scss
ソースマップファイルの生成は webpack の機能で webpack.config.js に設定されています(CSS ローダーの sourceMap や最後の方に記述されている開発モード時の devtool で設定)。
開発モードを終了するには control + c を押します。
テーマに構築
テーマで拡張してブロックを作成する場合も、ほぼ同じ手順で環境を構築できます。
テーマ開発で拡張する場合は、使用するテーマのディレクトリ wp-content/themes/テーマ名/ にブロック用のディレクトリを作成します。
この例では my-block と言う名前のディレクトリをテーマのディレクトリの中に作成し、その中にブロック用のファイルなどを配置します。
└── wp-content
    └── themes
        └── sample01 //使用するテーマのディレクトリ
            ├── category.php
            ├── front-page.php
            ├── functions.php
            ├── index.php
            │    ...
            └── my-block //ブロック用のディレクトリ(空)
ターミナルでテーマのディレクトリに移動してブロック用のディレクトリを作成し、そのディレクトリに移動します。
//テーマのディレクトリに移動(パスは環境に合わせます)
$ cd /Applications/MAMP/htdocs/blocks/wp-content/themes/sample01  return

//ブロック用のディレクトリを作成
$ mkdir my-block  return

//ブロック用のディレクトリへ移動
$ cd my-block  return
package.json を生成
以下のコマンド(npm init -y)を実行して package.json を生成します。
$ npm init -y  return
Wrote to /Applications/MAMP/htdocs/blocks/wp-content/themes/sample01/my-block/package.json:

{
  "name": "my-block",
  "version": "1.0.0",
  "description": "",
  "main": "index.js",
  "scripts": {
    "test": "echo \"Error: no test specified\" && exit 1"
  },
  "keywords": [],
  "author": "",
  "license": "ISC"
}
@wordpress/scripts をインストール
以下のように npm install にオプションを指定して実行し、wp-script をインストールします。
インストールが完了すると関連(依存)するパッケージが node_modules 配下にインストールされ、package.json が更新されます。
└── wp-content
    └── themes
        └── sample01 //テーマのディレクトリ
            ├── category.php
            ├── front-page.php
            ├── functions.php
            ├── index.php
            │    ...
            └── my-block //ブロック用のディレクトリ
                ├── node_modules  //関連パッケージ
                ├── package-lock.json
                └── package.json  //パッケージの設定ファイル
ビルド用コマンドの追加
package.json にビルド用コマンドを追加します(7〜8行目)。これによりターミナルで npm run build で本番用のビルドを、npm start で開発モードを実行できるようになります。
{
  "name": "my-block",
  "version": "1.0.0",
  "description": "",
  "main": "index.js",
  "scripts": {
    "start": "wp-scripts start",
    "build": "wp-scripts build"
  },
  "keywords": [],
  "author": "",
  "license": "ISC",
  "devDependencies": {
    "@wordpress/scripts": "12.2.0"
  }
}
src フォルダとブロック用スクリプトの作成
デフォルトでは src ディレクトリの index.js をコンパイルするようになっているので、src フォルダを作成してその中に index.js というブロック用スクリプトを作成します。
└── wp-content
    └── themes
        └── sample01 //テーマのディレクトリ
            ├── category.php
            ├── front-page.php
            ├── functions.php
            ├── index.php
            │    ...
            └── my-block //ブロック用のディレクトリ
                ├── node_modules
                ├── package-lock.json
                ├── package.json
                └── src  //追加
                    └── index.js  //ブロック用のスクリプト
この例では、以下のような JSX を使った単純なブロックのスクリプトを作成します。
import { registerBlockType } from '@wordpress/blocks';

registerBlockType( 'wdl/test-theme-block', {
  title: 'Test Theme Sample Block',
  icon: 'smiley',
  category: 'layout',
  edit: () => <div>Hello Theme! (Edit)</div>,
  save: () => <div>Hello Theme! (Save)</div>,
} );
ビルドコマンドを実行
ブロックのディレクトリ(my-block)で npm run build を実行してブロック用のスクリプトをコンパイル(ビルド)します。
build ディレクトリが作成され、その中にコンパイルされたブロック用のスクリプト(ndex.js)とアセット用のファイル(index.asset.php)が出力されます。
└── wp-content
    └── themes
        └── sample01 //テーマのディレクトリ
            ├── category.php
            ├── front-page.php
            ├── functions.php
            ├── index.php
            │    ...
            └── my-block
                ├── build //追加されたビルドディレクトリ
                │   ├── index.asset.php
                │   └── index.js  //コンパイルされたブロック用のスクリプト
                ├── node_modules
                ├── package-lock.json
                ├── package.json
                └── src
                    └── index.js  //ブロック用のスクリプト
ブロック用のスクリプトの読み込み
ブロック用のスクリプトの読み込みは functions.php に記述しますが、functions.php に記述するとごちゃごちゃしてしまうので、別ファイルに記述して functions.php で読み込むようにします。
この例では、ブロック用スクリプトを読み込むファイル(プラグインの場合はプラグインファイルに該当)を my-block.php という名前にして以下を記述します。
index.asset.php のインクルードのパスは get_theme_file_path() を使い、wp_register_script() の URL の指定では get_theme_file_uri() を使っています。
<?php
function test_theme_block_enqueue() {
  //依存スクリプトの配列とバージョンが記述された index.asset.php をインクルード
  $asset_file = include( get_theme_file_path('/my-block/build/index.asset.php'));

  //ブロック用のスクリプト build/index.js を登録
  wp_register_script(
    'test-theme-block-script',
    get_theme_file_uri('/my-block/build/index.js'),
    $asset_file['dependencies'], //依存スクリプトの配列
    $asset_file['version'] //バージョン
  );

  //ブロックタイプの登録
  register_block_type(
    'wdl/test-theme-block',
    array(
      //エディター用スクリプトにブロック用スクリプトのハンドル名を指定して関連付け
      'editor_script' => 'test-theme-block-script',
    )
  );
}
add_action( 'init', 'test_theme_block_enqueue' );
そして functions.php で上記ファイルを require や include を使って読み込みます。
include( get_theme_file_path('/my-block/my-block.php'));
以下のような構成になります。
└── wp-content
    └── themes
        └── sample01 //テーマのディレクトリ
            ├── category.php
            ├── front-page.php
            ├── functions.php  //my-block.php の読み込みを記述
            ├── index.php
            │    ...
            └── my-block  //ブロックのディレクトリ
                ├── build
                │   ├── index.asset.php
                │   └── index.js
                ├── my-block.php //ブロック用スクリプトを読み込むファイル(追加)
                ├── node_modules
                ├── package-lock.json
                ├── package.json
                └── src
                    └── index.js
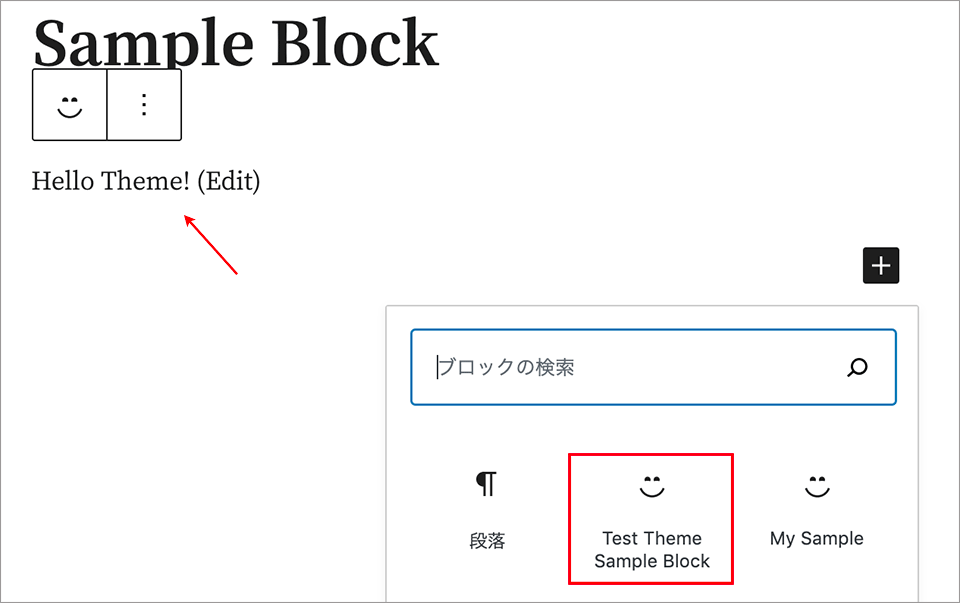
ブロックを表示
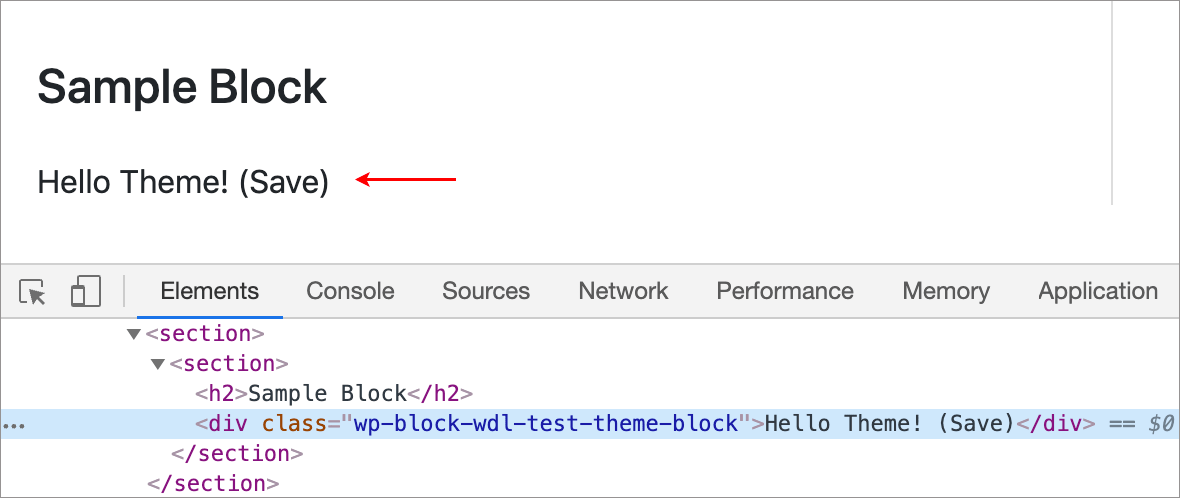
問題がなければ、投稿の新規作成や編集画面でブロックを挿入することができます(プラグインではないので、有効化は不要)。
以下はブロックを挿入した編集画面側です。
以下はフロントエンド側です。
デフォルトの構成を変更
デフォルトではブロック用スクリプトは src ディレクトリの index.js をコンパイルして、build ディレクトリに出力するようになっています。
この設定は、webpack.config.js の entry と output に設定されています。
但し、WordPress(wp-script)の webpack.config.js を直接変更することはせず、独自の webpack.config.js を作成して拡張します。
webpack 設定の拡張
wp-script の webpack の設定(webpack.config.js)を拡張するには、独自の webpack.config.js ファイルを作成し、Node.js の require() を使って全ての設定を読み込みスプレッド構文(...)で展開します。
そして設定を追加することで、既存の値を上書きしたりローダーや webpack のプラグインなどを追加することができます。
参考サイト:
- @wordpress/scripts(Provide your own webpack config)
- Complete Guide in Setting up a Development Environment for Gutenberg
関連ページ:
この例ではエントリーポイントを src/index.js から src/wdl-my-test-block.js に変更し、出力先を build ディレクトリからテーマディレクトリ直下の assets ディレクトリ内の blocks に変更します。
最終的には以下のような構成になります。
wp-content
└─ themes
    └─ sample01 //テーマのディレクトリ
        ├── category.php
        ├── front-page.php
        ├── functions.php
        ├── index.php
        │    ...
        ├── assets //任意のディレクトリ
        │   └── blocks  //ビルドされたファイルの出力先(ビルドで生成される)
        │        ├── wdl-my-test-block.asset.php //自動生成されるアセットファイル
        │        └── wdl-my-test-block.js   //コンパイルされたブロック用スクリプト
        └── my-block
            ├── my-theme-block.php //ブロック用スクリプトを読み込むファイル(後で追加)
            ├── node_modules
            ├── package-lock.json
            ├── package.json
            ├── webpack.config.js //独自の webpack.config.js
            └── src
                └── wdl-my-test-block.js  //ブロック用スクリプト
独自の webpack.config.js ファイルを作成
webpack.config.js という JavaScript のファイルを作成し、ブロックのディレクトリの package.json と同じ階層に配置します。
この例ではエントリーポイントと出力先を変更ように以下を記述します。
まず最初に Node.js の require() を使って既存の設定を変数 defaultConfig に取得して、module.exports 内の先頭で取得した設定をスプレッド構文で展開します(5行目)。
これにより既存の設定を全て取り込んで設定を拡張することができます。2行目は path.join() を利用するので Node.js の path モジュールを、require() を使って読み込んでいます。
スプレッド構文で既存の設定を展開した後には、独自の設定を追加することができます。
const defaultConfig = require( '@wordpress/scripts/config/webpack.config' );
const path = require('path');

module.exports = {
  ...defaultConfig,  //既存の設定をここに展開
  entry: {
    'wdl-my-test-block': './src/wdl-my-test-block.js'
  },
  output: {
    path: path.join(__dirname, '../assets/blocks'),
    filename: '[name].js'
  }
}
entry
entry プロパティはソースファイル(エントリポイント)を定義します。
各 entry プロパティは「キー:値」のペアで記述します。この例では wdl-my-test-block というキーで ./src/wdl-my-test-block.js というファイルを1つのエントリポイントとして定義しています。
コンパイルが必要なファイルをエントリポイントとして複数追加することができます。
output
output プロパティはコンパイルしたファイルの出力先の設定です。
output.path プロパティと output.filename プロパティを使用して、コンパイルしたファイルの出力先のパスと名前を指定します。
この例では出力先のパスに ../assets/blocks を指定して、1つ上の階層の assets ディレクトリの下の blocks ディレクトリを指定しています。
ファイル名は [name] を使って、entry プロパティで指定したキーが [name] に入ったファイル名のファイルが出力されるようにしています。
上記の設定により themes/sample01/my-block/src/wdl-my-test-block.js はコンパイルされて themes/sample01/assets/blocks/wdl-my-test-block.js に出力されます。
entry プロパティに別のエントリポイントを「キー:値」のペアで記述して追加すれば、同じ assets/blocks にキーで指定したファイル名で出力されます。
確認
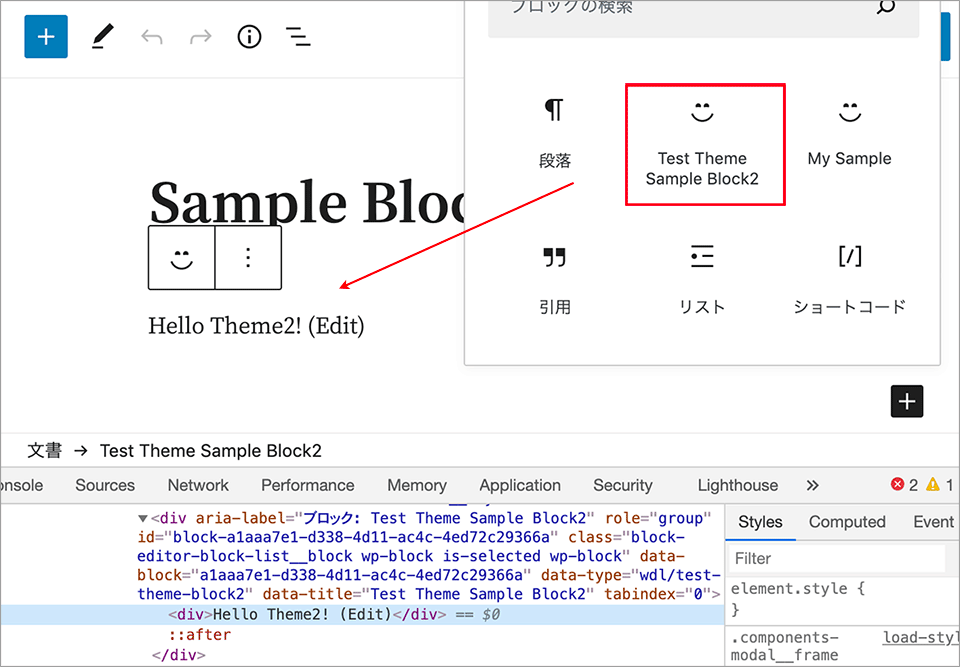
以下のブロック用スクリプトを作成して src ディレクトリに保存します。
import { registerBlockType } from '@wordpress/blocks';

registerBlockType( 'wdl/test-theme-block2', {
  title: 'Test Theme Sample Block2',
  icon: 'smiley',
  category: 'layout',
  edit: () => <div>Hello Theme2! (Edit)</div>,
  save: () => <div>Hello Theme2! (Save)</div>,
} );
npm run build でビルドを実行すると、src/wdl-my-test-block.js はコンパイルされて asseets/blocks/wdl-my-test-block.js に出力されます。
また、同時に wdl-my-test-block.asset.php という名前の依存ファイルとバージョンの情報が記述されたアセットファイルが出力先の asseets/blocks/ に生成されます。
$ npm run build  return

> my-block@1.0.0 build /Applications/MAMP/htdocs/blocks/wp-content/themes/sample01/my-block
> wp-scripts build

Hash: adbd54a6c06774572b06
Version: webpack 4.44.1
Time: 859ms
Built at: 2020/09/08 15:20:01
                      Asset       Size  Chunks             Chunk Names
wdl-my-test-block.asset.php  135 bytes       0  [emitted]  wdl-my-test-block
       wdl-my-test-block.js   1.33 KiB       0  [emitted]  wdl-my-test-block
Entrypoint wdl-my-test-block = wdl-my-test-block.js wdl-my-test-block.asset.php
[0] external {"this":["wp","element"]} 42 bytes {0} [built]
[1] external {"this":["wp","blocks"]} 42 bytes {0} [built]
[2] ./src/wdl-my-test-block.js 419 bytes {0} [built]
以下のブロック用スクリプトを読み込むファイルをブロックのディレクトリに作成します(※)。
<?php
function test_theme_block_enqueue2() {
  //依存スクリプトの配列とバージョンが記述されたアセットファイルをインクルード
  $asset_file = include( get_theme_file_path('/assets/blocks/wdl-my-test-block.asset.php'));

  //ブロック用のスクリプト assets/blocks/wdl-my-test-block.js' を登録
  wp_register_script(
    'test-theme-block-script2',
    get_theme_file_uri('/assets/blocks/wdl-my-test-block.js'),
    $asset_file['dependencies'], //依存スクリプトの配列
    $asset_file['version'] //バージョン
  );

  //ブロックタイプの登録
  register_block_type(
    'wdl/test-theme-block2',
    array(
      //エディター用スクリプトにブロック用スクリプトのハンドル名を指定して関連付け
      'editor_script' => 'test-theme-block-script2',
    )
  );
}
add_action( 'init', 'test_theme_block_enqueue2' );
functions.php で上記のブロック用スクリプトを読み込むファイルをインクルードします。
include( get_theme_file_path('/my-block/my-theme-block.php'));
投稿の編集で作成したブロックを挿入できれば、問題ありません。
[訂正] 2020年9月10日
以下は誤りです。ビルド先のディレクトリにブロック用スクリプトを読み込むファイルを配置すると、ビルドする度にそのファイルは削除されてしまいます。
もし、同様のことをする場合は、例えば assets ディレクトリの下に別のディレクトリを作成して配置するなどが考えられます。
※ 上記では、ブロック用スクリプトを読み込むファイル(my-theme-block.php)をブロックのディレクトリの直下に配置しましたが、以下のようにビルド先のディレクトリに配置すればテーマで使用する(サーバーにアップする)ファイルをまとめることができます。
sample01 //テーマのディレクトリ
    ├── category.php
    ├── front-page.php
    ├── functions.php
    ├── index.php
    │    ...
    ├── assets //任意のディレクトリ(サーバーにアップするファイル)
    │   └── blocks  //ビルドされたファイルの出力先
    │        ├── my-theme-block.php  //ビルドする度に削除される(★★★ NG ★★★)
    │        ├── wdl-my-test-block.asset.php
    │        └── wdl-my-test-block.js
    └── my-block
        ├── my-theme-block.php //★★★ OK ★★★
        ├── node_modules
        ├── package-lock.json
        ├── package.json
        ├── webpack.config.js //独自の webpack.config.js
        └── src
            └── wdl-my-test-block.js  //ブロック用スクリプト
このようにすれば、他のテーマでもこのブロックを使用する場合、functions.php に上記を追記して、assets ディレクトリとその中身だけをコピーすれば良いことになります。