JavaScript でアニメーション Web Animation API
Web Animation API を使うと JavaScript で DOM 要素のアニメーションを実装することができます。
現時点(2022年3月)ではほぼ主要なモダンブラウザで使用できるようになっています。
以下は Web Animation API の基本的な使い方の解説とサンプルです。
animate() メソッドや Animation()、KeyFrameEffect、getComputedTiming() などの基本的な使い方やアニメーションの制御、アニメーションイベント、プロミス、getAnimations() を使った CSS アニメーションの取得方法、Mortion Path や SVG アニメーションなどについて。
Web Animation API を使って疑似要素をアニメーションさせる方法(options の pseudoElement プロパティの使い方)を追加しました。
作成日:2022年3月31日
関連ページ
- CSS モーションパス(offset-path offset-distance)の使い方
- requestAnimationFrame の使い方(アニメーション)
- CSS3 アニメーション
- CSS clip-path アニメーション
- SVG アニメーション(SMIL を使ったアニメーション)
- SVG の基本的な使い方
Web Animation API の基本的な使い方
Web Animations API を利用すると CSS アニメーションと同様のことを JavaScript で記述することができます。JavaScript なので変数が使えるのでより柔軟な実装が可能です。
Web Animations API を使ってアニメーションを実行するには、Element.animate() メソッドを使ってアニメーションを再生する方法と Animation() コンストラクタで Animation オブジェクトを生成して play() メソッド等を使ってアニメーションを再生する方法があります。
Element.animate() は Animation オブジェクトを生成して play() メソッドを1回実行する方法のショートカットメソッドで、両者は互いに書き換えることができます。
var animation = Element.animate(keyframes, options)
- animation(戻り値)
- Animation オブジェクト
- Element
- アニメーション対象の要素
- keyframes(引数)
- キーフレームオブジェクト
- options(引数)
- タイミングプロパティを含むオブジェクト
var animation = new Animation( effect, timeline );
animation.play();  //生成した Animation オブジェクトの play() メソッドを実行
- animation(戻り値)
- Animation オブジェクト
- effect(引数)
- KeyFrameEffect(以下を指定して生成するオブジェクト)
- target(対象の要素。animate() の Element に該当)
- keyframes(キーフレームオブジェクト)
- options(タイミングプロパティを含むオブジェクト)
- timeline(引数)
- タイムライン(document.timeline ドキュメントのタイムライン:既定値)
以下はボタンをクリックすると、要素の不透明度と幅、高さを変化させる Web Animations API を使ったアニメーションです。fill オプション(options)を指定していないので、アニメーション終了後、アニメーションで適用された効果は破棄されて初期状態に戻ります。
<div class="target-wrapper">
  <div id="target" class="square-target"></div>
</div>
<button id="start" type="button">Start</button>
.square-target {
  width: 100px;
  height: 100px;
  background-color: #85A0F5;
}
.target-wrapper {
  width: 100px;
  height: 100px;
  margin: 40px 0 20px;
}
以下は上記のアニメーションをいくつかの異なる方法で実装する例です(それぞれの詳細は後述)。
Element.animate() メソッド
要素(Element)のメソッド Element.animate() を使った例です。
対象の要素とボタンの要素を取得し、ボタンの要素にクリックイベントを設定しています。
イベントハンドラではアニメーションの対象の要素に Element.animate() メソッドを使用してアニメーションを設定して実行するようにしています。
animate() メソッド(9行目〜20行目)では第1引数にアニメーションのキーフレーム(keyframes オブジェクト)を、第2引数にオプション(options この例では再生時間とイージング)を指定しています。
この例では2つのキーフレームを指定しています。2つのキーフレームを指定すると、自動的にそれぞれの値がアニメーションの進捗が 0% と 100% に割り当てられ、その間は2つの値を補間した内容が適用されます。3つのキーフレームを指定すると、それぞれ 0% 50% 100% に割り当てられます(キーフレームは等間隔のタイミングで配置されます)。
必要に応じて各キーフレームの進捗(タイミング)を offset を使って明示的に指定することもできます(※ CSS では%で指定しますが、offset では 0〜1 の数値で指定します)。
//アニメーションの対象の要素を取得
const target = document.getElementById('target');
//ボタンの要素を取得
const start =  document.getElementById('start');

//ボタンの要素にクリックイベントを設定
start.addEventListener('click', () => {

  //Element.animate() メソッドを使ったアニメーション
  target.animate(
    // keyframes
    [
      {opacity:1, width:'100px', height:'100px'},  // 0% の状態キーフレーム
      {opacity:0, width:'0px', height:'0px'}  // 100% の状態キーフレーム
    ],
    // options
    {
      duration: 1000, //再生時間(ミリ秒)
      easing: 'linear', //イージング
    },
  );

});
上記は以下のように、引数の keyframes と options をそれぞれ定義して記述することもできます。
const target = document.getElementById('target');
const start =  document.getElementById('start');

//keyframes
const keyframes = [
  {opacity:1, width:'100px', height:'100px'},
  {opacity:0, width:'0px', height:'0px'}
];

//options(タイミングオプション)
const options = {
  duration: 1000,
  easing: 'linear',
}

//ボタンの要素にクリックイベントを設定
start.addEventListener('click', () => {
  //Element.animate() メソッドを使ったアニメーション
  target.animate(keyframes, options);
});
CSS animation
上記と同じことを CSS animation(キーフレームアニメーション)で行う場合は以下のようになります。
CSS の @keyframes の内容が animate() メソッドの第1引数の keyframes オブジェクトに該当します。
また、CSS の animation-duration の値が animate() メソッドの duration の値に、CSS の animation-timing-function の値が animate() メソッドの easing の値にそれぞれ該当します。
@keyframes fade-out-keyframes {
  0% {
    opacity: 1;
    width: 100px;
    height: 100px;
  }
  100% {
    opacity: 0;
    width: 0px;
    height: 0px;
  }
}

.fade-out {
  animation-name: fade-out-keyframes; /*キーフレーム名 */
  animation-duration: 1s; /*アニメーションにかかる時間(再生時間)*/
  animation-timing-function: linear; /*イージング*/
  /* 以下は上記をショートハンドで指定する場合
  animation: fade-out-keyframes 1s linear;
  */
}
この例の場合、JavaScript ではボタンをクリックしたら上記アニメーションのクラス(fade-out )を対象の要素に追加してアニメーションを実行し、アニメーションが終了したら削除しています(CSS のアニメーションを Web Animation API を使って操作することもできます)。
//アニメーションの対象の要素を取得
const target = document.getElementById('target');
//ボタンの要素を取得
const start =  document.getElementById('start');

//ボタンの要素にクリックイベントを設定
start.addEventListener('click', () => {
  //対象の要素に CSS アニメーションのクラスを追加
  target.classList.add('fade-out');

  //アニメーション終了時のイベントを設定
  target.addEventListener('animationend', () => {
    // アニメーション終了後にクラスを削除
    target.classList.remove('fade-out');
  });
});
関連ページ:CSS3 アニメーション
Element.animate() で生成した Animation オブジェクトを利用
animate() メソッドはアニメーションの再生を行うショートカットメソッドですが、同時に新しい Animation オブジェクトを生成します。
生成された Animation オブジェクトは変数に格納しておけば何度でも利用することができます。
前述の例では生成された Animation オブジェクトは使い捨てて、ボタンをクリックする度に新たに Animation オブジェクトを生成していましたが、以下は animate() メソッドで生成した Animation オブジェクトを操作する例です。
animate() メソッドは Animation オブジェクトを生成すると同時にアニメーションの再生(実行)も行うので、この例ではクリックした場合にアニメーションが再生されるように Animation オブジェクトの生成後すぐに cancel() で再生を停止しています。
const target = document.getElementById('target');
const start =  document.getElementById('start');

//animate() メソッドで Animation オブジェクトを生成
const animation = target.animate(
  [
    {opacity:1, width:'100px', height:'100px'},
    {opacity:0, width:'0px', height:'0px'}
  ],
  {
    duration: 1000,
    easing: 'linear',
  },
);

//animate() メソッドによる autoplay(自動再生)のキャンセル
animation.cancel();

//ボタンの要素にクリックイベントを設定
start.addEventListener('click', (e) => {
  //すでに実行されているアニメーションがあれば一度停止
  animation.cancel();
  //アニメーションの再生
  animation.play();
});
KeyframeEffect オブジェクトを使って Animation オブジェクトを直接生成
コンストラクタ Animation() にキーフレーム設定オブジェクト(KeyframeEffect オブジェクト)を渡して Animation オブジェクトを直接生成することもできます。
この例では KeyframeEffect オブジェクトを作成して、Animation オブジェクトのコンストラクタ Animation() に渡して Animation オブジェクトを生成しています。
KeyframeEffect オブジェクトを生成するコンストラクタ KeyframeEffect() は第1引数にアニメーション対象の要素を、第2引数に keyframes オブジェクトを、第3引数にオプションを受け取ります。
KeyframeEffect() に渡す keyframes オブジェクトとオプションは Element.animate() メソッドに渡す内容と同じです。
コンストラクタ Animation() は第1引数に KeyFrameEffect オブジェクトを、第2引数にはアニメーションが属するタイムライン(デフォルトは document.timeline で省略可能)を受け取ります。
但し、Animation() で Animation オブジェクトを生成する場合、Element.animate() メソッドの場合とは異なり、アニメーションは自動で再生されないので、play() メソッドを使って再生する必要があります。
const target = document.getElementById('target');
const start =  document.getElementById('start');

//KeyFrameEffect オブジェクトを作成
const effect = new KeyframeEffect(
  //アニメーションの対象の要素
  target,
  //keyframes オブジェクト
  [
    {opacity:1, width:'100px', height:'100px'},
    {opacity:0, width:'0px', height:'0px'}
  ],
  //オプション
  {
    duration: 5000,
    easing: 'linear',
  },
);

//Animation オブジェクトを生成
const animation = new Animation(effect, document.timeline);

//ボタンの要素にクリックイベントを設定(前述の例と同じ)
start.addEventListener('click', (e) => {
  //再生中のアニメーションがあれば停止
  animation.cancel();
  //アニメーションを再生
  animation.play();
});
上記の例では keyframes オブジェクト(キーフレーム)の指定で、width と height を使ってサイズを0にしていますが、transform を使って以下のように指定しても同じことになります。
[
  {opacity:1, transform: 'scale(1,1)', transformOrigin: '0% 0%'},
  {opacity:0, transform: 'scale(0,0)', transformOrigin: '0% 0%'}
],
今までの例や以降の例のほとんどの場合、アニメーションの対象は div 要素を使用していますが、様々な DOM 要素を対象にアニメーションを設定することができます。
以下は SVG画像の img 要素と HTMLに記述された svg 要素にアニメーションを設定する例です。
<img id="targetImg" src="flower.svg" width="100" height="100" alt="花模様のSVG画像">
<svg id="targetSVG" width="100" height="100" viewBox="0 0 200 200">
  <path fill="#fb061d" stroke="#f71010"
  d="M0.554,83.753a17.751,・・・中略・・・306,8.306,0,0,0,31.808,134.6Z"/>
</svg>

<button type="button" id="start" class="control">Start </button>
JavaScript では animate() メソッドを使って img 要素と svg 要素にアニメーションを設定しています。
設定方法はアニメーションの対象が div 要素の場合と変わりません。
以下の場合は2つのアニメーションに同じキーフレームとタイミングプロパティを使うので、それらをあらかじめ定義しています。また、2つ目のアニメーションの開始を少し送らせるため、タイミングプロパティを後から変更しています(タイミングプロパティの変更)。
//対象の要素を取得
const targetImg = document.getElementById('targetImg');
const targetSVG = document.getElementById('targetSVG');

//共通で使用するキーフレーム(回転と縮小・拡大)を設定
const keyframes =  [
  { transform:'rotate(0deg) scale(0.5)' },
  { transform:'rotate(240deg) scale(1.5)' },
  { transform:'rotate(0deg) scale(1)' }
];

//共通で使用するタイミングプロパティを設定
const timing = {
  duration: 3000,
  easing: 'ease-in-out',
};

//img 要素にアニメーションを設定
const animationImg = targetImg.animate(keyframes, timing);
//自動再生を停止
animationImg.cancel();

//svg 要素にアニメーションを設定
const animationSVG  = targetSVG.animate(keyframes, timing);
//自動再生を停止
animationSVG.cancel();
//タイミングプロパティを変更
animationSVG.effect.updateTiming({ delay: 1000 });

//start をクリックイするとアニメーションを再生
document.getElementById('start').addEventListener('click', () => {
  animationImg.play();
  animationSVG.play();
})

また、今までの例ではボタンをクリックすることでアニメーションを開始するようにしていますが、対象の要素自体にクリックイベントを設定したり、初期状態でアニメーションを開始しておくこともできます。
以下は図形をクリックするとアニメーションを開始する例です。この例ではキーフレームを今までの例とは異なる書式で記述しています。
また、アニメーションの状態を検出して、その状態により、アニメーションを制御するメソッドの play() や pause() を実行するようにしています。
<div id="target"></div>
#target {
  height: 80px;
  width: 80px;
  background-color: darkcyan;
  /*角丸で楕円を作成*/
  border-radius: 50% 80% 50% 80%/40% 70% 50% 70%;
  /*カーソルの形状をポインターに*/
  cursor: pointer;
}
24行目の animation.cancel(); を削除すれば、アニメーションは最初から開始されます。
const target = document.getElementById('target');
const animation = target.animate(
  {
    //border-radius の値を変化させるキーフレーム
    borderRadius: [
      '50% 80% 50% 80%/40% 70% 50% 70%',
      '40% 60% 50% 60%/50% 40% 50% 30%',
      '30% 40% 50% 40%/30% 80% 50% 40%'
    ],
    //translate で位置やサイズを変化させるキーフレーム
    transform: [
      'translate(0px, 0px) scale(1, 1)',
      'translate(5px, 0px) scale(1.2, 1.1)',
      'translate(-5px, 5px) scale(1.1, 0.9)'
    ]
  },
  {
    iterations: Infinity, //無限に繰り返し
    direction: 'alternate', //奇数回と偶数回で反対方向に再生
    duration: 3000
  }
);
//自動再生を停止
animation.cancel();

target.addEventListener('click', () => {
  //アニメーションの状態を取得
  const playState = animation.playState;
  if(playState === 'running') {
    //実行中であれば一時停止
    animation.pause();
  }else{
    //実行中以外であれば再生
    animation.play();
  }
});
図形をクリックするとアニメーションを開始し、もう一度クリックすると一時停止します。
アニメーションの構成
Web Animations では WEB 環境における(タイムラインを基準とした)アニメーションの仕組みを定義していて、大きく分けると以下の2つのモデルに分けられます。
- タイミングモデル
- アニメーションモデル
タイミングモデル
アニメーションを実行する上での各種時刻を扱う概念です。アニメーションにかかる時間や開始時刻、繰り返しの回数などの情報を扱い、この内容からアニメーションの進捗状況などを得ることができます。
アニメーションモデル
グラフィックに適用する際のルール(キーフレーム)を定めます。例えば色が変わったり位置が移動するアニメーションであれば、タイミングモデルから算出されたアニメーションのタイミングで色や位置のキーフレームに合わせてグラフィックを描画します。
「アニメーションの対象」に上記のモデルを適用することでブラウザは描くべきグラフィックを判断し、その内容を書き換えることでアニメーションを表現します。
参考:Web Animationsが扱うモデル(Web Animations APIの基本的な使い方・まとめ)
メモ
Animation() コンストラクタを使った Animation オブジェクトの生成では、キーフレームの設定と対象の要素を含む KeyFrameEffect オブジェクト(KeyFrameEffect() コンストラクタで生成)とタイミングの基準となるタイムライン(document.timeline)を指定します。
KeyFrameEffect オブジェクトの生成では KeyFrameEffect() コンストラクタにアニメーションの対象の要素とキーフレーム(keyframes オブジェクト)及びアニメーションのタイミング関連のプロパティを指定します。
Animation オブジェクトの生成とアニメーションを実行するためのショートカットメソッド Element.animate() ではキーフレーム(keyframes オブジェクト)及びアニメーションのタイミング関連のプロパティを指定して内部的にはデフォルトのタイムラインを指定します(アニメーションの対象の要素のメソッドとして実行)。
- Animation オブジェクトのプロパティ(一部抜粋)
-
- effect(KeyFrameEffect オブジェクト)
- timeline(タイムライン document.timeline)
- KeyFrameEffect オブジェクトのプロパティ(一部抜粋)
-
- target(対象の要素)
- getKeyframes(キーフレームを取得するメソッド)
- getTiming (タイミング関連のプロパティを取得するメソッド)
アニメーションの記述例
本番用のコードでは、必要に応じて load や DOMContentLoaded イベントを使って記述します。
また、その際に一まとまりの処理を関数や const などを使って定義しておくと、変数の競合の心配も減るなど管理しやすくなります。

Click Me!
以下は上記アニメーションのコードです。アニメーションの設定などを setUpToggleAnimation() という関数にまとめて、load イベントを使って呼び出しています。
// 処理をまとめた関数を定義
function setUpToggleAnimation() {
  // 対象の要素を取得
  const targets = document.querySelectorAll('.slide-toggle');

  // 対象の要素のそれぞれについてイベントリスナを設定
  targets.forEach((elem) => {
    // 対象の要素を基点に要素を取得
    const cover = elem.querySelector('.cover');
    const img = elem.querySelector('img');
    const closeTxt = elem.querySelector('.close-text');

    // .cover の click イベントリスナーの設定
    cover.addEventListener('click', () => {
      const slideUp = cover.animate(
        {
          transform: ['translateY(0)','translateY(-300px)']
        },
        timingOpts(300, 'ease-in')
      );
      const showClose = closeTxt.animate(
        {
          opacity: [ 0, 1],
          transform: [' translateX(200%) rotate(-720deg)',' translateX(-50%) rotate(0deg)'],
        },
        timingOpts(800,'ease-out')
      );
    });

    // elem(.slide-toggle)の mouseenter/mouseleave イベントリスナーの設定
    elem.addEventListener('mouseenter', () => {
      const changeOpacity = cover.animate(
        {
        opacity: [ 1, .9 ]
        },
        timingOpts(500)
      );
    });
    elem.addEventListener('mouseleave', () => {
      const changeOpacity = cover.animate(
        {
        opacity: [ .9, 1 ]
        },
        timingOpts(900)
      );
    });

    // img の click イベントリスナーの設定
    img.addEventListener('click', () => {
      const slideDown = cover.animate(
        {
          transform: ['translateY(-300px)','translateY(0)']
        },
        timingOpts(500, 'ease-in')
      );
      const hideClose = closeTxt.animate(
        {
          opacity: [ 1, 0],
          transform: [' translateX(-50%) rotate(0deg)',' translateX(200%) rotate(-720deg)'],
        },
        timingOpts(800,'ease-out')
      )
    });

    // タイミングオプションを返す関数
    const timingOpts = (duration = 300, easing = 'ease', fill = 'forwards') => {
      return { duration, easing, fill };
    }
  });
};

// load イベントで上記関数を呼び出す
window.addEventListener('load', () => {
  setUpToggleAnimation();
});
<div class="slide-toggle">
  <img src="images/sample.jpg" width="600" height="398" alt="beach photo">
  <div class="close-text">Click to Close</div>
  <div class="cover"><p>Click Me!</p></div>
</div>
.slide-toggle {
  aspect-ratio: 1618/1000;
  max-width: 400px;
  position: relative;
  overflow: hidden;
}
.slide-toggle img {
  display: block;
  width: 100%;
  height: 100%;
  object-fit: cover;
  cursor: pointer;
}

.cover {
  position: absolute;
  top: 0;
  right: 0;
  bottom: 0;
  left: 0;
  background-color: #7aac81;;
  cursor: pointer;
}

.cover p {
  position: absolute;
  top: 50%;
  left: 50%;
  margin-right: -50%;
  transform: translate(-50%, -50%);
  color: #fff;
}

.close-text {
  position: absolute;
  top: 50%;
  left: 50%;
  margin-right: -50%;
  transform: translate(-50%, -500%);
  opacity: 0;
  color: #fff;
  pointer-events: none;
}
Element.animate()
要素(Element インターフェイス)の animate() メソッドは、このメソッドが呼び出された要素を対象として新しい Animation オブジェクトを生成し、そのアニメーションの再生を行うショートカットメソッドです。このメソッドは、生成した Animation オブジェクトのインスタンスを返します。
言い換えると、要素に animate() メソッドを適用すると引数(keyframes と options)で指定した内容のアニメーションを実行します。その際に Animation オブジェクトを生成し、戻り値として返すので、変数に代入すればその後そのオブジェクトを操作することができます。
以下が animate() メソッドの構文です。Element は要素です。
var animation = Element.animate(keyframes, options)
| 引数 | 説明 |
|---|---|
| keyframes | キーフレームオブジェクトの配列、またはプロパティ毎に記述した値が配列である単一のキーフレームオブジェクト(2つの書式があります) |
| options | アニメーションの再生時間を表す整数値(ミリ秒単位)、または 1 つ以上のタイミングプロパティを含むオブジェクト |
戻り値
Animation オブジェクト
W3C Working Draft : Animation animate(keyframes, options)
例(クリックする度に animate() でアニメーションを実行)
//keyframes(キーフレームオブジェクトの配列)
const keyframes = [
  { transform: 'translate(0px, 0px)' },
  { transform: 'translate(200px, 100px)' },
  { transform: 'translate(400px, 0px)' },
];

//options(タイミングオプション)
const timingOpts = {
  duration: 1000,
  easing: 'ease-in-out',
  direction: 'alternate',
  iterations : 2
}

//対象の要素を取得
const targetElem = document.getElementById('target');

//ボタンをクリックしたら animate() を適用してアニメーションを再生
document.getElementById('start').addEventListener('click', ()=> {
  //対象の要素に animate() を適用
  targetElem.animate(keyframes, timingOpts);
});
<div class="sample_wrapper">
  <div id="target"></div>
</div>
<button id="start" type="button">Start</button>
.sample_wrapper {
  position: relative;
  width: 400px;
  height: 100px;
  margin: 50px 0 20px;
}
#target {
  position: absolute;
  width: 30px;
  height: 30px;
  background-color: #98E698;
  border-radius: 50%;
}
上記の場合、生成された Animation オブジェクトは使い捨てて、ボタンをクリックする度に新たに Animation オブジェクトを生成していますが、生成した Animation オブジェクトを play() メソッドなどを使って操作することができます(アニメーションの制御)。
以下は上記と同じ結果になります。
const keyframes = [
  { transform: 'translate(0px, 0px)' },
  { transform: 'translate(200px, 100px)' },
  { transform: 'translate(400px, 0px)' },
];

const timingOpts = {
  duration: 1000,
  easing: 'ease-in-out',
  direction: 'alternate',
  iterations : 2
}

//対象の要素を取得
const targetElem = document.getElementById('target');

//Animation オブジェクトを生成
const animation = targetElem.animate(keyframes, timingOpts);
//animate() メソッドによる自動再生のキャンセル
animation.cancel();

document.getElementById('start').addEventListener('click', ()=> {
  //すでに実行されているアニメーションがあれば停止(キャンセル)
  animation.cancel();
  //アニメーションの再生
  animation.play();
});
keyframes
animate() メソッドの第1引数に渡す keyframes は、アニメーションの対象のプロパティがいつどのような値をとるかを記述したキーフレームのセットを表すオブジェクトです。
animate() メソッドの第1引数以外にも KeyframeEffect() コンストラクタや setKeyframes() メソッドの第2引数に渡す keyframes も同じです。
アニメーションの keyframes を取得するには Animation オブジェクトの effect プロパティのメソッド getKeyframes()、設定(変更)するには setKeyframes() メソッドが利用できます。
キーフレームに指定するプロパティ
キーフレームに指定するプロパティは対象の要素の CSS プロパティを指定します(例 opacity: 1)。
※ 但し、DOM の属性値をアニメーション化することはできません。
プロパティ名にハイフンを含む場合はキャメル形式で指定します。例えば background-color: red の場合は backgroundColor: red になります。
また、float は JavaScript の予約語になっているので cssFloat とし、offset はキーフレームのオフセットに使われているので cssOffset とします。
数値以外のプロパティの値は引用符( " または ' )で囲み文字列として指定します。
MDN: Keyframe Formats
keyframes の書式
keyframes の記述方法にはキーフレーム毎に記述する書式とプロパティ毎に記述する書式があります。どちらを使っても同じなので、アニメーションの内容により記述しやすい(簡潔に記述できる)書式を選択すると良いと思います。
[
  { プロパティ1: 値, プロパティ2: 値 }, // 0% の時のプロパティ1とプロパティ2の値
  { プロパティ1: 値, プロパティ2: 値 }, // 50% の時のプロパティ1とプロパティ2の値
  { プロパティ1: 値, プロパティ2: 値 }  // 100% の時のプロパティ1とプロパティ2の値
]
{
  プロパティ1: [値, 値, 値], // プロパティ1の 0%、50%、100% の時の値
  プロパティ2: [値, 値, 値]  // プロパティ2の 0%、50%、100% の時の値
}
以下の2つの keyframes の記述は同じ内容を表します。
targetElem.animate(
  //キーフレーム毎に記述する例
  [
    {transform:'translateX(0)',borderRadius:'0%',backgroundColor:'orange'},
    {transform:'translateX(100px)',borderRadius:'20%',backgroundColor:'yellow'},
    {transform:'translateX(200px)',borderRadius:'50%',backgroundColor:'green'},
  ],
  2000,
);
targetElem.animate(
  //プロパティ毎に記述する例
  {
    transform:['translateX(0)','translateX(100px)', 'translateX(200px)'],
    borderRadius:['0%','20%','50%'],
    backgroundColor:['orange', 'yellow', 'green']
  },
  2000,
);
<div id="target02"></div>
<button id="start02" type="button">Start</button>

<script>
const target02 = document.getElementById('target02');
const start02 = document.getElementById('start02');

const keyframes02 = [
  {transform:'translateX(0)',borderRadius:'0%',backgroundColor:'orange'},
  {transform:'translateX(100px)',borderRadius:'20%',backgroundColor:'yellow'},
  {transform:'translateX(200px)',borderRadius:'50%',backgroundColor:'green'},
];

/* //または以下でも同じこと
const keyframes02 =  {
  transform:['translateX(0)','translateX(100px)', 'translateX(200px)'],
  borderRadius:['0%','20%','50%'],
  backgroundColor:['orange', 'yellow', 'green']
};
*/

start02.addEventListener('click', () => {
  target02.animate(
    keyframes02, 2000
  );
});
</script>
offset プロパティ
デフォルトでは指定したキーフレームは等間隔のタイミングで配置されますが、offset プロパティを指定することでキーフレームのタイミングを指定することができます。
CSS の @keyframes ではパーセント(%)で指定しますが、offset 値は 0.0 から 1.0 までの数値で指定します。
offset 値が未指定の場合は前後のキーフレーム値から自動的に算出されます。
以下は3つのキーフレームに offset 値を指定する例です。offset 値を指定しなければ、等間隔(0%, 50%, 100%)のタイミングで実行されます。
document.getElementById('target').animate(
  [
    {
      transform:'translateX(0)',
      backgroundColor:'#85A0F5',
      offset: 0  //0%
    },
    {
      transform:'translateX(100px)',
      backgroundColor:'pink',
      offset: 0.2  //20%
    },
    {
      transform:'translateX(200px)',
      backgroundColor:'red',
      offset: 1.0  //100%
    },
  ],
  2000,
);
以下は上記の keyframes をプロパティ毎の記述に書き換えたものです。
document.getElementById('target').animate(
  {
    transform: [ 'translateX(0)', 'translateX(100px)', 'translateX(200px)'],
    backgroundColor: [ '#85A0F5', 'pink', 'red'],
    offset: [ 0, 0.2, 1]  //offset プロパティ
  },
  2000,
);
<div id="target03"></div>
<button id="start03" type="button">Start</button>

<script>
document.getElementById('start03').addEventListener('click', () => {
  document.getElementById('target03').animate(
    [
      {
        transform:'translateX(0)',
        backgroundColor:'#85A0F5',
        offset: 0
      },
      {
        transform:'translateX(100px)',
        backgroundColor:'pink',
        offset: 0.2
      },
      {
        transform:'translateX(300px)',
        backgroundColor:'red',
        offset: 1.0
      },
    ],
    2000,
  );
});
</script>
easing プロパティ
easing プロパティをキーフレーム毎に指定することができます。アニメーション全体にイージングを設定する場合は、options のタイミングプロパティに指定します。
以下の場合、offset が0から0.2の間に 'ease' が、0.2から1の間に 'ease-in-out' が適用されます。
document.getElementById('target').animate(
   [
    {
      transform:'translateX(0)',
      backgroundColor:'#85A0F5',
      offset: 0,
      easing: 'ease'  //easing プロパティを指定
    },
    {
      transform:'translateX(100px)',
      backgroundColor:'pink',
      offset: 0.2,
      easing: 'ease-in-out'  //easing プロパティを指定
    },
    {
      transform:'translateX(200px)',
      backgroundColor:'red',
      offset: 1.0
    },
  ],
  2000,
);
以下は上記の keyframes をプロパティ毎の記述に書き換えたものです。
easing プロパティの指定では、他のプロパティと配列のサイズ(要素数)を揃えるように最後に 'linear' を指定しています。
document.getElementById('target').animate(
  {
    transform: [ 'translateX(0)', 'translateX(100px)', 'translateX(200px)'],
    backgroundColor: [ '#85A0F5', 'pink', 'red'],
    offset: [ 0, 0.2, 1],
    easing: ['ease', 'ease-in-out', 'linear'] //easing プロパティ
  },
  2000,
);
<div id="target04"></div>
<button id="start04" type="button">Start</button>

<script>
document.getElementById('start04').addEventListener('click', () => {
  document.getElementById('target04').animate(
     [
      {
        transform:'translateX(0)',
        backgroundColor:'#85A0F5',
        offset: 0,
        easing: 'ease'
      },
      {
        transform:'translateX(100px)',
        backgroundColor:'pink',
        offset: 0.2,
        easing: 'ease-in-out'
      },
      {
        transform:'translateX(300px)',
        backgroundColor:'red',
        offset: 1.0
      },
    ],
    2000,
  );
});
</script>
以下はイージングの効果がわかりやすいように垂直方向と水平方向のアニメーションを別々に設定して同時に適用しています。top が 0px から 135px に変化する間に ease-in-out が適用されます。
const target = document.getElementById('target');

document.getElementById('start').addEventListener('click', () => {
  //垂直方向のアニメーション
  target.animate(
     [
      {top:'0px', easing:'ease-in-out'},
      {top:'135px'},
      {top:'270px'},
    ],
    2000,
  );
  //水平方向のアニメーション
  target.animate(
     [
      {left:'0px'},
      {left:'270px'},
    ],
    2000,
  );
});
単に斜め下に移動するアニメーションであれば同じキーフレームに top と left を指定するか、transform プロパティに translate() (または translateX() translateY() )を指定すれば1つのアニメーションで可能です。
<div class="target-wrapper">
  <div id="target"></div>
</div>
<button id="start" type="button">Start</button>

<style>
.target-wrapper {
  width: 300px;
  height: 300px;
  border: 1px solid #ccc;
  position: relative;
  margin: 30px 0;
}
#target {
  position: absolute;
  width: 30px;
  height: 30px;
  background-color: red;
  border-radius: 50%;
}
</style>
デフォルトのイージングは linear
CSS アニメーションのデフォルトのイージングは ease ですが、Web Animation API のデフォルトのイージングは linear になっています。
easing(タイミング関数)は以下のような値を設定することが可能です。
| easing(値) | 説明 |
|---|---|
| linear | 一定の速度(デフォルト) |
| ease | 急速に加速してゆっくり終わる |
| ease-in | ゆっくり入り、加速して終わる |
| ease-out | 速く入り、ゆっくり終わる |
| ease-in-out | easeよりも、ゆっくり入り、加速し、ゆっくり終わる |
| step-start | 開始時点で終了状態の値に変化する。steps(1, start)と同じ。 |
| step-end | 終了時点まで変化せず、終了時点で終了状態の値に変化する。steps(1, end)と同じ。 |
| steps(count, start|end) | 時間的変化をステップ数(count)の数のステップに等分に区切って不連続に変化させる |
| cubic-bezier(x1,y1,x2,y2) | 3次ベジェ曲線による定義(例 'cubic-bezier(1,0,0,1)') |
関連項目:タイミング関数 transition-timing-function
Easing 関連サイト:
暗黙の開始/終了キーフレーム
新しいバージョンのブラウザーではアニメーションの開始または終了状態のみのキーフレーム(1つのキーフレーム)で設定することができます(可能であればブラウザがアニメーションのもう一方のキーフレームを推測します)。
以下の場合、アニメーションの終了状態を指定しただけで、開始状態は指定していませんがブラウザが自動的に推測してアニメーションになります。
document.getElementById('target').animate(
  [
    //終了状態のキーフレームだけを指定
    { transform: 'rotate(1080deg)', backgroundColor: 'pink' }
  ],
  {
    duration: 2000,
    easing: 'ease-in-out'
  },
);
この場合、第2引数のタイミングプロパティの fill オプションに forwards や both を指定すると、終了状態を維持するので、2回目以降のアニメーションは実行されなくなります(fill のデフォルトは none)。
<style>
#target05 {
  width: 100px;
  height: 100px;
  background-color: #72DE87;
}
</style>

<div id="target05"></div>
<button id="start05" type="button">Start</button>

<script>
document.getElementById('start05').addEventListener('click', () => {
  document.getElementById('target05').animate(
    [
      { transform: 'rotate(1080deg)', backgroundColor: 'pink' }
    ],
    {
      duration: 2000,
      easing: 'ease-in-out'
    },
  );
});
</script>
options(タイミングプロパティ)
animate() メソッドの第2引数の options にはアニメーションの再生時間をミリ秒で表す整数値、または 1 つ以上のタイミングプロパティを含むオブジェクトを渡します(KeyframeEffect() コンストラクタの第3引数に指定する options も同じです)。
options オブジェクトに指定できるプロパティには以下のようなものがあります。
| プロパティ | 説明 | 初期値 | 対応する CSS プロパティ名 |
|---|---|---|---|
| delay | 遅延時間。アニメーションを呼び出してから開始するまでの時間をミリ秒単位の数値で指定。負の値も指定可能 | 0 | animation-delay |
| direction | アニメーションの再生方向。'normal':順方向のアニメーションを再生。'reverse':逆方向のアニメーションを再生。 'alternate':繰り返し毎にアニメーションを折り返す(奇数回と偶数回で反対方向に再生)。 'alternate-reverse':逆方向のアニメーションから始めて繰り返し毎にアニメーションを折り返す(alternate の逆方向に再生)。 | 'normal' | animation-direction |
| duration | 再生時間。1回のアニメーションにかかる時間をミリ秒単位の数値で指定 | 0 | animation-duration |
| easing | イージング(アニメーションの速度変化)を指定。'linear'、'ease'、'ease-in'、'ease-out'、'ease-in-out'、または cubic-bezier 関数を使った値(例 'cubic-bezier(0.42, 0, 0.58, 1)')を指定可能。関連項目:easing プロパティ | 'linear' | animation-timing-function |
| endDelay | 終了後の遅延時間。アニメーションが終了した後の完了までの時間をミリ秒単位の数値で指定。負の値も指定可能 | 0 | |
| fill | delay 値を伴うアニメーションで効果を再生前に要素に反映させる場合は 'backwards'(終了後は効果を破棄)、アニメーション終了後に効果を保持する場合は 'forwards'、両方を適用する場合は 'both'、どちらも適用しない場合は 'none' を指定 | 'none' | animation-fill-mode |
| iterationStart | 反復(繰り返し)のどの時点でアニメーションを開始するかを0.0〜1.0の間の数値で指定。例えば、0.5は最初の反復の半分の時点で開始することを示し、2回の反復のアニメーションは3回目の反復の半分の時点で終了します。 | 0.0 | |
| iterations | アニメーションの繰り返し回数を数値で指定するか、無限に繰り返す場合は Infinity(最初の文字は大文字で引用符は付けない)を指定。小数を指定可能。 | 1 | animation-iteration-count |
| composite | 複数のアニメーションが動作している場合にアニメーションの値(効果)の組み合わせ方法を指定。
※ 2022年3月の時点では Safari ではサポートされていません。 |
'replace' | |
| iterationComposite |
反復(繰り返し)ごとのアニメーションの値の扱い方を指定。累積('accumulate')または置換('replace')するように指定できます。 ※ 2022年3月の時点では Firefox でのみサポートされています。 |
'replace' | |
| pseudoElement | 疑似要素セレクターを表す文字列(::before や ::after、::marker)を指定。指定した場合、アニメーションはターゲット自体ではなく、ターゲットの選択された疑似要素に適用されます。 | なし |
以下は options のタイミングプロパティを変更して動作を確認するサンプルです。
※ このサンプルではアニメーション終了後、Animation オブジェクトの cancel() メソッドで適用されたキーフレームの効果(KeyframeEffect)をすべて初期化しています。
そのため、実際の動作と異なるように見える場合があります。例えば fill プロパティに forwards を指定しても終了後すぐに初期状態に戻ってしまうので、状態や動作を確認するには endDelay を指定する必要があります。
同様に fill プロパティに backwards を指定して動作を確認するには delay を指定する必要があります。iterationStart も endDelay を指定し、fill プロパティに forwards を指定すると状態や動作を確認しやすいかと思います。
また、アニメーション終了を検知して終了時に「Finished」と表示するようにしています。endDelay を指定すると、アニメーションの動作が終了後指定したミリ秒経過後に「Finished」と表示されます。
const target = document.getElementById('target');
document.getElementById('start').addEventListener('click', ()=> {
  target.animate(keyframes, timingOpts);
});
const keyframes = [
  { transform: 'translate(0px, 0px)', backgroundColor: 'green' },
  { transform: 'translate(200px, 85px)', backgroundColor: 'lightblue' },
  { transform: 'translate(400px, 0px)', backgroundColor: 'pink'},
];
//以下のスライダーやラジオボタンで変更します
const timingOpts = {
  delay: 0,
  duration: 1000,
  endDelay: 0,
  iterations: 1,
  iterationStart: 0.0,
  direction: 'normal',
  fill: 'none',
  easing: 'linear',
}
例えば、delay と endDelay を1000、iterationStart を 0.5、fill を both にして Start をクリックすると、中間地点(easing の値により変わります)に移動して1秒後に開始し中間地点で終了し、1秒後に初期状態に戻ります。
| delay | 0 | |
|---|---|---|
| duration | 1000 | |
| endDelay | 0 | |
| iterations | 1 | |
| iterationStart | 0.0 | |
| direction | ||
| fill | ||
| easing | ||
元になるタイミングを用意しておく
例えば、1つの要素に複数のアニメーションを適用する場合など、元になるタイミングオブジェクトを用意しておき、異なる部分のみを追加で設定して適用することもできます。
また、アニメーションの生成後にタイミングプロパティの値を変更することもできます(タイミングプロパティの変更)。
//タイミングプロパティの元となる設定
let timings = {
  easing: 'ease-in-out',
  iterations: Infinity,
  direction: 'alternate',
  fill: 'both'
}

//個別に delay と duration を設定して使用
timings.delay = 500;
timings.duration = 2500;

target1.animate(keyframes, timings);
//keyframes は別途定義してあるものとします

//delay と duration を更新して別の要素に使用
timings.delay = 1000;
timings.duration = 1500;

target2.animate(keyframes, timings);
タイミングプロパティを返す関数を定義
似たようなタイミングプロパティを複数のアニメーションで使用する場合など、タイミングプロパティを返す関数を作成しておくと便利かもしれません。
引数に指定してあるデフォルトと異なる場合は値を指定します。デフォルトの値でよければ引数を省略して getTimingOpts() を呼び出します。
//タイミングプロパティを返す関数
function getTimingOpts( duration = 300, easing = 'ease', fill = 'forwards' ) {
  return { duration, easing, fill };
}

const target = document.getElementById('target');

target.addEventListener('click', () => {
  const rotate = target.animate(
    {
      transform: ['rotate(0deg)', 'rotate(180deg)']
    },
    //タイミングプロパティを返す関数の呼び出し(duration と easing を変更)
    getTimingOpts(200, 'ease-out')
  );
});
3行目の return { duration, easing, fill } は return { duration: duration, easing: easing, fill: fill } と同じことです(プロパティの短縮構文)。
必要に応じて引数にデフォルト値を追加して戻り値のオブジェクトのプロパティも追加します。
以下は引数に pseudoElement が指定されている場合とそうでない場合で返すオプションのプロパティを変える例です。
function getTimingOpts( duration = 300, easing = 'ease-in', fill = 'forwards' ,pseudoElement) {
  let options = { duration, easing, fill, pseudoElement };
  if(!pseudoElement) {
    options = { duration, easing, fill };
  }
  return options
}
疑似要素にアニメーション
通常、疑似要素は JavaScript で直接操作できませんが、options オブジェクトの pseudoElement プロパティを使って疑似要素にアニメーションを適用することができます。
主要なブラウザでは pseudoElement プロパティで ::after、::before、および ::marker をサポートしているようです(その他の ::first-letter や ::selection などはサポートされていないようです)。
ブラウザーが pseudoElement の使用をサポートしていても、指定された疑似要素が有効でないかサポートされていない場合は、エラーがスローされ、アニメーションは発生しません。
can i use options.pseudoElement
以下は icon-arrow というクラスを指定した要素に疑似要素 ::before で挿入されたアイコンをアニメーションで回転させる例です。
<p class="icon-arrow">Sample Text</p>
.icon-arrow {
  position: relative;
  padding-left: 20px;
  cursor: pointer;
}

/* ::before で矢印アイコンを挿入 */
.icon-arrow::before {
  content: "";
  position: absolute;
  top: 0;
  bottom: 0;
  left: 0;
  margin: auto 0;
  width: 12px;
  height: 12px;
  border-top: 3px solid red;
  border-right: 3px solid blue;
  transform: rotate(45deg);
}
icon-arrow クラスを指定した要素にクリックイベントを設定し、animate() メソッドの第2引数 options オブジェクトの pseudoElement プロパティに ::before を指定することで、icon-arrow クラスを指定した要素の疑似要素にアニメーションを適用しています。
// icon-arrow クラスを指定した要素を取得
const iconArrow = document.querySelectorAll('.icon-arrow');

//取得したそれぞれの要素に
iconArrow.forEach((elem) => {
  //回転が適用されているか
  let isActive = false;
  //クリックイベントのリスナーを設定
  elem.addEventListener("click", (e) => {
    if(!isActive) {
      //e.currentTarget は icon-arrow クラスを指定した要素
      const rotateIcon = e.currentTarget.animate(
        { rotate: ["0deg", "90deg"] },
        // options オブジェクト
        {
          duration: 300,
          // pseudoElement プロパティに ::before を指定
          pseudoElement: "::before",
          easing: 'ease-in',
          fill: 'forwards',
        }
      );
      isActive = true;
    }else{
      const rotateIcon = e.currentTarget.animate(
        { rotate: ["90deg", "0deg"] },
        // options オブジェクト
        {
          duration: 300,
          // pseudoElement プロパティに ::before を指定
          pseudoElement: "::before",
          easing: 'ease-in',
          fill: 'forwards',
        }
      );
      isActive = false;
    }
  });
});
以下のテキストやアイコンをクリックすると、疑似要素のアイコンが回転します。
Sample Text
ホバーアニメーション
以下はマウスオーバーするとアニメーションするホバーアニメーションの例です。対象の要素に指定するクラス名は変更していますが、疑似要素の CSS は前述の例と同じです(セレクタは .icon-arrow-hove に変更します)。
<p class="icon-arrow-hover">Sample Text</p>
mouseenter と mouseleave イベントを使って、それぞれに呼び出す関数を定義しています。
// icon-arrow クラスを指定した要素を取得
const iconArrowHover = document.querySelectorAll('.icon-arrow-hover');

//取得したそれぞれの要素に mouseenter と mouseleave イベントのリスナーを設定
iconArrowHover.forEach((elem) => {
  // mouseenter イベントのリスナーを設定
  elem.addEventListener("mouseenter", (e) => {
    //e.currentTarget はリスナーを登録した要素(iconArrowHover == elem)
    enterIconArrow(e.currentTarget);
    // または enterIconArrow(elem); でも同じ
  });
  // mouseleave イベントのリスナーを設定
  elem.addEventListener("mouseleave", (e) => {
    //e.currentTarget はリスナーを登録した要素(iconArrowHover)
    leaveIconArrow(e.currentTarget);
  });
});

// mouseenter で呼び出すアニメーションの関数
function enterIconArrow(element) {
  const rotate = ["0deg", "90deg"];
  const options = {
    duration: 300,
    pseudoElement: "::before",
    easing: 'ease-in',
    fill: 'forwards',
  };
  element.animate({ rotate }, options);
};
// mouseleave で呼び出すアニメーションの関数
function leaveIconArrow(element) {
  const rotate =  ["90deg", "0deg"];
  const options = {
    duration: 300,
    pseudoElement: "::before",
    easing: 'ease-in',
    fill: 'forwards',
  };
  element.animate({ rotate }, options);
};
Sample Text
この例の場合、function に定義せずに以下のように記述したほうがシンプルになります。
const iconArrowHover = document.querySelectorAll('.icon-arrow-hover');

//取得したそれぞれの要素に mouseenter と mouseleave イベントのリスナーを設定
iconArrowHover.forEach((elem) => {
  elem.addEventListener("mouseenter", () => {
    elem.animate(
      { rotate: ["0deg", "90deg"] },
      {
        duration: 300,
        pseudoElement: "::before",
        easing: 'ease-in',
        fill: 'forwards',
      }
    );
  });
  elem.addEventListener("mouseleave", () => {
    elem.animate(
      { rotate: ["90deg", "0deg"] },
      {
        duration: 300,
        pseudoElement: "::before",
        easing: 'ease-in',
        fill: 'forwards',
      }
    );
  });
});
関連項目:連続発生するアニメーションを防止
::before と ::after にアニメーション
以下は ::before と ::after で挿入した疑似要素の両方にアニメーションを適用する例です。
<a href="#" class="icon-plus"></a>
この例では icon-plus というクラスを指定した要素に疑似要素 ::before と ::after で + 印のアイコンを表示しています。
.icon-plus {
  position: relative;
  display: inline-block;
  width: 40px;
  height: 40px;
  border: 1px solid #999;
}
.icon-plus::before,
.icon-plus::after {
  content: '';
  position: absolute;
  top: 50%;
  left: 6px;
  right: 6px;
  margin-top: -2px;
  border-top: 4px solid #666;
}
.icon-plus::before {
  transform: rotate(90deg);
}
::before と ::after で挿入した疑似要素のそれぞれにアニメーションを設定しています。
const iconPlus = document.querySelectorAll('.icon-plus');

iconPlus.forEach((elem) => {
  let isActive = false;
  elem.addEventListener("click", (e) => {
    //リンク先にページが移動するデフォルトの動作をキャンセル
    e.preventDefault();
    if(!isActive) {
      //::before のアニメーション
      const rotate1 = e.currentTarget.animate(
        {
          rotate: ["0deg", "90deg"],
          opacity: [1,0]
        },
        {
          duration: 300,
          // pseudoElement プロパティに ::before を指定
          pseudoElement: "::before",
          easing: 'ease-in',
          fill: 'forwards',
        }
      );
      //::after のアニメーション
      const rotate2 = e.currentTarget.animate(
        { rotate: ["0deg", "180deg"]},
        {
          duration: 300,
          // pseudoElement プロパティに ::after を指定
          pseudoElement: "::after",
          easing: 'ease-in',
          fill: 'forwards',
        }
      );
      isActive = true;
    }else{
      //::before のアニメーション
      const rotate1 = e.currentTarget.animate(
        {
          rotate: ["90deg", "0deg"],
          opacity: [0,1]
        },
        {
          duration: 300,
          // pseudoElement プロパティに ::before を指定
          pseudoElement: "::before",
          easing: 'ease-in',
          fill: 'forwards',
        }
      );
      //::after のアニメーション
      const rotate2 = e.currentTarget.animate(
        { rotate: ["180deg", "0deg"] },
        {
          duration: 300,
          // pseudoElement プロパティに ::after を指定
          pseudoElement: "::after",
          easing: 'ease-in',
          fill: 'forwards',
        }
      );
      isActive = false;
    }
  });
});
関連ページ:
同一プロパティに対するアニメーション
同じ要素に複数のアニメーションを設定した場合、同一プロパティに対するアニメーションは、後から実行したものが既に実行しているアニメーションを覆い隠します。
以下の例では、同じ要素に2つのアニメーションを transform プロパティ(同じプロパティ)に設定して、ボタンをクリックするとアニメーションを実行します。
この場合、2つ目のアニメーションは500ミリ秒送れて開始しますが、その時点で最初のアニメーションは覆い隠され、2つ目のアニメーションが終了後最初のアニメーションが継続します。
//アニメーションの対象の要素を取得
const target = document.getElementById('target');

//クリックするボタンの要素を取得
const startBtn = document.getElementById('start');

//ボタンの要素にクリックイベントを設定
startBtn.addEventListener('click', () => {

  //transform プロパティのアニメーション(右斜下に移動)を設定
  target.animate(
     [
      {transform: 'translate(0px, 0px)'},
      {transform: 'translate(270px, 270px)'},
    ],
    {
      duration:2000,
    },
  );

  //transform プロパティのアニメーション(左斜上に移動)を設定
  target.animate(
     [
      {transform: 'translate(270px, 200px)'},
      {transform: 'translate(100px, 100px)'},
    ],
    {
      duration: 1000,
      delay: 500
    },
  );
});
<div id="target"></div>
<button id="start" type="button">Start</button>
composite 合成
composite プロパティを使って値に add や accumulate を指定すると、複数のアニメーションを合成することができます。
※ 現時点(2022年3月)では Safari では機能しません。can i use KeyframeEffect API: composite
以下は同じプロパティ(transform)にアニメーションを設定した場合の例です。
デフォルトでは composite プロパティは replace なので、後から実行する translateY() が translateX() を覆い隠しますが、 add を指定すると translateY() と translateX() を同時に指定した動作になります。
この例の場合は add と accumulate では同じ動作になりますが、プロパティやその指定方法によっては合成される動作が異なります。
target.animate(
   [
    {transform: 'translateX(0px)'},
    {transform: 'translateX(270px)'},
  ],
  {
    duration: 1000,
  },
);
target.animate(
   [
    {transform: 'translateY(0px)'},
    {transform: 'translateY(270px)'},
  ],
  {
    duration: 1000,
    composite: 'replace'  //サンプルのラジオボタンで変更
  },
);
| composite |
|---|
以下は前述の例の2つのアニメーションの間に更に transform の scale を使ったアニメーションを追加した例です。この場合、add と accumulate では動作が異なります。
transform プロパティの場合、指定する関数のリストの順序が重要でそれにより動作が異なりますが、composite を使った合成でも順番や composite の値により動作が異なる場合があります。
以下の場合、add を指定すると translateX(270px)scale(0.8)translateY(270px) を指定したような動作になり Y 方向への値が scale により影響され、accumulate を指定すると translateX(270px)translateY(270px)scale(0.8) を指定したような動作になります。
target.animate(
   [
    {transform: 'translateX(0px)'},
    {transform: 'translateX(270px)'},
  ],
  {
    duration: 2000, //確認しやすいように 2000 に変更
  },
);
//追加のアニメーション
target.animate(
   [
      {transform: 'scale(0.5)'},
      {transform: 'scale(1.5)'},
  ],
  {
    duration: 2000,
    composite: 'replace'  //サンプルのラジオボタンで変更
  },
);
target.animate(
   [
    {transform: 'translateY(0px)'},
    {transform: 'translateY(270px)'},
  ],
  {
    duration: 2000,
    composite: 'replace'  //サンプルのラジオボタンで変更
  },
);
| composite |
|---|
参考サイト:Additive Animation with the Web Animations API
以下も同じ要素の transform プロパティに2つのアニメーションを設定する例です。
この例の場合も、composite に設定する値により、それぞれ動作が異なります。
初期状態では composite に add を指定しています。サンプルのラジオボタンを選択することで、その他の値に変更して動作を確認することができます。
赤い円を中心に rotate させるように、svg 要素のビューボックスは viewBox="-100 -100 200 200" としています(HTML の場合、回転の中心はその要素の中央ですが、SVG の場合、回転の中心はキャンバスの左上になるため)。関連:SVG rotate 回転
また、青とオレンジの円を g 要素でグループ化してアニメーションを適用するようにしています。
<svg width="200" height="200" viewBox="-100 -100 200 200">
   <g>
      <circle r="15" fill="red"/>
      <g id="target">
         <circle cx="70" r="8" fill="blue"/>
         <circle cx="95" r="3" fill="orange"/>
      </g>
   </g>
</svg>
1つ目のアニメーションは g 要素(青とオレンジの円)を赤い円の中心を原点に360度回転します。
2つ目のアニメーションは、translate(70px, 0) により原点を 70px ずらして青い円の中心を原点に360度回転します。そのため、青い円は自身を中心に回転し、オレンジの縁は青い円の周りを回転します。
composite のデフォルトの replace の場合は、後から実行する2つ目のアニメーションにより1つ目のアニメーションは覆い隠されますが、add や accumulate を指定すると動作が合成されてそれぞれ異なります。
//アニメーション対象の g 要素(SVG 要素)
const target = document.getElementById('target');

//同じ要素の同一プロパティにアニメーションを設定
const animations = [
  target.animate(
    [
      {transform: 'rotate(0deg)'},
      {transform: 'rotate(360deg)'},
    ],
    {
      duration: 12000,
      iterations:Infinity
    }
  ),
  target.animate(
    [
      {transform: 'translate(70px, 0) rotate(0deg) translate(-70px, 0)'},
      {transform: 'translate(70px, 0) rotate(-360deg) translate(-70px, 0)'},
    ],
    {
      duration:1400,
      iterations:Infinity,
      composite: 'add'  //accumulate や replace に変更すると動作が異なる
    }
  )
];

//上記で作成したアニメーションの自動再生を停止
animations.forEach( (animation) => {
  animation.cancel();
});

//Start ボタン
const toggle = document.getElementById('toggle');

//Start ボタンにクリックイベントを設定
toggle.addEventListener('click', (e) => {
  //それぞれのアニメーションに対して実行
  animations.forEach( (animation) => {
    // playState が running でなければ再生し、ボタンのラベルを Pause に変更
    if(animation.playState !== 'running'){
      animation.play();
      toggle.textContent = 'Pause';
    }else{
       // playState が running であれば停止し、ボタンのラベルを Start に変更
       animation.pause();
       toggle.textContent = 'Start';
    }
  });
});
上記では2つのアニメーションをまとめて配列として生成していますが、以下のように個別に生成しても同じです。
const target = document.getElementById('target');
//1つ目のアニメーション
const animation1 =  target.animate(
  [
    {transform: 'rotate(0deg)'},
    {transform: 'rotate(360deg)'},
  ],
  {
    duration: 12000,
    iterations:Infinity
  }
);
animation1.cancel();
//2つ目のアニメーション
const animation2 =  target.animate(
  [
    {transform: 'translate(70px, 0) rotate(0deg) translate(-70px, 0)'},
    {transform: 'translate(70px, 0) rotate(-360deg) translate(-70px, 0)'},
  ],
  {
    duration:1400,
    iterations:Infinity,
    composite: 'add'
  }
);
animation2.cancel();

const toggle = document.getElementById('toggle');
toggle.addEventListener('click', (e) => {
  [animation1, animation2].forEach( (animation) => {
    if(animation.playState !== 'running'){
      animation.play();
      toggle.textContent = 'Pause';
    }else{
       animation.pause();
       toggle.textContent = 'Start';
    }
  });
});
iterationComposite 反復による累積
iterationComposite は単一のアニメーションにおけるある反復から次の反復への値の扱いを指定するプロパティです。デフォルトは replace で繰り返しにより値は変化しませんが、accumulate を指定すると値は累積されます。
但し、現時点(2022年3月)では Firefox でしかサポートされていません。can i use KeyframeEffect API: iterationComposite
例えば、iterationComposite をサポートしているブラウザでは以下の2つのアニメーションは同じ結果になります。
document.getElementById('target').animate(
  [
    { transform: 'rotate(0deg) translateX(0px)', opacity: 0 },
    {  transform: 'rotate(360deg) translateX(50px)', opacity: .5 }
  ],
  {
    duration: 2000,  //持続時間
    iterations: 2,  //2回繰り返し
    fill: 'forwards',
    iterationComposite: 'accumulate' //accumulate(累積)を指定
  }
);
document.getElementById('target').animate(
  [
    { transform: 'rotate(0deg) translateX(0px)', opacity: 0},
    //終了時の値は2倍の値を指定
    { transform: 'rotate(720deg) translateX(100px)', opacity: 1}
  ],
  {
    duration: 4000,  //持続時間(2倍)
    iterations: 1,   //1回繰り返し
    fill: 'forwards',
    iterationComposite: 'replace' //デフォルトの replace
  }
);
以下は上記1つ目のアニメーションの例です。iterationComposite の値はラジオボタンで選択できるようになっています
accumulate を選択するとは Firefox では期待通りの動作になりますが、iterationComposite をサポートしていないブラウザでは同じアニメーションが2回繰り返されます(デフォルトの replace と同じ)。
Firefox でご確認ください。
タイミングプロパティとメモリリーク
Animation オブジェクトの生成の際に以下のパラメータを指定した場合、時間経過によって無効となりにくいアニメーションが作成され、メモリリークが発生する可能性があります。
- iterations プロパティに Infinity または大きな値を指定
- fill プロパティに forwards または bothを指定
- duration プロパティに大きな値を指定
上記のようなプロパティを指定した場合、作成された Animation オブジェクトは終了しなかったり、終了後もプロパティの値を書き換え続けているため一度実行されるといつまでもメモリから開放されない可能性があります。
このため、Animation オブジェクトを生成する Element.animate() メソッドによるアニメーションを何度も繰り返した場合、古い Animation オブジェクトが積み重なることでメモリリークが発生する可能性があります。
また、アニメーションを繰り返した際に Animation オブジェクトの蓄積により、次第にアニメーションがガクガクする現象が発生する場合があります。
解決策
これらの問題を解決するには以下のような方法があります。
- 変数に Animation オブジェクトを保存して Animation オブジェクトを再利用する
- アニメーション開始時に既存の Animation オブジェクトをキャンセルする
Animation オブジェクトを再利用
以下は Element.animate() メソッドを使う際に、クリックする度に Animation オブジェクトを生成するのではなく、Animation オブジェクトを変数に代入して再利用する例です。
const target = document.getElementById('target');

//変数に Animation オブジェクトを保存
const animation = target.animate(
  [
    {transform: 'translateX(0px)', backgroundColor: 'blue'},
    {transform: 'translateX(200px)', backgroundColor: 'green'}
  ],
  {
    duration: 2000,
    fill: 'forwards'
  }
);
//アニメーションを停止
animation.cancel();

const btn = document.getElementById('start');

btn.addEventListener('click', (e) => {
  //Animation オブジェクトを再利用
  animation.play();
});
開始時に既存の Animation オブジェクトをキャンセル
以下はアニメーション開始時に getAnimations() で対象の要素の Animation オブジェクトの配列を取得してすべてキャンセルする例です。
Element.getAnimations() は要素に影響を与える、あるいは将来的に影響を与える予定のすべての Animation オブジェクトの配列を返します。
const target = document.getElementById('target');
const btn = document.getElementById('start');

btn.addEventListener('click', (e) => {

  //getAnimations() でこの要素の Animation オブジェクトの配列を取得してすべて停止
  target.getAnimations().forEach((anim) => anim.cancel());

  target.animate(
    [
      {transform: 'translateX(0px)', backgroundColor: 'blue'},
      {transform: 'translateX(200px)', backgroundColor: 'red'}
    ],
    {
      duration: 2000,
      fill: 'forwards'
    }
  );
});
参考にさせていただいたサイト:Web Animations APIの基本的な使い方・まとめ
アニメーションの自動削除
最新のブラウザでは同じ要素に多数のアニメーションを起動させるなどでメモリリークを発生させる可能性がある場合は、開発者が明示的に指定しない限りそれらのアニメーションを自動的に削除します。
関連項目:
MDN:アニメーションの自動削除
Animation
Animation はアニメーションそのものを表す Web Animation API のインターフェースで、アニメーションの実行を制御するための API(プロパティやメソッド、イベントなど)を備えています。
以下は Animation のプロパティやメソッドの一部とその概要です。
| プロパティ | 説明 |
|---|---|
| effect | アニメーションに関連付けられた AnimationEffect(KeyframeEffect オブジェクト)を取得または設定 |
| playState | アニメーションの再生状態を取得 |
| pending | アニメーションが現在、再生待ちや再生中の一時停止などの非同期操作を待機しているかどうかを示すプロパティ |
| playbackRate | アニメーションの再生速度を取得または設定 |
| timeline | アニメーションに関連付けられる timeline(タイムライン)を取得または設定 |
| startTime | アニメーションの再生が始まる予定の時刻を取得または設定 |
| currentTime | アニメーションの現在時刻(再生位置)の値 |
| ready | アニメーションの再生準備ができた時点で Promise を返すプロパティ |
| finished | アニメーションの終了時に Promise を返すプロパティ |
| メソッド | 説明 |
|---|---|
| cancel() | アニメーションで発生したすべての keyframeEffects を消去し、再生を中止 |
| finish() | 再生位置をアニメーションのどちらかの端まで移動 |
| pause() | アニメーションの再生を一時停止 |
| play() | アニメーションの再生を開始または再開 |
| reverse() | 再生方向を反転 |
MDN:Animation
Animation()
Animation オブジェクトのインスタンスを生成するにはコンストラクタ Animation() を使います。
生成した Animation オブジェクトのメソッドを使ってアニメーションを実行することができます。
以下がコンストラクタ Animation() の構文です。
var animation = new Animation( effect, timeline );
| 引数 | 説明 |
|---|---|
| effect | アニメーションに割り当てるターゲットエフェクト(target effect)を指定します。現在利用可能なターゲットエフェクトは KeyFrameEffect オブジェクトのみです。 |
| timeline | アニメーションを関連付けるタイムラインを指定します。現在利用可能なタイムラインタイプは DocumentTimeline のみで、document.timeline を指定します(デフォルト)。 |
戻り値
Animation オブジェクト
W3C Working Draft : Animation (effect, timeline)
タイムライン
アニメーションは時間の流れに沿ってグラフィックの内容を書き換えますが、タイムラインはその時系列を表します。
タイムライン(timeline)は同期を目的とした時間値のソースで、AnimationTimeline ベースのオブジェクトです。デフォルトではアニメーションのタイムライン(AnimationTimeline)とドキュメントのタイムライン(DocumentTimeline)は同じです。
Animation オブジェクトを生成するコンストラクタ Animation() の第2引数には document.timeline を指定します(デフォルト)。
また、Animation.timeline を使って対象のアニメーションに紐づいたタイムライン(DocumentTimeline または AnimationTimeline) の取得(および設定)が可能です。
以下はアニメーションのタイムラインとドキュメントのタイムラインを同じに設定します(※これはすべてのアニメーションのデフォルトのタイムラインなので通常は意味がありません)。
animation.timeline = document.timeline;
timeline.currentTime
タイムライン上の現在時刻は document.timeline.currentTime で取得することができます。
| プロパティ | 説明 |
|---|---|
| AnimationTimeline.currentTime | タイムラインの現在の時刻をミリ秒単位で返します。タイムラインが非アクティブの場合は null を返します。 |
また、Animation オブジェクトには以下のようなプロパティがあります。
| プロパティ | 説明 |
|---|---|
| Animation. currentTime |
再生中か停止中かに関わらずアニメーションの現在時間(再生位置)をミリ秒で表します。getComputedTiming() メソッドの localTime と同じ値になります。関連項目:currentTime 再生位置 |
| Animation. startTime |
アニメーションが再生される時間(アニメーションの開始時刻)の取得および設定を行います。値を設定することで指定した時刻にアニメーションを再生することができます。開始前は値がないため null になります。関連項目:startTime 開始時刻の取得と設定 |
アニメーションの詳しいタイミング情報は getComputedTiming() メソッドで取得することができます。
これらの値はアニメーションの途中では以下のような関係がほぼ成立しますが、開始前及び終了後は成り立ちません(開始前及び終了後は startTime は null になり、また timeline.currentTime は時間の経過とともに増え続けますが、Animation.currentTime は終了時点での値のままになります)。
また、値は完全には一致しません(小数点以下11桁以降の部分が異なります)。
Animation.currentTime ≒ Animation.timeline.currentTime - Animation.startTime

アニメーションの現在時刻 ≒ タイムライン上の現在時刻からアニメーションの開始時刻を引いた値
以下は Start ボタンをクリックするとアニメーションを開始し、Check ボタンをクリックするとその時点でのそれぞれのプロパティの値を表示するサンプルです。
//アニメーション対象の要素
const target = document.getElementById('target');

//アニメーションを作成
const animation = target.animate(
  [
    { transform: 'translateX(0px)' },
    { transform: 'translateX(300px)' },
  ],
  {
    duration: 2000,
    easing: 'ease-in-out',
    iterations: 4,
    direction: 'alternate',
  }
);
//自動再生を停止
animation.cancel();

//Start ボタン
const start = document.getElementById('start');
//Start ボタンをクリックするとアニメーションを再生
start.addEventListener('click', (e) => {
  animation.play();
});

//それぞれのプロパティを取得して出力する関数
const outputProps = () => {
  const animationTimelineCurrentTime = animation.timeline.currentTime;
  const animationstartTime = animation.startTime;
  const animationCurrentTime = animation.currentTime;
  output.innerText = 'animation.timeline.currentTime: ' + animationTimelineCurrentTime + "\n" +
    'animation.startTime: ' + animationstartTime + "\n" +
    'animation.currentTime: ' + animationCurrentTime + "\n" +
     ( animationTimelineCurrentTime - animationstartTime) + ' ≒ ' + animationTimelineCurrentTime + ' - ' +  animationstartTime;
}

//Check ボタン
const check = document.getElementById('check');
//メッセージの出力先
const output = document.getElementById('output');

//Check ボタンをクリックすると一時停止してその時点のプロパティを出力
check.addEventListener('click', (e) => {
  //一時停止
  animation.pause();
  //それぞれのプロパティを取得して出力
  outputProps();
});

//Cancel ボタン
const cancel = document.getElementById('cancel');
cancel.addEventListener('click', (e) => {
  animation.cancel();
  outputProps();
});
KeyFrameEffect
KeyFrameEffect はアニメーションの対象に設定するキーフレームなどを表すオブジェクトで、コンストラクタ KeyFrameEffect() を使って生成します。
Animation() コンストラクタを使って Animation オブジェクトを生成する際は第1引数に指定します。
また、KeyFrameEffect オブジェクトは Animation オブジェクトの effect プロパティでアクセス(取得)することができます。
以下が KeyFrameEffect を生成する KeyFrameEffect() コンストラクタの構文です。
var effect = new KeyframeEffect(target, keyframes, options);
| 引数 | 説明 |
|---|---|
| target | アニメーション対象の(アニメーションを適用する) DOM 要素 |
| keyframes | keyframes オブジェクト。アニメーションの対象のプロパティがいつどのような値をとるかを記述したキーフレームのセットを表すオブジェクト。animate() メソッドの第1引数に渡す keyframes と同じ。 |
| options | アニメーションの再生時間を表す整数値、または 1 つ以上のタイミングプロパティを含むオブジェクト。animate() メソッドの第2引数に渡す options と同じ。 |
戻り値
KeyFrameEffect オブジェクト
Animation オブジェクトの生成
以下は予め KeyFrameEffect オブジェクトを作成して、Animation オブジェクトを生成する例です。
Element.animate() メソッドとは異なり、生成した Animation オブジェクトのアニメーションは自動的に再生されないので、Animation オブジェクトのメソッド play() を使ってアニメーションを再生しています。
//アニメーション対象の要素を取得
const target = document.getElementById('target');
//ボタンの要素を取得
const start =  document.getElementById('start');

//KeyFrameEffect オブジェクトを作成
const effect = new KeyframeEffect(

  //アニメーション対象の要素
  target,
  //keyframes オブジェクト
  [
    { transform: 'translate(0px, 0px)' },
    { transform: 'translate(200px, 100px)' },
    { transform: 'translate(400px, 0px)' },
  ],
  //オプション(タイミングプロパティ)
  {
    duration: 1000,
    easing: 'ease-in-out',
    direction: 'alternate',
    iterations : 2
  },
);

// Animation オブジェクトを生成
const animation = new Animation(effect, document.timeline);

//ボタンの要素にクリックイベントを設定
start.addEventListener('click', (e) => {
  //すでに実行されているアニメーションがあれば停止
  animation.cancel();
  //アニメーションを再生
  animation.play();
});
以下のようにコンストラクタ Animation() の中で KeyframeEffect オブジェクトを生成して Animation オブジェクトを生成することもできます。
// Animation オブジェクトを生成
const animation = new Animation(
  //KeyFrameEffect オブジェクトを作成
  new KeyframeEffect(

    //アニメーション対象の要素
    target_animation_sample01,
    //keyframes オブジェクト
    [
      { transform: 'translate(0px, 0px)' },
      { transform: 'translate(200px, 100px)' },
      { transform: 'translate(400px, 0px)' },
    ],
    //オプション(タイミングプロパティ)
    {
      duration: 1000,
      easing: 'ease-in-out',
      direction: 'alternate',
      iterations : 4
    },
  ),
  document.timeline
);
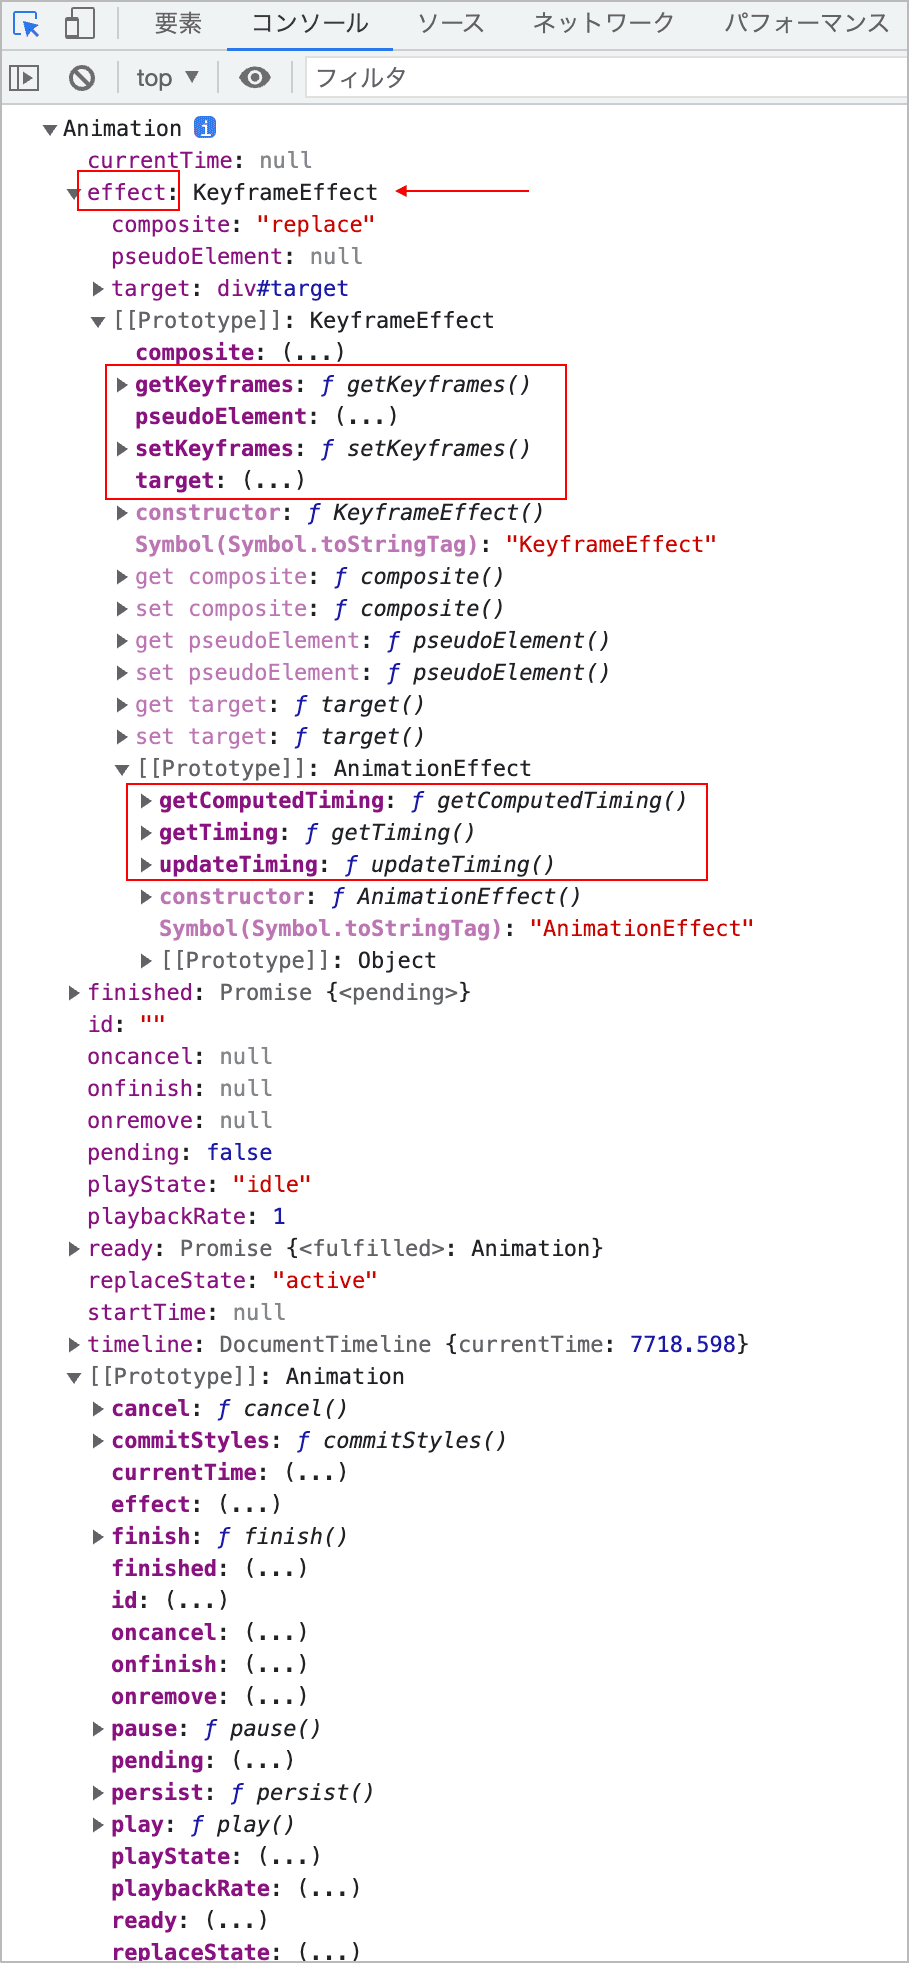
effect プロパティ
effect は Animation オブジェクトのプロパティで、KeyFrameEffect オブジェクトになります。
以下はコンソールに出力した Animation オブジェクトをブラウザのインスペクタで確認した例です。プロパティの1つに effect(KeyFrameEffect オブジェクト)があります。
KeyFrameEffect オブジェクトの取得
effect プロパティの値は対象のアニメーションの KeyFrameEffect オブジェクトになります。
つまり、Animation オブジェクトの effect プロパティで KeyFrameEffect オブジェクトにアクセス(取得)できます。
KeyFrameEffect オブジェクトのプロパティ
KeyFrameEffect オブジェクトには以下のようなプロパティがあります。composite プロパティの変更
| プロパティ | 説明 |
|---|---|
| target | このキーフレームの対象の要素、または疑似要素の元の要素を取得および設定します。KeyFrameEffect() コンストラクタの第1引数に指定した要素。 |
| pseudoElement | このキーフレームの対象の疑似要素を取得および設定します。 |
| iterationComposite | このキーフレームの iterationComposite(繰り返しごとのアニメーションの値の扱い方)を取得および設定します。 |
| composite | このキーフレームの composite(アニメーションの値の組み合わせ方法)を取得および設定します。 |
<div id="target"></div>
<script>
const target = document.getElementById('target');
//アニメーションを作成して実行
const animation = target.animate(
[
{ transform: 'translateX(0px)', backgroundColor: 'blue' },
{ transform: 'translateX(300px)' , backgroundColor: 'pink' },
],
{
duration: 1000,
easing: 'ease',
}
);
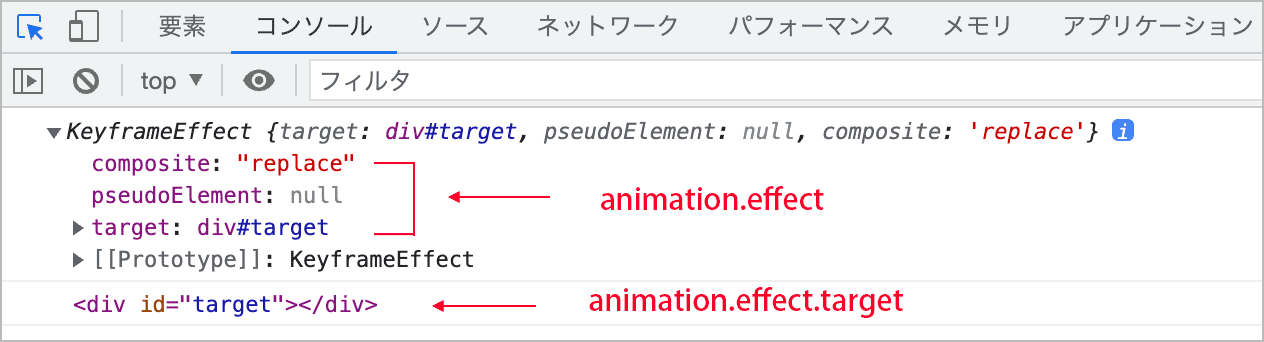
//アニメーションの effect プロパティ(KeyFrameEffect オブジェクト)をコンソールに出力
console.log(animation.effect);
//KeyFrameEffect オブジェクトの target プロパティ(対象の要素)をコンソールに出力
console.log(animation.effect.target);
</script>
KeyFrameEffect オブジェクトのメソッド
KeyFrameEffect オブジェクトには以下のようなメソッドがあり、KeyFrameEffect のキーフレームやタイミングの取得や設定ができます。タイミング関連のメソッドは AnimationEffect から継承しています。
| メソッド | 説明 |
|---|---|
| KeyframeEffect.getKeyframes() | キーフレーム(keyframes と keyframe offsets)の配列を返します |
| KeyframeEffect.setKeyframes() | キーフレームセット(keyframes)を置き換えます |
| AnimationEffect.getTiming() | タイミングプロパティのオブジェクトを返します |
| AnimationEffect.getComputedTiming() | 算出されたタイミング関連の詳しい情報(オブジェクト)を返します |
| AnimationEffect.updateTiming() | タイミングプロパティを更新します |
以下はアニメーションを作成して、その KeyFrameEffect(キーフレームとタイミング)の情報をコンソールに出力しています。
//アニメーションを生成
const animation = new Animation(
new KeyframeEffect(
document.getElementById('target'),
[
{ transform: 'translate(0px, 0px)', offset: 0 },
{ transform: 'translate(200px, 100px)', offset: 0.3 },
{ transform: 'translate(400px, 0px)', offset: 1 },
],
{
duration: 1000,
easing: 'ease-in-out',
direction: 'alternate',
iterations : 2
},
),
document.timeline
);
animation.play(); //再生
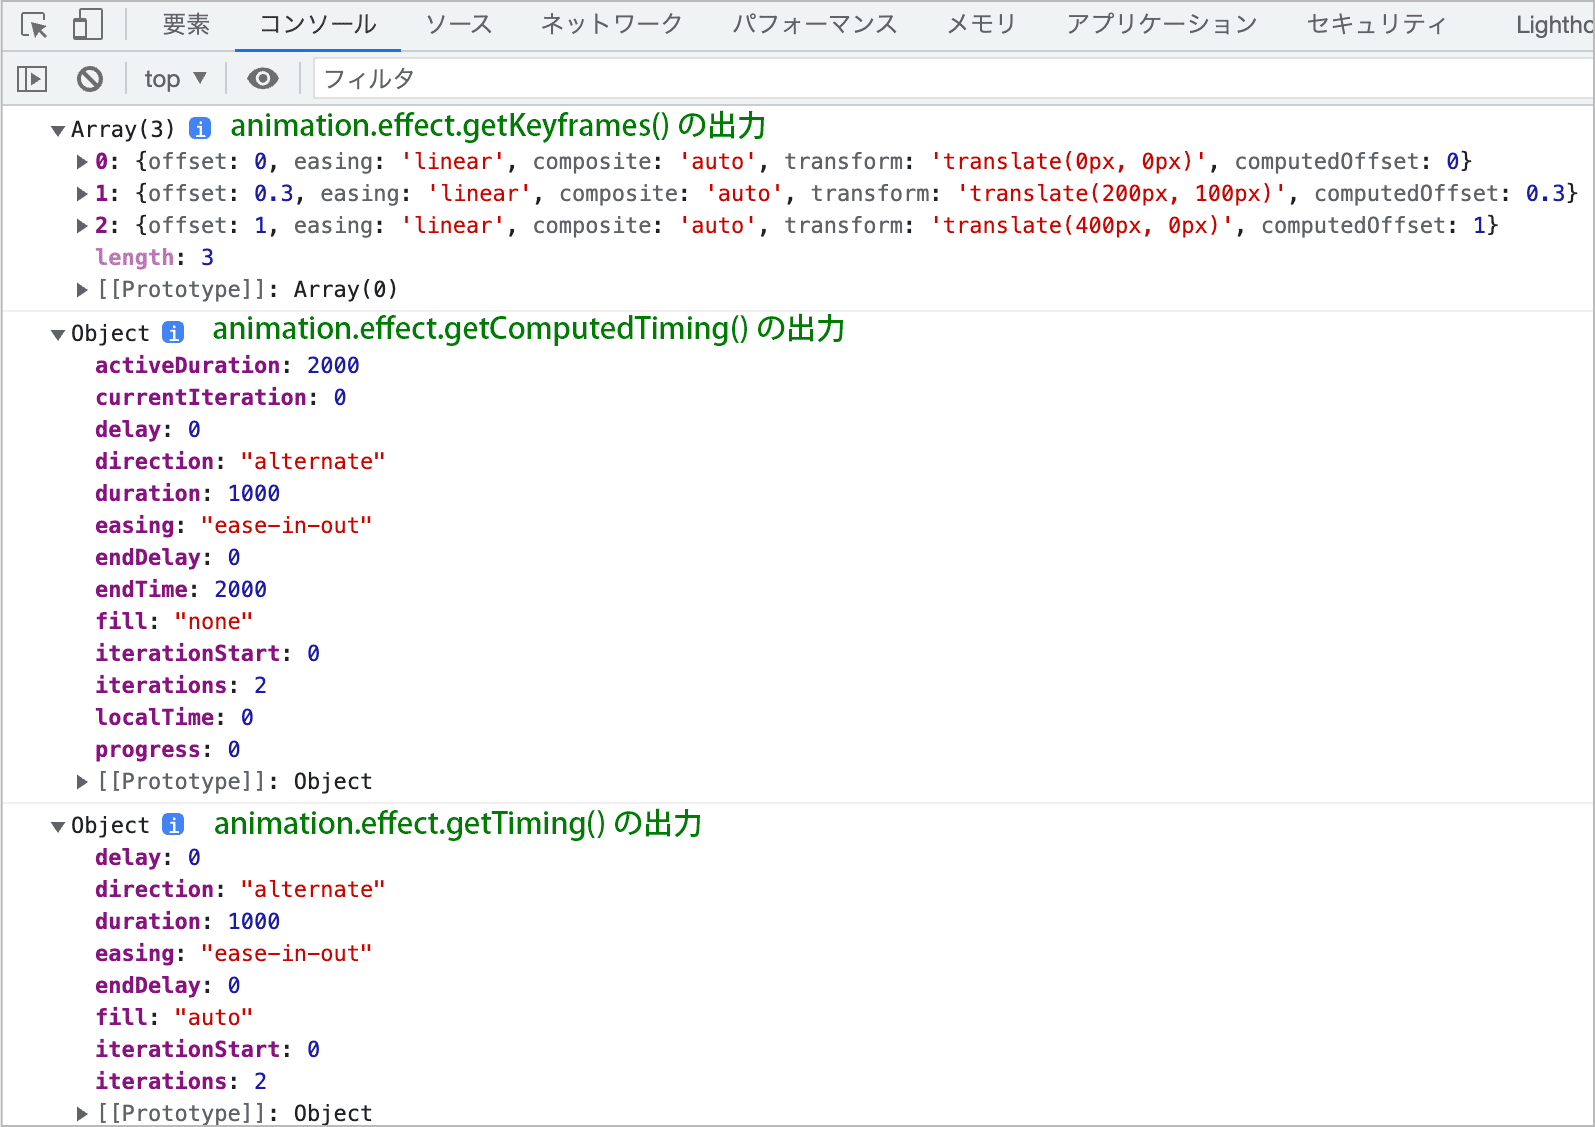
//メソッドを使って KeyFrameEffect の情報を出力
console.log(animation.effect.getKeyframes());
console.log(animation.effect.getComputedTiming());
console.log(animation.effect.getTiming());
ブラウザのインスペクタで確認すると以下のように表示されます。
getComputedTiming() タイミング情報
アニメーションの現在の CSS プロパティの値を取得するには、window.getComputedStyle() メソッドを利用できます。
アニメーションの詳しいタイミング情報を取得するには AnimationEffect.getComputedTiming() メソッドを利用することができます。
AnimationEffect インターフェイスの getComputedTiming() メソッドは、アニメーション効果の算出されたタイミングプロパティ(オブジェクト)を返します。
返されるオブジェクトの属性の多くは、AnimationEffect.getTiming() メソッドによって返されるオブジェクトと共通ですが、このオブジェクトによって返される値は以下が異なります。
- duration:反復期間の計算値を返します。duration が文字列 auto の場合、この属性は0を返します。
- fill:auto は適切な fill の値に置き換えられます。
以下が書式です。引数はありません。
- animation :対象の Animation オブジェクト
- currentTimeValues :タイミングプロパティのオブジェクト(戻り値)
var currentTimeValues = animation.effect.getComputedTiming();
戻り値
以下のような現在のアニメーションのタイミングプロパティを含むオブジェクト。
| プロパティ | 説明 |
|---|---|
| endTime | ミリ秒単位のアニメーションの開始からのアニメーションの終了時間(delay と endDelay も含まれます) |
| activeDuration | ミリ秒単位のアニメーションの効果が実行される時間の長さ(delay と endDelay を除いたアニメーションの全体としての持続時間)。 再生時間に反復回数を掛けたもの(duration * iterationCount)に等しくなります。 |
| localTime | アニメーションの現在の再生位置を表すミリ秒単位の数値。KeyframeEffect がアニメーションに関連付けられていない場合、値は null になります。Animation.currentTime と同じ(AnimationTimeline.currentTime とは異なる) |
| progress | アニメーションが現在(1ループ内で)どの程度進んでいるか(進捗度)を示す0〜1の間の値(CSS プロパティ値の補間位置)。アニメーションが実行されていない場合、またはその KeyframeEffect がアニメーションに関連付けられていない場合は null を返します(この値は easing 関数が適用されています)。 |
| currentIteration | アニメーションの現在のループ(繰り返し)回数(0から開始)。アニメーションが実行されていない場合、またはその KeyframeEffect がアニメーションに関連付けられていない場合は null を返します。 |
以下は Check ボタンをクリックするとその時点でのアニメーションのタイミング情報を取得して表示するサンプルです。
<div id="target"></div>
<button type="button" id="start">Start</button>
<button type="button" id="check">Check</button>
<div class="output" id="output"></div>
//アニメーション対象の要素を取得
const target = document.getElementById('target');

// animate() でアニメーションを作成
const animation = target.animate(
  [
    { transform: 'translateX(0px)' },
    { transform: 'translateX(300px)' },
  ],
  {
    duration: 2000,
    delay: 500,
    endDelay: 800,
    easing: 'ease-in-out',
    iterations: 6,
    direction: 'alternate',
  }
);
//アニメーションの自動再生を停止
animation.cancel();

//Start ボタンの要素を取得
const start = document.getElementById('start');
//ボタンの要素にクリックイベントを設定
start.addEventListener('click', (e) => {
  animation.play(); //アニメーションを再生
});

//プロパティの値を取得して出力する関数
const outputProps = () => {
  //変数 timing にタイミングプロパティ(オブジェクト)を代入
  const timing = animation.effect.getComputedTiming();
  //それぞれのプロパティの値を取得
  const endTime = timing.endTime;
  const activeDuration = timing.activeDuration;
  const localTime = timing.localTime;
  //localTime を endTime で割って100をかけて進捗状況の%を取得
  const completed = Math.floor((localTime * 100 / endTime));
  const progress = timing.progress;
  const currentIteration = timing.currentIteration;
  //animation.currentTime プロパティ(localTime と等しい)
  const animationCurrentTime = animation.currentTime;
  //出力
  output.innerText='endTime(=delay+activeDuration+endDelay): '+endTime+"\n" +
    'activeDuration(=duration * iterationCount): ' + activeDuration + "\n" +
    'localTime: ' + localTime + "\n" +
    'animation.currentTime ( = localTime ): ' + animationCurrentTime + "\n" +
    'completed : ' + completed + "% \n" +
    'progress: ' + progress + "\n" +
    'currentIteration: ' + currentIteration + '(' + (currentIteration +1) + "回目)\n";
}

//Check ボタンの要素を取得
const check = document.getElementById('check');
//出力先の要素を取得
const output = document.getElementById('output');
//Check ボタンにクリックイベントを設定
check.addEventListener('click', (e) => {
  //一時停止
  animation.pause();
  //プロパティを取得して出力
  outputProps();
});

//Cancel ボタンの要素を取得
const cancel = document.getElementById('cancel');
//Cancel ボタンにクリックイベントを設定
cancel.addEventListener('click', (e) => {
  //アニメーションを停止してアニメーション呼び出し前の状態に戻す
  animation.cancel();
  //プロパティを取得して出力
  outputProps();
});
このサンプルのタイミングプロパティ
- duration: 2000
- delay: 500
- endDelay: 800
- iterations: 6
- easing: 'ease-in-out'
- direction: 'alternate'
関連項目:requestAnimationFrame() の利用のサンプル
キーフレームの変更
KeyframeEffect の setKeyframes() を使ってアニメーションのキーフレームを変更する(置き換える)ことができます。
以下は2つのキーフレームを用意して、Change ボタンをクリックするとキーフレームを入れ替える例です。
<div id="target"></div>
<button type="button" id="start">Start</button>
<button type="button" id="change">Change</button>
アニメーションを生成する際は、1つ目のキーフレームを使って生成しています。
change ボタンがクリックされたら、アニメーションの effect プロパティ(KeyframeEffect)のメソッド setKeyframes() を使ってキーフレームを置き換えています。
また、cancel() でアニメーションを停止して keyframeEffects を消去して初期状態にしています。
//アニメーションの対象の要素を取得
const target = document.getElementById('target');

//キーフレーム(1)
const keyframe1 = [
  { transform: 'translateX(0px)' },
  { transform: 'translateX(300px)' },
];
//キーフレーム(2)
const keyframe2 = [
  { backgroundColor: '#85A0F5' },
  { backgroundColor: 'pink' },
];

//アニメーションを生成
const animation = new Animation(
  new KeyframeEffect(
    target,  //アニメーションの対象の要素
    keyframe1,  //キーフレーム(1)
    {
      duration: 1000,
      easing: 'ease-in-out',
    },
  ),
  document.timeline
);

//start ボタンの要素を取得
const start = document.getElementById('start');

//start ボタンにクリックイベントを設定
start.addEventListener('click', (e) => {
  animation.play(); //クリックしたらアニメーションを再生
});

//change ボタンの要素を取得
const change = document.getElementById('change');

//どちらのキーフレームが使用されているかの判定用の変数
let isKeyframe1 = true;

//change ボタンにクリックイベントを設定
change.addEventListener('click', (e) => {
  //対象要素のアニメーションのキーフレームを置き換え
  animation.effect.setKeyframes(isKeyframe1 ? keyframe2 : keyframe1);
  //アニメーションを停止(keyframeEffects の適用を消去)
  animation.cancel();
  //判定用の変数の値を更新(反転)
  isKeyframe1 = !isKeyframe1;
});
上記の例では2つのキーフレームを用意していますが、キーフレームを元に戻す必要がなければ、単純に .effect.setKeyframes() で新しいキーフレームを設定するだけです。
また、animate() を使う場合は上記のアニメーションを生成の部分(16〜26行目)を以下のようにします。
const animation = target.animate(
  keyframe1,
  {
    duration: 1000,
    easing: 'ease-in-out',
  }
);
//自動的に再生されないように一度停止
animation.cancel();
タイミングプロパティの変更
AnimationEffect の updateTiming() メソッドを使ってアニメーションのタイミングプロパティを変更することができます。
以下は2つのタイミングプロパティのオブジェクトを用意して、Change ボタンをクリックすると updateTiming() を使ってそれらを入れ替えてタイミングプロパティを変更する例です。
const target = document.getElementById('target');
//タイミングプロパティ(1)
const timing1 = {
  delay: 500,
  duration: 500,
  easing: 'ease',
  iterations: 4,
  fill: 'none',
  direction: 'alternate'
};
//タイミングプロパティ(2)
const timing2 = {
  delay: 0,
  duration: 1000,
  easing: 'ease-in-out',
  iterations: 1,
  fill: 'forwards',
  direction: 'normal'
};

//アニメーションを生成
const animation = new Animation(
  new KeyframeEffect(
    target,
    [
      { transform: 'translateX(0px)' },
      { transform: 'translateX(300px)' },
    ],
    timing1,//タイミングプロパティ(1)
  ),
  document.timeline
);

//start ボタンの要素を取得
const start = document.getElementById('start');
//start ボタンにクリックイベントを設定
start.addEventListener('click', (e) => {
  animation.play();
});

//change ボタンの要素を取得
const change = document.getElementById('change');
//どちらのタイミングプロパティが使用されているかの判定用の変数
let isTiming1 = true;

change.addEventListener('click', (e) => {
  //対象要素のアニメーションのタイミングプロパティを入れ替え
  animation.effect.updateTiming(isTiming1 ? timing2 : timing1);
  //アニメーションを停止(keyframeEffects の適用を消去)
  animation.cancel();
  //判定用の変数の値を更新(反転)
  isTiming1 = !isTiming1;
});
アニメーションを生成する部分は animate() メソッドを使って以下のように記述することもできます。
const animation = target.animate(
  [
    { transform: 'translateX(0px)' },
    { transform: 'translateX(300px)' },
  ],
  timing1
);
//自動的に再生されないように一度停止
animation.cancel();
タイミングプロパティを元に戻す必要がなければ、単純に変更することができます。
const animation = target.animate(
  [
    { transform: 'translateX(0px)' },
    { transform: 'translateX(300px)' },
  ],
  {
    delay: 500,
    duration: 500,
    easing: 'ease',
    iterations: 4,
    fill: 'none',
    direction: 'alternate'
  }
);
animation.cancel();

const start = document.getElementById('start');
start.addEventListener('click', (e) => {
  animation.play();
});
const change = document.getElementById('change');

change.addEventListener('click', (e) => {
  //変更後のタイミングプロパティ
  const timing = {
    delay: 0,
    duration: 1000,
    easing: 'ease-in-out',
    iterations: 1,
    fill: 'forwards',
    direction: 'normal'
  };
  //タイミングプロパティを変更
  animation.effect.updateTiming(timing);
  animation.cancel();
});
また、特定のタイミングプロパティだけを更新することもできます。以下は KeyFrameEffect のメソッド getTiming() で現在の direction プロパティの値を取得して、反対の方向へ変更する例です。
//現在の direction プロパティの値を取得
const direction = animation.effect.getTiming().direction;

if(direction === 'normal') {
  //direction プロパティの値を reverse に変更
  animation.effect.updateTiming({ direction: 'reverse' });
}else{
  //direction プロパティの値を normal に変更
  animation.effect.updateTiming({ direction: 'normal' });
}
composite プロパティの変更
アニメーションを作成する際には、タイミングプロパティに composite プロパティを指定しますが、 updateTiming() メソッドでは composite プロパティの値を変更することはできません。
アニメーションの composite プロパティを取得および設定するには KeyframeEffect の composite プロパティを使います。
// composite の値を取得(Animation は Animation オブジェクト)
var compositeValue = Animation.effect.composite;

// composite の値を設定(Animation は Animation オブジェクト)
Animation.effect.composite = 'accumulate';
composite の値
複数のアニメーションが動作している場合にアニメーションの値(効果)の組み合わせ方法を指定します。
- 'add':値は現在のプロパティ値に加算されます。例 blur(2) と blur(5) は blur(2) blur(5) になります。
- 'accumulate':値は現在のプロパティ値に累積されます。例 blur(2) と blur(5) は blur(7) になります。
- 'replace':前の値を新しい値で上書きします。例 blur(2) と blur(5) は blur(5) になります。
同様に iterationComposite プロパティの取得および設定は KeyframeEffect.iterationComposite プロパティを使います。
※ 現時点(2022年3月)では Safari では機能しません。can i use KeyframeEffect API: composite
以下は composite プロパティをクリックしたボタンの値に変更する例です。
関連項目:composite 合成
//対象の要素を取得
const target = document.getElementById('target');

//アニメーションの作成
const animation1 =  target.animate(
  [
    {transform: 'rotate(0deg)'},
    {transform: 'rotate(360deg)'},
  ],
  {
    duration: 12000,
    iterations:Infinity
  }
);
animation1.cancel();

//アニメーションの作成
const animation2 =  target.animate(
  [
    {transform: 'translate(70px, 0) rotate(0deg) translate(-70px, 0)'},
    {transform: 'translate(70px, 0) rotate(-360deg) translate(-70px, 0)'},
  ],
  {
    duration:1400,
    iterations:Infinity,
    composite: 'add'  //composite の初期値を指定
  }
);
animation2.cancel();

/*・・・中略(Start ボタンなどのイベント設定等)・・・*/

//Add ボタンにクリックイベントを設定
document.getElementById('add').addEventListener('click', (e) => {
  //アニメーションの effect.composite の値が「add」でなければ
  if(animation2.effect.composite !== 'add') {
    //アニメーションの effect.composite の値を「add」に設定
    animation2.effect.composite = 'add';
  }
});

/*・・・以下省略・・・*/
composite: add
<div>
  <svg width="200" height="200" viewBox="-100 -100 200 200">
    <g>
      <circle r="15" fill="red"/>
      <g id="target">
        <circle cx="70" r="8" fill="blue"/>
        <circle cx="95" r="3" fill="orange"/>
      </g>
    </g>
  </svg>
</div>
<p>composite: <strong><span id="output_composite">add</span></strong></p>
<div>
  <button type="button" id="add" class="control">Add</button>
  <button type="button" id="accumulate" class="control">accumulate</button>
  <button type="button" id="replace" class="control">Replace</button>
</div>
<div>
  <button type="button" id="start" class="control">Start</button>
  <button type="button" id="pause" class="control">Pause</button>
  <button type="button" id="cancel" class="control">Cancel</button>
</div>

<script>
const target = document.getElementById('target');
const animation1 =  target.animate(
  [
    {transform: 'rotate(0deg)'},
    {transform: 'rotate(360deg)'},
  ],
  {
    duration: 12000,
    iterations:Infinity
  }
);
animation1.cancel();

const animation2 =  target.animate(
  [
    {transform: 'translate(70px, 0) rotate(0deg) translate(-70px, 0)'},
    {transform: 'translate(70px, 0) rotate(-360deg) translate(-70px, 0)'},
  ],
  {
    duration:1400,
    iterations:Infinity,
    composite: 'add'  //composite プロパティ
  }
);
animation2.cancel();

const animations = [animation1, animation2];

document.getElementById('start').addEventListener('click', (e) => {
  animations.forEach( (animation) => {
    animation.play();
  });
});
document.getElementById('pause').addEventListener('click', (e) => {
  animations.forEach( (animation) => {
    animation.pause();
  });
});
document.getElementById('cancel').addEventListener('click', (e) => {
  animations.forEach( (animation) => {
    animation.cancel();
  });
});

const output_composite = document.getElementById('output_composite');

document.getElementById('add').addEventListener('click', (e) => {
  if(animation2.effect.composite !== 'add') {
    //composite プロパティを変更
    animation2.effect.composite = 'add';
    output_composite.textContent = animation2.effect.composite
  }
});
document.getElementById('accumulate').addEventListener('click', (e) => {
  if(animation2.effect.composite !== 'accumulate') {
    //composite プロパティを変更
    animation2.effect.composite = 'accumulate';
    output_composite.textContent = animation2.effect.composite
  }
});
document.getElementById('replace').addEventListener('click', (e) => {
  if(animation2.effect.composite !== 'replace') {
    //composite プロパティを変更
    animation2.effect.composite = 'replace';
    output_composite.textContent = animation2.effect.composite
  }
});
</script>
playState アニメーションの状態
Web Animations API ではアニメーションの状態(play state)は以下ように分類されていて、Animation.playState プロパティから調べることができます。
| 状態 | 説明 |
|---|---|
| idle | アニメーションが呼び出されていない状態。保留中のタスクがない状態 |
| running | アニメーションが再生中の状態(delay 及び endDelay を含む) |
| paused | アニメーションが一時停止中の状態 |
| finished | アニメーション完了の状態 |
| pending(※) | 以前は一部の非同期操作がまだ完了していないことを示すために pending(保留状態)を定義していましたが、現在は Animation.pending プロパティによって示されるようになっています。 |
以下はアニメーションを制御するメソッドを実行した際の playState を表示するサンプルです。
animate() メソッドでアニメーションを作成後、自動再生を停止し、その時点でのアニメーションの playState を出力し、ボタンをクリックして play() や pause() などを実行した際にも playState を出力します。 また、delay を 500 にしています。
//アニメーション対象の要素
const target = document.getElementById('target');
//アニメーションを作成
const animation = target.animate(
  [
    { transform: 'translateX(0px)', backgroundColor: '#85A0F5' },
    { transform: 'translateX(300px)' , backgroundColor: 'lightgreen' },
  ],
  {
    duration: 1000,
    delay: 500,
    iterations: 30,
    direction: 'alternate',
    fill: 'forwards',
    easing: 'ease',
  }
);
//自動再生を停止
animation.cancel();

//出力先
const output = document.getElementById('output');
//出力先にアニメーションの playState を出力
output.textContent = 'playState: ' + animation.playState;

document.getElementById('play').addEventListener('click', (e) => {
  animation.play(); //再生
  output.textContent = 'playState: ' + animation.playState;
});
document.getElementById('pause').addEventListener('click', (e) => {
  animation.pause(); //一時停止
  output.textContent = 'playState: ' + animation.playState;
});
document.getElementById('reverse').addEventListener('click', (e) => {
  animation.reverse(); //逆再生
  output.textContent = 'playState: ' + animation.playState;
});
document.getElementById('finish').addEventListener('click', (e) => {
  animation.finish(); //終了
  output.textContent = 'playState: ' + animation.playState;
});
document.getElementById('cancel').addEventListener('click', (e) => {
  animation.cancel(); //停止
  output.textContent = 'playState: ' + animation.playState;
});
アニメーションの制御
Animation オブジェクトには以下のようなアニメーションを制御するメソッドが定義されています。
| メソッド | 説明 |
|---|---|
| play() | アニメーションの再生を開始します。アニメーションが一時停止中であれば再開し、既に終了しているアニメーションについては再度再生を行います。アニメーションは running 状態になります。 |
| pause() | 再生中のアニメーションを一時停止します。アニメーションは paused 状態になります。 |
| cancel() | 対象アニメーションによる keyframeEffects の効果の適用を消去し(アニメーション呼び出し前の状態に戻し)、再生を中断します。アニメーションは idle 状態になります。 |
| finish() | アニメーションの再生を終了までジャンプし、アニメーションを完了時の状態にします。アニメーションは finished 状態になります。 |
| reverse() | アニメーションを逆再生(逆方向に再生)し、開始時点で終了します。アニメーションが終了または未再生の場合は終わりから最初まで再生します。アニメーションは running 状態になります。 |
| direction | |
|---|---|
| fill |
play() と revers()
play() メソッドを実行するとアニメーションの再生を開始します。アニメーションが一時停止中であれば再開し、既に終了しているアニメーションについては再度再生を行います。
reverse() メソッドを実行するとアニメーションを逆再生(逆方向に再生)し、開始時点で終了します。アニメーションが終了または未再生の場合は終わりから最初まで再生します。
※ reverse() メソッドの後で play() メソッドを実行すると、アニメーションが逆方向に再生されます。reverse() メソッドの後で reverse() メソッドを実行すると、アニメーションが順方向に再生されます。
また、Animation.playbackRate プロパティの値を -1(負の値)にして play() メソッドを実行することで逆方向に再生することができますが、その場合は playbackRate プロパティの値を 1(正の値)に戻さない限り常に逆方向に再生されます。
const target = document.getElementById('target');
//animate() メソッドで Animation オブジェクトを生成し変数 animation に代入
const animation = target.animate(
  [
    { transform: 'translateX(0px)', backgroundColor: '#85A0F5' },
    { transform: 'translateX(300px)' , backgroundColor: 'pink' },
  ],
  {
    duration: 1000,
    easing: 'ease',
  }
);
//animate() メソッドによる自動再生を停止
animation.cancel();

//ボタンの要素を取得
const play = document.getElementById('play');
const reverse = document.getElementById('reverse');

play.addEventListener('click', () => {
  //生成した Animation オブジェクト(animation)の play() メソッドを実行
  animation.play(); //再生
});
reverse.addEventListener('click', () => {
  //生成した Animation オブジェクト(animation)の reverse() メソッドを実行
  animation.reverse(); //逆再生
});
以下は Toggle ボタンをクリックすると playbackRate の値を変更(正と負を逆転)して、再生方向を逆にする例です。
const target = document.getElementById('target');
const animation = target.animate(
  [
    { transform: 'translateX(0px)', backgroundColor: '#85A0F5' },
    { transform: 'translateX(300px)' , backgroundColor: 'pink' },
  ],
  {
    duration: 1000,
    easing: 'ease',
  }
);
animation.cancel();
const play = document.getElementById('play');
const toggle = document.getElementById('toggle');

//playbackRate に設定する値の初期値(順方向)
let playbackRateVal = 1;

toggle.addEventListener('click', () => {
  //Toggle ボタンをクリックすると正と負の値を逆転
  playbackRateVal = playbackRateVal * -1;
});

play.addEventListener('click', () => {
  //playbackRate の値を更新
  animation.playbackRate = playbackRateVal;
  animation.play();
});
Infinity と reverse()
繰り返し回数を指定するタイミングプロパティの iterations に Infinity を指定しているアニメーションで、reverse() メソッドを実行すると Uncaught DOMException: Failed to execute 'reverse' on 'Animation': Cannot play reversed Animation with infinite target effect end. のようなエラーが発生します。
解決策としては以下のような方法があります。
- Infinity の代わりに長い反復回数を設定する
- updateTiming({ direction: 'reverse' }) を使用する
簡単なのは1の方法です。無限に繰り返す Infinity の代わりに大きな数値を指定します。
updateTiming() を使用する方法の場合は、再生位置がジャンプしてしまいます。以下はボタン(reverseBtn)がクリックされた際に、KeyFrameEffect のメソッド effect.getTiming() で現在の direction を取得して、updateTiming() で値を変更して逆方向に再生する例です。
reverseBtn.addEventListener('click', () =>  {
  //direction の値を取得
  const direction = animation.effect.getTiming().direction;
  if(direction === 'normal') {
    animation.effect.updateTiming({ direction: 'reverse' });
  }else{
    animation.effect.updateTiming({ direction: 'normal' });
  }
  // running 状態でない場合は play() で再生
  if(animation.playState !== 'running') animation.play();
});
cancel() finish() pause()
cancel() メソッドを実行すると、アニメーションによる途中及び結果の効果(effect)の適用を破棄してアニメーション実行前の状態に戻して停止します。
pause() メソッドを実行するとアニメーションを一時停止し、その後 play() メソッドまたは reverse() メソッドを呼び出してアニメーションの再生を再開することができます。
finish() メソッドを実行するとアニメーションの状態に関わらず、アニメーション完了の状態にします。
以下の例では、タイミングプロパティの fill にforwards を指定して、アニメーション終了後に効果を保持するようにしています。
const target = document.getElementById('target');
const animation = target.animate(
  [
    { transform: 'translateX(0px)', backgroundColor: '#85A0F5' },
    { transform: 'translateX(300px)' , backgroundColor: 'pink' },
  ],
  {
    duration: 3000,
    easing: 'cubic-bezier(0.23, 1, 0.32, 1)', //easeOutQuint
    fill: 'forwards'  //アニメーション終了後に効果を保持
  }
);
animation.cancel(); //自動再生を停止

const play = document.getElementById('play');
const pause = document.getElementById('pause');
const finish = document.getElementById('finish');
const cancel = document.getElementById('cancel');

play.addEventListener('click', () => {
 animation.play(); //再生
});
reverse.addEventListener('click', () => {
 animation.reverse(); //逆再生
});
pause.addEventListener('click', () => {
 animation.pause(); //一時停止
});
finish.addEventListener('click', () => {
 animation.finish(); //終了
});
cancel.addEventListener('click', () => {
 animation.cancel(); //停止(取り消し)
});
スタイルとタイミングの取得
以下はボタンをクリックして要素を左右に移動させるアニメーションの3つの例です。
最初の例は単純に固定された位置から移動します。
2つ目の例では getComputedStyle() で現在のスタイル値を取得してクリックした時点での位置から移動します。
3つ目の例では getComputedTiming() でアニメーションからタイミング情報を取得して移動にかかる時間を移動する距離に合わせて動的に変更するようにします。
HTML は共通で以下のようになっています。
<div id="target"></div>
<button type="button" id="left">Left</button>
<button type="button" id="right">Right</button>
以下は単純に固定された位置から移動する例です。
関数 move() は引数に指定された値の分だけ animate() メソッドで要素を移動するアニメーションを生成及び再生する関数です。
最初に、すでにアニメーションが存在していればオプショナルチェーン (optional chaining) 演算子 (?.) と cancel() で停止して初期状態に戻すようにしています。
右と左に移動する関数 moveRight() と moveLeft() は move() に指定した引数をキーフレームの transform プロパティに指定して呼び出し、それぞれのボタンのクリックイベントにハンドラーとして登録しています。
//対象の要素を取得
const target = document.getElementById('target');

//アニメーションを入れる変数の宣言
let animation;

//要素を移動するアニメーションを生成する関数の定義
const move = (transformStart, transformEnd) => {
  //現在アニメーションが存在すれば停止して初期状態に戻す
  animation?.cancel();
  //または if(animation) animation.cancel();

  //animate() メソッドでアニメーションを生成して実行
  animation = target.animate(
    //引数で指定された値分移動(transform)するキーフレーム
    [
      { transform: transformStart },
      { transform: transformEnd }
    ],
    {
      duration: 1000,
      easing: 'ease-in',
      fill: 'forwards', //アニメーション終了後に効果を保持
    },
  );
}

//右に移動する関数(上記で定義した関数 move を利用)
const moveRight = () => {
  move('translateX(0)', 'translateX(300px)');
}

//左に移動する関数(上記で定義した関数 move を利用)
const moveLeft = () => {
  move('translateX(300px)', 'translateX(0)');
}

//Right ボタンをクリックしたら関数 moveRight() を実行
document.getElementById('right').addEventListener('click', ()=> {
  moveRight();
});

//Left ボタンをクリックしたら関数 moveLeft() を実行
document.getElementById('left').addEventListener('click', ()=> {
  moveLeft();
});
この例の場合、Right のボタンをクリックした場合は左端(0px)の開始位置から右側に移動し、Left のボタンをクリックした場合は右 300px の位置から開始されます。
また、Left や Right のボタンをアニメーションの途中でクリックすると、クリックした時点の位置ではなく、キーフレームで指定した最初の位置または終了の位置からアニメーションが開始されます。
window.getComputedStyle() で現在のスタイル値を取得
getComputedStyle() に要素を渡して実行するとその要素の現在のスタイル値を表すライブオブジェクトを取得できます。
以下の例では getComputedStyle() にアニメーション対象の要素を渡して取得したオブジェクトから transform プロパティの値を取得してキーフレームの開始点としています。
関数 move() ではアニメーションがすでに実行されていれば pause() で一時停止し、getComputedStyle() でその時点の transform の値を取得し、キーフレームの開始点の変数に代入しています。
そして現在のアニメーションをキャンセルしてブラウザリソースを解放し、アニメーションを生成及び再生しています。
また、キーフレームの開始点(transformStart)は、getComputedStyle() で動的に取得するため、定義している move 関数の transformStart 引数は不要なので削除しています。
const target = document.getElementById('target');
let animation;

//キーフレームの開始点 transformStart 引数は不要なので削除
const move = (transformEnd) => {
  //現在アニメーションが実行されていれば一時停止
  animation?.pause();
  //現在の transform の値を取得して変数 transformStart に代入
  let transformStart = getComputedStyle(target).transform;
  //現在のアニメーションをキャンセル
  animation?.cancel();

  animation = target.animate(
    [
      { transform: transformStart },
      { transform: transformEnd }
    ],
    {
      duration: 1000,
      easing: 'ease-in',
      fill: 'forwards',
    },
  );
}

const moveRight = () => {
  //キーフレームの開始点 transformStart 引数は不要なので削除
  move('translateX(300px)');
}
const moveLeft = () => {
  //キーフレームの開始点 transformStart 引数は不要なので削除
  move('translateX(0)');
}
document.getElementById('left').addEventListener('click', ()=> {
  moveLeft();
});
document.getElementById('right').addEventListener('click', ()=> {
  moveRight();
});
getComputedTiming() でアニメーションからタイミング情報を取得
前の例の場合、アニメーションの期間(duration)を固定しているため、例えば0.5秒後に逆方向のボタンをクリックして現在のアニメーションをキャンセルした場合、半分の距離しか移動していなくてもそのアニメーションに1秒かかります。
Animation オブジェクトの effect プロパティのメソッド getComputedTiming() を使うと、アニメーションからタイミング情報のオブジェクトを取得することができます。
getComputedTiming() で取得するオブジェクトにはアニメーションの持続時間を表す activeDuration やアニメーションの進捗状況を0〜1の間の値で返す progress が含まれているので、これらの値を使って動的に duration を算出することができます。
以下の式でクリックした時点でアニメーションに設定する duration を算出できます。
duration = duration - (activeDuration - progress * activeDuration)
const target = document.getElementById('target');
let animation;

const move = (transformEnd) => {
  animation?.pause();
  let transformStart = getComputedStyle(target).transform;
  let duration = 1000;  //duration の初期値を変数に代入
  if (animation) {
    //アニメーションからタイミング情報(オブジェクト)を取得して変数に代入
    const timing = animation.effect.getComputedTiming();
    //アニメーションの持続時間
    const activeDuration = timing.activeDuration;
    //アニメーションの進捗状況(0〜1)
    const activeProgress = timing.progress;
    //duration を算出
    duration -= activeDuration - activeProgress * activeDuration;
  }
  animation?.cancel();
  animation = target.animate(
    [
      { transform: transformStart },
      { transform: transformEnd }
    ],
    {
      duration: duration, //動的な duration の値(上記で算出)
      easing: 'ease-in',
      fill: 'forwards',
    },
  );
}

const moveRight = () => {
  move('translateX(300px)');
}
const moveLeft = () => {
  move('translateX(0)');
}
document.getElementById('left').addEventListener('click', ()=> {
  moveLeft();
});
document.getElementById('right').addEventListener('click', ()=> {
  moveRight();
});
playbackRate 再生速度
Animation オブジェクトのプロパティ playbackRate を使うとアニメーションの再生速度を取得・設定することができます。また、負の値を設定することでアニメーションを逆方向への再生することができます。
//現在の playbackRate を変数に取得(Animation は Animation オブジェクト)
var currentPlaybackRate = Animation.playbackRate;

//playbackRate を newRate に設定
Animation.playbackRate = newRate;
playbackRate の値
取得・設定する値は0、負、または正の数値になります。負の値はアニメーションを反転させます。 この値は倍率であるため、例えば値2を指定すると、再生速度が2倍になります。
※アニメーションの playbackRate を0に設定すると、アニメーションが一時停止します(但し、その playState は必ずしも paused になるとは限りません)。
以下は 2x ボタンをクリックすると playbackRate を2倍に、1/2 ボタンをクリックすると半分に、Toggle ボタンをクリックすると正と負の値を逆転します。
const target = document.getElementById('target');
const animation = target.animate(
  [
    { transform: 'translateX(0px)', backgroundColor: '#85A0F5' },
    { transform: 'translateX(300px)' , backgroundColor: 'lightgreen' },
  ],
  {
    duration: 3000,
  }
);
//自動再生を停止
animation.cancel();
//ボタンと出力先の要素を取得
const play = document.getElementById('play');
const doubleUp = document.getElementById('doubleUp');
const halfDown = document.getElementById('halfDown');
const pause = document.getElementById('pause');
const toggle = document.getElementById('toggle');
const cancel = document.getElementById('cancel');
const output = document.getElementById('output');

play.addEventListener('click', () => {
  //アニメーションを再生
  animation.play();
  //playbackRate を出力
  output.textContent = 'playbackRate: ' +  animation.playbackRate;
});
doubleUp.addEventListener('click', () => {
  //playbackRate を2倍に
  animation.playbackRate *= 2;
  output.textContent = 'playbackRate: ' +  animation.playbackRate;
});
halfDown.addEventListener('click', () => {
  //playbackRate を半分に
  animation.playbackRate *= 0.5;
 output.textContent = 'playbackRate: ' +  animation.playbackRate;
});
toggle.addEventListener('click', () => {
  //playbackRate の正負を反転
  animation.playbackRate = animation.playbackRate * -1;
  output.textContent = 'playbackRate: ' +  animation.playbackRate;
});
pause.addEventListener('click', () => {
  animation.pause();
});
cancel.addEventListener('click', () => {
  animation.cancel();
});
currentTime 再生位置
Animation オブジェクトの currentTime プロパティは、実行中か一時停止中かに関係なくアニメーションの現在の再生位置(時刻値)をミリ秒単位で返します。アニメーションにタイムラインがない場合や非アクティブである場合、またはまだ再生されていない場合、currentTime の戻り値は null になります(再生前の場合は 0 ?)。
currentTime プロパティに値を設定するとアニメーションの状態を指定した再生時刻の位置までスキップします。
//currentTime の値を取得(Animation は Animation オブジェクト)
var currentTime = Animation.currentTime;

//currentTime の値を設定(Animation は Animation オブジェクト)
Animation.currentTime = newTime;
currentTime に設定する値
アニメーションの現在の時刻(再生位置)をミリ秒単位で表す数値を指定します。アニメーションを非アクティブ化する場合は null を指定します。
例えば、アニメーションの 50% マークを求める(再生位置を設定する)一般的な方法は次のとおりです。
delay の値と activeDuration(持続時間)の半分を加算した値を currentTime に設定します。
animation.currentTime = animation.effect.getComputedTiming().delay + animation.effect.getComputedTiming().activeDuration / 2;
以下は 50% というボタンをクリックすると、アニメーションの再生位置をその時点での delay を考慮した 50% に移動するサンプルです。
const target = document.getElementById('target');
const animation = target.animate(
  [
    { transform: 'translateX(0px)', backgroundColor: '#85A0F5' },
    { transform: 'translateX(300px)' , backgroundColor: 'lightgreen' },
  ],
  {
    duration: 3000,
    fill: 'forwards',
    delay: 0,
  }
);
//自動再生を停止
animation.cancel();

//Play ボタン
const play = document.getElementById('play');
play.addEventListener('click', () => {
  //アニメーションを再生
  animation.play();
  // currentTime を出力
  output.textContent = 'animation.currentTime : ' + animation.currentTime;
});

//50% ボタン
const fiftyPercent = document.getElementById('fiftyPercent');
fiftyPercent.addEventListener('click', () => {
  //アニメーションを一時停止
  animation.pause();
  //currentTime に delay と activeDuration の半分の値を設定して 50% の位置へ
  animation.currentTime = animation.effect.getComputedTiming().delay + animation.effect.getComputedTiming().activeDuration / 2;
  output.textContent = 'animation.currentTime : ' + animation.currentTime;
});

//delay の値を変更するスライダー(input type="range")
const delay_slider = document.getElementById('delay_slider');
//スライダーに input イベントを設定
delay_slider.addEventListener('input', (e) => {
  //変更された delay を使ってタイミングプロパティを作成
  const timing = {
    duration: 3000,
    fill: 'forwards',
    delay: e.currentTarget.value,
  };
  //タイミングプロパティを変更
  animation.effect.updateTiming(timing);
  //この時点での currentTime と delay を出力
  output.innerText = 'animation.currentTime : ' + animation.currentTime + "\n" + 'delay: ' + animation.effect.getComputedTiming().delay;
})
この例では delay の値をスライダーで変更できます。50% をクリックすると再生位置をその時点での delay を考慮した 50% に移動します。
50% をクリックした後に delay を変更すると、その時点での currentTime は固定なので delay の値により再生位置が変わります。
delay
0
<div id="target"></div>
<div>delay
  <input type="range" id="delay_slider" min="0" max="3000" value="0" step="100">
  <span id="delay_slider_span">0</span>
</div>
<button type="button" id="play">Play</button>
<button type="button" id="fiftyPercent">50%</button>
<button type="button" id="finish">Finish</button>
<button type="button" id="pause">Pause</button>
<button type="button" id="cancel">Cancel</button>
<div class="output" id="output"></div>
<script>
  const target = document.getElementById('target');
  const animation = target.animate(
    [
      { transform: 'translateX(0px)', backgroundColor: '#85A0F5' },
      { transform: 'translateX(300px)' , backgroundColor: 'lightgreen' },
    ],
    {
      duration: 3000,
      fill: 'forwards',
      delay: 0,
    }
  );
  animation.cancel();
  const play = document.getElementById('play');
  const fiftyPercent = document.getElementById('fiftyPercent');
  const finish = document.getElementById('finish');
  const pause = document.getElementById('pause');
  const cancel = document.getElementById('cancel');
  const output = document.getElementById('output');
  play.addEventListener('click', () => {
    animation.play();
    output.innerText = 'animation.currentTime : ' + animation.currentTime + "\n" + 'delay: ' + animation.effect.getComputedTiming().delay;
  });
  fiftyPercent.addEventListener('click', () => {
    animation.pause();
    animation.currentTime = animation.effect.getComputedTiming().delay + animation.effect.getComputedTiming().activeDuration / 2;
    output.innerText = 'animation.currentTime : ' + animation.currentTime + "\n" + 'delay: ' + animation.effect.getComputedTiming().delay;
  });
  finish.addEventListener('click', () => {
    animation.finish();
    output.innerText = 'animation.currentTime : ' + animation.currentTime + "\n" + 'delay: ' + animation.effect.getComputedTiming().delay;
  });
  pause.addEventListener('click', () => {
    animation.pause();
    output.innerText = 'animation.currentTime : ' + animation.currentTime + "\n" + 'delay: ' + animation.effect.getComputedTiming().delay;
  });
  cancel.addEventListener('click', () => {
    animation.cancel();
    output.innerText = 'animation.currentTime : ' + animation.currentTime + "\n" + 'delay: ' + animation.effect.getComputedTiming().delay;
  });
  const delay_slider = document.getElementById('delay_slider');
  const delay_slider_span = document.getElementById('delay_slider_span');
  delay_slider.addEventListener('input', (e) => {
    const delay_value = e.currentTarget.value;
    delay_slider_span.textContent = delay_value;
    const timing = {
      duration: 3000,
      fill: 'forwards',
      delay: delay_value,
    };
    animation.effect.updateTiming(timing); //タイミングプロパティを変更
    output.innerText = 'animation.currentTime : ' + animation.currentTime + "\n" + 'delay: ' + animation.effect.getComputedTiming().delay;
  })
</script>
以下は異なる currentTime を設定したアニメーションの例です。Sync ボタンをクリックすると両方の currentTime を同じ値にして同期する例です。Randomize ボタンをクリックすると2つめのアニメーションの currentTime にランダムな値を加算してずらすようにしています。
//共通のキーフレーム
const frames = [
  { transform: 'translateX(0px)' },
  { transform: 'translateX(300px)' },
];
//共通のタイミングプロパティ
const timings = {
  duration: 1000,
  iterations: Infinity,
  direction: 'alternate',
  fill: 'forwards',
  delay: 0,
  easing: 'ease-in-out'
};
//1つ目のアニメーションを作成して自動再生を停止
const animation1 = document.getElementById('target1').animate(frames, timings);
animation1.cancel();
//2つ目のアニメーションを作成して自動再生を停止
const animation2 = document.getElementById('target2').animate(frames, timings);
animation2.cancel();

//2つのアニメーションを配列に格納
const animations = [animation1, animation2];

//Start ボタンにクリックイベントを設定
document.getElementById('start').addEventListener('click', (e) => {
  //一時停止後の再生でない場合は2つ目のアニメーションの currentTime を変更
  if(animation2.playState !== 'paused') {
    const rand = Math.random();
    //2つ目のアニメーションの currentTime を変更
    animation2.currentTime = 500 * rand;
  }
  //2つのアニメーションを再生
  animations.forEach( (animation) => {
    animation.play();
  });
});

document.getElementById('sync').addEventListener('click', (e) => {
  //2つのアニメーションの currentTime を同じ値に
  animation2.currentTime = animation1.currentTime;
});
document.getElementById('randomize').addEventListener('click', (e) => {
  const rand = Math.random();
  //2つ目のアニメーションの currentTime を変更(ずらす)
  animation2.currentTime = animation1.currentTime + (500 * rand);
});
document.getElementById('pause').addEventListener('click', (e) => {
  animations.forEach( (animation) => {
    animation.pause();
  });
});
document.getElementById('cancel').addEventListener('click', (e) => {
  animations.forEach( (animation) => {
    animation.cancel();
  });
});
以下はスライダー(input type="range")の値を currentTime に設定してアニメーションさせる例です。delay を 500 に設定しているので、スライダーの値が 500 未満の場合は動きません。
また、この例ではスライダーの要素の max 属性の値はアニメーションのタイミングプロパティを getComputedTiming() で取得してその endTime プロパティの値を設定しています(この例の場合、duration + delay = 3500)。
<div id="target"></div>
currentTime <!--input 要素の max 属性は Javascript で endTime の値を設定-->
<input type="range" id="ct_slider" min="0" value="0" step="1">
<span id="ct_slider_span">0</span>

<script>
  const target = document.getElementById('target');
  //animate() でアニメーションを作成
  const animation = target.animate(
    [
      { transform: 'translateX(0px)', backgroundColor: '#85A0F5' },
      { transform: 'translateX(300px)' , backgroundColor: 'pink' },
    ],
    {
      duration: 3000,
      delay: 500,
      fill: 'forwards'
    }
  );
  //自動再生を停止
  animation.cancel();

  //currentTime の値を変更するスライダー(input type="range")
  const ct_slider = document.getElementById('ct_slider');

  //タイミングプロパティ(オブジェクト)を取得
  const timing = animation.effect.getComputedTiming();
  //スライダー(input type="range")の max 属性に endTime プロパティの値を設定
  ct_slider.setAttribute('max', timing.endTime );

  //スライダーに input イベントを設定
  ct_slider.addEventListener('input', (e) => {
    //アニメーションの currentTime にスライダーの値を設定
    animation.currentTime = e.currentTarget.value;
    //スライダーの値を出力
    document.getElementById('ct_slider_span').textContent = e.currentTarget.value;
  });
</script>
currentTime
0
startTime 開始時刻の取得と設定
Animation オブジェクトの startTime プロパティはアニメーションが再生される時間(アニメーションの開始時刻)の取得および設定が行えます。
startTime はアニメーションが開始された時刻を表し、play() メソッドや reverse() メソッドなどによるアニメーションが開始された時刻が格納されています。
また、startTime に値を設定することで指定した時刻にアニメーションを再生することができます。
startTime に値を明示的に設定していない限り、アニメーションの開始前は startTime は値がないため null になります。
//startTime の値を取得(Animation は Animation オブジェクト)
var startTime = Animation.startTime;

//1秒後に再生開始
Animation.startTime = Animation.timeline.currentTime + 1000;
startTime に値を設定することで設定した時刻にアニメーションを開始します。
設定する値は通常タイムライン(Animation.timeline.currentTime)を使って指定します。
過去の時刻を指定すればアニメーションはその時点から開始されたように現在時刻までスキップされ、未来の時刻を指定すればアニメーションはその時刻に開始されるようにスケジュールされます。
以下は3つのアニメーションにそれぞれ異なる startTime を設定する例です。Set ボタンをクリックするとそれぞれのアニメーションに startTime を設定することでアニメーションがその時刻に開始されます。
<div id="target1"></div>
<div id="target2"></div>
<div id="target3"></div>
<button type="button" id="set">Set</button>
<button type="button" id="cancel">Cancel</button>
<div id="output"></div>
<script>
//キーフレーム
const frames = [
  { transform: 'translateX(0px)' },
  { transform: 'translateX(300px)' },
];
//タイミングプロパティ
const timing = {
  duration: 2000,
  direction: 'alternate',
  iterations: Infinity,
};
//それぞれの要素に上記キーフレームとタイミングプロパティを使ってアニメーションを設定
const animation1 = document.getElementById('target1').animate(frames, timing);
const animation2 = document.getElementById('target2').animate(frames, timing);
const animation3 = document.getElementById('target3').animate(frames, timing);
const animations = [animation1, animation2, animation3];
//全てのアニメーションの自動再生を停止
animations.forEach((animation) => {
  animation.cancel();
});

const output = document.getElementById('output');
//タイムラインの現在の値とそれぞれの startTime を出力する関数
const printStartTimes = () => {
  output.innerText = 'animation1.timeline.currentTime: ' + animation1.timeline.currentTime + "\n" +
  'animation1.startTime: ' + animation1.startTime + "\n" +
  'animation2.startTime: ' + animation2.startTime + "\n" +
  'animation3.startTime: ' + animation3.startTime + "\n";
}
printStartTimes();

document.getElementById('set').addEventListener('click', (e) => {
  //過去の時刻(1秒前)を設定
  animation1.startTime = animation1.timeline.currentTime - 1000;
  //現在の時刻を設定(この場合 animation2.play(); と同じ)
  animation2.startTime = animation1.timeline.currentTime;
  //未来の時刻(1秒後)を設定
  animation3.startTime = animation1.timeline.currentTime + 1000;
  //クリックした時点のタイムラインの値とそれぞれの startTime を出力
  printStartTimes();
});

document.getElementById('cancel').addEventListener('click', (e) => {
  //全てのアニメーションを停止
  animations.forEach((animation) => {
    animation.cancel();
  });
  printStartTimes();
});
</script>
複数アニメーションの適用
CSS 同様、要素に対して animate() を複数回呼び出して複数のアニメーションを適用することができます。
以下は複数の div 要素に対してタイミングをずらせて複数のアニメーションを適用する例です。
<div id="target">
  <div></div>
  <div></div>
  <!-- 中略(合計20個 の div 要素) -->
  <div></div>
  <div></div>
</div>
<button type="button" id="play">Play</button>
<button type="button" id="pause">Pause</button>
<button type="button" id="cancel">Cancel</button>
#target {
  width: 300px;
  height: 300px;
  display: flex;
  justify-content: center;
  background-color: #111;
}
#target div {
  width: 20px;
  height: 10px;
  background-color: #111;
}
最初にアニメーションを適用する全ての要素を querySelectorAll() で取得して NodeList から配列に変換しています。
この例ではそれぞれの要素に3つの異なるアニメーションを適用します。タイミングは delay と duration 以外は同じなので元になるオブジェクトを用意して利用しています。
また、それぞれのアニメーションを play() などのメソッドで操作するので、生成したアニメーションを配列に入れておきます(getAnimations() を使えば、配列を用意せずにアニメーションの配列を取得することができます)。
//対象の要素を全て取得して NodeList から配列に変換
const targets = Array.from(document.querySelectorAll('#target div'));
//または Array.prototype.slice.call(document.querySelectorAll('#target div'));

//タイミングプロパティの元となる設定
let timings = {
  easing: 'ease-in-out',
  iterations: Infinity,
  direction: 'alternate',
  fill: 'both'
}

//生成した各アニメーションを代入する変数
let animation1, animation2, animation3;

//生成したアニメーションを格納する配列
const animations = [];

//対象の要素のそれぞれについて animate() でアニメーションを設定
targets.forEach((elem, i) => {
  //delay の値はインデックスを利用(少しずつずらして開始)
  timings.delay = i * 98;
  //アニメーションの持続時間
  timings.duration = 2500;

  //1つ目のアニメーションを設定
  animation1 = elem.animate([
    {transform: 'translateY(0) scaleX(.8)'},
    {transform: 'translateY(290px) scaleX(1)'}
  ], timings);
  //自動再生を停止
  animation1.cancel();
  //生成したアニメーションを配列に追加
  animations.push(animation1);

  //2つ目のアニメーションを設定
  timings.duration = 2000;
  animation2 = elem.animate([
    {opacity: 1},
    {opacity: 0}
  ], timings);
  animation2.cancel();
  animations.push(animation2);

  //3つ目のアニメーションを設定
  timings.duration = 3000;
  animation3 = elem.animate([
    {backgroundColor: '#fff'},
    {backgroundColor: '#F32F03'}
  ], timings);
  animation3.cancel();
  animations.push(animation3);
});

//ボタンにクリックイベントを設定
document.getElementById('play').addEventListener('click', () => {
  //それぞれのアニメーションに対してメソッドを実行
 animations.forEach((anim) => {
   anim.play();
 });
});
document.getElementById('pause').addEventListener('click', () => {
  animations.forEach((anim) => {
   anim.pause();
 });
});
document.getElementById('cancel').addEventListener('click', () => {
  animations.forEach((anim) => {
   anim.cancel();
 });
});
要素が見えたら開始(Intersection Observer)
スクロールして、アニメーション対象が見えたらアニメーションを開始するには Intersection Observer API を使うと比較的簡単に実装できます。
以下は Intersection Observer を使って、アニメーション対象の要素が見えたらアニメーションを開始する例です。
<div id="target"></div><!--アニメーション対象の要素-->
#target {
  width: 50px;
  height: 50px;
  border-radius: 50%;
  background-color: palevioletred;
  margin: 20px 0;
}
20行目からが Intersection Observer に関する記述です。
この例では、オプションの threshold(コールバック関数を呼び出すタイミング)には 1 を指定して、対象の要素の全体が見えてからコールバック関数を呼び出すようにしています。また、rootMargin に '-100px 0px' を指定して、100px の位置でコールバック関数が呼び出されるように調整しています。
コールバック関数では、entry.isIntersecting が true の場合(対象の要素が画面上に見えたら)にアニメーションを再生しています。
対象の要素が画面上から見えなくなったら、pause() でアニメーションを一時停止していますが、cancel() で停止して初期状態にすることもできます。
また、アニメーションの内容によっては playState を確認して処理した方が良いかも知れません。
オプションとコールバック関数をコンストラクタ IntersectionObserver() に指定してオブザーバーを生成し、 その observe() メソッドに対象の要素を指定して監視します。
//キーフレーム
const frames = [
  { transform: 'translateX(0px)' },
  { transform: 'translateX(300px)' },
];
//タイミング
const timing = {
  duration: 1000,
  direction: 'alternate',
  iterations: Infinity,
  easing: 'ease-out',
};
//アニメーション対象の要素
const target =  document.getElementById('target');
//Animation オブジェクトを生成
const animation = target.animate(frames, timing);
//アニメーションの自動再生を停止
animation.cancel();

//オブザーバーのオプション
const options = {
  //対象の要素が画面上に見えてから100pxを超えたら
  rootMargin: '-100px 0px',
  //対象の要素の全体が表示されたら
  threshold: 1
}

//オブザーバーのコールバック関数
const callback = (entries) => {
  entries.forEach( (entry) => {
    //対象の要素が画面上に見えたら
    if (entry.isIntersecting) {
      //アニメーションを再生
      animation.play();
    } else { //対象の要素が画面上から見えなくなった場合
      //アニメーションを一時停止
      animation.pause();
      //animation.cancel();
    }
  });
}
//オブザーバーを生成
const observer = new IntersectionObserver(callback, options);
//対象の要素をオブザーバーに監視するように指定
observer.observe(target);
上記の21〜43行目は以下のように短縮して記述することもできます。entries はオブジェクトの配列ですが、この例の場合、監視対象は1つなので entries[0] でオブジェクトにアクセスしてその isIntersecting の値で状態(見えているかどうか)を判定しています。
const observer = new IntersectionObserver(
  //コールバック関数
  (entries) => {
    if (entries[0].isIntersecting) {
      animation.play();
    } else {
      animation.pause();
    }
  },
  //オプション
  {
    rootMargin: '-100px 0px',
    threshold: 1
  }
);
Animation オブジェクトのイベント
Animation オブジェクトには以下のようなイベントがあり、アニメーションの状態(playState)が遷移する際やアニメーションが削除された際に発生します。
| イベント | 説明 |
|---|---|
| finish | アニメーションの再生が終了したときや finish() メソッドが呼び出たときに発生します。 |
| cancel | cancel() メソッドが呼び出されたときなど、アニメーションが idle 状態に入ったときに発生します。 |
| remove | アニメーションが削除されたときに発生します。 |
また、リスナー関数には、Event オブジェクトを継承する AnimationPlaybackEvent オブジェクトが渡され、通常の Event オブジェクトのプロパティの他に以下のプロパティを持っています。
| プロパティ | 説明 |
|---|---|
| AnimationPlaybackEvent. currentTime |
イベントが発生したアニメーションの経過時間。cancel イベント時には値が null となり、finish イベント時には値がアニメーション全体の持続時間(active duration)になります。 |
| AnimationPlaybackEvent. timelineTime |
イベントが発生したアニメーションのタイムライン(AnimationTimeline)における現在時刻 |
finish イベント
finish イベントはアニメーションの再生が終了したときや finish() メソッドが呼び出されてアニメーションがすぐに終了したとき(アニメーションが finished 状態になったとき)に発生します。
イベントハンドラとして onfinish が用意されています。
Animation.addEventListener('finish', event => { 処理 })
//または
Animation.onfinish = event => { 処理 }
※ paused 状態(playState)は finished 状態に優先するので、アニメーションが paused と finished の両方の状態の場合、paused 状態がイベントとして通知されます。
startTime プロパティを以下のように設定することで、アニメーションを強制的に finished 状態にすることができます。
document.timeline.currentTime - (Animation.currentTime * Animation.playbackRate)
以下はボタンをクリックすると画像の表示と非表示を切り替えるアニメーションの例です。
画像の表示・非表示の状態を表す変数 isShown を用意して、表示するアニメーション show と非表示にするアニメーション hide が終了するのを onfinish イベントハンドラで検知して値を反転しています。

<div class="toggle-img-anim">
  <button type="button" class="toggle-btn">Hide Image</button>
  <div class="toggle-img-wrapper">
    <img src="../images/sample.jpg" width="600" height="398" alt="beach photo">
  </div>
</div>
const toggleImgAnim = document.querySelectorAll('.toggle-img-anim');

toggleImgAnim.forEach((elem) => {
  // 画像の表示・非表示を判定するフラグ
  let isShown = true;
  // 各要素を取得
  const toggleBtn = elem.querySelector('.toggle-btn');
  const imgWrapper = elem.querySelector('.toggle-img-wrapper');
  const img = imgWrapper.querySelector('img');

  // ボタンのクリックイベントのリスナー
  toggleBtn.addEventListener('click', () => {
    if (isShown) {
      //画像が表示されていれば非表示にするアニメーションを実行
      const hide = imgWrapper.animate(
        {
          opacity: [1, 0],
          height: [img.offsetHeight + 'px', 0],
        },
        timingOpts
      );
      hide.onfinish = () => {
        //アニメーションが終了したらフラグを反転し、ボタンのテキストを変更
        isShown = false;
        toggleBtn.textContent = 'Show Image';
      }
    } else {
      //画像が非表示の場合は、表示するアニメーションを実行
      const show = imgWrapper.animate(
        {
          opacity: [0, 1],
          height: [0, img.offsetHeight + 'px'],
        },
        timingOpts
      );
      show.onfinish = () => {
        //アニメーションが終了したらフラグを反転し、ボタンのテキストを変更
        isShown = true;
        toggleBtn.textContent = 'Hide Image';
      }
    }
  });

  //タイミングオプション
  const timingOpts = {
    duration: 300,
    easing: 'ease-in',
    fill: 'forwards'
  };
});
onfinish イベントハンドラの部分を Animation.finished プロパティを使って以下のように記述することもできます。
※ onfinish イベントハンドラはイベントが毎回発生する度にリスナー関数を実行するのに対し、finished プロパティを使った Promise は解決した際に then() メソッドに渡したコールバック関数を一度だけ実行します(この例の場合は、どちらでも同じ結果になります)。
toggleBtn.addEventListener('click', () => {
  if (isShown) {
    const hide = imgWrapper.animate(
      {
        opacity: [1, 0],
        height: [img.offsetHeight + 'px', 0],
      },
      timingOpts
    );
    // finished プロミスの then メソッドで処理を実行
    hide.finished.then( () => {
      isShown = false;
      toggleBtn.textContent = 'Show Image';
    });
  } else {
    const show = imgWrapper.animate(
      {
        opacity: [0, 1],
        height: [0, img.offsetHeight + 'px'],
      },
      timingOpts
    );
    // finished プロミスの then メソッドで処理を実行
    show.finished.then( () => {
      isShown = true;
      toggleBtn.textContent = 'Hide Image';
    });
  }
});
.toggle-img-anim {
  height: 300px;
}
.toggle-img-wrapper {
  overflow: hidden;
  width: 300px;
}

.toggle-img-wrapper img {
  width: 100%;
  height: auto;
}

.toggle-btn {
  margin: 20px 0;
  background-color: cornflowerblue;
  border: none;
  padding: 5px 10px;
  color: #fff;
  cursor: pointer;
  width: 8rem;
}
関連項目:終了したら実行
連続するクリックの制御
前述の例のボタンをクリックすると画像の表示と非表示を切り替えるアニメーションの場合、ボタンを連続してクリックすると現在実行されているアニメーションが終了しないうちに次のアニメーションが実行されるので画像がちらついてしまいます。
以下はアニメーションが実行中かどうかを判定するフラグの変数 isAnimating を用意して、実行中の場合は return して、アニメーションが実行中の場合は、クリックしても何もしないようにする例です。
アニメーション開始時に isAnimating を true にして、onfinish で終了を検知して isAnimating を false にしています。
const toggleImgAnim = document.querySelectorAll('.toggle-img-anim');

toggleImgAnim.forEach((elem) => {
  // アニメーションが実行中かどうかを判定するフラグ
  let isAnimating = false;
  let isShown = true;
  const toggleBtn = elem.querySelector('.toggle-btn');
  const imgWrapper = elem.querySelector('.toggle-img-wrapper');
  const img = imgWrapper.querySelector('img');

  toggleBtn.addEventListener('click', () => {
    // アニメーション中の場合はリターン(何もしない)
    if (isAnimating === true) {
      return;
    }
    if (isShown) {
      // アニメーション中とする
      isAnimating = true;
      const hide = imgWrapper.animate(
        {
          opacity: [1, 0],
          height: [img.offsetHeight + 'px', 0],
        },
        timingOpts
      );
      hide.onfinish = () => {
        isShown = false;
        toggleBtn.textContent = 'Show Image';
        // アニメーション終了とする
        isAnimating = false;
      }
    } else {
      // アニメーション中とする
      isAnimating = true;
      const show = imgWrapper.animate(
        {
          opacity: [0, 1],
          height: [0, img.offsetHeight + 'px'],
        },
        timingOpts
      );
      show.onfinish = () => {
        isShown = true;
        toggleBtn.textContent = 'Hide Image';
        // アニメーション終了とする
        isAnimating = false;
      }
    }
  });

  const timingOpts = {
    duration: 300,
    easing: 'ease-in',
    fill: 'forwards'
  };
});
カスタム属性(dataset プロパティ)の利用
前述の例と同じことですが、アニメーションが実行中かどうかを判定するフラグを変数で定義する代わりに、要素のカスタム属性に設定することもできます。
以下では、アニメーションの対象の要素 .toggle-img-wrapper に data-is-animating というカスタム属性を dataset プロパティで設定しています。
dataset プロパティで要素のカスタム属性 data-is-animating にアクセスするには imgWrapper.dataset.isAnimating のように属性名の data- を除いた部分をキャメルケースにします。
const toggleImgAnim = document.querySelectorAll('.toggle-img-anim');

toggleImgAnim.forEach((elem) => {
  let isShown = true;
  const toggleBtn = elem.querySelector('.toggle-btn');
  //アニメーションの対象の要素 .toggle-img-wrapper
  const imgWrapper = elem.querySelector('.toggle-img-wrapper');
  const img = imgWrapper.querySelector('img');

  toggleBtn.addEventListener('click', () => {
    // アニメーション中の場合はリターン(何もしない)
    if (imgWrapper.dataset.isAnimating === 'true') {
      return;
    }
    if (isShown) {
      // アニメーション中とする(カスタム属性を dataset プロパティで設定)
      imgWrapper.dataset.isAnimating = 'true';
      const hide = imgWrapper.animate(
        {
          opacity: [1, 0],
          height: [img.offsetHeight + 'px', 0],
        },
        timingOpts
      );
      hide.onfinish = () => {
        isShown = false;
        toggleBtn.textContent = 'Show Image';
        // アニメーション終了とする
        imgWrapper.dataset.isAnimating = 'false';
      }
    } else {
      // アニメーション中とする
      imgWrapper.dataset.isAnimating = 'true';
      const show = imgWrapper.animate(
        {
          opacity: [0, 1],
          height: [0, img.offsetHeight + 'px'],
        },
        timingOpts
      );
      show.onfinish = () => {
        isShown = true;
        toggleBtn.textContent = 'Hide Image';
        // アニメーション終了とする
        imgWrapper.dataset.isAnimating = 'false';
      }
    }
  });

  const timingOpts = {
    duration: 300,
    easing: 'ease-in',
    fill: 'forwards'
  };
});
Debounce の利用
一定時間の間に何回クリックしても、最初のクリックのみを検出する Debounce 関数(Leading Debounce)を利用する方法もあります。
連続する関数の呼び出しがあった場合、一定の時間、後続の関数の呼び出しを無視する関数 debounce_leading を定義して、addEventListener のリスナー関数を debounce_leading でラップし、待機時間(timeout)を指定します。
以下の場合、timeout = 300 と待機時間(timeout)の初期値を 300 ミリ秒としているので、省略しても同じことになります(アニメーションの長さにより、待機時間を調整します)。
// Debounce 関数の定義
function debounce_leading(func, timeout = 300) {
  let timer;
  return function(...args) {
    if (!timer) {
      func.apply(this, args);
    }
    clearTimeout(timer);
    timer = setTimeout(() => {
      timer = undefined;
    }, timeout);
  };
}

const toggleImgAnim = document.querySelectorAll('.toggle-img-anim');

toggleImgAnim.forEach((elem) => {
  let isShown = true;
  const toggleBtn = elem.querySelector('.toggle-btn');
  const imgWrapper = elem.querySelector('.toggle-img-wrapper');
  const img = imgWrapper.querySelector('img');

// リスナーを debounce_leading() でラップ
toggleBtn.addEventListener('click',debounce_leading( () => {
  if (isShown) {
    const hide = imgWrapper.animate(
      {
        opacity: [1, 0],
        height: [img.offsetHeight + 'px', 0],
      },
      timingOpts
    );
    hide.finished.then( () => {
      isShown = false;
      toggleBtn.textContent = 'Show Image';
    });
  } else {
    const show = imgWrapper.animate(
      {
        opacity: [0, 1],
        height: [0, img.offsetHeight + 'px'],
      },
      timingOpts
    );
    show.finished.then( () => {
      isShown = true;
      toggleBtn.textContent = 'Hide Image';
    });
  }
}, 300)); // timeout(待機時間)を指定
  const timingOpts = {
    duration: 300,
    easing: 'ease-in',
    fill: 'forwards'
  };
});
この場合、前述の例とは異なり、最後のクリックから300ミリ秒以内のクリックは無視されます。例えば、短い間隔でクリックし続けると何回クリックしても1回のクリックとして扱われます。
cancel イベント
cancel イベントは cancel() メソッドが呼び出されたときやアニメーションが再生を終了する前に要素から削除されたときなど、アニメーションが idle 状態に入ったときに発生します。
※ 新しいアニメーションを作成する際に初期状態では idle 状態になりますが、新規に作成されるアニメーションでは cancel イベントはトリガーされません。
イベントハンドラとして oncancel が用意されています。
Animation.addEventListener('cancel', event => { 処理 })
//または
Animation.oncancel = event => { 処理 }
finish / cancel イベントの例
以下は finish/cancel イベントが発生した際にリスナー関数に渡されるイベントの情報を出力する例です。
<div id="target"></div>
<button type="button" id="play">Play</button>
<button type="button" id="finish">Finish</button>
<button type="button" id="cancel">Cancel</button>
<div  id="output"></div>
<script>
//アニメーションを対象の要素に設定
const animation = document.getElementById('target').animate(
  [
    { transform: 'translateX(0px)' },
    { transform: 'translateX(300px)' },
  ],
  {
    duration: 2000,
    fill: 'forwards'
  }
);
animation.cancel(); // 自動再生の停止

const output = document.getElementById('output');

//finish イベントにリスナーを登録
animation.addEventListener('finish', (e) => {
  //イベントオブジェクトのプロパティを出力
  output.innerText = 'finish event' + "\n" +
    'e.type: '  + e.type + "\n" +
    'e.currentTime: '  + e.currentTime + "\n" +
    'e.timelineTime: '  + e.timelineTime;
});

//cancel イベントにリスナーを登録
animation.addEventListener('cancel', (e) => {
  //イベントオブジェクトのプロパティを出力
  output.innerText = 'cancel event' + "\n" +
    'e.type: '  + e.type + "\n" +
    'e.currentTime: '  + e.currentTime + "\n" +
    'e.timelineTime: '  + e.timelineTime;
});

document.getElementById('play').addEventListener('click', (e) => {
  animation.play();
});
document.getElementById('finish').addEventListener('click', (e) => {
  animation.finish();
});
document.getElementById('cancel').addEventListener('click', (e) => {
  animation.cancel();
});
</script>
Play ボタンをクリックしてアニメーションを再生して、アニメーションが終了するか Finish ボタンをクリックすると finish イベントが発生し、Cancel ボタンをクリックすると cancel イベントが発生します。
remove イベント
remove イベントはアニメーション(Animation オブジェクト)が削除されたときに発生します。
イベントハンドラとして onremove が用意されています。
Animation.addEventListener('remove', event => { 処理 })
//または
Animation.onremove = event => { 処理 }
最新のブラウザでは、アニメーションリストが膨大になるなどメモリリークが発生する可能性がある場合にアニメーションを自動的に削除します。
以下はクリックする度に animate() メソッドでアニメーションを生成し、fill プロパティに forwards を指定しているサンプルです。
この場合、fill プロパティに forwards を指定しているため一度実行されるといつまでもメモリから開放されない可能性があるのでブラウザは適宜生成されたアニメーションを削除します(おそらく)。
fill プロパティの値を none にすると、何度クリックしても連打してもアニメーションは削除されません。
<div id="target"></div>
<p>removed count: <span id="rc">0</span></p>
<script>
  //アニメーションの対象の要素
  const target = document.getElementById('target');
  target.style.cursor = 'pointer';
  //削除カウントの出力先の要素
  const rc = document.getElementById('rc');
  //Animation オブジェクトが削除された回数を入れる変数の初期化
  let removedCount = 0;

  //対象の要素をクリックするとアニメーションを生成して再生
  target.addEventListener('click', () => {
    const animation = target.animate(
      { backgroundColor:[' #85A0F5', '#72DE87', '#F39294'] },
      {
        duration: 1000,
        fill: 'forwards',  //メモリリークが発生する可能性あり
      },
    );
    animation.addEventListener('remove', () => {
      removedCount++;
      rc.textContent = removedCount;
    });
  });
</script>
以下の円をクリックすると背景色が変わるアニメーションが実行されます。何度も続けてクリックしたりすると、ブラウザによりアニメーションが削除されてカウントが増えていきます。
ブラウザによりアニメーションが削除される際は特にコンソールにエラーなどは出力されません。
removed count: 0
関連項目:CSS アニメーションのイベント
Promise
Animation オブジェクトにはアニメーションの準備ができたことを通知する Animation.ready プロパティとアニメーションが終了したことを通知する Animation.finished プロパティが定義されていて、いずれも Promise を返します。
| プロパティ | 説明 |
|---|---|
| Animation.ready | 対象アニメーションの再生準備ができた時点で Promise を返します。 |
| Animation.finished | 対象アニメーションの終了時に Promise を返します。 |
Promise には then() メソッドが定義されているので、Promise を受け取る側でプロミスが解決(resolve)された際の処理(コールバック関数)を then() メソッドを使って設定することができます。
そしてプロミスが解決される(例えばアニメーションが終了する)と then() メソッドに渡したコールバック関数が呼び出されます。
プロミス解決時に実行するコールバック関数には引数としてプロミスを解決した Animation オブジェクトが渡されます。
また、プロミスが解決済みであれば then() メソッドに渡したコールバック関数は即時実行されます。
関連ページ:JavaScript Promise の使い方
Promise とイベント処理
Promise の then() メソッドの利用と addEventListener() メソッドを使ったイベント処理は似ていますが、addEventListener() メソッドはイベントが毎回発生する度にリスナー関数を実行するのに対し、Promise は解決した際に then() メソッドに渡したコールバック関数を一度だけ実行します。
Animation.ready
Animation.ready プロパティはアニメーションを再生する準備ができたときに解決される Promise を返します。
animation.ready.then(function() {
  //アニメーションを再生する準備ができたときに実行する処理
});
アニメーションが pending 状態(アニメーションが再生の開始や実行中のアニメーションの一時停止などの非同期操作を現在待機している状態)に入ったり、アニメーションがキャンセルされるたびに(アニメーションを再開する準備ができているため)新しい Promise が作成されます。
例えば、Animation オブジェクトを生成したり、play()、reverse()、pause()、cancel() メソッドのいずれかを実行すると ready プロミスが新たに生成されアニメーションの状態が pending に設定されます。
そしてアニメーションの準備が整うと ready プロミスを解決し、then() に渡した処理が実行されます。
また、MDN の Animation.ready のページには「再生と一時停止のリクエストの pending 状態の場合、同じ Promise が使用されるため、Promise が解決されたらアニメーションの状態(playState)を確認することをお勧めします」とあります。
以下は Animation.ready プロパティを使ってアニメーションを再生する準備ができたら、コンソールにメッセージを表示する例です。コンソールには true、false、"It's ready. playState: idle" の順番で表示されます。
もし、9行目の cancel() を削除するとアニメーションの自動再生が行われて出力されるメッセージは true、true、 "It's ready. playState: running"のようになります。
//アニメーションを作成
const animation = document.getElementById('target').animate(
  { transform: ['translateX(0px)','translateX(300px)']},
  1000
);
//pending 状態の確認
console.log(animation.pending);  //true
//アニメーションの自動再生を停止
animation.cancel();

//ready プロミスの then メソッドにコールバック関数を渡す
animation.ready.then( (anim) => {
  //コールバック関数には引数としてプロミスを解決した Animation オブジェクトが渡される
  console.log("It's ready. playState: " + anim.playState);
  //出力:It's ready. playState: idle
});
//pending 状態の確認
console.log(animation.pending);   //false
以下のように cancel() を then メソッドの直後に記述すると、Uncaught (in promise) DOMException: The user aborted a request. のような例外がコンソールに表示され、then メソッドは実行されません(アニメーションは問題なく作成されます)。
const animation = document.getElementById('target').animate(
  { transform: ['translateX(0px)','translateX(300px)']},
  1000
);
console.log(animation.pending);  //true
console.log(animation.playState); //running
animation.ready.then( (anim) => {
  console.log("It's ready. playState: " + anim.playState);
});
animation.cancel(); //解決する前にキャンセルされた→エラー(例外)
console.log(animation.pending);   //false
console.log(animation.playState);  //idle
必要であれば、catch メソッドを使って例外を捕捉することもできます。以下の場合コンソールには animation cancelled. DOMException: The user aborted a request. のように出力されます。
animation.ready.then((anim) => {
  //ここには来ない(出力されない)
  console.log("It's ready. playState: " + anim.playState);
}).catch((error) => console.error('animation cancelled.', error));
以下は ready プロミスを使って、アニメーションの生成直後や各メソッドを実行した際に Animation オブジェクトの状態を確認するサンプルです。
//アニメーションを作成
const animation = document.getElementById('target').animate(
  { transform: ['translateX(0px)','translateX(300px)']},
  2000
);
animation.cancel(); //自動再生を停止

//メッセージの出力先要素
const output =  document.getElementById('output');
//ready プロミスを使ってアニメーションの準備ができたらその際の playState を表示する関数
const checkReadyPromise = (method) => {
  animation.ready.then((anim) => {
    output.innerText = method + ' :  ready ' + ' (' + anim.playState + ')';
  });
}
//上記関数を実行(一度だけ実行される)
checkReadyPromise('Initial');

document.getElementById('play').addEventListener('click', (e) => {
  output.textContent ='';
  animation.play();
  checkReadyPromise('play()');//play ボタンをクリックする度に確認
});
document.getElementById('pause').addEventListener('click', (e) => {
  output.textContent ='';
  animation.pause();
  checkReadyPromise('pause()'); //pause ボタンをクリックする度に確認
});
document.getElementById('reverse').addEventListener('click', (e) => {
  output.textContent ='';
  animation.reverse();
  checkReadyPromise('reverse()'); //reverse ボタンをクリックする度に確認
});
document.getElementById('finish').addEventListener('click', (e) => {
  output.textContent ='';
  animation.finish();
  checkReadyPromise('finish()'); //finish ボタンをクリックする度に確認
});
document.getElementById('cancel').addEventListener('click', (e) => {
  output.textContent ='';
  animation.cancel();
  checkReadyPromise('cancel()'); //cancel ボタンをクリックする度に確認
});
Animation.finished
Animation.finished プロパティはアニメーションの再生が終了(完了)したときに解決される Promise を返します。
animation.finished.then(function() {
  //アニメーションが終了した時に実行する処理
});
以下は animate() メソッドでアニメーションを作成してそのまま再生する例です。
この場合、アニメーションの再生に1秒かかるので、1秒後に then() メソッドに指定したコールバック関数によりコンソールに It's finished. playState: finished と出力されます。
//アニメーションを生成して再生
const animation = document.getElementById('target').animate(
  { transform: ['translateX(0px)','translateX(300px)']},
  1000
);

//finished プロミスの then メソッドにコールバック関数を渡す
animation.finished.then( (anim) => {
  //コールバック関数には引数としてプロミスを解決した Animation オブジェクトが渡される
  console.log("It's finished. playState: " + anim.playState);
  //出力:It's finished. playState: finished
});
finished プロミスでもアニメーションが完了する前にキャンセルされると例外が発生するので、必要に応じて catch() メソッドで捕捉することができます。
以下の場合、アニメーションの再生後、完了する前にキャンセルボタンをクリックして cancel() を実行するとコンソールに animation cancelled. DOMException: The user aborted a request. と出力されます。
const animation = document.getElementById('target').animate(
  { transform: ['translateX(0px)','translateX(300px)']},
  3000
);

animation.finished.then( (anim) => {
  console.log("It's finished. playState: " + anim.playState);
  //キャンセルされた場合に発生する例外を捕捉
}).catch((error) => console.error('animation cancelled.', error));

//キャンセルボタンをクリックしたら cancel() を実行
document.getElementById('cancel').addEventListener('click', (e) => {
  animation.cancel();
});
また、アニメーションが終了した再生状態(finished)を離れるたびに(アニメーションが再び再生を開始する際に)、Animation.finished プロパティに対して新しい Promise が作成され、新しいアニメーションシーケンスが完了すると、新しい Promise は解決されます。
以下は finished プロミスを使って、各メソッドを実行した後にアニメーションが完了した際にメッセージを表示するサンプルです。pause() メソッドの場合は、実行後アニメーションは終了しないので、pending 状態を出力するようにしています(いつも true)。
//アニメーションを作成
const animation = document.getElementById('target').animate(
  { transform: ['translateX(0px)','translateX(300px)']},
  2000
);
animation.cancel(); //自動再生を停止

//メッセージの出力先要素
const output =  document.getElementById('output');

//finished プロミスを使ってアニメーションの準備ができたらその際の playState を表示する関数
const checkFinishedPromise = (method) => {
  animation.finished.then((anim) => {
    output.innerText = method + ' :  finished ';
  }).catch((error) => output.innerText = method + ' : animation cancelled' + ' (' + error + ')');
}

document.getElementById('play').addEventListener('click', (e) => {
  output.textContent ='';
  animation.play();
  checkFinishedPromise('play()');//play ボタンをクリックする度に確認
});
document.getElementById('pause').addEventListener('click', (e) => {
  output.textContent ='';
  animation.pause();
  //pending 状態を表示
  output.textContent = 'pending: ' + animation.pending;
});
document.getElementById('reverse').addEventListener('click', (e) => {
  output.textContent ='';
  animation.reverse();
  checkFinishedPromise('reverse()'); //reverse ボタンをクリックする度に確認
});
document.getElementById('finish').addEventListener('click', (e) => {
  output.textContent ='';
  animation.finish();
  checkFinishedPromise('finish()'); //finish ボタンをクリックする度に確認
});
document.getElementById('cancel').addEventListener('click', (e) => {
  output.textContent ='';
  animation.cancel();
  checkFinishedPromise('cancel()'); //cancel ボタンをクリックする度に確認
});
終了したら実行
以下は3つのアニメーションを作成し、1つ目のアニメーションの finished プロミスの then() メソッドに2つ目のアニメーションの再生を、そして2つ目のアニメーションの finished プロミスの then() メソッドに3つ目のアニメーション再生を設定して順番に再生する例です。
この場合、アニメーションの delay や endDelay の値により動作が異なってきます。
<div id="targets">
  <div class="target" id="target1"></div>
  <div class="target" id="target2"></div>
  <div class="target" id="target3"></div>
</div>
<button type="button" id="play">Play</button>
.target {
  width: 40px;
  height: 40px;
  border-radius: 50%;
  position: absolute;
}
#target2 {
  left: 100px;
}
#target3 {
  left: 200px;
}
//全ての対象の要素を取得して配列に変換
const targets = Array.from(document.querySelectorAll('#targets .target'));
//生成したアニメーションを格納する配列
const animations = [];

//取得した要素にアニメーションを設定
targets.forEach((target, i) => {
  const animation = target.animate(
    [
      { transform: 'translateX(0px)'},
      { transform: 'translateX(60px)'},
    ],
    {
      duration: 500,
      fill: 'forwards',
      delay: 0,
      endDelay: 0,
      easing: linear
    }
  );
  animation.cancel();
  animations.push(animation);
});

//ボタンにクリックイベントを設定
document.getElementById('play').addEventListener('click', ()=> {
  animations.forEach((anim) => {
    anim.cancel();
  });
  animations[0].play();
  //1つ目のアニメーションの finished プロミスの then() に2つ目のアニメーション再生を設定
  animations[0].finished.then( (anim) => {
    animations[1].play();
  });
  //2つ目のアニメーションの finished プロミスの then() に3つ目のアニメーション再生を設定
  animations[1].finished.then( (anim) => {
    animations[2].play();
  });
});
この場合は、以下のように finish イベントを使って記述したほうが良いかもしれません。以下は上記とほぼ同様の動作になります。
//ボタンにクリックイベントを設定
document.getElementById('play').addEventListener('click', ()=> {
  animations.forEach((anim) => {
    anim.cancel();
  });
  animations[0].play();
});

//1つ目のアニメーションの finish イベントに2つ目のアニメーション再生を設定
animations[0].addEventListener('finish', (e) => {
  animations[1].play();
});
//2つ目のアニメーションの finish イベントに3つ目のアニメーション再生を設定
animations[1].addEventListener('finish', (e) => {
  animations[2].play();
});
| delay | 0 | |
|---|---|---|
| endDelay | 0 | |
| easing | ||
Promise.all
Promise.all メソッドを使うと複数の Promise を使った処理を実行し、全ての Promise が解決した時点で then メソッドのコールバック関数を呼び出します(複数の Promise を使った非同期処理を1つの Promise として扱うことができます)。
このため、複数のアニメーションを同時に開始する場合など、Promise.all を使うと便利です。
Promise.all メソッドは Promise インスタンスの配列を受け取ります。
以下は対象の3つの要素にそれぞれアニメーションを作成し、play ボタンをクリックすると Promise.all メソッドを使って同時にアニメーションを開始する例です。
Promise.all には map で各アニメーションのプロミスからなる配列を作成して渡しています(41行目)。
但し、この例の場合、pause() で一時停止した後に再開すると、fill: 'forwards' を指定しているなどの理由で開始位置が揃わない場合があります(あまり良いサンプルではありません)。
<div class="target"></div>
<div class="target"></div>
<div class="target"></div>
<button type="button" id="play">Play</button>
<button type="button" id="pause">Pause</button>
<button type="button" id="reverse">Reverse</button>
<button type="button" id="cancel">Cancel</button>
<script>
  //全てのアニメーションの対象の要素
  const targets = document.querySelectorAll('.target');
  //作成した Animation オブジェクトを格納する配列
  const animations = [];

  //全ての対象の要素にアニメーションを作成
  targets.forEach((target, index) => {
    //Animation オブジェクトを生成
    const animation = new Animation(
      new KeyframeEffect(
        target,
        [
          { transform: 'translateX(0px)' },
          { transform: 'translateX(300px)' },
        ],
        {
          duration: 1000 + index * 300, //持続時間を少しずつ異なるように指定
          easing: 'ease-in',
          fill: 'forwards',
          iterations : 1
        },
      ),
      document.timeline
    );
    //生成した Animation オブジェクトを配列に追加
    animations.push(animation);
  });

  //play ボタンのクリックイベント
  document.getElementById('play').addEventListener('click', () => {
    Promise.all(
      //各アニメーションの ready プロミスの配列を作成
      animations.map( (animation) => animation.ready )
    ).then( (anims) =>
      //全てのアニメーションの準備ができたら各アニメーションの play() を実行
      anims.forEach( (anim) => anim.play())
      //または anims.forEach( (anim) => anim.startTime = document.timeline.currentTime)
    );
  });

  //reverse ボタンのクリックイベント
  document.getElementById('reverse').addEventListener('click', () => {
    Promise.all(
      //各アニメーションの ready プロミスの配列を作成
      animations.map( (animation) => animation.ready )
    ).then( (anims) =>
      //全てのアニメーションの準備ができたら各アニメーションの reverse() を実行
      anims.forEach( (anim) => anim.reverse())
    );
  });
  //pause ボタンのクリックイベント
  document.getElementById('pause').addEventListener('click', () => {
    animations.forEach( (anim) => anim.pause())
  });
  //cancel ボタンのクリックイベント
  document.getElementById('cancel').addEventListener('click', () => {
    animations.forEach( (anim) => anim.cancel())
  });

</script>
※ 上記の場合、play() メソッドを使ってアニメーションを開始していますが、この場合、個々のアニメーションがずれる可能性があります。全く同時に開始するには、startTime に document.timeline.currentTime を指定するようにします(45行目)。
但し、その場合、このサンプルの動作とは少し異なり、pause で一時停止した後に play ボタンをクリックすると最初の位置から再生されます。
以下は前述の例同様 Promise.all メソッドを使って同時にアニメーションを開始し、追加で Promise.all に finished プロミスをまとめて指定して、全てのアニメーションが完了したらメッセージを表示する例です。
この例では、前述の例のように別途 Animation オブジェクトを生成しておく方法だとうまく毎回メッセージをクリアできなかったため、play ボタンをクリックする度に新たに Animation オブジェクトを生成しています。
また、毎回 Animation オブジェクトを生成するのに加えて fill: 'forwards' を指定しているので、play ボタンを何度もクリックするとメモリーリークを防ぐため、ブラウザが自動的に古い Animation オブジェクトを削除します(確認のための remove イベントを40〜43行目で設定して削除回数を出力するようにしています)。
<div class="targetl"></div>
<div class="target"></div>
<div class="target"></div>
<button type="button" id="play">Play</button>
<div id="output"></div>
<p>removed count: <span id="rc">0</span></p>
<script>
  //全てのアニメーションの対象の要素
  const targets = document.querySelectorAll('.target');
  //メッセージの出力先の要素
  const output = document.getElementById('output');
  //削除カウントの出力先の要素
  const rc = document.getElementById('rc');
  //Animation オブジェクトが削除された回数を入れる変数の初期化
  let removedCount = 0;
  document.getElementById('play').addEventListener('click', () => {
    //メッセージの出力先のテキストをクリア
    output.textContent = '';
    //作成した Animation オブジェクトを格納する配列
    const animations = [];
    //全ての対象の要素にアニメーションを作成
    targets.forEach((target) => {
      const animation = new Animation(
        new KeyframeEffect(
          target,
          [
            { transform: 'translateX(0px)' },
            { transform: 'translateX(300px)' },
          ],
          {
            duration: 700 + Math.random() * 1000, //ランダムな値を設定
            easing: 'ease-in',
            fill: 'forwards',
            iterations : 1
          },
        ),
        document.timeline
      );
      //Animation オブジェクトが削除されたらカウントして出力
      animation.addEventListener('remove', () => {
        removedCount++;
        rc.textContent = removedCount;
      });
      //生成した Animation オブジェクトを配列に追加
      animations.push(animation);
    });

    Promise.all(
      //各アニメーションの ready プロミスの配列を作成
      animations.map( (animation) => animation.ready )
    ).then( (anims) =>
      //準備ができたら各アニメーションの startTime にタイムラインの currentTime を指定して同時に再生
      anims.forEach( (anim) => anim.startTime = document.timeline.currentTime)
    );

    Promise.all(
      //各アニメーションの finished プロミスの配列を作成
      animations.map( (animation) => animation.finished )
      //全てのアニメーションが終了したらメッセージを表示
    ).then( () => output.textContent = '全て終了');
  });
</script>
removed count: 0
上記の例では、クリックする度にアニメーションを生成し、タイミングプロパティで fill: 'forwards' を指定しているのでブラウザが自動的に不要な Animation オブジェックトを自動的に削除しますが、以下のようにアニメーション開始時に既存の Animation オブジェクトをキャンセルすることで古い Animation オブジェクトが積み重なることを防げます。
前述の例に7〜9行目を追加しています。また、この場合、連続してクリックすると finished プロミスは追加したキャンセルの処理ををエラー「Uncaught (in promise) DOMException: The user aborted a request.」として発生させるので、以下では catch メソッドで単にコンソールにメッセージを出力するようにしています(44行目)。
const targets = document.querySelectorAll('.target');
const output = document.getElementById('output');
const rc = document.getElementById('rc');
let removedCount = 0;
document.getElementById('play').addEventListener('click', () => {
  //アニメーション開始時に対象の要素の Animation オブジェクトを取得してすべてキャンセル
  targets.forEach((target) => {
    target.getAnimations().forEach((anim) => anim.cancel());
  });
  output.textContent = '';
  const animations = [];
  targets.forEach((target) => {
    const animation = new Animation(
      new KeyframeEffect(
        target,
        [
          { transform: 'translateX(0px)' },
          { transform: 'translateX(300px)' },
        ],
        {
          duration: 700 + Math.random() * 1000,
          easing: 'ease-in',
          fill: 'forwards',
          iterations : 1
        },
      ),
      document.timeline
    );
    animation.addEventListener('remove', () => {
      removedCount++;
      rc.textContent = removedCount;
    });
    animations.push(animation);
  });
  Promise.all(
    animations.map( (animation) => animation.ready )
  ).then( (anims) =>
    anims.forEach( (anim) => anim.startTime = document.timeline.currentTime)
  );
  Promise.all(
    animations.map( (animation) => animation.finished )
  ).then( () => output.textContent = '全て終了')
  //catch メソッドで例外(エラー)を捕捉
  .catch((error) => console.log('animation cancelled'));
});
関連項目:タイミングプロパティとメモリリーク
getAnimations() アニメーションの取得
Element.getAnimations()
対象の要素に適用または実行されているアニメーションを Element.getAnimations() メソッドで取得することができます(戻り値は Animation オブジェクの配列)。
適用とは fill プロパティの forwards や both の設定によりアニメーション完了後もアニメーションの効果が残っていることを意味します。
※ idle 状態の(cancel() を実行した)アニメーションは取得できません
また、取得されるアニメーションには CSS で定義したアニメーション(CSS アニメーション、CSS トランジション)も含まれます。
以下が Element.getAnimations() メソッドの構文です(Element は対象の要素)。
var animations = Element.getAnimations(options);
引数
引数 の options にはオブジェクト { subtree: true } を指定することができ、指定した場合、 Element の子孫をターゲットとしたアニメーションも返します(Element やその子孫に付けられた CSS 擬似要素をターゲットとするアニメーションを含みます)。省略した場合の既定値は { subtree: false } です。
※対象の要素の子要素や疑似要素のアニメーションを取得するには { subtree: true } を指定します。
戻り値
Animation オブジェクトの配列を返します。
以下は要素に設定されているアニメーションで現在実行中または適用中のアニメーションを取得してその時点での数を表示するサンプルです。
以下の例では play ボタンをクリックすると対象の要素に4つのアニメーションを設定し実行します。その際には最初に getAnimations() で取得した全てのアニメーションを停止しています。
get ボタンをクリックすると、getAnimations() で取得したアニメーションの数を出力します。
<div id="target"></div>
<button type="button" id="play">Play</button>
<button type="button" id="get">Get</button>
<button type="button" id="cancel">Cancel</button>
<div id="output"></div>

<script>
  //対象の要素
  const target = document.getElementById('target');
  //メッセージの出力先の要素
  const output = document.getElementById('output');

  //play ボタンにクリックイベントを設定
  document.getElementById('play').addEventListener('click', () => {
    //この要素のアニメーションを全て停止
    target.getAnimations().forEach(anim => anim.cancel());
    //メッセージをクリア
    output.textContent = '';
    //以下4つのアニメーションを作成して実行
    target.animate(
      { opacity: [0, 1] },
      { duration: 1500 }
    );
    target.animate(
      { transform: ['translateX(0px)', 'translateX(400px)'] },
      { duration: 2000, easing: 'ease-in' },
    );
    target.animate(
      { backgroundColor: ['#85A0F5', 'pink'] },
      { duration: 3000, fill: 'both' }
    );
    target.animate(
      { borderRadius: ['0%', '50%'] },
      { duration: 4000, fill: 'forwards' }
    );
  });

  //get ボタンにクリックイベントを設定
  document.getElementById('get').addEventListener('click', () => {
    //現在実行または適用中のアニメーションを取得してその数を表示
    output.textContent = '実行(適用)中アニメーション: ' + target.getAnimations().length;
  });

  document.getElementById('cancel').addEventListener('click', () => {
    //この要素のアニメーションを全て停止
    target.getAnimations().forEach(anim => anim.cancel());
    //メッセージをクリア
    output.textContent = '';
  });
</script>
play ボタンをクリックした直後では4つのアニメーションが実行され、その後時間の経過とともに最初の2つのアニメーションは完了します。
後の2つのアニメーションは fill プロパティに both や forwards が設定されているので完了後もアニメーションの効果が適用されているので、getAnimations() で取得されます。
cancel ボタンをクリックすると全てのアニメーションを停止するので、getAnimations() では取得されません。
animate() 直後に getAnimations() でアニメーションを取得
getAnimations() は idle 状態のアニメーションは取得できませんが、animate() メソッドはアニメーションを生成して実行するので、animate() 直後にアニメーションを取得することができます。
これは多数の要素をまとめて処理する際にアニメーションを取得するのに便利です。必要に応じてアニメーションの取得後 cancel() を実行すれば自動生成を停止できます。
以下は複数の要素に animate() メソッドでアニメーションを適用して、それらを getAnimations() で取得する例です。
Play All ボタンをクリックするとアニメーションを開始してボタンのテキストが Pause All に変わり、再度ボタンをクリックするとアニメーションが一時停止します。
<div id="target">
  <div></div>
  <div></div>
  <!-- 中略(合計32個 の div 要素) -->
  <div></div>
  <div></div>
</div>
<button type="button" id="toggle">Play All</button>
#target {
  width: 400px;
  height: 300px;
  background-color: #021250;
  overflow: hidden;
}
#target div {
  width: 15px;
  height: 15px;
  background-color: #F8F8D0;
  border-radius: 50%;
  display: inline-block;
  margin: 15px;
}
最初にアニメーションを適用する全ての要素を querySelectorAll() で取得して Array.from() で NodeList から配列に変換しています。
取得した全ての要素に forEach() を使って animate() メソッドでアニメーションを設定します。
キーフレームの移動する距離やタイミングプロパティの持続時間は乱数を使ってランダムになるように設定しています(8、9行目の200や、19行目の1600を変更すれば動作が変わります)。
animate() メソッドを実行した直後は自動的にアニメーションが再生され running 状態にあるので、この例では最初にボタンをクリックした時点で getAnimations() で全てのアニメーションを取得するようにしています。
この例ではアニメーション対象の親要素のメソッドとして getAnimations() を実行し、その子要素のアニメーションを取得するようにオプションに { subtree: true } を指定しています。
また、この例では初期状態ではアニメーションを停止させておくため、toggle.click() でボタンをクリックした状態にしています。toggle.click() の記述を削除すると初期状態でアニメーションが開始されているようになります。
//アニメーション対象の要素をすべて取得
const targets = Array.from(document.querySelectorAll('#target div'));

//取得した全ての要素それぞれに animate() メソッドでアニメーションを設定
targets.forEach((elem, i) => {
  //キーフレームの transform: translate() に指定する値を乱数とインデックスから作成
  const to = {
    //x軸方向の場合は2つに1つは反対方向へ
    x: Math.random() * (i % 2 === 0 ? -200 : 200),
    y: Math.random() * 200
  }

  elem.animate(
    [
      { transform: 'translate(0,0)' },
      { transform: 'translate(' + to.x + 'px,' + to.y + 'px)' }
    ],
    {
      //持続時間を乱数を使って設定
      duration: (Math.random() + 1) * 1600,
      direction: 'alternate',
      fill: 'both',
      iterations: Infinity,
      easing: 'ease-in-out'
    }
  );
});

//ボタンの要素
const toggle = document.getElementById('toggle');

//ボタンの要素にクリックイベントを設定
toggle.addEventListener('click', (e) => {
  //全てのアニメーションを取得(子要素のアニメーションを取得するのでsubtree: trueを指定)
  const animations = document.getElementById('target').getAnimations({subtree: true});

  if (animations && animations.length) {
    //playState の値により play または pause が代入される変数を宣言
    let action;
    //1つ目のアニメーションの状態(playState)を調べて変数 action に値を設定
    if (animations[0].playState === 'running') {
      action = 'pause';
    } else if (animations[0].playState === 'paused') {
      action = 'play';
    } else {
      return;
    }
    //全てのアニメーションに pause() または play() を実行
    animations.forEach((animation, i) => {
      //ブラケットでメソッドにアクセス animation.pause() または animation.play()
      animation[action]();
    });
    //ボタンのラベルを playState の値により変更
    toggle.textContent = (action === 'play') ? 'Pause All' : 'Play All';
  }
});
//ボタンをクリックしてアニメーションを停止
toggle.click();
前述の例では、初期状態では paused になっていますが、以下は初期状態で idle にする例です。
前述の例にアニメーションと CSS を追加して、Start ボタンをクリックするとフェードインするようにしています。また、初期状態に戻す Reset ボタンを追加しています。
HTML は前述の例に Reset ボタンの要素(id が reset の button 要素)を追加し、CSS では初期状態で非表示にするように全てのアニメーション対象の要素に opacity: 0 を追加で指定しています。
<div id="target">
  <div></div>
  <!-- 中略(合計32個 の div 要素) -->
  <div></div>
</div>
<button type="button" id="toggle">Play All</button>
<button type="button" id="reset" class="control">Reset</button>
#target {
  width: 400px;
  height: 300px;
  background-color: #021250;
  overflow: hidden;
}
#target div {
  width: 15px;
  height: 15px;
  background-color: #F8F8D0;
  border-radius: 50%;
  display: inline-block;
  margin: 15px;
  opacity: 0;  /*追加*/
}
24〜37行目が追加のアニメーションで、開始時にフェードインするように繰り返し(iterations)は1にして、元のアニメ=ションには delay: 800 を指定して開始時はフェードインがほぼ完了する時点で再生するようにしています。
また、52〜58行目では、アニメーションの状態(playState)を確認して、paused または idle の場合に再生するようにしています。これは2つ目のフェードインのアニメーションが finished の状態であれば、フェードインは不要なので実行しないようにするためです。
ちなみにこの例の場合、32個の要素に対して2つのアニメーションを適用しているので合計64個のアニメーションが生成されていて、1〜32(targets.length)個目まで、つまり animations[0]〜animations[targets.length-1] が1つ目のアニメーションを適用したものになっています。
const targets = Array.from(document.querySelectorAll('#target div'));
targets.forEach((elem, i) => {
  const to = {
    x: Math.random() * (i % 2 === 0 ? -200 : 200),
    y: Math.random() * 200
  }
  elem.animate(
    [
      { transform: 'translate(0,0)' },
      { transform: 'translate(' + to.x + 'px,' + to.y + 'px)' }
    ],
    {
      duration: (Math.random() + 1) * 1600,
      direction: 'alternate',
      fill: 'both',
      iterations: Infinity,
      easing: 'ease-in-out',
      delay: 800 // 追加
    }
  );
});

//追加のアニメーション
targets.forEach((elem, i) => {
  elem.animate(
    [
      { opacity: 0 },
      { opacity: 1 }
    ],
    {
      duration: 1000,
      fill: 'forwards',
      iterations: 1,
      easing: 'ease-in-out'
    }
  );
});

const toggle = document.getElementById('toggle');

//animate() で生成直後にアニメーションを取得
const animations = document.getElementById('target').getAnimations({ subtree: true });

toggle.addEventListener('click', (e) => {
  if (animations && animations.length) {
    let action;
    if (animations[0].playState === 'running') {
      action = 'pause';
    } else {
      action = 'play';
    }
    animations.forEach((animation, i) => {
      if (animation.playState === 'running') {
        animation.pause();
      }else if (animation.playState==='paused'||animation.playState==='idle'){
        animation.play();
      }
    });
    toggle.textContent = (action === 'play') ? 'Pause' : 'Play';
  }
});

// Reset ボタン
const reset = document.getElementById('reset');
// Reset ボタンにクリックイベントを設定
reset.addEventListener('click', (e) => {
  animations.forEach((animation, i) => {
    animation.cancel();
  });
  toggle.textContent = 'Start';
});
//Reset ボタンをクリックしてアニメーションを停止
reset.click();
Document.getAnimations()
document.getAnimations() メソッドを使うと、document において実行または適用中の全てのアニメーション(の配列)を取得することができます。取得されるアニメーションは Element.getAnimations() 同様、Web Animation 以外にも CSS で定義したアニメーション(CSS アニメーション、CSS トランジション)も含まれます。
以下が document.getAnimations() メソッドの構文です。引数はありません。
var allAnimations = document.getAnimations();
戻り値
Animation オブジェクトの配列
メモリリークの有無の判断
document.getAnimations() で取得した Animation オブジェクトの数が増加していく場合、アニメーションが原因のメモリリークが発生している可能性があります。
関連項目:タイミングプロパティとメモリリーク
<button type="button" id="check">Check</button>
<p>現在実行または適用中のアニメーションの数:<span id="count"></span></p>

<script>
  const count = document.getElementById('count');
  document.getElementById('check').addEventListener('click', () => {
    //ドキュメントの全ての実行中のアニメーションの数を取得して出力
    count.textContent = document.getAnimations().length;
  });
</script>
現在実行または適用中のアニメーションの数:
現在 running や paused の playState になっているサンプルなどのアニメーションの数が表示されます(このページでは初期状態で paused になっているアニメーションが 38 あります)。
CSS アニメーションの取得
Element.getAnimations() 及び Document.getAnimations() メソッドは CSS で定義したアニメーションも取得することができます。※ 但し、要素に display:none が指定されている場合は取得できません。
以下は Element.getAnimations() で要素に定義されている CSS アニメーションを取得して、取得した Animation オブジェクトを使って CSS アニメーションを操作する例です。
<div id="target"></div>
<button type="button" id="play">Play</button>
<button type="button" id="pause">Pause</button>
<button type="button" id="reverse">Reverse</button>
<button type="button" id="cancel">Cancel</button>
#target{
  animation: cssAnimation 2s ease-out 0s forwards;
}
@keyframes cssAnimation {
  0% {
    transform: translateX(0px);
    background-color:  #85A0F5;
  }
  100% {
    transform: translateX(300px);
    background-color:  pink;
  }
}
関連ページ:CSS アニメーション
//アニメーションが設定されている要素を取得
const target = document.getElementById('target');
//要素に設定されている CSS アニメーションを取得(配列なので最初の要素を取得)
const animation = target.getAnimations()[0];
//アニメーションの自動再生を停止
animation.cancel();

//ボタンの要素にクリックイベントを設定して操作
document.getElementById('play').addEventListener('click', () => {
 animation.play();
});
document.getElementById('pause').addEventListener('click', () => {
 animation.pause();
});
document.getElementById('reverse').addEventListener('click', () => {
 animation.reverse();
});
document.getElementById('cancel').addEventListener('click', () => {
 animation.cancel();
});
cancel() を実行した(idle 状態の)アニメーションは取得できない
CSS で定義したアニメーションを取得して、cancel() を実行することはできますが、cancel() 実行後はそのアニメーションを getAnimations() で取得することはできません。
前述の例では cancel() 実行後は変数に代入したアニメーションの play() などのメソッドで操作しているので問題ありませんが、例えば以下はアニメーションが取得できないので Uncaught TypeError: Cannot read properties of undefined (reading 'play') のようなエラーになります。
変数に代入しているアニメーションを使って animation.play() は可能です(エラーになりません)
const target = document.getElementById('target');
const animation = target.getAnimations()[0];
//キャンセル
animation.cancel();
//アニメーションが取得できないのでエラー ※ animation.play() は可能(エラーにならない)
target.getAnimations()[0].play();
@keyframes(CSS アニメーション)と getAnimations() の組み合わせ
基本となるアニメーションは CSS アニメーション の @keyframes で記述して、getAnimations() でアニメーションを取得して Web Animation API で操作することでアニメーションの定義と制御を分離することができます。また、既存の CSS アニメーションを Web Animation API で利用することもできます。
以下は1つの CSS キーフレームを記述して、要素ごとのアニメーションの開始時刻(startTime)を操作したアニメーションの例です。
CSS で対象の要素(#target div)の animation プロパティでアニメーション名(cssAnimation)及びタイミング関連のプロパティを設定し、キーフレームを定義しています。
#target {
  display: flex;
  height: 170px;
  width: 300px;
  border: 1px solid #eee;
}
#target div{
  animation: cssAnimation 3s ease-in-out 0s infinite alternate;
  width: 20px;
  height: 20px;
  background-color:pink;
  border-radius: 50%;
}
@keyframes cssAnimation {
  0% {
    transform: translateY(0px) scaleX(1);
    border-radius: 50%;
    background-color: pink;
    opacity: .8;
  }
  50% {
    background-color: mediumpurple;
  }
  100% {
    transform: translateY(150px)  scaleX(.8);
    border-radius: 0%;
    background-color: lightskyblue;
    opacity: 1;
  }
}
<div id="target">
  <div></div>
  <div></div>
  ・・・中略・・・
  <div></div>
  <div></div>
</div>
<button type="button" id="play">Play</button>
<button type="button" id="pause">Pause</button>
この例では最初に cancel() を実行して停止するので、その前に getAnimations() で要素のアニメーションを取得して配列に格納しておきます。
play ボタンをクリックすると、タイムラインの現在時刻 document.timeline.currentTime を取得して、その値を元に少しずつずらした時刻を startTime に設定してアニメーションを再生します。
pause() で一時停止していた場合は、タイムラインの現在時刻の代わりにアニメーションの現在時間(再生位置) Animation.currentTime を使っています。
//対象の全ての要素を取得(15個の div 要素)
const targets = document.querySelectorAll('#target div');

//アニメーションを格納する配列の初期化
const animations = [];

//getAnimations() で取得したアニメーションを配列に追加
targets.forEach((elem) => {
  animations.push(elem.getAnimations()[0]);
});

//取得した全てのアニメーションをキャンセルして停止
animations.forEach((anim) => {
  anim.cancel();
});

//play ボタンのクリックイベント
document.getElementById('play').addEventListener('click', (e) => {
  //ドキュメントのタイムラインの現在時刻を取得
  const now = document.timeline.currentTime;
  //アニメーションの現在時間(再生位置)を取得(pause 後の再生用)
  const ct = animations[0].currentTime;

  animations.forEach((anim, i) => {
    if(anim.playState === 'idle') {
      //アニメーションの状態が idle の場合はタイムラインの現在時刻を使って startTime を設定
      anim.startTime = now + i * 300;
    }else{
      //idle 以外の場合はアニメーションの現在時間(再生位置)を使って startTime を設定
      anim.startTime = ct + i * 300;
    }
  });
});

document.getElementById('pause').addEventListener('click', (e) => {
  animations.forEach((anim, i) => {
    anim.pause();
  });
});

document.getElementById('cancel').addEventListener('click', (e) => {
  animations.forEach((anim, i) => {
    anim.cancel();
  });
});
一時停止後のアニメーションの再開は、一時停止した位置から再開されるようにはなっていません。複数アニメーションの適用のサンプルでは、startTime ではなく play() を使っているので、一時停止した位置から再開されるようになっています。
clip-path アニメーションの例
以下は CSS で設定した clip-path アニメーションを取得して JavaScript で制御する例です。

この例では2枚の同じ画像を重ねて表示し、上に表示する画像に clip-path を適用してアニメーションしています。
<div class="cp-sample">
  <img class="bg-image" src="../images/01.jpg" alt="">
  <img class="cp-image" src="../images/01.jpg" alt="">
</div>
<button type="button" id="play">Play </button>
<button type="button" id="pause">Pause</button>
<button type="button" id="cancel">Cancel</button>
.cp-sample {
  position: relative;  /* 絶対配置の基準に */
  width: 300px;
}
.cp-sample img {
  max-width: 100%;
}
.bg-image {
  opacity: 0.4;
}
.cp-image {
  position: absolute; /*背景の同じ画像に重ねて表示*/
  top: 0;
  left: 0;
  clip-path: circle(0% at 100% 0);
  /*アニメーションを設定*/
  animation: clipPathAnimation 7s ease-in-out infinite alternate;
}

/*clip-path のアニメーション*/
@keyframes clipPathAnimation {
  0% {
  clip-path: circle(0% at 100% 0);
  }
  50% {
  clip-path: circle(90% at 0 100%);
  }
  75% {
  clip-path: circle(40%);
  }
  100% {
  clip-path: circle(30% at 47% 50%);
  }
}
アニメーション対象の要素から CSS のアニメーションを取得して、ボタンにクリックイベントを設定して制御するようにしています。
//CSS アニメーション対象の要素
const cpImage = document.querySelector('.cp-image');

//対象の要素の CSS アニメーションをを取得
const animation = cpImage.getAnimations()[0];
//取得したアニメーションを停止
animation.cancel();

//ボタンにアニメーションを制御するクリックイベントを設定
document.getElementById('play').addEventListener('click', () => {
  animation.play();
});
document.getElementById('pause').addEventListener('click', () => {
  animation.pause();
});
document.getElementById('cancel').addEventListener('click', () => {
  animation.cancel();
});
上記の CSS アニメーションを Web Animation API を使って書き換えると以下のようになります。
.cp-sample {
  position: relative;
  width: 300px;
}
.cp-sample img {
  max-width: 100%;
}
.bg-image {
  opacity: 0.4;
}
.cp-image {
  position: absolute;
  top: 0;
  left: 0;
}
//アニメーションの対象の要素
const cpImage = document.querySelector('.cp-image');

//アニメーションを設定
const animation = cpImage.animate(
  [
    {
      clipPath:'circle(0% at 100% 0)',
      offset: 0
    },
    {
      clipPath:'circle(90% at 0 100%)',
      offset: 0.5
    },
    {
      clipPath:'circle(40%)',
      offset: 0.75
    },
    {
      clipPath:'circle(30% at 47% 50%)',
      offset: 1.0
    },
  ],
  {
    duration: 7000,
    easing: 'ease-in-out',
    iterations: Infinity,
    direction: 'alternate'
  }
);
//生成したアニメーションの自動再生を停止
animation.cancel();

//ボタンにアニメーションを制御するクリックイベントを設定
document.getElementById('play').addEventListener('click', () => {
  animation.play();
});
document.getElementById('pause').addEventListener('click', () => {
  animation.pause();
});
document.getElementById('cancel').addEventListener('click', () => {
  animation.cancel();
});
関連項目:CSS clip-path の使い方/clip-path アニメーション
CSS アニメーションのイベント
CSS アニメーションには Window、Document、HTMLElement のそれぞれについて以下のようなイベントがあります。
| イベント | 説明 |
|---|---|
| animationstart | CSS アニメーションが開始したとき(animation-delay がある場合、待ち時間が経過したとき)に発生します。 |
| animationiteration | CSS アニメーションの反復が1回分終了し、次の回が始まったときに発生します。animationend イベントと同時には発生しません(animation-iteration-count が1のアニメーションでは発生しません)。 |
| animationend | CSS アニメーションが完了したときに発生します。アニメーションが完了前に中止された場合は発生しません。 |
| animationcancel | CSS アニメーションが中断されたときに発生します |
getAnimations() で取得した CSS アニメーションでは、上記の HTMLElement などのイベント及び Animation オブジェクトのイベントを利用できます。
以下は getAnimations() で取得したアニメーションの対象の要素の CSS アニメーションのイベントを出力する例です。
#target{
  animation: cssAnimation 1s linear 0s 4 forwards;
}
@keyframes cssAnimation {
  0% {
    transform: translateX(0px);
    background-color:  #85A0F5;
  }
  100% {
    transform: translateX(300px);
    background-color:  pink;
  }
}
<div id="target"></div>
<button type="button" id="play">Play</button>
<button type="button" id="pause">Pause</button>
<button type="button" id="reverse">Reverse</button>
<button type="button" id="cancel">Cancel</button>
<div id="output"></div>
<p id="iterationCount"></p>
CSS アニメーション(HTMLElement)の animationiteration イベントを使って繰り返し回数を増加させて表示しています。
また、アニメーションオブジェクトの finish イベントと cancel イベントを使って繰り返し回数をリセットするようにしています。
//アニメーションが設定されている要素を取得
const target = document.getElementById('target');
//要素に設定されている CSS アニメーションを取得(配列なので最初の要素を取得)
const animation = target.getAnimations()[0];
//アニメーションの自動再生を停止
animation.cancel();

//ボタンの要素にクリックイベントを設定して操作
document.getElementById('play').addEventListener('click', () => {
  animation.play(); //再生
});
document.getElementById('pause').addEventListener('click', () => {
  animation.pause(); //一時停止
});
document.getElementById('reverse').addEventListener('click', () => {
  animation.reverse(); //逆方向に再生
});
document.getElementById('cancel').addEventListener('click', () => {
  animation.cancel(); //停止(キャンセル)
});

//メッセージの出力先
const output = document.getElementById('output');
//繰り返し回数を入れる変数
const iterationCountText = document.getElementById('iterationCount');
//繰り返し回数の初期値
let iterationCount = 0;

//HTMLElement の animationstart イベントにリスナーを登録
target.addEventListener('animationstart', () => {
  output.textContent = 'アニメーション開始';
});

//HTMLElement の animationiteration イベントにリスナーを登録
target.addEventListener('animationiteration', () => {
  iterationCount++; //繰り返し回数を増加
  iterationCountText.textContent = `${iterationCount} 回終了`;
});

//HTMLElement の animationend イベントにリスナーを登録
target.addEventListener('animationend', () => {
  output.textContent = 'アニメーション終了';
});

//HTMLElement の animationcancel イベントにリスナーを登録
target.addEventListener('animationcancel', () => {
  output.textContent = 'アニメーションが取り消されました';
});

//Animation オブジェクトの finish イベントにリスナーを登録
animation.addEventListener('finish', (e) => {
  iterationCount = 0;
  iterationCountText.textContent = '';
});

//Animation オブジェクトの cancel イベントにリスナーを登録
animation.addEventListener('cancel', (e) => {
  iterationCount = 0;
  iterationCountText.textContent = '';
});
擬似要素の CSS アニメーション
以下は疑似要素に設定されている CSS アニメーションを取得する例です。
疑似要素に設定されている CSS アニメーションを Element.getAnimations() で取得する場合は、引数に { subtree: true } を指定します。
#target {
  line-height: 40px;
  height: 40px;
}
#target span {
  vertical-align: top;
  color: silver;
}
#target::before {
  content:'';
  display:inline-block;
  width: 40px;
  height: 40px;
  margin-right: 15px;
  background-color: #85A0F5;
  /*疑似要素にアニメーションを設定*/
  animation: pseudoAnimation 2s ease-in-out 0s infinite alternate;
}

@keyframes pseudoAnimation {
  0%   {
    transform: rotate(0deg);
  }
  100% {
    transform: rotate(360deg);
    background-color: pink;
  }
}
<p id="target"><span>Target</span></p>
<button type="button" id="play">Play</button>
<button type="button" id="pause">Pause</button>
<button type="button" id="cancel">Cancel</button>
疑似要素を設定してある要素を取得して、その要素の getAnimations() の引数にオプションの { subtree: true } を指定して疑似要素のアニメーションを取得します。
getAnimations() の戻り値は配列です。この例の場合は設定してあるアニメーションは1つなので最初の要素を取得しています。
//疑似要素を設定してある要素を取得
const target = document.getElementById('target');
//getAnimations() に { subtree: true } を指定して疑似要素のアニメーションを取得
const animation = target.getAnimations( { subtree: true } )[0];
//アニメーションを停止
animation.cancel();

//ボタンの要素にクリックイベントを設定して操作
document.getElementById('play').addEventListener('click', () => {
 animation.play();
});
document.getElementById('pause').addEventListener('click', () => {
 animation.pause();
});
document.getElementById('cancel').addEventListener('click', () => {
 animation.cancel();
});
Target
以下は上記と同じことを Document.getAnimations() を使って行う場合の例です。
document.getAnimations() で取得したアニメーションの effect プロパティの target プロパティは疑似要素の元の要素を返すので、その id 属性を調べて、対象の要素の id と一致したアニメーションを取得しています。
//ドキュメントの全てのアニメーションを取得
const animations = document.getAnimations();
//取得するアニメーションを格納する変数の宣言
let animation;
//取得した全てのアニメーションに対して id を確認して一致すれば取得
animations.forEach((anim, i) => {
  //アニメーションの effect.target.id で要素の id の値を調べる
  if(anim.effect.target.id === 'target') animation = anim;
});
//アニメーションを停止
animation.cancel();

//ボタンの要素にクリックイベントを設定して操作
document.getElementById('play').addEventListener('click', () => {
 animation.play();
});
document.getElementById('pause').addEventListener('click', () => {
 animation.pause();
});
document.getElementById('cancel').addEventListener('click', () => {
 animation.cancel();
});
CSS トランジションの取得
CSS トランジションも動作中であれば getAnimations() メソッドで取得することができます。
以下はチェックボックスにチェックを入れるとトランジションアニメーションを開始する CSS の例です。
#target {
  width: 60px;
  height: 60px;
  margin: 30px 0;
  background-color: #85A0F5;
  transition:transform 3s ease-in-out;
}
#start:checked ~ #target{
  transform: translateX(300px)rotate(720deg) ;
}
<input type="checkbox" id="start">
<label for="start"> Transition Start </label>
<div><button type="button" id="pause">Pause</button> </div>
<div id="target"></div>
アニメーションが動作中でない場合は、getAnimations() メソッドでアニメーションを取得できないので取得できている場合にのみ処理をするようにしています。
9行目の判定を行わないと、アニメーションが動作していない場合にボタンをクリックすると Uncaught TypeError: Cannot read properties of undefined (reading 'playState') のようなエラーになります。
//アニメーション対象の要素を取得
const target = document.getElementById('target');

//pause ボタンにクリックイベントを設定
document.getElementById('pause').addEventListener('click', (e) => {
  //対象の要素のアニメーションを全て取得して最初のアニメーションを変数に代入
  const animation = target.getAnimations()[0];
  //アニメーションが取得できていれば
  if(animation) {
    //アニメーションの状態が running の場合
    if(animation.playState === 'running'){
      //一時停止
      animation.pause();
      //ボタンのテキストを変更(e.currentTarget は pause ボタンの要素)
      e.currentTarget.textContent = 'Play';
    }else{
      //アニメーションの状態が running 以外の場合
      animation.play();
      e.currentTarget.textContent = 'Pause';
    }
  }
});
9〜 21行目の部分はオプショナルチェーン (?.) を使って以下のように記述することもできます。
if(animation?.playState === 'running'){
  animation?.pause();
  e.currentTarget.textContent = 'Play';
}else{
  animation?.play();
  e.currentTarget.textContent = 'Pause';
}
チェックボックスにチェックを入れるとアニメーションが開始され、Pause ボタンをクリックすると一時停止します。
複数のトランジション
以下は1つの要素に複数のトランジションを設定している例です。前述の例に background-color を変更するトランジションを追加しています。
#target {
  width: 60px;
  height: 60px;
  margin: 30px 0;
  background-color: #85A0F5;
  /* background-color の transition を追加 */
  transition: background-color 3s, transform 3s ease-in-out;
}
#start:checked ~ #target{
  transform: translateX(300px)rotate(720deg) ;
  background-color: pink;  /* 追加 */
}
複数のトランジションを設定しているので、取得したそれぞれのアニメーションに対してメソッドを実行します。
この場合、forEach() を使っているので、6行目の判定はなくてもエラーにはなりません。
const target = document.getElementById('target');
document.getElementById('pause').addEventListener('click', (e) => {
  /対象の要素のアニメーションを全て取得
  const animations = target.getAnimations();
  //取得したアニメーションがあれば
  if(animations.length > 0) {
    //それぞれのアニメーションに対してメソッドを実行
    animations.forEach((animation) => {
      if(animation.playState === 'running'){
        animation.pause();
        e.currentTarget.textContent = 'Play';
      }else{
        animation.play();
        e.currentTarget.textContent = 'Pause';
      }
    });
  }
});
以下は親要素のエリア(背景色のある部分)にホバーするとトランジションアニメーションを開始する例です。その際、背景色のある部分でクリックするとアニメーションを一時停止します。
<style>
#target {
  width: 60px;
  height: 60px;
  background-color: #85A0F5;
  transition: background-color 2s, transform 2s ease-in-out;
}
.target-wrapper {
  width: 300px;
  height: 120px;
  padding: 30px 0;
  background-color: #E0F9EC;
  cursor: pointer;
}
.target-wrapper:hover #target {
  transform: translateX(240px)rotate(720deg);
  background-color: pink;
}
</style>

<div class="target-wrapper">
  <div id="target"></div>
</div>

<script>
const target = document.getElementById('target');
const wrapper = document.querySelector('.target-wrapper');

wrapper.addEventListener('click', (e) => {
  //対象の要素のアニメーションを全て取得
  const animations = target.getAnimations();
  //取得したアニメーションがあれば
  if(animations.length > 0) {
    //それぞれのアニメーションに対してメソッドを実行
    animations.forEach((animation) => {
      if(animation.playState === 'running'){
        animation.pause();
      }else{
        animation.play();
      }
    });
  }
});
</script>
Mortion Path によるアニメーション
モーションパス (Mortion Path) は CSS のモジュールの一つで、任意のグラフィックオブジェクトを独自の経路に沿って動作させるためのものです。
offset-path プロパティを使って任意の形状の経路を定義することができ、 offset-distance プロパティを使って経路に沿って動かすことができます。
offset-path には現時点では値として path() を指定することができます。
関連ページ:CSS モーションパス(offset-path offset-distance)の使い方
以下はモーションパスを使った CSS アニメーションの例です。
この例では getAnimations() で CSS アニメーションを取得してボタンで制御できるようにしています。
<div id="motion-demo"></div>
#motion-demo {
  /* offset-path プロパティに path() を使って経路の形状を指定  */
  offset-path: path('M20,20 C20,100 200,0 200,100');
  /* キーフレームアニメーションを指定  */
  animation: move 3000ms infinite alternate ease-in-out;
  width: 40px;
  height: 40px;
  background: blue;
  opacity: .5;
  border: 1px solid #999;
}

/* offset-distance を使ったキーフレームアニメーションを設定  */
@keyframes move {
  0% {
    offset-distance: 0%; /* offset-distance プロパティ */
  }
  100% {
    offset-distance: 100%;; /* offset-distance プロパティ */
  }
}
また、この例では offset-path で指定したパスの形状を SVG の path 要素で表示しています。
<svg width="200" height="120" viewBox="0 0 200 120" style="position: absolute;">
  <path fill="none" stroke="#ccc" d="M20,20 C20,100 200,0 200,100"/>
  <!--パスの形状-->
</svg>
//モーションパスの CSS アニメーションを取得
const mpAnimation = document.getElementById('motion-demo').getAnimations()[0];

//ボタンの要素を取得
const toggle = document.getElementById('toggle');

//ボタンの要素にクリックイベントを設定
toggle.addEventListener('click', () => {
  //アニメーションの playState により pause() または play() を実行し、ボタンのラベルを変更
  if(mpAnimation.playState === 'running') {
    mpAnimation.pause();
    toggle.textContent = 'Start';
  }else{
    mpAnimation.play();
    toggle.textContent = 'Pause';
  }
});
モーションパスアニメーションを Web Animation API で実装
以下は上記と同じことを animate() メソッドを使って行う例です(パスの線を表示する svg は省略)。
2022年3月の時点では Safari ではサポートされていません(前述の getAnimations() で CSS アニメーションを取得する方法は機能します)。
<div id="target"></div>
<button type="button" id="play">Play </button>
<button type="button" id="pause">Pause</button>
<button type="button" id="cancel">Cancel</button>
.motion-demo-wrapper {
  position: relative;
  width: 220px;
  height: 120px;
  margin: 30px 0;
}
#target {
  width: 40px;
  height: 40px;
  background: red;
  opacity: .5;
  border: 3px solid #999;
}
対象の要素に CSS で offset-path を設定することもできますが、以下では style 属性に指定しています。
また、キーフレームに offsetDistance を指定してます。
//アニメーションの対象の要素
const target = document.getElementById('target');
//要素のスタイルに offset-path を設定
target.style.offsetPath = "path('M20,20 C20,100 200,0 200,100')";
//アニメーションを作成
const animation = target.animate(
  {
    // CSS の offset-distance に該当
    offsetDistance: ['0%', '100%']
  },
  {
    duration: 3000,
    easing: 'ease-in-out',
    iterations: Infinity,
    direction: 'alternate'
  }
);
//アニメーションの自動再生を停止
animation.cancel();

//ボタンにクリックイベントを設定
document.getElementById('play').addEventListener('click', () =>  {
  animation.play();
});
 document.getElementById('pause').addEventListener('click', () =>  {
  animation.pause();
});
document.getElementById('cancel').addEventListener('click', () =>  {
  animation.cancel();
});
以下は2つの要素に同じモーションパスを適用したアニメーションを設定する例です。
1つの要素のアニメーションは初期状態では停止しておき、Start または Reverse ボタンをクリックするとアニメーションを開始します。もう一方のアニメーションは iterations に Infinity を設定して無限に繰り返します。2つのアニメーションは異なる Easing を設定しています。
また、2つのモーションパス(円と正方形)を用意して、Change ボタンをクリックするとモーションパスを入れ替えています。
※2022年3月の時点では Safari では機能しません。
<div class="motion-demo-wrapper2">
  <svg width="200" height="200" viewBox="0 0 200 200" style="position: absolute;">
    <path id="path" fill="none" stroke="#ddd" d="M 25 100 A 75 75 0 1 1 175 100 A 75 75 0 1 1 25 100"/>
  </svg>
<div id="target1"></div>
<div id="target2"></div>
</div>
<button type="button" id="start">Start </button>
<button type="button" id="pause">Pause</button>
<button type="button" id="reverse">Reverse</button>
<button type="button" id="cancel">Cancel</button>
<button type="button" id="change">Change</button>
CSS では2つ目の要素に margin-top: -20px を指定して1つ目の要素と同じ位置になるようにしています。
#target1 {
  width: 20px;
  height: 20px;
  background-color: red;
  opacity: .6;
}
#target2{
  width: 20px;
  height: 20px;
  background-color: blue;
  opacity: .4;
  margin-top: -20px; /*#target1 と重ねる*/
}
.motion-demo-wrapper2 {
  position: relative;
  width: 200px;
  height: 200px;
  margin: 30px 0;
}
path() に指定する円と正方形のパスを表す d 属性の値を用意して、アニメーション対象の要素の offset-path に同じパスを指定しています。
それぞれの対象の要素には animate() メソッドでアニメーションを設定し、1つ目のアニメーションは初期状態では停止しておきます。
Change ボタンのクリックイベントの設定では、現在使用しているパスを判定するための変数の値により、使用していない方のパスを対象の要素及びパスの形状を表示している svg 要素に設定しています。
//path() に指定する d 属性の値を変数に代入
const d1 = 'M 25 100 A 75 75 0 1 1 175 100 A 75 75 0 1 1 25 100';  //円のパス用
const d2 = 'M 25 100 v-75 h150 v150 h-150 z';  //正方形のパス用

//path() の値を変数に代入
const path1 = `path('${d1}')`;
const path2 = `path('${d2}')`;

//アニメーションの対象の要素を取得
const target1 = document.getElementById('target1');
const target2 = document.getElementById('target2');

//対象の要素 に offset-path を設定
target1.style.offsetPath = path1;
target2.style.offsetPath = path1;

//1つ目の対象の要素にアニメーションを設定
const animation1 = target1.animate(
  { offsetDistance: ['0%', '100%'] },
  {
    duration: 3000,
    easing: 'ease-in-out',
    iterations: 1000, /*ある程度大きな適当な値を指定*/
  }
);
//こちらのアニメーションは初期状態では停止しておく
animation1.cancel();

//2つ目の対象の要素にアニメーションを設定
const animation2 = target2.animate(
  { offsetDistance: ['0%', '100%'] },
  {
    duration: 3000,
    easing: 'linear', /*デフォルトの linear を指定(省略可能)*/
    iterations: Infinity, /* 無限に繰り返し */
  }
);

//それぞれのボタンにクリックイベントを設定
document.getElementById('start').addEventListener('click', () =>  {
  animation1.play();
});
document.getElementById('pause').addEventListener('click', () =>  {
  animation1.pause();
});
document.getElementById('reverse').addEventListener('click', () =>  {
  animation1.reverse();
});
document.getElementById('cancel').addEventListener('click', () =>  {
  animation1.cancel();
});

//モーションパスの形状を表示している svg の path 要素を取得
const path = document.getElementById('path');

//現在使用しているモーションパスを判定するための変数
let usingPath1 = true;

//Change ボタンのクリックイベントの設定
document.getElementById('change').addEventListener('click', () =>  {
  //現在1つ目のパスが使用されていれば
  if(usingPath1) {
    //対象の要素の offset-path に2つ目のパスを設定
    target1.style.offsetPath = path2;
    target2.style.offsetPath = path2;
    //svg の path 要素の d 属性を2つ目のパスの値に変更
    path.setAttribute('d', d2) ;
    //判定用の変数を更新
    usingPath1 = false;
  }else{
    target1.style.offsetPath = path1;
    target2.style.offsetPath = path1;
    path.setAttribute('d', d1) ;
    usingPath1 = true;
  }
});
SVG アニメーション(SMIL)では animateMotion 要素を使って同様のアニメーションが可能です。
テキストを Mortion Path でアニメーション
以下はテキストをパスに沿ってアニメーションさせる例です。但し、この例の場合、テキストを JavaScript で1文字ずつに分割して順番を入れ替えているので、アクセシビリティ的には問題があるかと思います。
Play をクリックするとテキストをパスに沿って移動させます。
以下が HTML です。id が target の要素に指定した文字を Javascript で1つ1つの span 要素に分割します。svg 要素はパスの形状を表示するためのものです。
<div class="motion-demo-wrapper">
  <svg width="200" height="120" viewBox="0 0 200 120" style="position: absolute;">
    <path fill="none" stroke="#ccc" d="M20,20 C20,100 200,0 200,100"/>
  </svg>
  <div id="target">Motion Path</div>
</div>
<button type="button" id="play">Play </button>
<button type="button" id="pause">Pause</button>
<button type="button" id="cancel">Cancel</button>
対象の要素のテキストを分割して生成される span 要素に position: absolute を指定しています。また初期状態では非表示にするので opacity: 0 も指定しています。
.motion-demo-wrapper {
  position: relative;
  width: 220px;
  height: 120px;
  margin: 30px 0;
}
#target {
  position: relative;
}
#target span {
  position: absolute;
  opacity: 0;
}
対象の要素のテキストをひとまとまりとして Mortion Path でアニメーションさせるとそれぞれの文字をパスに沿って動かすことができません。
そのため、この例ではテキストを1文字ずつに分割して、それぞれにアニメーションを設定し、開始時間(delay)をずらすことで順番に表示しています。
それぞれの文字の間隔は delay で調整しています。
//対象の要素を取得
const target = document.getElementById('target');

//対象の要素のテキストを分割して取得した配列の要素の順番を逆に
const chars = target.textContent.split('').reverse();

//対象の要素のテキストを空に
target.innerHTML = '';

//各文字を使った span 要素を生成して対象の要素に追加
chars.forEach((char) => {
  const span = document.createElement('span');
  span.textContent = char;
  target.appendChild(span);
});

//全てのアニメーションで共通のタイミング
let timing = {
  duration: 4000,
  easing: 'ease-in-out',
  iterations: Infinity,
}

//全ての span 要素に Mortion Path によるアニメーションを設定
document.querySelectorAll('#target span').forEach((elem, i) => {
  elem.style.offsetPath = "path('M20,20 C20,100 200,0 200,100')";
  //1文字ずつずらして開始(文字の間隔を調整)
  timing.delay = 150 * i;
  elem.animate(
    {
      offsetDistance: ['0%', '100%'],
      opacity: [0, 1, 1, 0],
      offset: [ 0, 0.3, 0.9, 1]
    },
    //共通のタイミングにそれぞれで異なる delay を指定したものを設定
    timing
  );
});
//対象の要素に設定されている全てのアニメーションを取得
const animations = target.getAnimations({ subtree: true });

//全てのアニメーションを停止
animations.forEach((animation) => {
  animation.cancel();
});

//ボタンにクリックイベントを設定
document.getElementById('play').addEventListener('click', () =>  {
  animations.forEach((animation) => {
    animation.play();
  });
});

document.getElementById('pause').addEventListener('click', () =>  {
  animations.forEach((animation) => {
    animation.pause();
  });
});

document.getElementById('cancel').addEventListener('click', () =>  {
  animations.forEach((animation) => {
    animation.cancel();
  });
});
※現時点では Safari では動作しません。テキストをパスに沿って動かす場合は SVG アニメーション(SMIL)を使った方が柔軟で簡単に実装できるかと思います。
SVG のアニメーション
SVG の属性によっては Web Animation API を使ってアニメーションを適用することができますが、現時点(2022年3月)ではサポートされていないブラウザもあります。
また、SVG アニメーション(animate や animateMotion、animateTransform など)はアニメーションの対象が CSS プロパティであっても現時点では getAnimations() メソッドで取得できないようです。
以下は animate 要素を使った SVG アニメーションですが、 getAnimations() メソッドでは取得できません。
<svg width="50" height="50" viewBox="0 0 50 50">
  <rect id="target" x="0" y="0" width="50" height="50" rx="10" ry="10" fill="darkseagreen">
    <animate
      attributeType="CSS"
      attributeName="opacity"
      dur="3s"
      values="1; 0.5; 0.2; 0.8; 1"
      repeatCount="indefinite"/>
  </rect>
</svg>
<button type="button" id="toggle" class="control">Pause</button>

<script>
const target = document.getElementById('target');

document.getElementById('toggle').addEventListener('click', (e)=>{
  //アニメーションを取得
  const animation = target.getAnimations()[0];
  //アニメーションを取得できれば以下を実行(animation は undefined になるので実行されない)
  if(animation){
    if(animation.playState === 'running') {
      animation.pause();
      e.currentTarget.textContent = 'Play';
    }else{
      animation.play();
      e.currentTarget.textContent = 'Pause';
    }
  }
});
</script>
Pause をクリックしても何も起きません。
但し、SVG 要素でも CSS アニメーションであれば getAnimations() メソッドで実行中のアニメーションを取得することができます。以下の例では CSS を svg の defs 要素内 の style 要素に記述していますが、head 内などの style 要素に記述することもできます。
また、この方法の場合は Safari でも機能します
<svg width="50" height="50" viewBox="0 0 50 50" style="overflow: visible;">
  <rect id="target" x="0" y="0" width="50" height="50" fill="darkseagreen"></rect>
  <defs>
    <style>
      #target{
        animation: cssAnim 3s linear 0s infinite;
      }
      @keyframes cssAnim {
        0%   { fill: darkseagreen; transform: translateX(0px)}
        50%  { fill: pink; transform: translateX(100px)}
        100% { fill: lightblue; transform: translateX(0px)}
      }
    </style>
  </defs>
</svg>
<button type="button" id="toggle" class="control">Pause</button>

<script>
const target = document.getElementById('target');

document.getElementById('toggle').addEventListener('click', (e)=>{
  //アニメーションを取得
  const animation = target.getAnimations()[0];
  //この場合はアニメーションを取得できるで以下が実行される
  if(animation){
    if(animation.playState === 'running') {
      animation.pause();
      e.currentTarget.textContent = 'Play';
    }else{
      animation.play();
      e.currentTarget.textContent = 'Pause';
    }
  }
});
</script>
この場合はボタンをクリックするとアニメーションを一時停止できます。
モーフィングアニメーション
キーフレームで path 要素の d 属性の値に path() を使った文字列(パスデータ)を指定することでモーフィングアニメーションが可能です。
path 要素のアニメーション(モーフィング)の場合、パスシェイプが正確に同じ数の頂点/ポイントを持ち、同じコマンド及び順序で記述される必要があります(以下ではわかりやすいようにパスデータの値の間にスペースを入れてあります)。
以下は Safari では機能しません。
<svg width="200" height="100" viewBox="0 0 200 100">
  <path id="target" fill="green" d="M 0,0 L50,0 L100,0 L50,100z"/>
</svg>
<button type="button" id="start" class="control">Start </button>

<script>
//ボタン要素にクリックイベントを設定
document.getElementById('start').addEventListener('click', ()=> {
  //対象の path 要素に animate メソッドでアニメーションを設定
  document.getElementById('target').animate(
    {
      d: [
        //path() を使ったパスデータを指定
        "path('M 0,0    L50,0  L100,0    L50,100z')",
        "path('M 0,100  L50,0  L100,100  L50,100z')",
        "path('M 0,100  L50,0  L100,100  L50,0z')",
        "path('M 0,0    L50,0  L100,0    L50,100z')"
      ]
    },
    {
      duration:3000,
      easing: 'ease-out'
    }
  );
});
</script>
以下もモーフィングアニメーションの例です。この例では図形の塗り(fill)も変化するようにしています。
モーフィングアニメーションは Safari では機能しませんが、fill のアニメーションは機能します。
<svg width="150" height="150" viewBox="0 0 200 200">
  <path id="target" fill="lightblue" d="M32.93,45 中略 ,32.93,45.82Z"/>
</svg>

<button type="button" id="start">Start </button>
<button type="button" id="cancel">Cancel </button>

<script>
const target = document.getElementById('target');

//animate() で 生成したアニメーションを変数に代入
const animation = target.animate(
  {
    d: [
      "path('M32.93,45.82C58.31,25. 中略 .73,32.93,45.82Z')",
      "path('M60,72.63c25.38-20.82, 中略 ,80.53,60,72.63Z')",
      "path('M60,72.63c25.38-20.82, 中略 ,80.53,60,72.63Z')",
      "path('M54.58,55.36c25.37-20, 中略 .26,54.58,55.36Z')",
      "path('M60.76,39.38c25.38-20, 中略 .28,60.76,39.38Z')",
      "path('M32.93,45.82C58.31,25, 中略 .73,32.93,45.82Z')"
    ],
    //塗りもアニメーションするように指定
    fill: ['lightblue', 'lightgreen', 'mediumpurple', 'pink', 'orange', 'gold']
  },
  {
    duration:5000,
    easing: 'ease-out',
    iterations: Infinity
  }
);
//自動再生を停止
animation.cancel();

const start = document.getElementById('start');

start.addEventListener('click', (e)=> {
  if(animation.playState === 'idle' || animation.playState === 'paused'){
    animation.play();
    e.currentTarget.textContent = 'Pause';
  }else{
    animation.pause();
    e.currentTarget.textContent = 'Start';
  }
});

document.getElementById('cancel').addEventListener('click', (e)=> {
  animation.cancel();
  start.textContent = 'Start';
});
</script>
<div>
  <svg width="150" height="150" viewBox="0 0 200 200">
    <path id="target" fill="lightblue" d="M32.93,45.82C58.31,25,92.46,13.09,122.62,32.94s60.57,53.35,52.32,84.53S80.35,205.1,50.2,166.19,23.3,53.73,32.93,45.82Z"/>
  </svg>
</div>
<button type="button" id="start" class="control">Start </button>
<button type="button" id="cancel" class="control">Cancel </button>

<script>
const target = document.getElementById('target');
const animation = target.animate(
  {
    d: [
      "path('M32.93,45.82C58.31,25,92.46,13.09,122.62,32.94s60.57,53.35,52.32,84.53S80.35,205.1,50.2,166.19,23.3,53.73,32.93,45.82Z')",
      "path('M60,72.63c25.38-20.82,32.47-59.54,62.63-39.69s76.54,67.52,68.3,98.71S80.35,205.1,50.2,166.19,50.36,80.53,60,72.63Z')",
      "path('M60,72.63c25.38-20.82,78.35-75.26,108.5-55.41s30.67,83.24,22.43,114.43S51.74,204.07,21.59,165.15,50.36,80.53,60,72.63Z')",
      "path('M54.58,55.36c25.37-20.81,63.91-34,94.07-14.17s3.09,54.89-5.16,86.08-63.14,43.3-93.29,4.38S44.94,63.26,54.58,55.36Z')",
      "path('M60.76,39.38c25.38-20.81,57.73-18,87.89,1.81s42.27,80.41,34,111.59S62.05,209,31.9,170.07,51.13,47.28,60.76,39.38Z')",
      "path('M32.93,45.82C58.31,25,92.46,13.09,122.62,32.94s60.57,53.35,52.32,84.53S80.35,205.1,50.2,166.19,23.3,53.73,32.93,45.82Z')"
    ],
    fill: ['lightblue', 'lightgreen', 'mediumpurple', 'pink', 'orange', 'gold']
  },
  {
    duration:5000,
    easing: 'ease-out',
    iterations: Infinity
  }
);
animation.cancel();
const start = document.getElementById('start');
start.addEventListener('click', (e)=> {
  if(animation.playState === 'idle' || animation.playState === 'paused'){
    animation.play();
    e.currentTarget.textContent = 'Pause';
  }else{
    animation.pause();
    e.currentTarget.textContent = 'Start';
  }
});
document.getElementById('cancel').addEventListener('click', (e)=> {
  animation.cancel();
  start.textContent = 'Start';
});
</script>
以下は上記と同じことを CSS アニメーションで定義して、getAnimations() でアニメーションを取得して制御する例です。この方法の場合も、現時点では Safari では機能しません。
<svg width="150" height="150" viewBox="0 0 200 200">
  <path id="target" fill="lightblue" d="M32.93,45 中略 ,32.93,45.82Z" />
  <defs>
    <style>
      #target {
        animation:morpAnim 5s ease-in-out 0s infinite alternate;
      }
      @keyframes morpAnim {
        0%   {
          d: path('M32.93,45.82C58.31,25. 中略 .73,32.93,45.82Z');
          fill: lightblue;
        }
        20%  {
          d: path('M60,72.63c25.38-20.82, 中略 ,80.53,60,72.63Z');
          fill: lightgreen
        }
        40%  {
          d: path('M60,72.63c25.38-20.82, 中略 ,80.53,60,72.63Z');
          fill: mediumpurple
        }
        60%  {
          d: path('M54.58,55.36c25.37-20, 中略 .26,54.58,55.36Z');
          fill: pink
        }
        80%  {
          d: path('M60.76,39.38c25.38-20, 中略 .28,60.76,39.38Z');
          fill: orange
        }
        100% {
          d: path('32.93,45.82C58.31,25, 中略 .73,32.93,45.82Z');
          fill: gold
        }
      }
    </style>
  </defs>
</svg>
<button type="button" id="start" class="control">Start </button>
<button type="button" id="cancel" class="control">Cancel </button>

<script>
const target = document.getElementById('target');
const start = document.getElementById('start');
//アニメーションを取得
const animation = target.getAnimations()[0];
if(animation) animation.cancel();

start.addEventListener('click', (e)=>{
  if(animation){
    if(animation.playState === 'running') {
      animation.pause();
      //Start ボタンのラベル
      e.currentTarget.textContent = 'Play';
    }else{
      animation.play();
      e.currentTarget.textContent = 'Pause';
    }
  }
});

document.getElementById('cancel').addEventListener('click', (e)=>{
  if(animation) {
    animation.cancel();
    start.textContent = 'Start';
  }
});
</script>
同様のアニメーションを SVG アニメーション(SMIL)を使って行う方法は以下を参照ください。SMIL を使った方法では Safari でも動作します。
requestAnimationFrame() の利用
window.requestAnimationFrame() はブラウザの描画のタイミングに合わせてコールバック関数を実行してくれるメソッドです。
関連ページ:requestAnimationFrame の使い方(アニメーション)
例えば、requestAnimationFrame() を使って再生中のアニメーションのタイミング情報などを進捗に合わせて表示することができます。
以下は getComputedTiming() で取得したアニメーションの現在の再生位置(localTime)をスライダー(type が range の input 要素)で表示し、進捗状況を表す progress の値を表示する例です。
Play ボタンがクリックされたら、play() メソッドを実行し、Animation.ready プロパティを使ってアニメーションを再生する準備ができたら displayTiming() を呼び出します。
displayTiming() はアニメーションの effect のメソッド getComputedTiming() でタイミング情報を取得し、再生位置(localTime)をスライダーの値に、CSS プロパティ値の補間位置を表す progress の値を span 要素のテキストに設定します。また、この関数では、アニメーションが再生中の間、requestAnimationFrame() を使って displayTiming() を実行します。
<div id="target"></div>

<button type="button" id="play">Play </button>
<input id="localTimeRange" type="range" min="0" max="3000" step="1" value="0" disabled/>
<p>progress: <span id="progress"></span> </p>

<script>
  const target = document.getElementById('target');
  const play = document.getElementById('play');
  const localTimeRange = document.getElementById('localTimeRange');
  const progress = document.getElementById('progress');
  const animation = target.animate(
    {
      transform: ['translateX(0px)', 'translateX(200px)']
    },
    {
      duration: 2000,
      delay: 1000,
      easing: 'ease-in-out',
      fill: 'both'
    }
  );
  animation.pause();

  //Play ボタンにクリックイベントを設定
  play.addEventListener('click', () => {
    animation.play();
    //アニメーションの準備ができたら displayTiming() を呼び出す
    animation.ready.then(displayTiming);
  });

  //進捗状況を表示する関数
  const displayTiming = () => {
    //タイミング情報を取得
    const timing = animation.effect.getComputedTiming();
    //localTime(再生位置)を取得
    localTimeRange.value = timing.localTime;
    //progress(CSS プロパティ値の補間位置)を取得
    progress.textContent = timing.progress;
    //アニメーションが再生中の間、requestAnimationFrame() でこの関数を呼出し続ける
    if(animation.playState === 'running'){
      requestAnimationFrame(displayTiming);
    }
  }
</script>
Play ボタンをクリックするとアニメーションを開始し、アニメーションの再生位置(localTime)をスライダーで表し、CSS プロパティ値の補間位置を表す progress の値(0〜1)をその下に表示します。
progress の値はアニメーションがまだ開始されていない場合や delay の間はアニメーション値が存在しないため null になります(この例では delay に 1000 を指定しています)。
progress:
以下はアニメーションの現在の再生位置を表す localTime と終了時間(delay と endDelay も含む)を表す endTime を使ってアニメーションの進捗状況をパーセントで表示する例です。
また、currentIteration を使ってアニメーションの現在の繰り返し回数(0から開始)も表示しています。
<div id="target"></div>
<button type="button" id="play">Play </button>
<div id="completed">Completed :
  <input type="range" min="0" max="100" step="1" value="0" disabled/><span></span>
</div>
<p>currentIteration: <span id="currentIteration"></span> </p>

<script>
  const target = document.getElementById('target');
  const play = document.getElementById('play');
  const rangeCompleted = document.querySelector('#completed input[type="range"]')
  const spanCompleted = document.querySelector('#completed span');
  const currentIteration = document.getElementById('currentIteration');
  const animation = target.animate(
    {
      transform: ['rotate(0deg)', 'rotate(360deg)'],
      transformOrigin: ['50px 50px', '50px 50px'],
    },
    {
      duration: 1000,
      delay: 500,
      direction: 'alternate',
      easing: 'ease-in-out',
      fill: 'forwards',
      iterations: 5
    }
  );
  animation.pause();
  play.addEventListener('click', () => {
    animation.play();
    animation.ready.then(displayTiming);
  });

  const displayTiming = () => {
    //タイミング情報を取得
    const timing = animation.effect.getComputedTiming();
    //進捗状況をパーセントでスライダーとテキストで表示
    rangeCompleted.value = Math.floor((timing.localTime * 100 / timing.endTime));
    spanCompleted.textContent = Math.floor((timing.localTime * 100 / timing.endTime)) + "%";
    //現在のアニメーションの繰り返し回数(最初は0)を表示
    currentIteration.textContent = timing.currentIteration;
    if(animation.playState === 'running'){
      requestAnimationFrame(displayTiming);
    }
  }

</script>
currentIteration:
以下のサイトを参考にさせていただきました。
Hover animation
以下は CSS の :hover での transition アニメーションのようなホバー時のアニメーションを Web Animation API で行う例です(もっと良い方法があるかもしれません)。
<p class="hover-target"></p>
.hover-target {
  width: 100px;
  height: 100px;
  background-color: red;
  cursor: pointer;
}
ホバー時のイベントは mouseenter と mouseleave を使っています。
アニメーションを定義する関数では、引数に要素を受け取り、animate() メソッドで毎回新しい Animation オブジェクトを生成しています。
// hoverTarget クラスを指定した要素を取得
const hoverTargets = document.querySelectorAll('.hover-target');

hoverTargets.forEach((elem) => {
  // mouseenter のイベントリスナーを設定
  elem.addEventListener('mouseenter', (e) => {
    //e.currentTarget はリスナーを登録した要素(elem でも同じことです)
    enterAnimation(e.currentTarget); // または enterAnimation(elem);
  });
  // mouseleave のイベントリスナーを設定
  elem.addEventListener('mouseleave', (e) => {
    leaveAnimation(e.currentTarget);
  });
});

// mouseenter で呼び出す関数
function enterAnimation(element) {
  // キーフレーム
  const keyframes = { opacity: [ 1, 0.4 ] };
  // タイミングプロパティ(options)
  const options = {
    duration: 300,
    fill: "forwards"
  };
  // 新しい Animation オブジェクトを生成し、そのアニメーションの再生
  element.animate(keyframes, options);
};

// mouseleave で呼び出す関数
function leaveAnimation(element) {
  const keyframes = { opacity: [ 0.4, 1 ] };
  const options = {
    duration: 300,
    fill: "forwards"
  };
  element.animate(keyframes, options);
};
上記の関数の定義部分では以下のようにオブジェクトのプロパティの短縮構文を使って記述することもできます。
function enterAnimation(element) {
  // keyframes のプロパティ
  const opacity = [ 1, 0.4 ];
  const options = {
    duration: 300,
    fill: "forwards"
  };
  // 第1引数はオブジェクトのプロパティの短縮構文
  element.animate( { opacity }, options) ;
};

function leaveAnimation(element) {
  // keyframes のプロパティ
  const opacity = [ 0.4, 1 ];
  const options = {
    duration: 300,
    fill: "forwards"
  };
  // 第1引数はオブジェクトのプロパティの短縮構文
  element.animate( { opacity }, options );
};
赤い四角にマウスオーバーすると、opacity を変化させ、マウスアウトすると元に戻ります。
上記の例では mouseenter と mouseleave イベントで実行するアニメーションをそれぞれ関数で定義しましたが、以下のように直接記述しても同じです。
const hoverTargets = document.querySelectorAll('.hover-target');

hoverTargets.forEach((elem) => {
  elem.addEventListener('mouseenter', (e) => {
    const keyframes = { opacity: [ 1, 0.4 ] };
    const options = {
      duration: 300,
      fill: "forwards"
    };
    e.currentTarget.animate(keyframes, options);
  });
  elem.addEventListener('mouseleave', (e) => {
    const keyframes = { opacity: [ 0.4, 1 ] };
    const options = {
      duration: 300,
      fill: "forwards"
    };
    e.currentTarget.animate(keyframes, options);
  });
});
この例の場合は keyframes や options を別途定義せずに以下のように記述した方が簡潔になります。
また、以下では fill: "forwards" の代わりに、要素にアニメーション後のスタイルを設定しています。
const hoverTargets = document.querySelectorAll('.hover-target');

hoverTargets.forEach((elem) => {
  elem.addEventListener('mouseenter', (e) => {
    elem.animate({
      opacity: [ 1, 0.4 ]
    }, 300);
    elem.style.opacity = '0.4'; //fill: "forwards" の代わり
  });
  elem.addEventListener('mouseleave', (e) => {
    elem.animate({
      opacity: [ 0.4, 1 ]
    }, 300);
    elem.style.opacity = '1'; //fill: "forwards" の代わり
  });
});
連続発生するアニメーションを防止
以下は前述の例の mouseleave の関数に回転のアニメーションを追加した例です。
const hoverTargets2 = document.querySelectorAll('.hover-target2');
hoverTargets2.forEach((elem) => {
  elem.addEventListener('mouseenter', (e) => {
    const keyframes = { opacity: [ 1, 0.4 ] };
    const options = {
      duration: 300,
      fill: "forwards"
    };
    e.currentTarget.animate(keyframes, options);
  });
  elem.addEventListener('mouseleave', (e) => {
    const keyframes = {
      opacity: [ 0.4, 1 ],
      rotate: ['0deg', '90deg'] //追加
      };
    const options = {
      duration: 300,
      fill: "forwards"
    };
    e.currentTarget.animate(keyframes, options);
  });
});
マウスオーバーしてマウスアウトする際の位置(矢印の先のあたりや回転する範囲など)によっては、連続したアニメーションが発生することがあります。
カスタム属性 の利用
以下は、連続したアニメーションが発生しないようにするため、対象の要素に data-enter-status と data-leave-status というカスタム属性を dataset プロパティで設定して、その値に running が設定されている場合は、アニメーションを行わないようにしています。
dataset プロパティを使用する場合、ハイフンが含まれればキャメルケースに変換します(カスタム属性 data-enter-status に JavaScript でアクセスするには、dataset.enterStatus とします)。
カスタム属性に値を設定する代わりに、変数を用意しても同じことができます。
const hoverTargets3 = document.querySelectorAll('.hover-target3');
hoverTargets3.forEach((elem) => {
  elem.addEventListener('mouseenter', (e) => {
    const el = e.currentTarget;
    //data-enter-status の値が running の場合は何もしない
    if (el.dataset.enterStatus === "running") {
      return;
    }
    const keyframes = { opacity: [1, 0.4] };
    const options = {
      duration: 300,
      fill: "forwards"
    };
    //data-enter-status の値に running を設定
    el.dataset.enterStatus = "running";
    const animation = el.animate(keyframes, options);
    animation.onfinish = () => {
      //アニメーションが終了したら data-enterStatus の値を running 以外に
      el.dataset.enterStatus = "finished";
    };
  });
  elem.addEventListener('mouseleave', (e) => {
    const el = e.currentTarget;
    //data-leave-status の値が running の場合は何もしない
    if (el.dataset.leaveStatus === "running") {
      return;
    }
    const keyframes = {
      opacity: [0.4, 1],
      rotate: ['0deg', '90deg']
    };
    const options = {
      duration: 300,
      fill: "forwards"
    };
    //data-leave-status の値に running を設定
    el.dataset.leaveStatus = "running";
    const animation = el.animate(keyframes, options);
    animation.onfinish = () => {
      //アニメーションが終了したら data-leaveStatus の値を running 以外に
      el.dataset.leaveStatus = "finished";
    };
  });
});
※ 但し、この方法の場合にも問題があり、マウスアウトした際の位置によっては mouseleave の回転と透明度を戻すアニメーションが実行されない場合があります。
Debounce の利用
以下は連続する関数の呼び出しで後続の関数の呼び出しを無視する Leading Debounce(Debounce)を利用する方法です。
但し、この方法の場合も前述の方法同様、マウスアウトした際の位置などによっては mouseleave の回転と透明度を戻すアニメーションが実行されない場合があります。
連続する関数の呼び出しで後続の関数の呼び出しを無視する関数 debounce_leading を定義します。
そして、addEventListener のリスナー関数を debounce_leading でラップして、待機時間(timeout)を指定します。この例の場合、timeout の初期値を 300(ミリ秒)としているので、省略しても同じことになります(アニメーションの継続時間により調整します)。
// Debounce の定義
const debounce_leading = (func, timeout = 300) =>{
  let timer;
  return function(...args) {
    if (!timer) {
      func.apply(this, args);
    }
    clearTimeout(timer);
    timer = setTimeout(() => {
      timer = undefined;
    }, timeout);
  };
}

const hoverTargets4 = document.querySelectorAll('.hover-target4');
hoverTargets4.forEach((elem) => {
  //コールバック関数を debounce_leading() で拡張
  elem.addEventListener('mouseenter', debounce_leading((e) => {
    const keyframes = { opacity: [ 1, 0.4 ] };
    const options = {
      duration: 300,
      fill: "forwards"
    };
    e.currentTarget.animate(keyframes, options);
  }, 300));  //待機時間(timeout)を 300 ms に
  //コールバック関数を debounce_leading() で拡張
  elem.addEventListener('mouseleave', debounce_leading((e) => {
    const keyframes = {
      opacity: [ 0.4, 1 ],
      rotate: ['0deg', '90deg']
      };
    const options = {
      duration: 300,
      fill: "forwards"
    };
    e.currentTarget.animate(keyframes, options);
  }, 300));  //待機時間(timeout)を 300 ms に
});
参考サイト
以下のサイトを参考にさせていただきました。
- Web Animations APIの基本的な使い方・まとめ
- CSS-Tricks: CSS Animations vs Web Animations API
- CSS-Tricks: Additive Animation with the Web Animations API
- Dan Wilson Topic: Web Animations API
- Dan Wilson Pseudo-elements in the Web Animations API
- An intro to animating with the Web Animations API
- MDN ウェブアニメーション API
- Web Animations W3C Working Draft
- Web Animations (日本語訳)
- Web Animations — Programming interface(日本語訳)
- mozdevs Web animations examples