CSS モーションパス(offset-path offset-distance)の使い方
CSS モジュールのモーションパス (CSS Motion Path) を使うと、定義したパス(軌道)に沿って要素を動かすアニメーションを簡単に作成することができます。
モーションパスのプロパティは、以前は motion-path や motion-offset などの名前でしたが、現在は offset-path や offset-distance などに変更されています。
現時点(2022年4月)では、Safari を除く主なモダンブラウザでモーションパスを利用できます(一部の機能は Safari でも動作するようです)。
以下はモーションパスの offset-path や offset-distance などのプロパティの使い方やそれらを使ってアニメーションを作成する方法についての解説です。
作成日:2022年4月11日
関連ページ
- Web Animation API の使い方 JavaScript でアニメーション
- SVG の基本的な使い方
- SVG アニメーション(SMIL を使ったアニメーション)
- Photoshop で SVG
- CSS3 アニメーション
Motion Path の基本的な使い方
パス(軌道)に沿って要素を動かすアニメーションは、path() 関数を使って定義したパスを、要素の offset-path プロパティに指定します。
そして offset-distance プロパティを使って CSS アニメーション(キーフレームまたはトランジション)や Web Animation API などでアニメーションを作成します。
この例では以下のような幅と高さが 20px の要素をパスに沿って動かすアニメーションを作成します。
<div class="elem"></div>
.elem {
  width: 20px;
  height: 20px;
  background-color: red;
  border-right: 5px solid blue; /*向きがわかりやすいように右側にボーダーを指定*/
  opacity: .5;
}
パスを定義
要素がたどる経路(軌道)であるパスは path() 関数を使って定義します。
または Illustrator や SVG Editor などを使って作成したパスから値を取得して path() 関数に指定することもできます。
path() は直線や曲線、ベクトル化された線などを定義する関数で、M や L、C、などのコマンドと座標を指定します。SVG の path 要素の d 属性に指定する値と同じです(SVG の基本的な使い方 path)。
この例では以下のような形状のパスを定義しています。M コマンドで開始位置の座標(10 10)を指定し、C コマンドと S コマンドに座標を指定して3次ベジェ曲線を描画しています。
path('M10 10 C50 100,90 140,150 60 S230 0,280 60')
上記の path() に指定した値(M10 10 C50 100,90 140,150 60 S230 0,280 60)を SVG の path 要素の d 属性に指定すると以下のようにパスが表示されます。
<svg width="300px" height="120px" viewBox="0 0 300 120">
  <path d="M10 10 C50 100,90 140,150 60 S230 0,280 60" stroke="silver" stroke-width="1" fill="transparent"/>
</svg>
上記のような単純なパスはコマンドを使って作成できますが、複雑なパスは Illustrator や Photoshop などで作成して、SVG に変換後その path 要素の d 属性の値を使用するのが簡単です。
offset-path にパスを指定
offset-path プロパティを使用して、アニメーション中に要素がたどる(非表示の)パスを path() 関数を使って指定することができます。
以下はアニメーション対象の要素に設定する offset-path プロパティの例です。
.elem {
  offset-path: path('M10 10 C50 100,90 140,150 60 S230 0,280 60');
}
offset-path プロパティはその要素がたどるパスを定義しますが、パス自体は表示されません。上記を設定すると以下のように要素はパスに沿った状態でパスの始点に配置されます。
以下は offset-path プロパティに設定したパスと同じ形状のラインを SVG で表示しています。パスの形状に合わせて図形の右側が移動方向を向いて、要素の中心がパスの始点(赤丸で表示)に配置されているのがわかります。
offset-distance 配置する位置を指定
offset-path 上に要素を配置する位置を offset-distance プロパティを使用して指定します。
offset-distance プロパティには任意の長さの値を指定できますが、パーセントで指定するのが簡単です。
100% は常にパスの終わり(終点)を表し、0% はパスの開始位置(始点)を、50% はパスの半分まで進んだ位置を表します。
以下のように offset-distance に 75% を指定すれば、パスの長さの 75% の位置に要素が配置されます。
.elem {
  offset-path: path('M10 10 C50 100,90 140,150 60 S230 0,280 60');
  offset-distance: 75%;
}
例えば、offset-distance に 0%、 25%、 50%、 75%、 100% を指定した場合はそれぞれ以下のように表示(配置)されます。
offset-distance の初期値(デフォルト)は 0 なので、何も指定しなければ 0% の位置に配置されます。
CSS アニメーションでパスに沿って動かす
CSS アニメーションで要素をパスに沿って動かすには、キーフレームに offset-distance を設定します。
パス全体(offset-distance の 0%から100%)に沿って要素をアニメーションで動かすにはキーフレームの 0% と 100% に offset-distance の値として 0% と 100% を指定します。
この場合、キーフレームの 0% には offset-distance のデフォルト(0%)を指定しているので、9〜11行目は省略することもできます。
また、この例では alternate を指定しているので繰り返しの際は逆方向に再生し、infinite を指定しているので無限に繰り返します(関連ページ: CSS アニメーション)。
.elem {
  offset-path: path('M10 10 C50 100,90 140,150 60 S230 0,280 60');
  /*move という名前のアニメーションを設定*/
  animation: move 4s ease-in-out infinite alternate;
}

/*move のキーフレーム*/
@keyframes move {
  0% {
    offset-distance: 0%; /* 始点(開始位置)を指定 */
  }
  100% {
    offset-distance: 100%; /* 終点を指定 */
  }
}
<style>
.elem {
  offset-path: path('M10 10 C50 100,90 140,150 60 S230 0,280 60');
  animation: move 4s ease-in-out infinite alternate both;
  width: 20px;
  height: 20px;
  background-color: red;
  opacity: .5;
  border-right: 5px solid blue;
}
@keyframes move {
  0% {
    offset-distance: 0%;
  }
  100% {
    offset-distance: 100%;
  }
}
</style>

<div class="svg-wrapper" style="height: 180px;">
  <svg width="340px" height="180px" viewBox="0 0 340 180" style="position: absolute;">
    <path d="M10 10 C50 100,90 140,150 60 S230 0,280 60" stroke="silver" stroke-width="1" fill="transparent" stroke-dasharray="7 3"/>
  </svg>
  <div class="elem"></div>
</div>
CSS transition でアニメーション
CSS transition を使ってのアニメーションも可能です。
以下は親要素(.elem-wrapper)にマウスオーバーすると transition でアニメーションさせる例です。
<div class="elem-wrapper">
  <div class="elem"></div>
</div>
CSS では transition プロパティに offset-distance のトランジションアニメーションを設定しています。
また、offset-distance に 0% を指定していますが、デフォルトなので省略可能です。0% 以外を指定すれば、その位置からアニメーションを開始し、その位置まで戻ります。
アニメーション対象の要素の幅や高さなどのスタイルは省略しています(今までの例と同じ)。
.elem {
  offset-path: path('M10 10 C50 100,90 140,150 60 S230 0,280 60');
  offset-distance: 0%; /*デフォルトなので省略可能*/
  transition: offset-distance 2s ease-in-out;
}

.elem-wrapper {
  width: 320px;
  height: 140px;
  padding: 20px;
  background-color: #F8F6C0;
  cursor: pointer;
}

親要素のホバー時に transition でアニメーション
.elem-wrapper:hover .elem {
  offset-distance: 100%;
}
黄色いエリアにマウスオーバーするとアニメーションを開始し、offset-distance が 100% の位置(17行目で指定)まで移動します。途中でエリアからマウスが外れると、offset-distance で指定した位置(0%)まで戻ります。
Web Animation API でアニメーション
以下は Web Animation API を使ってアニメーションを設定する例です。
この例では要素の animate() メソッド使っていますが、getAnimations() メソッドを使って CSS で設定したアニメーションを取得して JavaScript で制御することもできます。
詳細は JavaScript でアニメーション Web Animation API を参照ください。
<div class="elem-wrapper">
  <div class="elem"></div>
</div>
<button type="button" id="play">Play </button>
<button type="button" id="reset">Reset</button>
CSS では対象の要素のスタイルのみを設定しています。
.elem {
  width: 20px;
  height: 20px;
  background-color: red;
  opacity: .5;
  border-right: 5px solid blue;
}

.elem-wrapper {
  width: 320px;
  height: 160px;
  margin: 40px 0;
}
JavaScript では取得した要素の style 属性に offset-path を設定し、animate() メソッドでキーフレームに offset-distance を指定します。
JavaScript では、offset-path は offsetPath、 offset-distance は offsetDistance のようにキャメルケースに変換します。
//アニメーションの対象の要素を取得
const elem = document.querySelector('.elem');
//要素のスタイルに offset-path を設定
elem.style.offsetPath = "path('M10 10 C50 100,90 140,150 60 S230 0,280 60')";
//アニメーションを作成
const animation = elem.animate(
  {
    //キーフレーム(offset-distance を 0% から 100% に)
    offsetDistance: ['0%', '100%']
  },
  {
    duration: 2000,
    easing: 'ease-in-out',
    iterations: Infinity,
    direction: 'alternate'
  }
);
//アニメーションの自動再生を停止
animation.cancel();

//Play ボタンを取得
const playBtn = document.getElementById('play');

//Play ボタンにクリックイベントを設定
playBtn.addEventListener('click', (e) =>  {
  //アニメーションの状態(playState)が実行中(running)の場合
  if(animation.playState === 'running') {
    //pause() メソッドで一時停止
    animation.pause();
    //ボタンのラベルを変更
    e.currentTarget.textContent = 'Play';
  }else{
    //実行中イバイの場合は play() メソッドで再生
    animation.play();
    e.currentTarget.textContent = 'Pause';
  }
});

//Reset ボタンにクリックイベントを設定
document.getElementById('reset').addEventListener('click', () =>  {
  //cancel() メソッドでキャンセル(初期状態に)
  animation.cancel();
  playBtn.textContent = 'Play';
});
この例では、Play ボタンをクリックするとアニメーションを開始してボタンのラベルを Pause に変更し、Pause をクリックすると一時停止してボタンのラベルを Play に変更しています。
また、Reset ボタンをクリックするとアニメーションを初期状態に戻します。
パス自体のアニメーション化
今までの例では要素をパスに沿ってアニメーションさせていましたが、offset-path の値を変化させることでパス自体をアニメーション化することもできます。
パスに同じ数のデータポイントがある場合、ブラウザは値を補間してパスをスムーズにアニメーションすることができます。※モーフィングアニメーション同様、パスシェイプが正確に同じ数の頂点(ポイント)を持ち、同じコマンド及び順序で記述される必要があります。
例えば、複数の要素を offset-distance を使ってパス上の異なる位置に配置して、複数の異なるパス(offset-path )をキーフレームに設定します。
以下は5つの要素をパス上の異なる位置(offset-distance の 0%、25%、50%、75%、100%)に配置して、2つの異なるパスをキーフレームに設定してアニメーションさせる例です。
チェックボックスにチェックを入れると設定した2つの異なるパスの形状を SVG で表示します。
<div class="elems">
  <div class="ap-one"></div>
  <div class="ap-two"></div>
  <div class="ap-three"></div>
  <div class="ap-four"></div>
  <div class="ap-five"></div>
</div>
<div class="svg-wrapper" style="height: 120px;">
<svg id="svgPath" width="300px" height="120px" viewBox="0 0 300 120" style="position: absolute; display: none;">
  <path d="M10 10 C50 100,90 140,150 60 S230 0,280 60" stroke="blue" stroke-width="1" fill="transparent" stroke-dasharray="5 3"/>
  <path d="M10 100 C90 -100,90 70,220 90 S200 120,280 30" stroke="red" stroke-width="1" fill="transparent" stroke-dasharray="5 3"/>
</svg>
<div class="elems">
  <div class="ap-one"></div>
  <div class="ap-two"></div>
  <div class="ap-three"></div>
  <div class="ap-four"></div>
  <div class="ap-five"></div>
</div>
</div>
<div><input type="checkbox" name="toggleSVG"> Show SVG Path</div>
<script>
  const toggleSVG = document.querySelector('input[name="toggleSVG"]');
  const svgPath = document.getElementById('svgPath');

  toggleSVG.addEventListener('change', (e) => {
    if( e.currentTarget.checked ) {
      svgPath.style.display = 'block';
    }else{
      svgPath.style.display = 'none';
    }
  });
</script>
.elems {
  width: 300px;
  position: relative;
}
.elems div {
  width: 20px;
  height: 20px;
  background-color: red;
  opacity: .5;
  border-right: 5px solid blue;
  /*5つの要素に同じパスを設定(キーフレームに指定するので省略可能)*/
  offset-path: path('M10 10 C50 100,90 140,150 60 S230 0,280 60');
  /*同じパスを使用するので絶対配置を指定*/
  position: absolute;
}

.ap-one {
  /*offset-distance でそれぞれの位置を指定*/
  offset-distance: 0%;
  /*5つの要素に同じアニメーションを指定*/
  animation: animatePath 4s ease-in-out infinite alternate;
}
.ap-two {
  offset-distance: 25%;
  animation: animatePath 4s ease-in-out infinite alternate;
}
.ap-three {
  offset-distance: 50%;
  animation: animatePath 4s ease-in-out infinite alternate;
}
.ap-four {
  offset-distance: 75%;
  animation: animatePath 4s ease-in-out infinite alternate;
}
.ap-five {
  offset-distance: 100%;
  animation: animatePath 4s ease-in-out infinite alternate;
}

/*同じ数のデータポイントを持つパスを offset-path に指定*/
@keyframes animatePath {
  0% {
    offset-path: path('M10 10 C50 100,90 140,150 60 S230 0,280 60');
  }
  100% {
    offset-path: path('M10 100 C90 -100,90 70,220 90 S200 120,280 30');
  }
}
以下は31個の要素をパス上に配置して、前述の例のパスに直線のパスを加えた3つのパスを使ったアニメーションの例です。この例では Web Animation API の animate() メソッド使っています。
Play ボタンをクリックするとアニメーションを開始します。またチェックボックスにチェックを入れると使用しているパスの形状を表示します。
<div class="svg-wrapper">
  <div class="elems">
    <div></div>
    <div></div>
    <!--・・・31個の div 要素・・・-->
    <div></div>
    <div></div>
  </div>
</div>
<button type="button" id="play">Play </button>
<button type="button" id="reset">Reset</button>
<div class="svg-wrapper" style="height: 120px;">
  <svg id="svgPath" width="300px" height="120px" viewBox="0 0 300 120" style="position: absolute; display: none;">
    <path d="M10 10 C10 10,150 10,150 10 S280 10,280 10" stroke="green" stroke-width="1" fill="transparent" stroke-dasharray="5 3"/>
    <path d="M10 10 C50 100,90 140,150 60 S230 0,280 60" stroke="blue" stroke-width="1" fill="transparent" stroke-dasharray="5 3"/>
    <path d="M10 100 C90 -100,90 70,220 90 S200 120,280 30" stroke="red" stroke-width="1" fill="transparent" stroke-dasharray="5 3"/>
  </svg>
  <div class="elems">
    <div></div>
    <div></div>
    <!--・・・31個の div 要素・・・-->
    <div></div>
    <div></div>
  </div>
</div>
<button type="button" id="play">Play </button>
<button type="button" id="reset">Reset</button>
<div><input type="checkbox" name="toggleSVG"> Show SVG Path</div>
CSS では要素のスタイルのみを指定し、offset-path や offset-distance は JavaScript で設定します。
.elems {
  width: 300px;
  position: relative;
}
.elems div {
  width: 8px;
  height: 8px;
  border-radius: 50%;
  background-color: green;
  opacity: .5;
  position: absolute;
}
CSS ではそれぞれの要素に対して offset-distance やアニメーションの設定をしなければなりませんが、JavaScript を使用するとそれらの設定を forEach() などを使って簡単に記述できます。
遅延を少しずつずらすなどの設定もインデックスを利用すると簡単に指定することができます。
また、追加した初期状態の offset-path は直線ですが、他の曲線のパスと同じ数のデータポイント及びコマンドを使用して作成しています。
この例ではキーフレームに offset-path と background-color を設定しています。
//対象の要素を全て取得
const elems = document.querySelectorAll('.elems div');

//対象の要素の全てに offset-path と offset-distance の初期値を設定
elems.forEach((elem, i) => {
  //初期状態の offset-path を指定
  elem.style.offsetPath = "path('M10 10 C10 10,150 10,150 10 S280 10,280 10')";
  //等間隔に配置
  elem.style.offsetDistance = i * 100/(elems.length-1) + '%';
});

//生成したアニメーションを格納する配列を初期化
const animations = [];

//対象の要素のそれぞれにアニメーションを設定
elems.forEach((elem, i) => {
  // animate() でアニメーションを設定
  const animation = elem.animate(
    //offset-path と background-color のキーフレーム
    {
      offsetPath : [
        "path('M10 10 C10 10,150 10,150 10 S280 10,280 10')",
        "path('M10 10 C50 100,90 140,150 60 S230 0,280 60')",
        "path('M10 100 C90 -100,90 70,220 90 S200 120,280 30')"
      ],
      backgroundColor: ['green','blue', 'red']
    },
    {
      duration: 4000,
      delay: i * 30, // 開始遅延を少しずつずらす
      easing: 'ease-in-out',
      iterations: Infinity,
      direction: 'alternate'
    }
  );
  //生成したアニメーションを配列に追加
  animations.push(animation);
  //アニメーションの自動再生を停止
  animation.cancel();
});

//Play ボタン
const playBtn = document.getElementById('play');

//Play ボタンにクリックイベントを設定
playBtn.addEventListener('click', (e) =>  {
  // メソッド名を入れる変数
  let action;
  //最初のアニメーションの状態(playState)を確認して action に代入するメソッド名を決定
  if (animations[0].playState === 'running') {
    action = 'pause';
  } else if (animations[0].playState==='paused'||animations[0].playState==='idle'){
    action = 'play';
  }
  //全てのアニメーションに action に代入された名前のメソッドを実行
  animations.forEach((animation, i) => {
    animation[action]();  //animation.pause() または animation.play()
  });
  //ボタンのラベルを変更
  playBtn.textContent = (action === 'play') ? 'Pause' : 'Play';
});

//Reset ボタン
const reset = document.getElementById('reset');

//Reset ボタンにクリックイベントを設定
reset.addEventListener('click', (e) => {
  //全てのアニメーションを停止して初期状態に
  animations.forEach((animation, i) => {
    animation.cancel();
  });
  playBtn.textContent = 'Play';
});
20〜27行目のキーフレームは以下のような CSS に近い書式で指定することもできます。
[
  {
    offsetPath: "path('M10 10 C10 10,150 10,150 10 S280 10,280 10')",
    backgroundColor: 'green'
  },
  {
    offsetPath: "path('M10 10 C50 100,90 140,150 60 S230 0,280 60')",
    backgroundColor: 'blue'
  },
  {
    offsetPath: "path('M10 100 C90 -100,90 70,220 90 S200 120,280 30')",
    backgroundColor: 'red'
  }
],
path 要素の CSS アニメーション
Chrome や Firefox などの CSS の d プロパティをサポートしているブラウザでは、SVG の path 要素の d 属性を使った CSS アニメーションが可能です(モーションパスではありませんが参考まで)。
<svg width="300px" height="180px" viewBox="0 0 300 180" >
  <path id="css_path_animation" d="M10 10 C50 100,90 140,150 60 S230 0,280 6" stroke="blue" stroke-width="3" fill="transparent"/>
</svg>
SVG の path 要素にアニメーションを設定し、d 属性の値を使ったキーフレームを作成しています。また、この例では線色(stroke)のアニメーションも合わせて指定しています。
#css_path_animation {
  animation: change-d 4s ease-in-out infinite alternate both;
}

@keyframes change-d {
  0% {
    d: path("M10 10 C50 100,90 140,150 60 S230 0,280 60");
    stroke: cornflowerblue
  }
  100% {
    d: path("M10 100 C90 -100,90 70,220 90 S200 120,280 30");
    stroke: forestgreen
  }
}
パスと移動のアニメーションの合成
アニメーション化したパスに沿って要素を移動させることもできます。
以下は2つのパス(軌道)をアニメーション化して、そのパスに沿って offset-distance で要素を移動するアニメーションの例です。
移動する要素にはパスと移動の2つのアニメーションを適用していますが、パス(軌道)自体は非表示なので、別途 SVG の path 要素で表示しています(こちらにも別途アニメーションを適用しています)。つまり、2つの要素と3つのアニメーションからできています。
チェックボックスにチェックを入れると元になる2つのパスの形状を SVG の path 要素で表示します。
<div class="wrapper" style="height: 120px;">
  <svg width="300px" height="120px" viewBox="0 0 300 120" style="position: absolute;">
    <!--軌道を表示する path 要素(アニメーションを適用)-->
    <path id="svgPath" d="M10 10 C50 100,90 140,150 60 S230 0,280 60" stroke="purple" stroke-width="1" fill="transparent" stroke-dasharray="5 3"/>
    <!--チェックを入れた際に表示する元となるパスを表す path 要素(最初は非表示)-->
    <path class="bg-path" d="M10 10 C50 100,90 140,150 60 S230 0,280 60" stroke="lightblue" stroke-width="1" fill="transparent"/>
    <path class="bg-path" d="M10 100 C90 -100,90 70,220 90 S200 120,280 30" stroke="pink" stroke-width="1" fill="transparent"/>
  </svg>
  <!--移動する要素(2つのアニメーションを適用)-->
  <div class="elem"></div>
</div>
<button type="button" id="play">Play</button>
<button type="button" id="reset">Reset</button>
<input type="checkbox" name="toggleSVG"> Show SVG Path
移動する要素には初期状態のパスを設定し、移動(move)とパス(change-offset-path)の2つのアニメーションを設定しています。
また、合成したパスを表示する path 要素にもアニメーション(change-d-attr)を設定しています。
2つのアニメーション(move と change-offset-path)の持続時間(duration)には同じ 4s を指定していますが、異なる値を指定することもできます。※但し、change-offset-path と change-d-attr には同じ値を指定する必要があります(実際に移動するパスと表示されるパスがずれてしまうため)。
/*移動する要素*/
.elem {
  /*初期状態のパス*/
  offset-path: path('M10 10 C50 100,90 140,150 60 S230 0,280 60');
  /*移動とパスの2つのアニメーションを指定*/
  animation: move 4s ease-in-out infinite alternate, change-offset-path 4s ease-in-out infinite alternate;
  width: 20px;
  height: 20px;
  background-color: red;
  border-right: 5px solid blue;
  opacity: .5;
}

/*パスを表示する SVG の path 要素*/
#svgPath {
  /*移動する要素の初期状態のパス(省略可能)*/
  d: path('M10 10 C50 100,90 140,150 60 S230 0,280 60');
  /*表示するパスのアニメーション(持続時間の値は change-offset-path と合わせる)*/
  animation: change-d-attr 4s ease-in-out infinite alternate;
}

/*移動する要素のキーフレーム*/
@keyframes move {
  100% {
  offset-distance: 100%;
  }
}

/*移動する要素のパスのキーフレーム*/
@keyframes change-offset-path {
  100% {
  offset-path: path('M10 100 C90 -100,90 70,220 90 S200 120,280 30');
  }
}

/*パスを表示する SVG(path 要素)のキーフレーム*/
@keyframes change-d-attr {
  100% {
  d: path('M10 100 C90 -100,90 70,220 90 S200 120,280 30');
  }
}

/*パスの元の形状を表示する SVG(最初は非表示) */
.bg-path {
  display: none;
}
上記の CSS を設定するとアニメーションが開始され、無期限に繰り返します。
この例では設定されている CSS アニメーションを Element.getAnimations() で取得して操作できるようにいています。
Element.getAnimations() は要素に設定されている全てのアニメーションを取得します。
この例の場合、移動する要素とパスの要素にアニメーションが設定されています。それぞれを取得することもできますが、この場合は取得したアニメーションに対して同じ操作をするので、getAnimations() にオプションの {subtree: true} を指定してその親要素からまとめてアニメーションを取得しています。
クリックしてアニメーションを開始するように、最初にアニメーションの再生を停止しています。
アニメーションの操作は前述の例と同じです。
//アニメーションが設定されている要素の親要素を取得
const target = document.querySelector('.wrapper');

//上記で取得した要素の子要素に設定されている CSS アニメーションを全て取得
const animations = target.getAnimations({subtree: true});

//CSS アニメーションの再生を停止
animations.forEach((animation) => {
  animation.cancel();
});

//Play ボタンを取得
const playBtn = document.getElementById('play');

//Play ボタンにクリックイベントを設定
playBtn.addEventListener('click', (e) =>  {
  // メソッド名を入れる変数
  let action;
  //最初のアニメーションの状態(playState)を確認して action に代入するメソッド名を決定
  if (animations[0].playState === 'running') {
    action = 'pause';
  } else if (animations[0].playState==='paused'||animations[0].playState==='idle'){
    action = 'play';
  }
  //全てのアニメーションに action に代入された名前のメソッドを実行
  animations.forEach((animation, i) => {
    animation[action]();  //animation.pause() または animation.play()
  });
  //ボタンのラベルを変更
  playBtn.textContent = (action === 'play') ? 'Pause' : 'Play';
});

//Reset ボタンを取得
const reset = document.getElementById('reset');

//Reset ボタンにクリックイベントを設定
reset.addEventListener('click', (e) => {
  //全てのアニメーションを停止して初期状態に
  animations.forEach((animation, i) => {
    animation.cancel();
  });
  playBtn.textContent = 'Play';
});

//チェックボックスの要素を取得
const toggleSVG = document.querySelector('input[name="toggleSVG"]');
//パスの元の形状を表示する要素を取得(2つの要素)
const bgPath = document.querySelectorAll('.bg-path');

//チェックボックスに change イベントを設定
toggleSVG.addEventListener('change', (e) => {
  if( e.currentTarget.checked ) {
    //チェックされれば要素を表示
    bgPath.forEach((elem) => {
      elem.style.display = 'block';
    });
  }else{
    //チェックが外されれば要素を非表示
    bgPath.forEach((elem) => {
      elem.style.display = 'none';
    });
  }
});
CSS モーションパスのプロパティ
CSS モーションパスには以下のようなプロパティがあります。
但し、現時点(2022年4月)では offset-anchor は Firefox のみがサポートしていて、offset-position をサポートしているブラウザはありません。
| プロパティ | 説明 | サポート状況 |
|---|---|---|
| offset-path | 要素がたどるパスと、親コンテナーの中での要素の配置を指定 | IE, Safari 以外 |
| offset-distance | offset-path 上の要素を配置する位置を指定 | IE, Safari 以外 |
| offset-rotate | 要素が offset-path に沿って配置された場合の向き/方向を定義 | IE, Safari 以外 |
| offset-anchor | offset-path に沿って移動する要素のボックス内のポイントを指定 | Firefox のみ |
| offset-position | offset-path の初期位置を定義 | なし |
| offset | モーションパスの一括指定プロパティ | IE, Safari 以外 |
offset-path
offset-path は要素がたどる移動経路(パス)を定義するプロパティです。デフォルトは none です(パスを定義しません)。以下が構文です。
offset-path: 値;
値には以下を指定できます。但し、現時点(2020/04)でサポートされているのは basic-shape の path() のみです。
※ ray() は Chrome と Edge ではサポートされているようですが確認できていません。
| 値 | 説明 | サポート |
|---|---|---|
| none | デフォルト。パスを定義しない。 | |
| basic-shape | CSS シェイプの以下を指定します。 ※現時点では path() のみがサポートされています。
|
Safari、IE 以外 |
| ray() | 最大 3 つの値を取り、ボックスの位置から始まり、指定された角度で定義された方向に進む線分であるパスを定義します。 | Firefox、Safari、IE 以外 |
| url() | SVG 図形の ID の参照です。circle、ellipse、line、path、polygon、polyline、rect のいずれかで、図形の形状をパスとして使用します。 | なし |
以下は要素に offset-path を設定する例です。
<div class="elem"></div>
.elem {
  width: 20px;
  height: 20px;
  background-color: red;
  border-right: 5px solid blue;
  opacity: .5;
  /* offset-path を設定*/
  offset-path: path('M30 30 C50 100,90 140,150 60 S230 0,280 60');
}
offset-path を設定すると、デフォルトの offset-distance : 0%(初期位置)や offset-rotate : auto(図形の右側が移動方向を向く)、offset-anchor : auto(図形の中心 50% 50%)が適用され、パスの始点にパスに沿った状態で配置されます。
別途 offset-distance や offset-rotate などの指定があればそれらの設定が適用されます。
offset-path に none を指定するか、offset-path の設定を削除すると、要素は通常の配置になります。
以下の場合、offset-path に path('M30 30 C50 100,90 140,150 60 S230 0,280 60') を指定しているので、M30 30 により要素の中心が x 座標:30、 y 座標:30 の位置に図形の右側が移動方向を向くように配置されます。
チェックボックスにチェックを入れると、offset-path に none を指定した(または offset-path を削除した)状態になります。
path()
path() には SVG 座標の構文で定義されたパス文字列を指定します(SVG の基本的な使い方 path)。
パス文字列には M や L、C、などのコマンドと座標を指定します。最初は移動コマンド(mまたはM)でパスの始点を指定し、カレント座標を図形の始点に移動し、その他のコマンドを使って次の点を指定して図形を描画していきます。
以下は SVG で path 要素を使って 100 x 100 の正方向のパスを描画する例です。path 要素の d 属性に指定する値が path() 関数に指定するパス文字列に該当します。
この例の場合、まず M コマンドで始点を x 座標:10、 y 座標:10 の位置に指定しています。そして続く v コマンドで垂直方向(下の方へ) 100 移動し、h コマンドで水平方向(右の方へ)100 移動して、v -100 で上の方へ100、h -100 で左の方へ 100 移動して正方形を描画しています。
<svg width="120" height="120" viewBox="0 0 120 120" style="">
  <path d="M10 10 v100 h100 v-100 h-100" stroke="green" stroke-width="1" fill="transparent"/>
</svg>
以下は上記 SVG の path 要素の d 属性の値を offset-path に指定したアニメーションの例です。
パス文字列に指定された経路(左上の 10 10 の位置から下、右、上、左の順)でアニメーションします。この例の場合は再生方向に alternate を指定しているので、繰り返しの際には逆方向に移動します。
同じ正方形でもパス文字列の順番によりどちらに進むかが変わってきます。
<div class="svg-wrapper" style="height: 120px;">
  <svg width="120px" height="120px" viewBox="0 0 120 120" style="position: absolute;">
    <path d="M10 10 v100 h100 v-100 h-100" stroke="green" stroke-width="1" fill="transparent"/>
    <circle cx="10" cy="10" r="3" fill="red"/>
  </svg>
  <div class="elem"></div><!--アニメーション対象の要素-->
</div>
.elem {
  offset-path: path('M10 10 v100 h100 v-100 h-100'); /*path 要素の d 属性の値*/
  animation: animatePath 4s ease-in-out infinite alternate;
  width: 20px;
  height: 20px;
  background-color: red;
  opacity: .5;
  border-right: 5px solid blue;
  margin: 20px 0;
}
@keyframes animatePath {
  0% {
  offset-distance: 0%;
  }
  100% {
  offset-distance: 100%;
  }
}
ソフトウェアを利用
Illustrator などのソフトウェアや SvgPathEditor などのオンライン SVG Editor を使って path() に指定するパス文字列を取得することもできます。
SvgPathEditor はオンラインで利用できる SVG Path Editor で、+ をクリックしてポイントを追加し、右クリックからコマンドを選択してパスを作成することができます。
使い方は github.com/Yqnn/svg-path-editor に掲載されています。
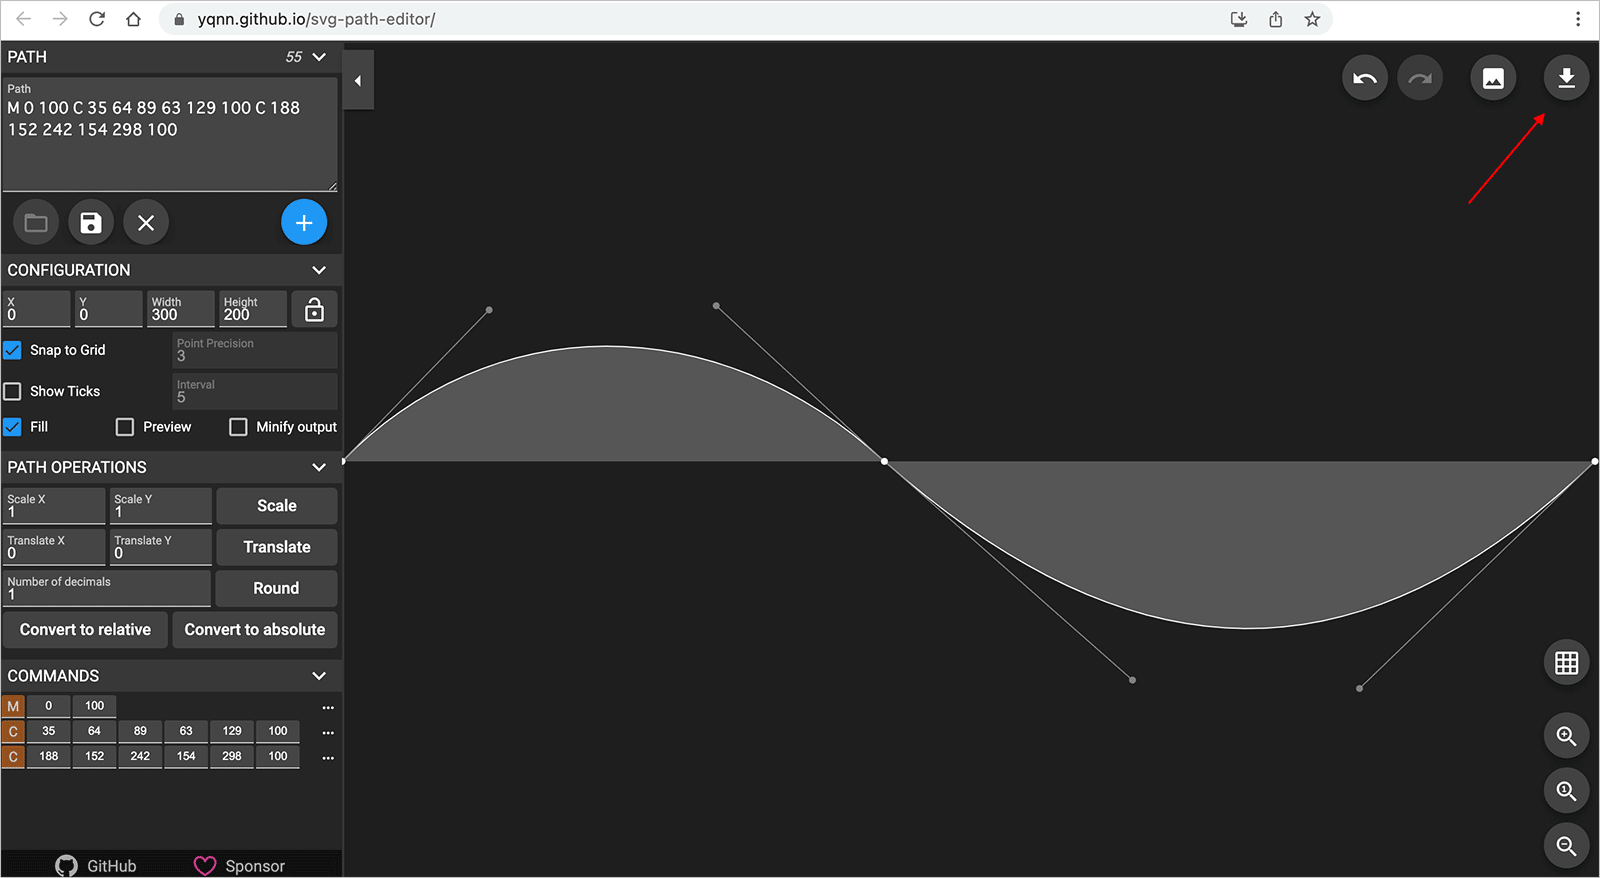
パスを作成後、右上のダウンロードボタンをクリックすると以下のようなウィンドウが表示されるので、Style で塗り色(Fill)や線色(Stroke)を指定したり、ViewBox で座標やサイズを指定して SVG としてダウンロードすることができます。
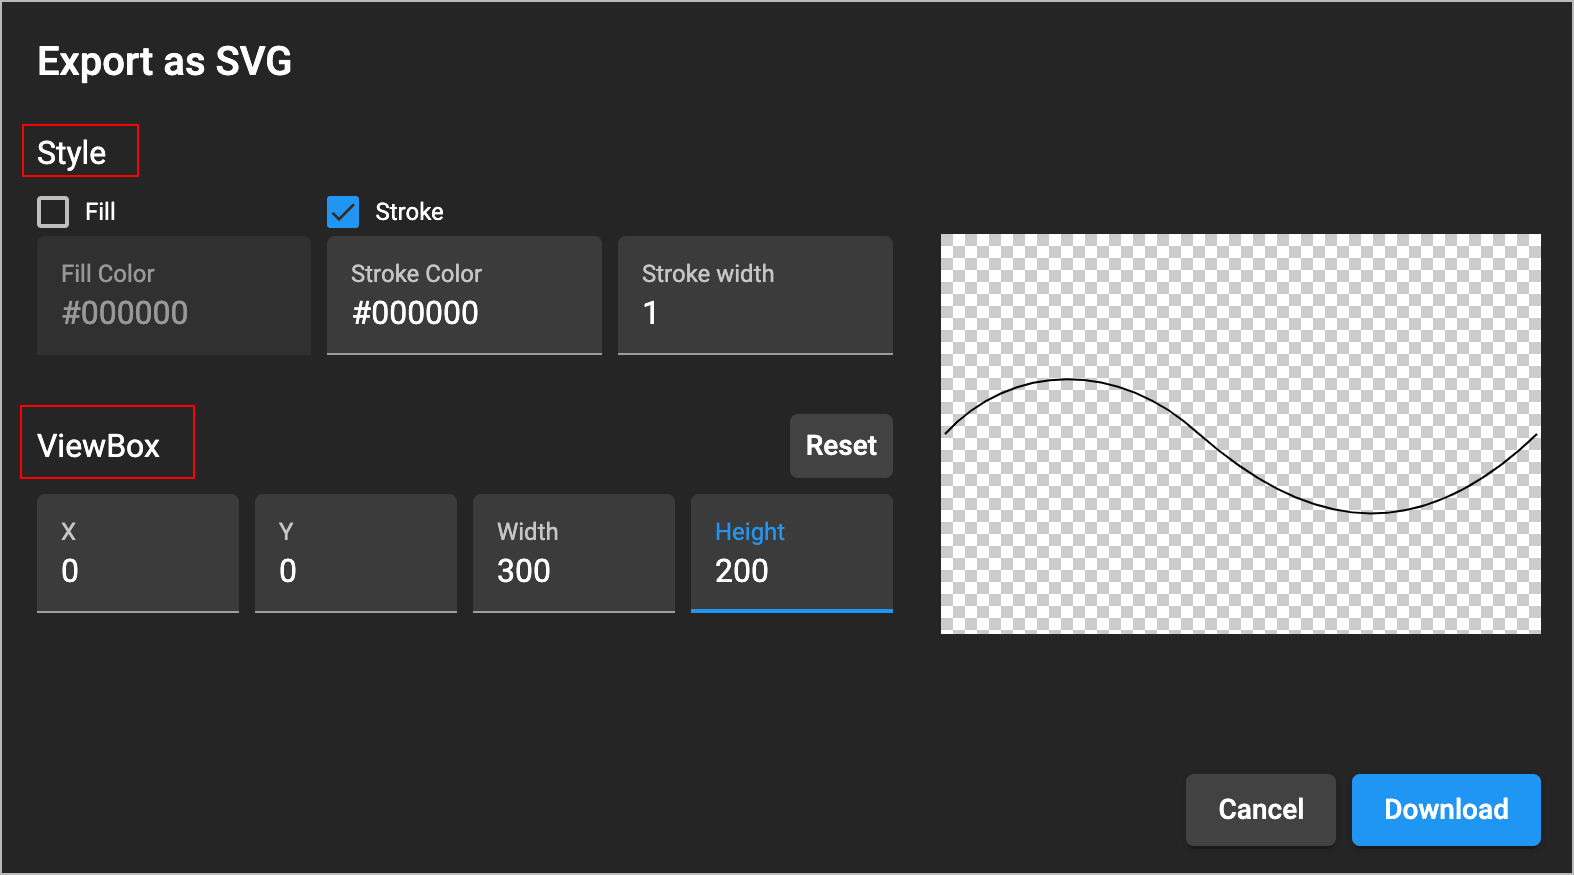
例えば上記の場合、以下のような SVG ファイルがダウンロードされます。エディタで開いて path 要素の d 属性(M 0 100 C 35 64 89 63 129 100 C 188 152 242 154 298 100)の値を使います。
<svg xmlns="http://www.w3.org/2000/svg" viewBox="0 0 300 200">
  <path d="M 0 100 C 35 64 89 63 129 100 C 188 152 242 154 298 100" stroke="#000000" stroke-width="1" fill="none"/>
</svg>
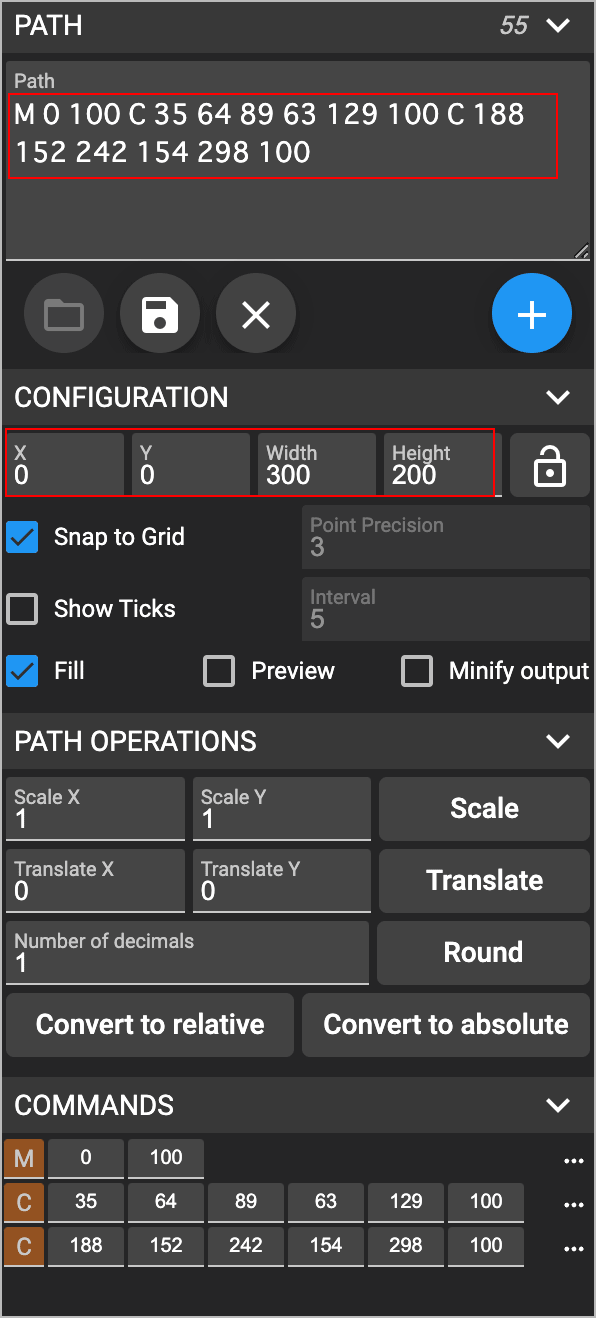
上記 SVG をHTML に埋め込むと以下のように表示されます。但し、幅と高さが指定されていないので、この例では svg 要素に width="300" height="200"を追加しています。
左上の PATH にはパスの値が表示されるのでコピーすることもできます。また、その下の CONFIGURATION で座標やサイズ(ViewBox)を調整することもできます。
パス文字列(構文)の単位
path() や d 属性に指定するパス文字列には単位がありません。
CSS を SVG 内の要素に適用する場合、それらの座標値は、その SVG の viewBox に設定された座標系を使用します。
他の HTML 要素に適用する場合、それらの値はピクセルになります。
関連項目:svg 要素の属性
複数の要素
以下は黒い背景のエリアにマウスオーバーすると8つの div 要素 offset-path 上を移動するアニメーション(transition)の例です。
dot-wrapper クラスを指定した div 要素の子要素として8つの div 要素を配置しています。
<div class="dot-wrapper">
  <div></div>
  <div></div>
  <div></div>
  <div></div>
  <div></div>
  <div></div>
  <div></div>
  <div></div>
</div>
8つの div 要素は position: absolute で絶対配置にして、offset-path の始点を全て同じ位置(100 100)を指定しています。
offset-distance のデフォルトは 0 なので全ての要素は始点に重なって配置されます。
それぞれの要素に offset-path でパスを定義し、 トランジションアニメーションを設定し、ホバー時に offset-distance でパス上を 100% まで移動するようにしています。
/*親要素*/
.dot-wrapper {
  position: relative;
  width: 200px;
  height: 200px;
  background-color: #111;
  cursor: pointer;
}

/*それぞれの div 要素*/
.dot-wrapper div{
  width: 10px;
  height: 10px;
  border-radius: 50%;
  /*絶対配置で重ねて表示*/
  position: absolute;
  /*トランジションアニメーションの設定*/
  transition: offset-distance .6s ease-in-out;
}

.dot-wrapper:hover div{
  /*ホバー時にパス上を 100% まで移動*/
  offset-distance: 100%;
}

/*それぞれの要素のパスと背景色の設定*/
.dot-wrapper div:nth-child(1){
  offset-path: path('M 100 100 L 100 0');
  background-color: aqua;
}
.dot-wrapper div:nth-child(2){
  offset-path: path('M 100 100 L 150 50');
  background-color: pink
}
.dot-wrapper div:nth-child(3){
  offset-path: path('M 100 100 L 200 100');
  background-color: cornflowerblue;
}
.dot-wrapper div:nth-child(4){
  offset-path: path('M 100 100 L 150 150');
  background-color: lightgreen;
}
.dot-wrapper div:nth-child(5){
  offset-path: path('M 100 100 L 100 200');
  background-color: orange;
}
.dot-wrapper div:nth-child(6){
  offset-path: path('M 100 100 L 50 150');
  background-color: yellow;
}
.dot-wrapper div:nth-child(7){
  offset-path: path('M 100 100 L 0 100');
  background-color: mediumpurple;
}
.dot-wrapper div:nth-child(8){
  offset-path: path('M 100 100 L 50 50');
  background-color: hotpink;
}
上記の CSS では8つの div 要素に position: absolute を指定して全ての要素を重ねていますが、以下のように最初の要素以外の margin-top に要素の高さ分をマイナスで指定して重ねることもできます。
.dot-wrapper div {
  width: 10px;
  height: 10px;
  border-radius: 50%;
  /*position: absolute; 削除 */
  transition: offset-distance .6s ease-in-out;
}

/*最初の要素以外*/
.dot-wrapper div:not(:nth-child(1)){
  /*margin-top に -10px(要素の高さ)を指定*/
  margin-top: -10px;
}
以下は前述の例と同じ8つの div 要素に position: absolute や margin-top: -10px を指定しない場合の例です。div 要素は記述順に配置され、それぞれに offset-path が適用されます。
offset-path は前述の例と同じ値を指定していますが、アニメーションを確認すると、最初の要素以外では、それぞれの軌道はその要素の初期位置の分、ずれています。
.dot-wrapper {
  position: relative;
  width: 200px;
  height: 200px;
  background-color: #111;
  cursor: pointer;
  margin: 50px 0;
}
.dot-wrapper div {
  width: 10px;
  height: 10px;
  border-radius: 50%;
  transition: offset-distance .6s ease-in-out;
}

.dot-wrapper:hover div {
  offset-distance: 100%;
}
.dot-wrapper div:nth-child(1){
  offset-path: path('M 100 100 L 100 0');
  background-color: aqua;
}
.dot-wrapper div:nth-child(2){
  offset-path: path('M 100 100 L 150 50');
  background-color: pink
}
.dot-wrapper div:nth-child(3){
  offset-path: path('M 100 100 L 200 100');
  background-color: cornflowerblue;
}
.dot-wrapper div:nth-child(4){
  offset-path: path('M 100 100 L 150 150');
  background-color: lightgreen;
}
.dot-wrapper div:nth-child(5){
  offset-path: path('M 100 100 L 100 200');
  background-color: orange;
}
.dot-wrapper div:nth-child(6){
  offset-path: path('M 100 100 L 50 150');
  background-color: yellow;
}
.dot-wrapper div:nth-child(7){
  offset-path: path('M 100 100 L 0 100');
  background-color: mediumpurple;
}
.dot-wrapper div:nth-child(8){
  offset-path: path('M 100 100 L 50 50');
  background-color: hotpink;
}
以下は前述の例の offset-distance のアニメーションの前に、margin-top を使ったアニメーションを追加したものです。
offset-distance のアニメーションの前に、margin-top を使って位置をその高さ分上へ移動するようにしています。
.dot-wrapper {
  position: relative;
  width: 200px;
  height: 200px;
  background-color: #111;
  cursor: pointer;
}

.dot-wrapper div{
  width: 10px;
  height: 10px;
  border-radius: 50%;
}

.dot-wrapper div:nth-child(1){
  offset-path: path('M 100 100 L 100 0');
  background-color: aqua;
  /*位置をその高さ分上へ移動するアニメーションを追加*/
  transition:  margin-top .0s ease-in 0s, offset-distance 1s ease-in-out;
}
.dot-wrapper div:nth-child(2){
  offset-path: path('M 100 100 L 150 50');
  background-color: pink;
  transition: margin-top .05s ease-in 0s, offset-distance 1s ease-in-out .05s;
}
.dot-wrapper div:nth-child(3){
  offset-path: path('M 100 100 L 200 100');
  background-color: cornflowerblue;
  transition: margin-top .05s ease-in .05s , offset-distance 1s ease-in-out .1s;
}
.dot-wrapper div:nth-child(4){
  offset-path: path('M 100 100 L 150 150');
  background-color: lightgreen;
  transition: margin-top .05s ease-in .1s, offset-distance 1s ease-in-out .15s;
}
.dot-wrapper div:nth-child(5){
  offset-path: path('M 100 100 L 100 200');
  background-color: orange;
  transition: margin-top .05s ease-in .15s, offset-distance 1s ease-in-out .2s;
}
.dot-wrapper div:nth-child(6){
  offset-path: path('M 100 100 L 50 150');
  background-color: yellow;
  transition: margin-top .05s ease-in .2s, offset-distance 1s ease-in-out .25s;
}
.dot-wrapper div:nth-child(7){
  offset-path: path('M 100 100 L 0 100');
  background-color: mediumpurple;
  transition: margin-top .05s ease-in .25s, offset-distance 1s ease-in-out .3s;
}
.dot-wrapper div:nth-child(8){
  offset-path: path('M 100 100 L 50 50');
  background-color: hotpink;
  transition: margin-top .05s ease-in .3s, offset-distance 1s ease-in-out .35s;
}

.dot-wrapper:hover div:nth-child(1){
  margin-top: 0px;
  offset-distance: 100%;
}
.dot-wrapper:hover div:not(:nth-child(1)){
  margin-top: -10px;
  offset-distance: 100%;
}
上記では各要素の transition を CSS で設定していますが、指定する値(持続時間や遅延時間)は規則性があるので以下のように JavaScript で設定したほうが簡単です。
以下を設定する場合は、CSS の transition の設定は不要なので削除します。
//対象の要素を取得
const targets = document.querySelectorAll('.dot-wrapper div');

targets.forEach((elem, i) => {
  /*margin-top アニメーションの持続時間*/
  const mtdur = 0.05;
  /*margin-top アニメーションの遅延時間*/
  const mtdel = i > 1 ? mtdur * i : 0;
  /*offset-distance アニメーションの持続時間*/
  const oddur = 1;
  /**offset-distance アニメーションの遅延時間*/
  const oddel = i * mtdur;
  elem.style.setProperty('transition', `margin-top ${mtdur}s ease-in ${mtdel}s, offset-distance ${oddur}s ease-in-out ${oddel}s`)
});
以下は Web Animation API を使ったキーフレームアニメーションの例です。
前述の例と同様、8つの div 要素にアニメーションを設定しています。
この例の場合、8つの div 要素の親要素(.dot-wrapper)を更に div 要素(.wrapper)で囲んでいます。
<div class="wrapper">
  <div class="dot-wrapper">
    <div></div>
    <div></div>
    <div></div>
    <div></div>
    <div></div>
    <div></div>
    <div></div>
    <div></div>
  </div>
</div>
<div>
  <button type="button" id="play" >Play </button>
  <button type="button" id="reset" >Reset</button>
</div>
それぞれの div 要素の offset-path と background-color は CSS で指定しています。
8つの div 要素の親要素(.dot-wrapper)には position: absolute を指定しています(アニメーションにより、なぜか? .dot-wrapper の要素も動いてしまうため)。
また、.dot-wrapper の要素には padding-top を指定して背景のエリアを調整しています。
.wrapper {
  position: relative;
  width: 200px;
  height: 200px;
}
.dot-wrapper {
  position: absolute;
  padding-top: 10px;
  width: 200px;
  height: 200px;
  background-color: #111;
}
.dot-wrapper div {
  width: 10px;
  height: 10px;
  border-radius: 50%;
}
.dot-wrapper div:nth-child(1) {
  offset-path: path('M 100 100 L 100 0');
  background-color: aqua;
}
.dot-wrapper div:nth-child(2) {
  offset-path: path('M 100 100 L 150 50');
  background-color: pink;
}
.dot-wrapper div:nth-child(3) {
  offset-path: path('M 100 100 L 200 100');
  background-color: cornflowerblue;
}
.dot-wrapper div:nth-child(4) {
  offset-path: path('M 100 100 L 150 150');
  background-color: lightgreen;
}
.dot-wrapper div:nth-child(5) {
  offset-path: path('M 100 100 L 100 200');
  background-color: orange;
}
.dot-wrapper div:nth-child(6) {
  offset-path: path('M 100 100 L 50 150');
  background-color: yellow;
}
.dot-wrapper div:nth-child(7) {
  offset-path: path('M 100 100 L 0 100');
  background-color: mediumpurple;
}
.dot-wrapper div:nth-child(8) {
  offset-path: path('M 100 100 L 50 50');
  background-color: hotpink;
}
JavaScript では、共通のキーフレームと元になるタイミングプロパティを用意して、それぞれの要素に対して animate() でアニメーションを生成しています。
この例では play ボタンをクリックしたらアニメーションを開始するように自動再生を停止して、ボタンのクリックイベントでアニメーションの再生を制御しています。
//対象の div 要素を全て取得
const targets = document.querySelectorAll('.dot-wrapper div');

//キーフレーム(全てで共通)
let frames = [
  { offset: 0,   marginTop: '0px',   offsetDistance: '0%' },
  { offset: 0.2, marginTop: '-10px', offsetDistance: '0%' },
  { offset: 1,   marginTop: '-10px', offsetDistance: '100%' },
];

//タイミングプロパティ(各要素で delay と endDelay を変更)
let timing = {
  delay: 0,
  duration: 2000,
  direction: 'alternate',
  easing: 'ease-in-out',
  endDelay: 0,
  fill: 'both',
  iterations: Infinity,
};

//生成したアニメーションを格納する配列
const animations = [];

//それぞれの要素に対して animate() でアニメーションを生成
targets.forEach((target, i) => {
  //インデックスの値(i)を使って delay と endDelay を個々に変更
  timing.delay = 50 * i;
  timing.endDelay = 50 * i;
  const animation = target.animate(frames, timing);
  //自動再生を停止(初期状態で停止するように)
  animation.cancel();
  //生成したアニメーションを配列に追加
  animations.push(animation);
});

//play ボタンを取得
const play = document.getElementById('play');

//play ボタンにクリックイベントを設定
play.addEventListener('click', (e) =>  {
  let action;
  //最初のアニメーションの状態を判定
  if (animations[0].playState === 'running') {
    action = 'pause';
  } else if (animations[0].playState==='paused'||animations[0].playState==='idle'){
    action = 'play';
  }
  //全てのアニメーションに action に代入された名前のメソッドを実行
  animations.forEach((animation, i) => {
    animation[action]();   //animation.pause() または animation.play()
  });
  play.textContent = (action === 'play') ? 'Pause' : 'Play';
});

//reset ボタンを取得
const reset = document.getElementById('reset');

//reset ボタンにクリックイベントを設定
reset.addEventListener('click', (e) => {
  //全てのアニメーションに cancel() を実行して停止(初期状態に戻す)
  animations.forEach((animation, i) => {
    animation.cancel();
  });
  play.textContent = 'Play';
});
offset-distance
offset-distance は offset-path 上の要素を配置する位置を指定するプロパティです。以下が構文です。
offset-distance: 値;
値には以下を指定できます。どちらの場合も、パスの始点からの距離の長さを指定します。デフォルトは0です(0pxまたは0%)
- length:単位(px など)付きの値。例 40px(始点から40pxの位置)
- percentage:パーセント値。例 50% (パスの全長の半分の位置)
要素をパス全体の上でアニメーションさせる場合は、その offset-path を定義してキーフレームで offset-distance に 0% から 100% までを取るアニメーションを設定します。
offset-distance には必要に応じて任意の値を設定できます。
<div class="elem"></div>
以下はスライダー(type が range の input 要素)で値を変更するサンプルです。
0% の値を 100% の値より大きくすると逆方向に再生され、同じ値を指定するとその位置で停止します。
また、0% に負の値を指定すると、その分開始が遅れ delay を指定したような状態になり、100% に 100% より大きな値を指定すると終了後の遅延(endDelay)を指定したような状態になります(これが仕様かどうかは不明です)。
Cancel ボタンをクリックするとアニメーションを停止し、初期状態(offset-distance : 0%)に戻します(停止後もスライダーを変更した時点でアニメーションを開始するようにしています)。
.elem {
  offset-path: path('M10 10 C50 100,90 140,150 60 S230 0,280 60');
  animation: move 3s ease-in-out infinite alternate;
  width: 20px;
  height: 20px;
  background-color: red;
  border-right: 5px solid blue;
  opacity: .5;
}

@keyframes move {
  0% {
    offset-distance: 0%; /*以下のスライダーで変更可能*/
  }
  100% {
    offset-distance: 100%; /*以下のスライダーで変更可能*/
  }
}
| 0% の offset-distance | 0% | |
|---|---|---|
| 100% の offset-distance | 100% |
要素をパス上に等間隔に配置
以下は JavaScript を使って複数の要素をパス上に等間隔に配置する例です(Safari では機能しません)。
<div class="elems">
  <div></div>
  <div></div>
  ・・・中略・・・
  <div></div>
  <div></div>
</div>
各要素は絶対配置にします。
.elems div {
  width: 5px;
  height: 5px;
  background-color: red;
  opacity: .5;
  border-radius: 50%;
  position: absolute; /*絶対配置*/
}
等間隔に配置するように要素の個数(elems.length)とインデックス(i)の値を利用しています。
例えば11個の要素がある場合、最初の要素は i は0なので0%、最後の要素の i は10なので、10 * 100/(11-1) = 100% になります。
//対象の要素を全て取得
const elems = document.querySelectorAll('.elems div');

//対象の要素の全てに offset-path と offset-distance を設定
elems.forEach((elem, i) => {
  //offset-path でパスの形状を指定
  elem.style.offsetPath = "path('M10 10 C50 100,90 140,150 60 S230 0,280 60')";
  //等間隔に配置
  elem.style.offsetDistance = i * 100/(elems.length-1) + '%';
});
以下は上記の例にアニメーションを追加したものです(Safari では機能しません)。
各要素の margin-top の値を変更して上下に動かし、delay を指定して少しずつずらすようにしています(delay を指定しないと全体が同じ動きになります)。
const elems = document.querySelectorAll('.elems div');

elems.forEach((elem, i) => {
  elem.style.offsetPath = "path('M10 10 C50 100,90 140,150 60 S230 0,280 60')";
  elem.style.offsetDistance = i * 100/(elems.length-1) + '%';

  //アニメーションを追加
  const animation = elem.animate(
    {
      marginTop: ['0px', '10px']
    },
    {
      duration: 800,
      delay: i * 50,
      easing: 'ease-in-out',
      iterations: Infinity,
      direction: 'alternate'
    }
  );
});
以下は40個の div 要素に同じ offset-path を設定して絶対配置にし、キーフレームで offset-distance の 100% に少しずつずらした値を指定するアニメーションです(Safari では機能しません)。
<div class="elems" style="height: 180px;">
  <div></div>
  <div></div>
  ・・・中略(合計40個の div 要素)・・・
  <div></div>
  <div></div>
</div>
CSS では全ての div 要素を絶対配置にして重ねます。
.elems div {
  width: 5px;
  height: 5px;
  background-color: blue;
  opacity: .5;
  border-radius: 50%;
  position: absolute; /*絶対配置*/
}
offsetDistance の 100% には、前述の例同様、elems.length(要素の個数)と i (インデックス)の値を利用して等間隔に配置されるように指定しています。
遅延(delay)も elems.length と i を使って少しずつ遅れるように設定しています。
また、親要素(.elems)で getAnimations( {subtree:true} ) を使って全ての子要素のアニメーションを取得して制御するようにしています。
//全ての div 要素を取得
const elems = document.querySelectorAll('.elems div');

//それぞれの div 要素に offset-path を指定してアニメーションを設定
elems.forEach((elem, i) => {
  elem.style.offsetPath = "path('M10 10 C50 100,90 140,150 60 S230 0,280 60')";
  const duration = 2000;
  elem.animate(
    {
      offsetDistance: ['0px', i * 100/(elems.length-1) + '%']
    },
    {
      duration: duration,
      delay: i * duration/elems.length,
      easing: 'ease-in-out',
      iterations: Infinity,
      direction: 'alternate',
    }
  );
});

//全てのアニメーションを取得
const animations = document.querySelector('.elems').getAnimations({subtree:true});
animations.forEach((animation) => {
  //全てのアニメーションの自動再生を停止
  animation.cancel();
});

//play 及び reset ボタンにクリックイベントを設定
const play = document.getElementById('play');
play.addEventListener('click', (e) =>  {
  let action;
  if (animations[0].playState === 'running') {
    action = 'pause';
  } else if (animations[0].playState==='paused'||animations[0].playState==='idle'){
    action = 'play';
  }
  animations.forEach((animation, i) => {
    animation[action]();
  });
  play.textContent = (action === 'play') ? 'Pause' : 'Play';
});
const reset = document.getElementById('reset');
reset.addEventListener('click', (e) => {
  animations.forEach((animation, i) => {
    animation.cancel();
  });
  play.textContent = 'Play';
});
前述の例では、アニメーションを繰り返していますが、以下はそれぞれの要素で1回だけアニメーションを実行する例です(Safari では機能しません)。
<div class="elems" style="height: 180px;">
  <div></div>
  <div></div>
  ・・・中略(合計40個の div 要素)・・・
  <div></div>
  <div></div>
</div>
.elems div {
  width: 5px;
  height: 5px;
  background-color: green;
  opacity: .1;
  border-radius: 50%;
  position: absolute; /*絶対配置*/
}
offsetDistance のキーフレームでは 0% にもインデックスにより異なり位置を指定しています。この例では不透明度のキーフレームも追加し、インデックスにより異なる値になるようにしています。
また、Play ボタンをクリックすると続けてクリックできないように disabled に設定して、Animation.finished プロパティを使って最後のアニメーションが終了した時点で finished プロミスを使って disabled を解除するようにしています。
const elems = document.querySelectorAll('.elems div');

elems.forEach((elem, i) => {
  elem.style.offsetPath = "path('M10 10 C50 100,90 140,150 60 S230 0,280 60')";
  const duration = 1000;
  elem.animate(
    {
      offsetDistance:
        [
          (i-1) * 100/(elems.length-1) + '%',
          i * 100/(elems.length-1) + '%'
        ],
      opacity:
        [
          0.5,
          1* (i+1)/elems.length
        ]
    },
    {
      duration: duration,
      delay: i * duration/elems.length,
      easing: 'ease-in-out',
      fill:'forwards' //アニメーション終了後に効果を保持
    }
  );
});
const animations = document.querySelector('.elems').getAnimations({subtree:true});
animations.forEach((animation) => {
  animation.cancel();
});
const play = document.getElementById('play');

play.addEventListener('click', (e) =>  {
  animations.forEach((animation, i) => {
    animation.play();
  });
  play.setAttribute('disabled', true);
  //最後のアニメーションが終了したら finished  プロミスを使って disabled を解除
  animations[elems.length-1].finished.then( ()=> {
    play.removeAttribute('disabled');
  });
});
以下はスライダー(type が range の input 要素)で指定した位置に要素を移動する例です。スライダーを動かすとそれに合わせて要素が移動します。
<div class="elem"></div>
<div>
  <input type="range" id="range_slider" min="0" max="100" value="0" step="1">
  <span id="value_span">0%</span>
</div>
.elem {
  /*offset-path を指定*/
  offset-path: path('M10 10 C50 100,90 140,150 60 S230 0,280 60');
  width: 20px;
  height: 20px;
  background-color: red;
  border-right: 5px solid blue;
  opacity: .5;
}
//対象の要素
const elem = document.querySelector('.elem');
//スライダーの input 要素
const range_slider = document.getElementById('range_slider');
//スライダーの値
let range_value = '0%';
//スライダーの値を表示する span 要素
const value_span = document.getElementById('value_span');

//スライダーに input イベントを設定
range_slider.addEventListener('input', (e) => {
  //スライダーの値を取得して % を付ける
  range_value = range_slider.value + '%';
  //対象の要素の offset-distance にスライダーの値を設定
  elem.style.setProperty('offset-distance', range_value );
  //表示されているスライダーの値を更新
  value_span.textContent = range_value;
});
offset-rotate
offset-rotate は要素が offset-path に沿って配置された際の向き/方向を定義するプロパティです。
以下が構文です。
offset-rotate: 値;
offset-rotate の値には以下を指定できます。
| 値 | 説明 |
|---|---|
| auto | 要素はパスの方向に向き、右側は常にパスに対して垂直に保たれます(デフォルト) |
| angle(角度) | パスの位置に関係なく指定された角度を維持します。単位は deg や grad、rad、turn が使えます。<angle> |
| auto angle | auto に angle が続いた場合、その角度が auto の計算値に加算されます |
| reverse | 要素は auto と同様にパスに合わせて回転しますが、反対方向を向きます。 auto 180deg を指定したのと同じです。 |
以下のサンプルはラジオボタンで offset-rotate の値を変更して確認できます。
<div class="svg-wrapper">
  <svg width="300px" height="200px" viewBox="0 0 300 200" style="position: absolute;">
    <path id="motion_path3" d="M10 10 C50 100,90 140,150 60 S230 0,280 60" stroke="#999" stroke-width="1" fill="transparent" stroke-dasharray="3 2"></path>
  </svg>
  <div id="anim-wrapper">
    <div class="elem"></div>
    <div class="dot"></div>
  </div>
</div>
<div>
  <input type="radio" name="or" id="or_auto" value="auto" checked>
  <label for="or_auto"> auto </label>
  <input type="radio" name="or" id="or_reverse" value="reverse">
  <label for="or_reverse"> reverse </label>
  <input type="radio" name="or" id="or_90deg" value="90deg">
  <label for="or_90deg"> 90deg </label>
  <input type="radio" name="or" id="or_auto_90deg" value="auto 90deg">
  <label for="or_auto_90deg">auto 90deg </label>
</div>
<div>
  <button type="button" id="play">Play </button>
  <button type="button" id="reset">Reset</button>
</div>
 /*対象の要素*/
.elem {
  offset-path: path('M10 10 C50 100,90 140,150 60 S230 0,280 60');
  animation: move 6s ease-in-out infinite alternate;
  /* offset-rotate にトランジションを設定 */
  transition: offset-rotate .5s;
  position: absolute;
  width: 30px;
  height: 20px;
  background-color: red;
  border-right: 10px solid blue;
  opacity: .5;
}
 /*図形の中心のドット(赤色の点)*/
.dot {
  offset-path: path('M10 10 C50 100,90 140,150 60 S230 0,280 60');
  animation: move 6s ease-in-out infinite alternate;
  position: absolute;
  width: 3px;
  height: 3px;
  border-radius: 50%;
  background-color: red;
}
/*キーフレーム*/
@keyframes move {
  0% {
  offset-distance: 0%;
  }
  100% {
  offset-distance: 100%;
  }
}
//親要素からその子孫要素の全ての CSS アニメーションを取得
const animations = document.getElementById('anim-wrapper').getAnimations({subtree:true});

//自動再生を停止
animations.forEach((animation) => {
  animation.cancel();
});

//対象の要素を取得
const elem = document.querySelector('.elem');
//ラジオボタンを取得
const radios = document.querySelectorAll('input[name="or"]');
//ラジオボタンの値の初期値
let radios_value = 'auto';

//ラジオボタンに change イベントを設定
for(let i=0; i<radios.length; i++) {
  radios[i].addEventListener('change', (e) => {
    radio_value = e.currentTarget.value;
    //選択されたラジオボタンの値を offset-rotate に設定
    elem.style.setProperty('offset-rotate',radio_value )
  });
}

// play 及び reset ボタンにイベントを設定
const play = document.getElementById('play');
play.addEventListener('click', (e) =>  {
  let action;
  if (animations[0].playState === 'running') {
    action = 'pause';
  } else if (animations[0].playState==='paused'||animations[0].playState==='idle'){
    action = 'play';
  }
  animations.forEach((animation, i) => {
    animation[action]();
  });
  play.textContent = (action === 'play') ? 'Pause' : 'Play';
});
const reset = document.getElementById('reset');
reset.addEventListener('click', (e) => {
  animations.forEach((animation, i) => {
    animation.cancel();
  });
  play.textContent = 'Play';
});
offset-rotate のアニメーション
offset-rotate プロパティを使ってアニメーションを設定することもできます。
以下は要素がパス上を移動中に1秒間に1回転するアニメーションです。
<div class="svg-wrapper" style="height: 200px;">
  <svg width="300px" height="200px" viewBox="0 0 300 200" style="position: absolute;">
    <path id="motion_path3" d="M10 10 C50 100,90 140,150 60 S230 0,280 60" stroke="#999" stroke-width="1" fill="transparent" stroke-dasharray="3 2"></path>
  </svg>
  <div class="elem"></div>
</div>
<div>
  <button type="button" id="play">Play </button>
  <button type="button" id="reset">Reset</button>
</div>
要素(.elem)には移動(move)と回転(rotate)の2つのアニメーションを設定しています。
.elem {
  offset-path: path('M10 10 C50 100,90 140,150 60 S230 0,280 60');
  animation: move 6s ease-in-out infinite alternate, rotate 1s ease-in-out infinite;
  position: absolute;
  width: 30px;
  height: 20px;
  background-color: red;
  border-right: 10px solid blue;
  opacity: .5;
}

@keyframes move {
  0% {
  offset-distance: 0%;
  }
  100% {
  offset-distance: 100%;
  }
}

/*回転のアニメーションのキーフレーム*/
@keyframes rotate {
  0% {
  offset-rotate: 0deg;
  }
  100% {
  offset-rotate: 360deg;
  }
}
getAnimations() を使って対象の要素から全ての CSS アニメーション(move と rotate)取得して操作しています。
//対象の要素に設定してある全てのアニメーションを取得
const animations = document.querySelector('.elem').getAnimations();
//animations は配列(この場合、move と rotate のアニメーション:2つの要素)
animations.forEach((animation) => {
  animation.cancel();
});

const play = document.getElementById('play');
play.addEventListener('click', (e) =>  {
  let action;
  if (animations[0].playState === 'running') {
    action = 'pause';
  } else if (animations[0].playState==='paused'||animations[0].playState==='idle'){
    action = 'play';
  }
  animations.forEach((animation, i) => {
    animation[action]();
  });
  play.textContent = (action === 'play') ? 'Pause' : 'Play';
});

const reset = document.getElementById('reset');
reset.addEventListener('click', (e) => {
  animations.forEach((animation, i) => {
    animation.cancel();
  });
  play.textContent = 'Play';
});
参考サイト
以下のサイトを参考にさせていただきました。