Vue の基本的な使い方 (5) Pinia を使って状態管理
Pinia を利用すると、複雑な Vue 3 の状態管理(コンポーネント間のデータの受け渡しやデータの共有など)が簡単に行なえます。以下は Pinia の基本的な使い方についての解説のような覚書です。
関連ページ
- Vue の基本的な使い方 (1) Options API
- Vue の基本的な使い方 (2) Composition API
- Vue の基本的な使い方 (3) Vite と SFC 単一ファイルコンポーネント
- Vue の基本的な使い方 (4) Vue Router ルーティング
- Vue の基本的な使い方 (6) Vue3 で簡単な To-Do アプリを色々な方法で作成
- Vue の基本的な使い方 (7) Vue Router と Pinia を使った簡単なアプリの作成
作成日:2022年11月26日
Pinia とは
Pinia とは、Vue で扱うグローバルなデータの状態(global state)を管理するための状態管理ツールです。
Vue2 までは Vuex がデフォルトの Vue の状態管理ツールでしたが、Vue3 では Pinia の利用が推奨されています。Vuex の英語ページ には Pinia is now the new default とあり、「Vue の公式状態管理ライブラリが Pinia に変更されました」と記載されています(Pinia は事実上の Vuex 5 です)。
以下で利用している Pinia のバージョンは 2.0.23 です。
Pinia 公式サイト:https://pinia.vuejs.org/
Pinia ではコンポーネント間で共有する必要があるグローバルなデータをストア(store)と呼ばれる場所で管理します。これにより以下のようなメリットがあります。
- コンポーネント間で共有するデータをストアで一元的に管理できる
- コンポーネントの階層に関わらずストアのデータを参照・操作できる
- ストア上のデータはリアクティブなので自動的に同期される
Pinia のインストール
Pinia は npm や yarn を使ってインストールすることができます。Vite で作成したプロジェクトに以下のコマンドで Pinia を追加することができます。
// npm の場合
npm install pinia
// yarn の場合
yarn add pinia
上記のように Pinia を追加した場合は、Pinia のセットアップ(main.js での Pinia の生成と読み込み)やストアを定義するファイルの保存先(src/stores)の作成は手動で行う必要があります。
または、create-vue や create-vite で Vite を利用して Pinia を追加したプロジェクトの雛形を作成することができ、Pinia の基本的な初期設定やストアのサンプルファイルも生成されます。
以下では create-vue(npm create vue)を使って Pinia を Vue に追加してプロジェクトを作成します。
npm create vue@latest を実行すると対話形式のプロジェクト生成ウィザードが起動するので、Add Pinia for state management? で矢印キーで Yes を選択して Pinia をプロジェクトに追加します。
プロジェクト生成ウィザードではデフォルトが No なのでそのまま return キーを押せば、その項目はインストールされません。
% npm create vue@latest  return  // Vue プロジェクトの枠組みを生成

Vue.js - The Progressive JavaScript Framework

✔ Project name: … my-pinia-project  //プロジェクト名を指定
✔ Add TypeScript? … No / Yes  //そのまま return キーを押せば No(インストールされない)
✔ Add JSX Support? … No / Yes
✔ Add Vue Router for Single Page Application development? … No / Yes
✔ Add Pinia for state management? … No / Yes  // → Yes を選択して Pinia を追加
✔ Add Vitest for Unit Testing? … No / Yes
✔ Add an End-to-End Testing Solution? › No
✔ Add ESLint for code quality? … No / Yes

Scaffolding project in /Applications/MAMP/htdocs/vue/my-pinia-project...

Done. Now run:  // 続いて実行するコマンドが表示される

  cd my-pinia-project
  npm install
  npm run dev
続いて、生成されたプロジェクトのディレクトリに移動し、npm install を実行して必要なパッケージをインストールします。
% cd my-pinia-project  return  //生成されたプロジェクトへ移動

% npm install  return  //必要なパッケージをインストール

added 36 packages, and audited 37 packages in 9s
6 packages are looking for funding
  run `npm fund` for details
found 0 vulnerabilities

% npm run dev  return  //開発サーバーを起動

> my-pinia-project@0.0.0 dev
> vite

  VITE v3.2.3  ready in 259 ms

  ➜  Local:   http://127.0.0.1:5173/
  ➜  Network: use --host to expose
npm run dev を実行すると開発サーバーを起動することができます。

開発サーバーを終了するには control + c を押します。
以下は上記により生成されるプロジェクトのファイル構成(一部省略)です。Pinia が追加されているので、ストアを格納するディレクトリ stores が生成され、その中にサンプルのストアのファイル(counter.js)があります。
my-pinia-project //プロジェクトのディレクトリ
├── index.html  // 表示用フィル
├── node_modules
├── package-lock.json
├── package.json
├── public
├── src
│   ├── App.vue  // メインコンポーネント
│   ├── assets
│   ├── components  // コンポーネントのディレクトリ
│   │   ├── HelloWorld.vue // サンプルのコンポーネント
│   │   ├── TheWelcome.vue //同上
│   │   └── WelcomeItem.vue //同上
│   ├── main.js  // エントリポイント(Pinia のセットアップを含む)
│   └── stores  // ストアのディレクトリ
│         └── counter.js  // ストアのサンプル
└── vite.config.js //Vite の設定ファイル
package.json を確認すると、dependencies フィールドにインストールされた pinia とその依存関係を表すバージョン(この時点での最新版 2.0.23)がリストされています。
{
  "name": "my-pinia-project",
  "version": "0.0.0",
  "scripts": {
    "dev": "vite",
    "build": "vite build",
    "preview": "vite preview"
  },
  "dependencies": {
    "pinia": "^2.0.23",
    "vue": "^3.2.41"
  },
  "devDependencies": {
    "@vitejs/plugin-vue": "^3.1.2",
    "vite": "^3.1.8"
  }
}
vite.config.js
vite.config.js は以下のように初期状態では、@ を使ってコンポーネントなど ./src 以下のファイルをインポートできるように ./src を @ で表すエイリアス(resolve.alias)が設定されています。
import { fileURLToPath, URL } from 'node:url'

import { defineConfig } from 'vite'
import vue from '@vitejs/plugin-vue'

// https://vitejs.dev/config/
export default defineConfig({
  plugins: [vue()],
  resolve: {
    alias: {
      '@': fileURLToPath(new URL('./src', import.meta.url))
    }
  }
})
index.html
以下は表示用のファイル index.html です。
アプリをマウントする div 要素(id="app")と、main.js を読み込んでいる script 要素(type="module")が記述されています。title や lang 属性などは必要に応じて適宜変更します。
<!DOCTYPE html>
<html lang="en">
  <head>
    <meta charset="UTF-8">
    <link rel="icon" href="/favicon.ico">
    <meta name="viewport" content="width=device-width, initial-scale=1.0">
    <title>Vite App</title>
  </head>
  <body>
    <div id="app"></div>
    <script type="module" src="/src/main.js"></script>
  </body>
</html>
Vue に Pinia をセットアップ
Pinia を利用するには createPinia() を使って Pinia のインスタンス (ルートストア) を生成し、Vue アプリのインスタンスの use() メソッドを使ってプラグインとして読み込みます。
この例の場合、Pinia を追加してプロジェクトを作成しているので、セットアップの処理は src フォルダの main.js にすでに記述されています。
createPinia() は Pinia のインスタンスを生成して返す関数です。引数はありません。
import { createApp } from 'vue'
import { createPinia } from 'pinia' //pinia から createPinia をインポート
import App from './App.vue'

import './assets/main.css'  //CSS の読み込み

const app = createApp(App) //Vue アプリのインスタンスを生成
app.use(createPinia()) //Pinia を生成してアプリで読み込む
app.mount('#app')
このままでも問題ありませんが、以下では Pinia のインスタンスにアクセスできるように、Pinia のインスタンスを生成して変数に代入するように書き換えています。
また、以降の例では5行目の CSS の読み込みは不要なので削除します。
import { createApp } from 'vue'
import { createPinia } from 'pinia'
import App from './App.vue'

//Vue アプリのインスタンスを生成
const app = createApp(App)
//Pinia のインスタンスを生成
const pinia = createPinia()

//アプリの use() メソッドを使って Pinia を読み込む(プラグインとしてアプリに渡す)
app.use(pinia)
app.mount('#app')
//console.log(pinia)
上記の console.log(pinia) のコメントを外せば、以下のようにブラウザのコンソールタブで Pinia のインスタンスを確認することができます(CSS の読み込みを削除したのでページの表示が変わっています)。
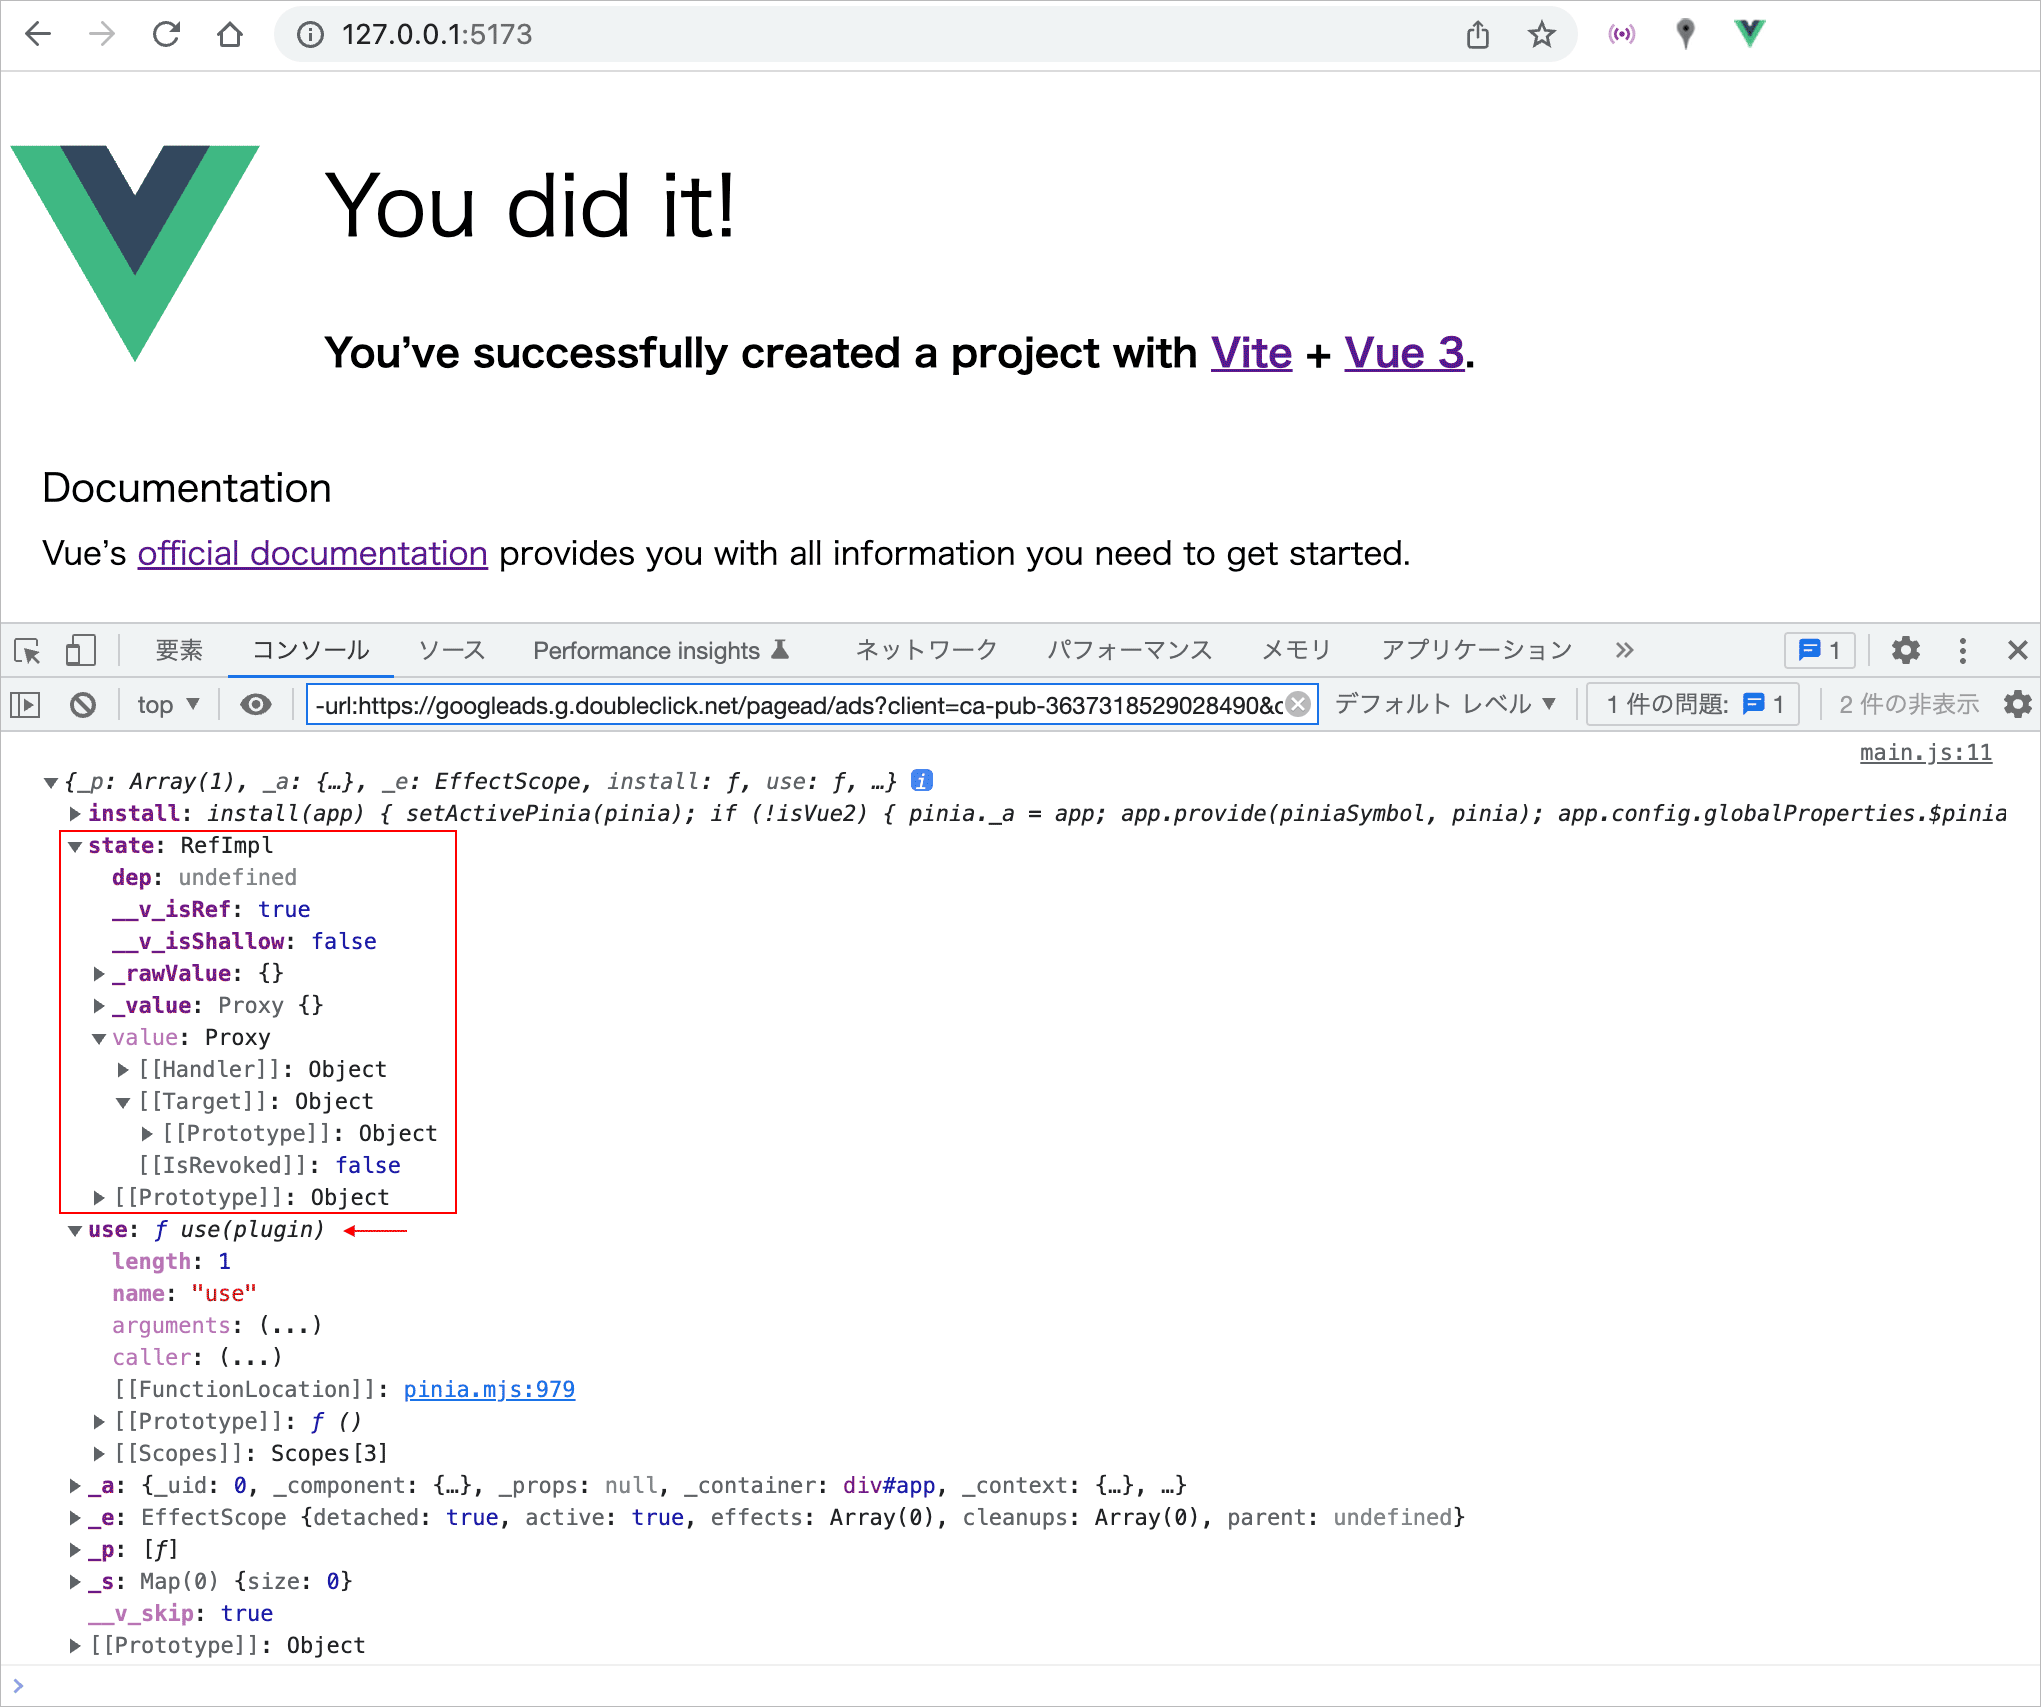
state プロパティは全てのストアの state へのアクセスを提供します。但し、まだストアを作成していないのでこの時点では value は空です。
ここに表示されている use メソッドは、Pinia のメソッドで、Pinia のプラグインを呼び出すためのものです(Pinia プラグインはストアごとに呼び出されるフック関数で、複数またはすべてのストアを同時に操作するために利用することができます)。
ストアを定義
Vue に Pinia をセットアップしたら、データを格納するストアを準備(定義)します。
ストアを定義するファイルは、通常、src/stores/ ディレクトリに保存します。
npm create vue@latest で Pinia を追加してプロジェクトを作成した場合は、以下のようなサンプルのファイルが src/stores/ ディレクトリの中に作成されています。
ストアは defineStore() を使って定義し、名前を付けてエクスポートします。
import { ref, computed } from 'vue'
import { defineStore } from 'pinia'

//defineStore() を使ってストアを定義し、名前を付けてエクスポート
export const useCounterStore = defineStore('counter', () => {
  const count = ref(0)
  const doubleCount = computed(() => count.value * 2)
  function increment() {
    count.value++
  }

  return { count, doubleCount, increment }
})
※ 必要な数のストアを定義できますが、各ストアをそれぞれ別のファイルに定義する必要があります。
defineStore
defineStore() は以下の2つの引数を受け取ります。
ストアは複数定義できるので、第1引数にはストアを識別するための一意な名前(id)を指定します。
任意の名前を付けられますが、ストアのファイル名と同じにすると関係がわかりやすいです(完全に同じ名前である必要はありませんが)。
| 引数 | 説明 |
|---|---|
| id | ストアを識別するための一意な名前(ストアのファイル名と同じにするとわかりやすい) |
| options | ストアを定義するためのオプション。Options オブジェクトまたは Setup 関数のいずれかを受け取ります。 |
戻り値
defineStore() は定義されたストアのインスタンスを生成する関数を返します(StoreDefinition)。
※ ストアのインスタンスを生成する関数と書いていますが、defineStore() の戻り値の関数は、コンストラクタではなく getter 関数(ゲッター)です(useXxxxStore)。
戻り値の getter 関数はアプリ(コンポーネント)側から参照できるように名前付きエクスポートします。
以下は id に main という名前を指定して定義したストアの戻り値(の関数)に useMainStore という名前をつけてエクスポートしています。
戻り値の名前は任意ですが、慣例的に use で始まり(Composables 同様)、Store を最後に付けます。
例えば useUserStore や useProductStore のように useXxxxStore とし、利用するコンポーネント側ではインポートして useXxxxStore() でこの関数を実行してストアのインスタンスを取得します。
//pinia から defineStore をインポート
import { defineStore } from 'pinia'

// defineStore() の戻り値に名前 useXxxxStore を付けてエクスポート(named export)
export const useMainStore = defineStore('main', {
  // オプションの設定
})
defineStore の引数 options
defineStore() は、2番目の引数(options)に以下のいずれかを受け取ってストアを定義することができます。
- Options オブジェクト
- Setup 関数(リアクティブなオブジェクトを返す関数)
Option Stores
引数 options に Options オブジェクトを渡してストアを定義する構文です(Option Stores)。
Vue の Options API のように Options オブジェクトを渡すことができ、Options オブジェクトは以下のプロパティを持ちます。
| プロパティ | 説明 |
|---|---|
| state | データ本体(data オプションに相当)。state はデータの初期状態(初期値)を返す関数として定義します。データは必要な数だけ「名前:初期値」の形式で列記できます。 |
| getters | state のデータに対する算出プロパティ(computed オプションに相当)。既存の state の値をもとに算出するためのプロパティ。第1引数に state を受け取り、値を返す関数(ゲッター)です。 |
| actions | state の値を更新する関数(methods オプションに相当)。ストアのインスタンスに this でアクセスできます。 |
以下は defineStore() の第2引数に Options オブジェクトを指定して定義する例です。
import { defineStore } from 'pinia'

export const useCounterStore = defineStore('counter', {
  // 初期状態(初期値)を返す関数として定義
  state: () => ({
    count: 0, //名前:初期値
  }),
  // 算出プロパティ
  getters: {
    // 第1引数に state を受け取る
    doubleCount: (state) => state.count * 2,
  },
  // state の値を更新する関数
  actions: {
    //this を利用するのでアロー関数は使えない
    increment() {
      // ストアのインスタンスに this でアクセス
      this.count++
    },
  },
})
Setup Stores(Setup Syntax)
もう1つの構文は第2引数に、リアクティブなプロパティとメソッドを定義して公開したいプロパティとメソッドを含むオブジェクトを返す関数を渡します(Setup Stores)。
以下は前述の例を Setup 構文(Setup Syntax)で書き換えたものです。
ref() で定義したリアクティブなデータの値にアクセスするには .value を使用します。
import { ref, computed } from 'vue'
import { defineStore } from 'pinia'

export const useCounterStore = defineStore('counter', () => {
  // ref() を使ってリアクティブなデータの初期値を定義
  const count = ref(0)
  // computed メソッドを使用して算出プロパティを定義
  const doubleCount = computed(() => count.value * 2)
  // メソッドを定義(値には .value でアクセス)
  function increment() {
    count.value++
  }
  // 公開したいプロパティとメソッドを含むオブジェクトを返す
  return { count, doubleCount, increment }
})
この構文(Setup Syntax)では、
ref()メソッドで定義したリアクティブなデータが Option Stores のstateプロパティにcomputed()でメソッド定義した算出プロパティがgettersプロパティにfunction()またはアロー関数で定義した関数がactionsプロパティに
に相当します。
Setup stores(Setup Syntax)は、ストア内にウォッチャーを作成したり、コンポーザブルを自由に使用できるため、Option Stores よりも柔軟性があります。
但し、SSR を使用する場合、コンポーザブルの使用はより複雑になることに注意する必要があるようです。
どちらの構文を利用するか
以下は、公式のドキュメント What syntax should I pick? からの引用です。
Vue のコンポジション API とオプション API と同様に、最も使いやすいものを選択してください。 よくわからない場合は、最初に Option Stores を試してください。
ストアにアクセス
定義したストアはコンポーネントの setup() 内で呼び出されるまで作成されません。
コンポーネント側でストアにアクセスするには、定義したストアをインポートし、setup 内でインポートしたストアの関数 useXxxxStore() を実行します。
そして、その戻り値のストアのインスタンスを任意の変数に格納し、この変数を介して、state や getters、actions で定義したプロパティにアクセスします。
戻り値のストアのインスタンスを格納した変数がストアとしての役割をします。
関数 useXxxxStore()
関数 useXxxxStore() は、どこで呼び出されても、何回呼び出されても、常に同じストアのインスタンスを返す getter 関数です。 これにより、すべてのコンポーネントが同じストアのインスタンス(オブジェクト)にアクセスすることが保証されます。
以下は App.vue を書き換えて counter.js で定義してあるストアのデータにアクセスする例です。
以下ではインポートしたストアの関数 useCounterStore() でストアのインスタンスを生成して変数 store に代入し、ストアの state に定義した count に store.count で(変数を介して)アクセスしています。
この例ではストアのインスタンスを格納する変数の名前を store としていますが、任意の名前を付けられます。複数のストアを利用する場合などは識別しやすい名前を付けるとよいかと思います。
import のパスの @ は ./src のエイリアスです(vite.config.js)。
<script setup>
//定義したストア(の関数)をインポート
import { useCounterStore } from '@/stores/counter'
//インポートした関数を呼び出してストアをインスタンス化(ストアを生成)して変数に代入
const store = useCounterStore()  //setup() 内で useXxxxStore() を実行
</script>

<template>
  <h1>App Title</h1>
  <!-- 生成したストアを介して count にアクセス -->
  <p>store.count : {{ store.count }}</p>
</template>
以下は上記の script setup 構文を setup() で書き換えた例です。
<script>
import { useCounterStore } from '@/stores/counter'
export default {
  setup() {
    //インポートした関数を呼び出してストアをインスタンス化して変数に代入
    const store = useCounterStore()  //setup() 内で useXxxxStore() を実行
    return {
      //テンプレートで使用するストアのインスタンス全体を返すことができます
      store,
    }
  },
}
</script>
import { defineStore } from 'pinia'

export const useCounterStore = defineStore('counter', {
  // 初期状態(初期値)を返す関数として定義
  state: () => ({
    count: 0, //名前:初期値
  }),
  // 算出プロパティ
  getters: {
    // 第1引数に state を受け取る
    doubleCount: (state) => state.count * 2,
  },
  // state の値を更新する関数
  actions: {
    //this を利用するのでアロー関数は使えない
    increment() {
      // ストアのインスタンスに this でアクセス
      this.count++
    },
  },
})
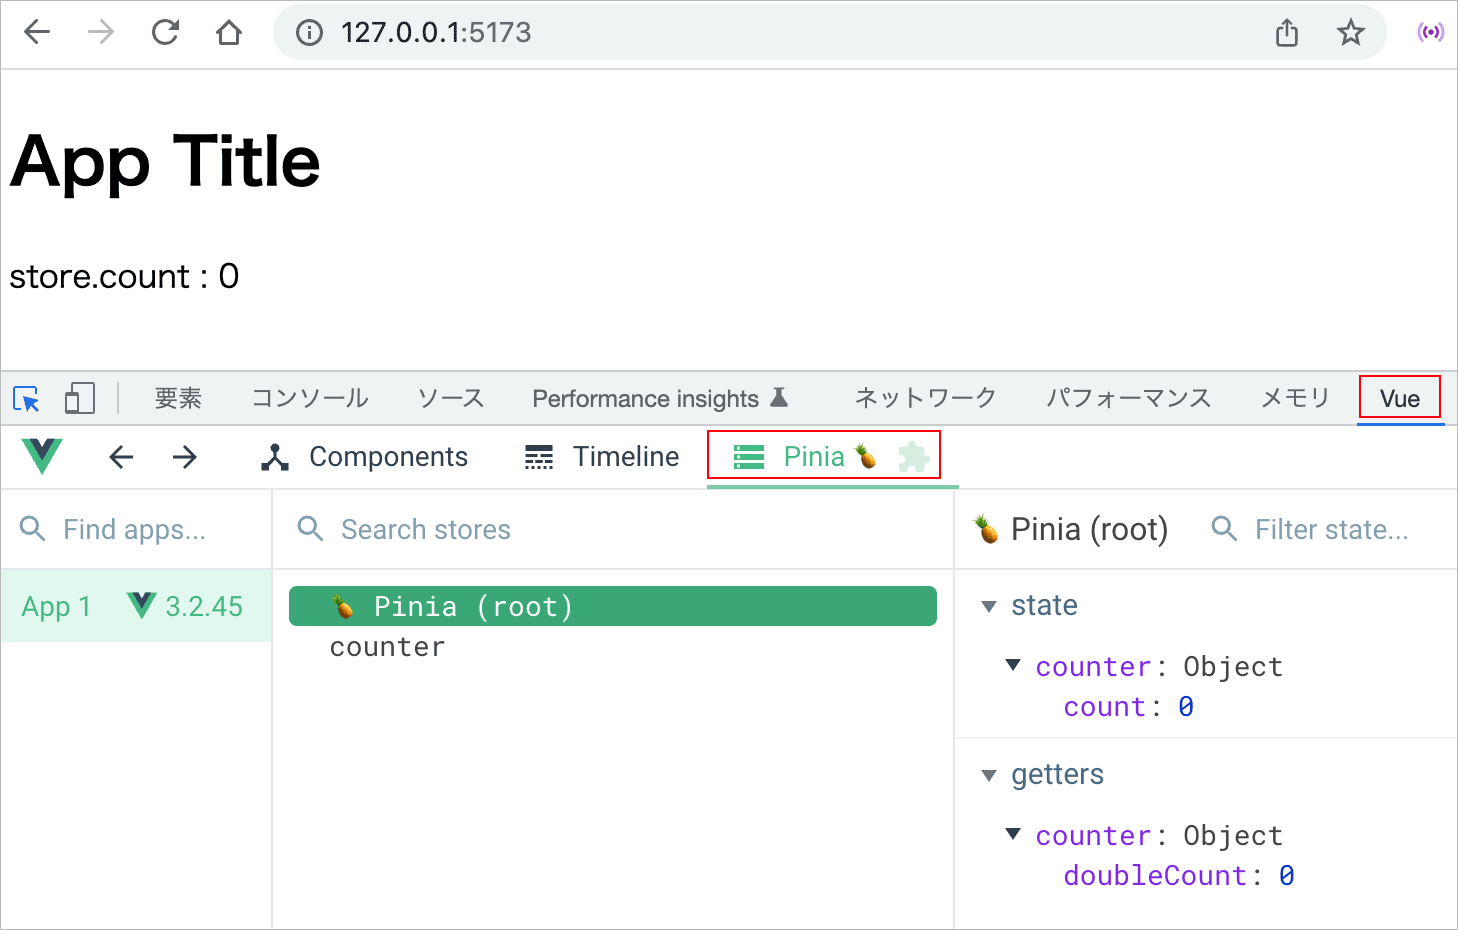
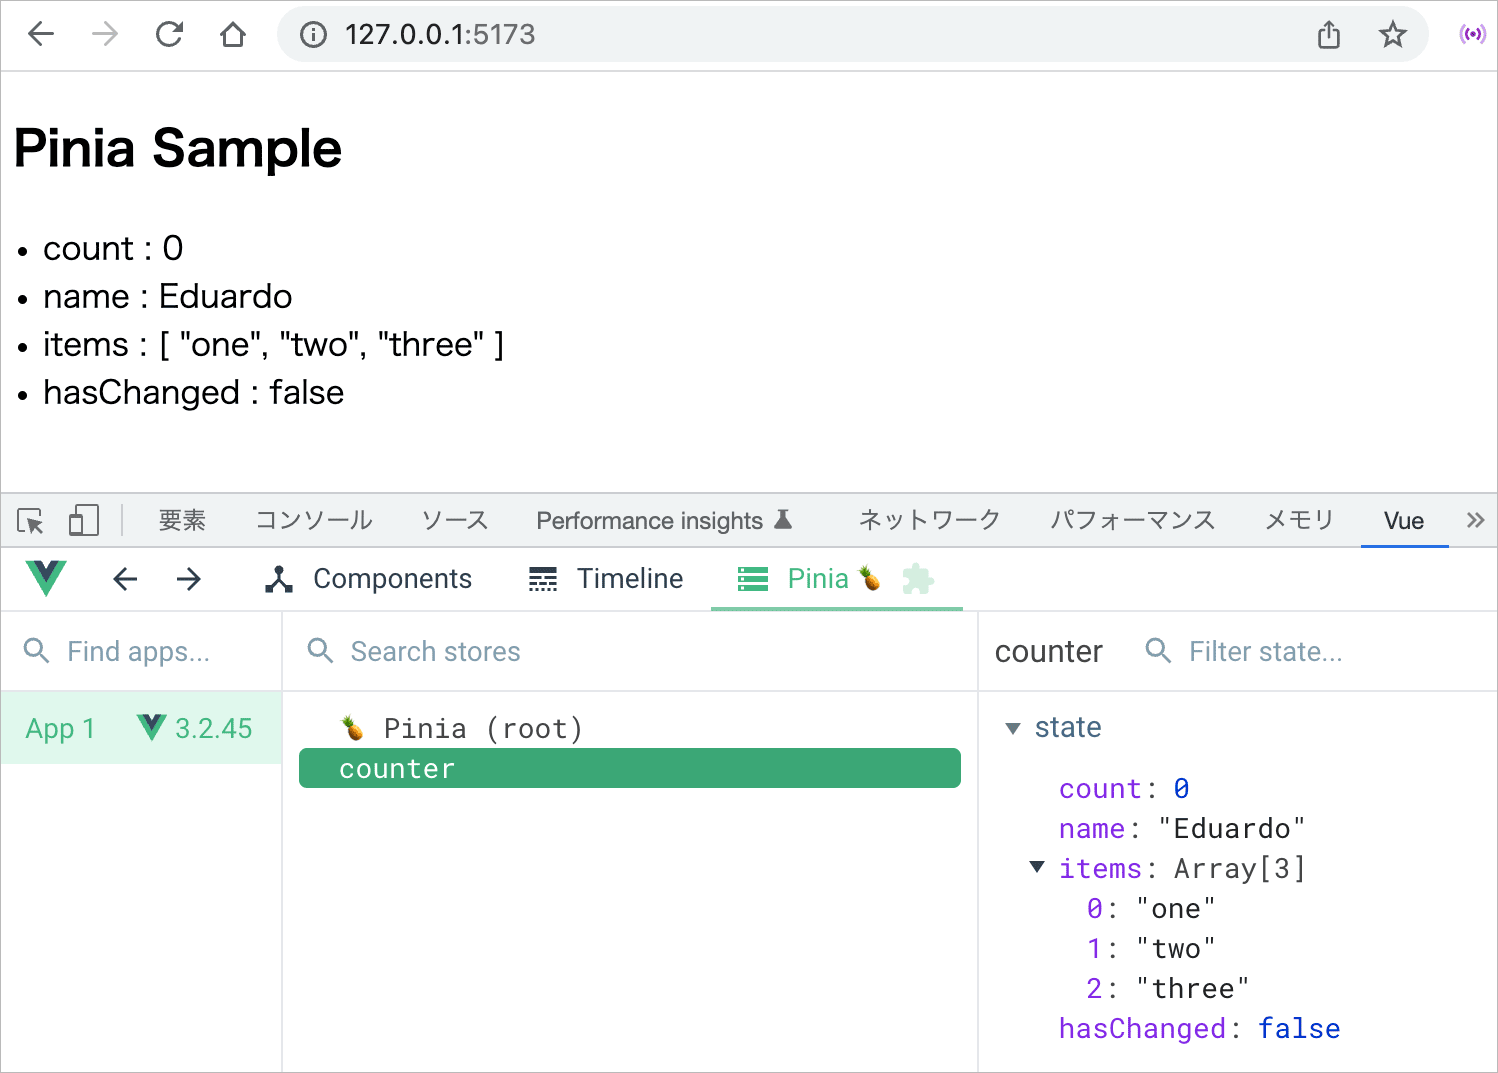
npm run dev で開発サーバーを起動すれば、以下のように表示されます。ブラウザの拡張機能 Vue Devtools をインストールしてあれば、以下のように Pinia のストアの状態を確認することができます。
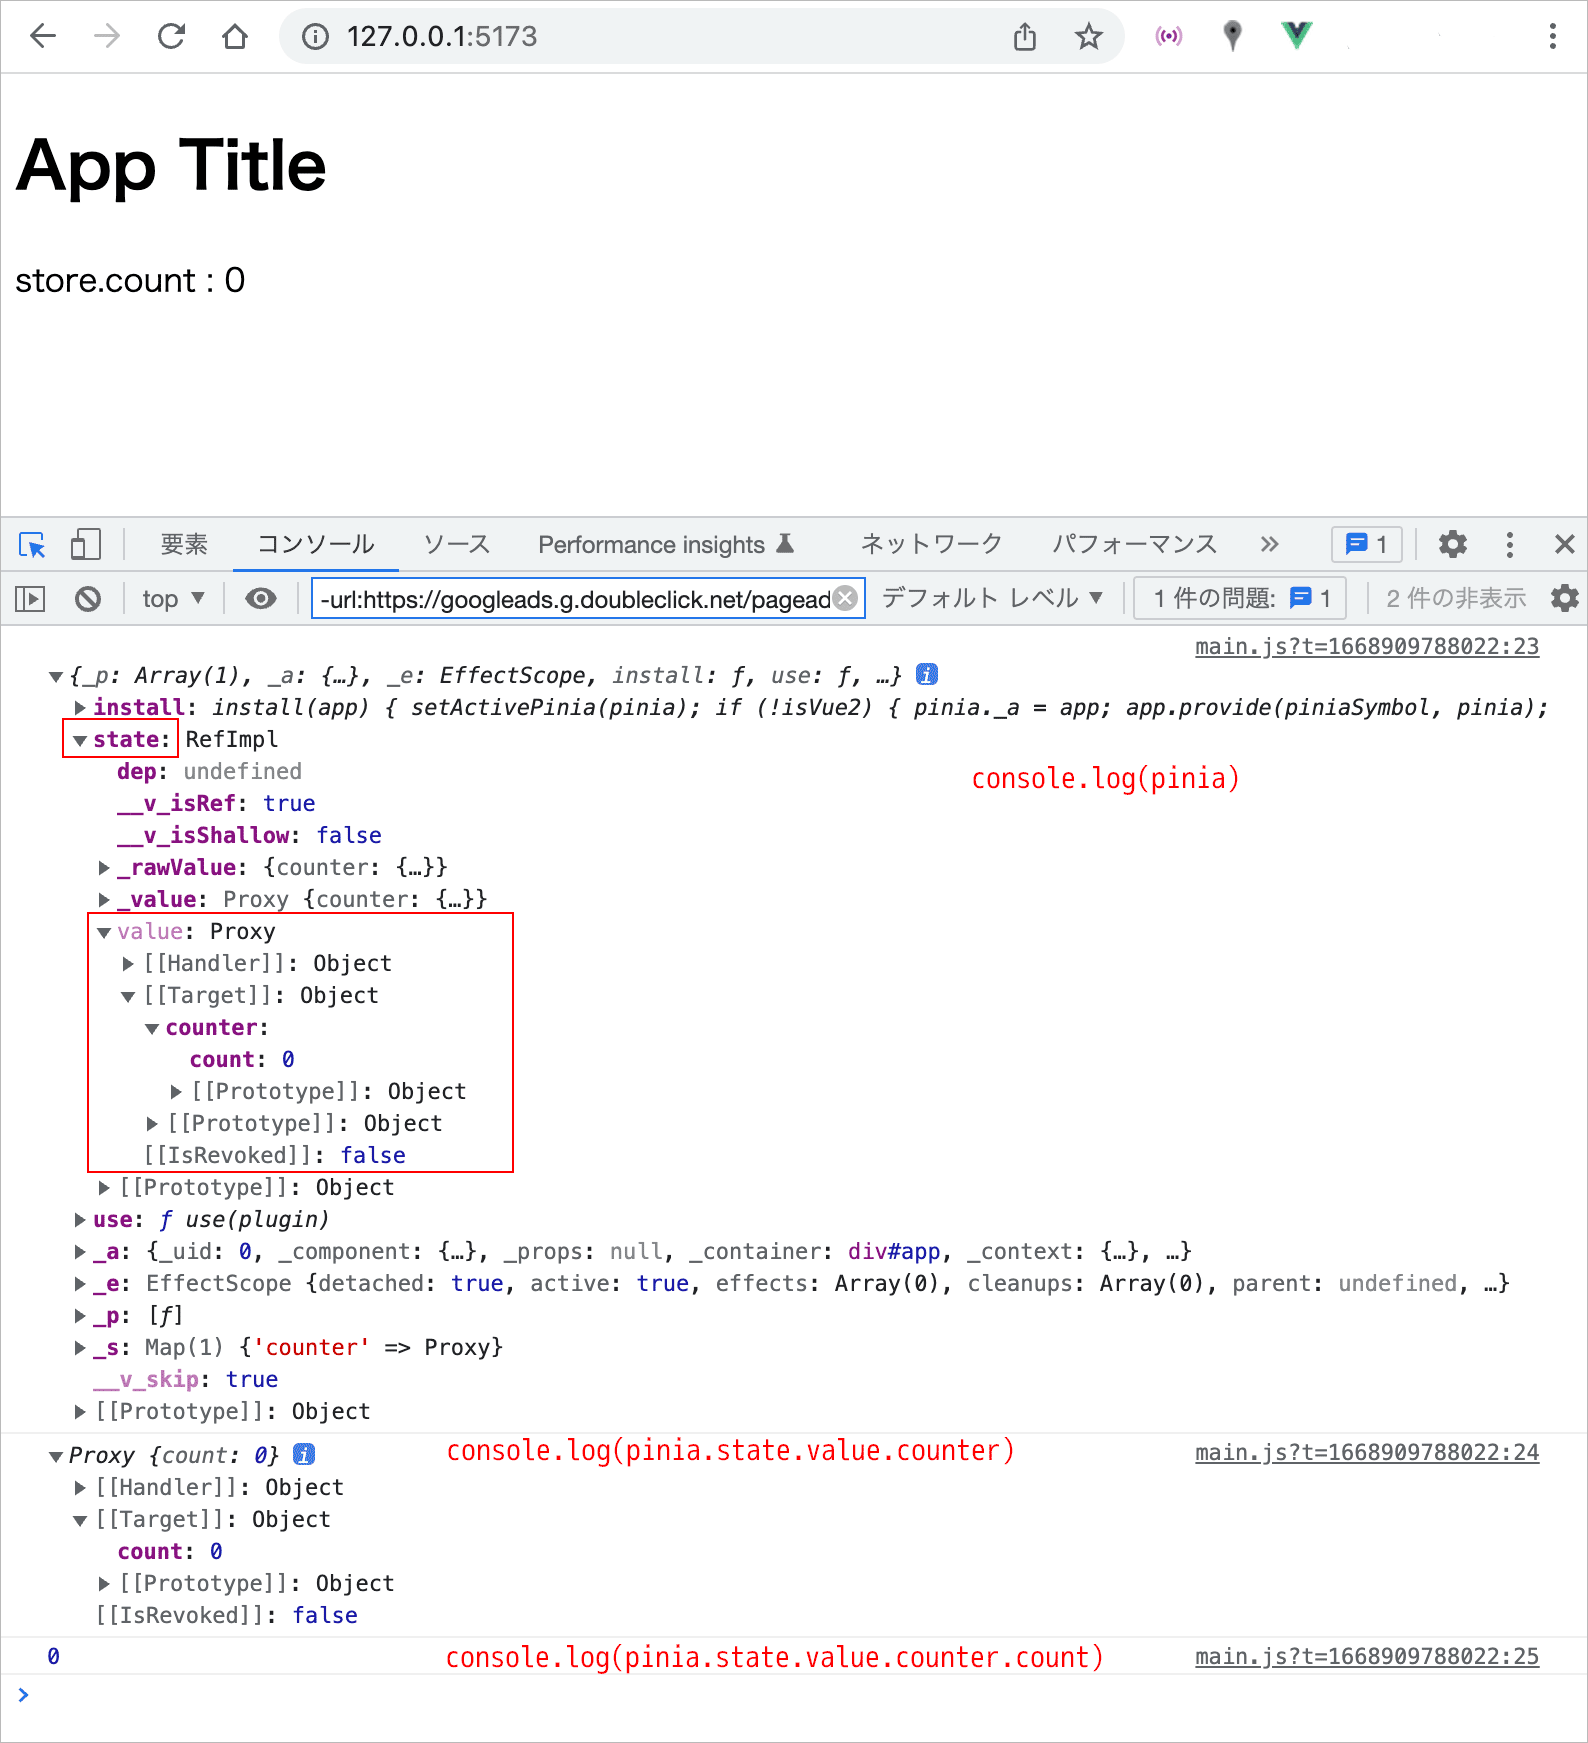
また、main.js に 以下の Pinia のインスタンスを確認する記述を追加すると、
import { createApp } from 'vue'
import { createPinia } from 'pinia'
import App from './App.vue'

const app = createApp(App)
const pinia = createPinia()

app.use(pinia)
app.mount('#app')

//Pinia のインスタンス確認する以下の記述を追加(後で削除)
console.log(pinia)
console.log(pinia.state.value.counter)
console.log(pinia.state.value.counter.count)
以下のようにコンソールに出力されます。
Pinia のインスタンスの state の value プロパティに counter ストアの state が保存されているのが確認できます。
pinia.state.value.xxxx(xxxx はストアのID)で、特定のストアの state にアクセスできます。
また、以下のように App.vue に console.log(store) を追加するとストアのインスタンスを確認することができます。
<script>
import { useCounterStore } from '@/stores/counter'
export default {
  setup() {
    const store = useCounterStore()
    console.log(store)  //ストアのインスタンス確認する記述(後で削除)
    return {
      store,
    }
  },
}
</script>

<template>
  <h1>App Title</h1>
  <p>store.count : {{ store.count }}</p>
</template>
以下のようにコンソールに出力されます。
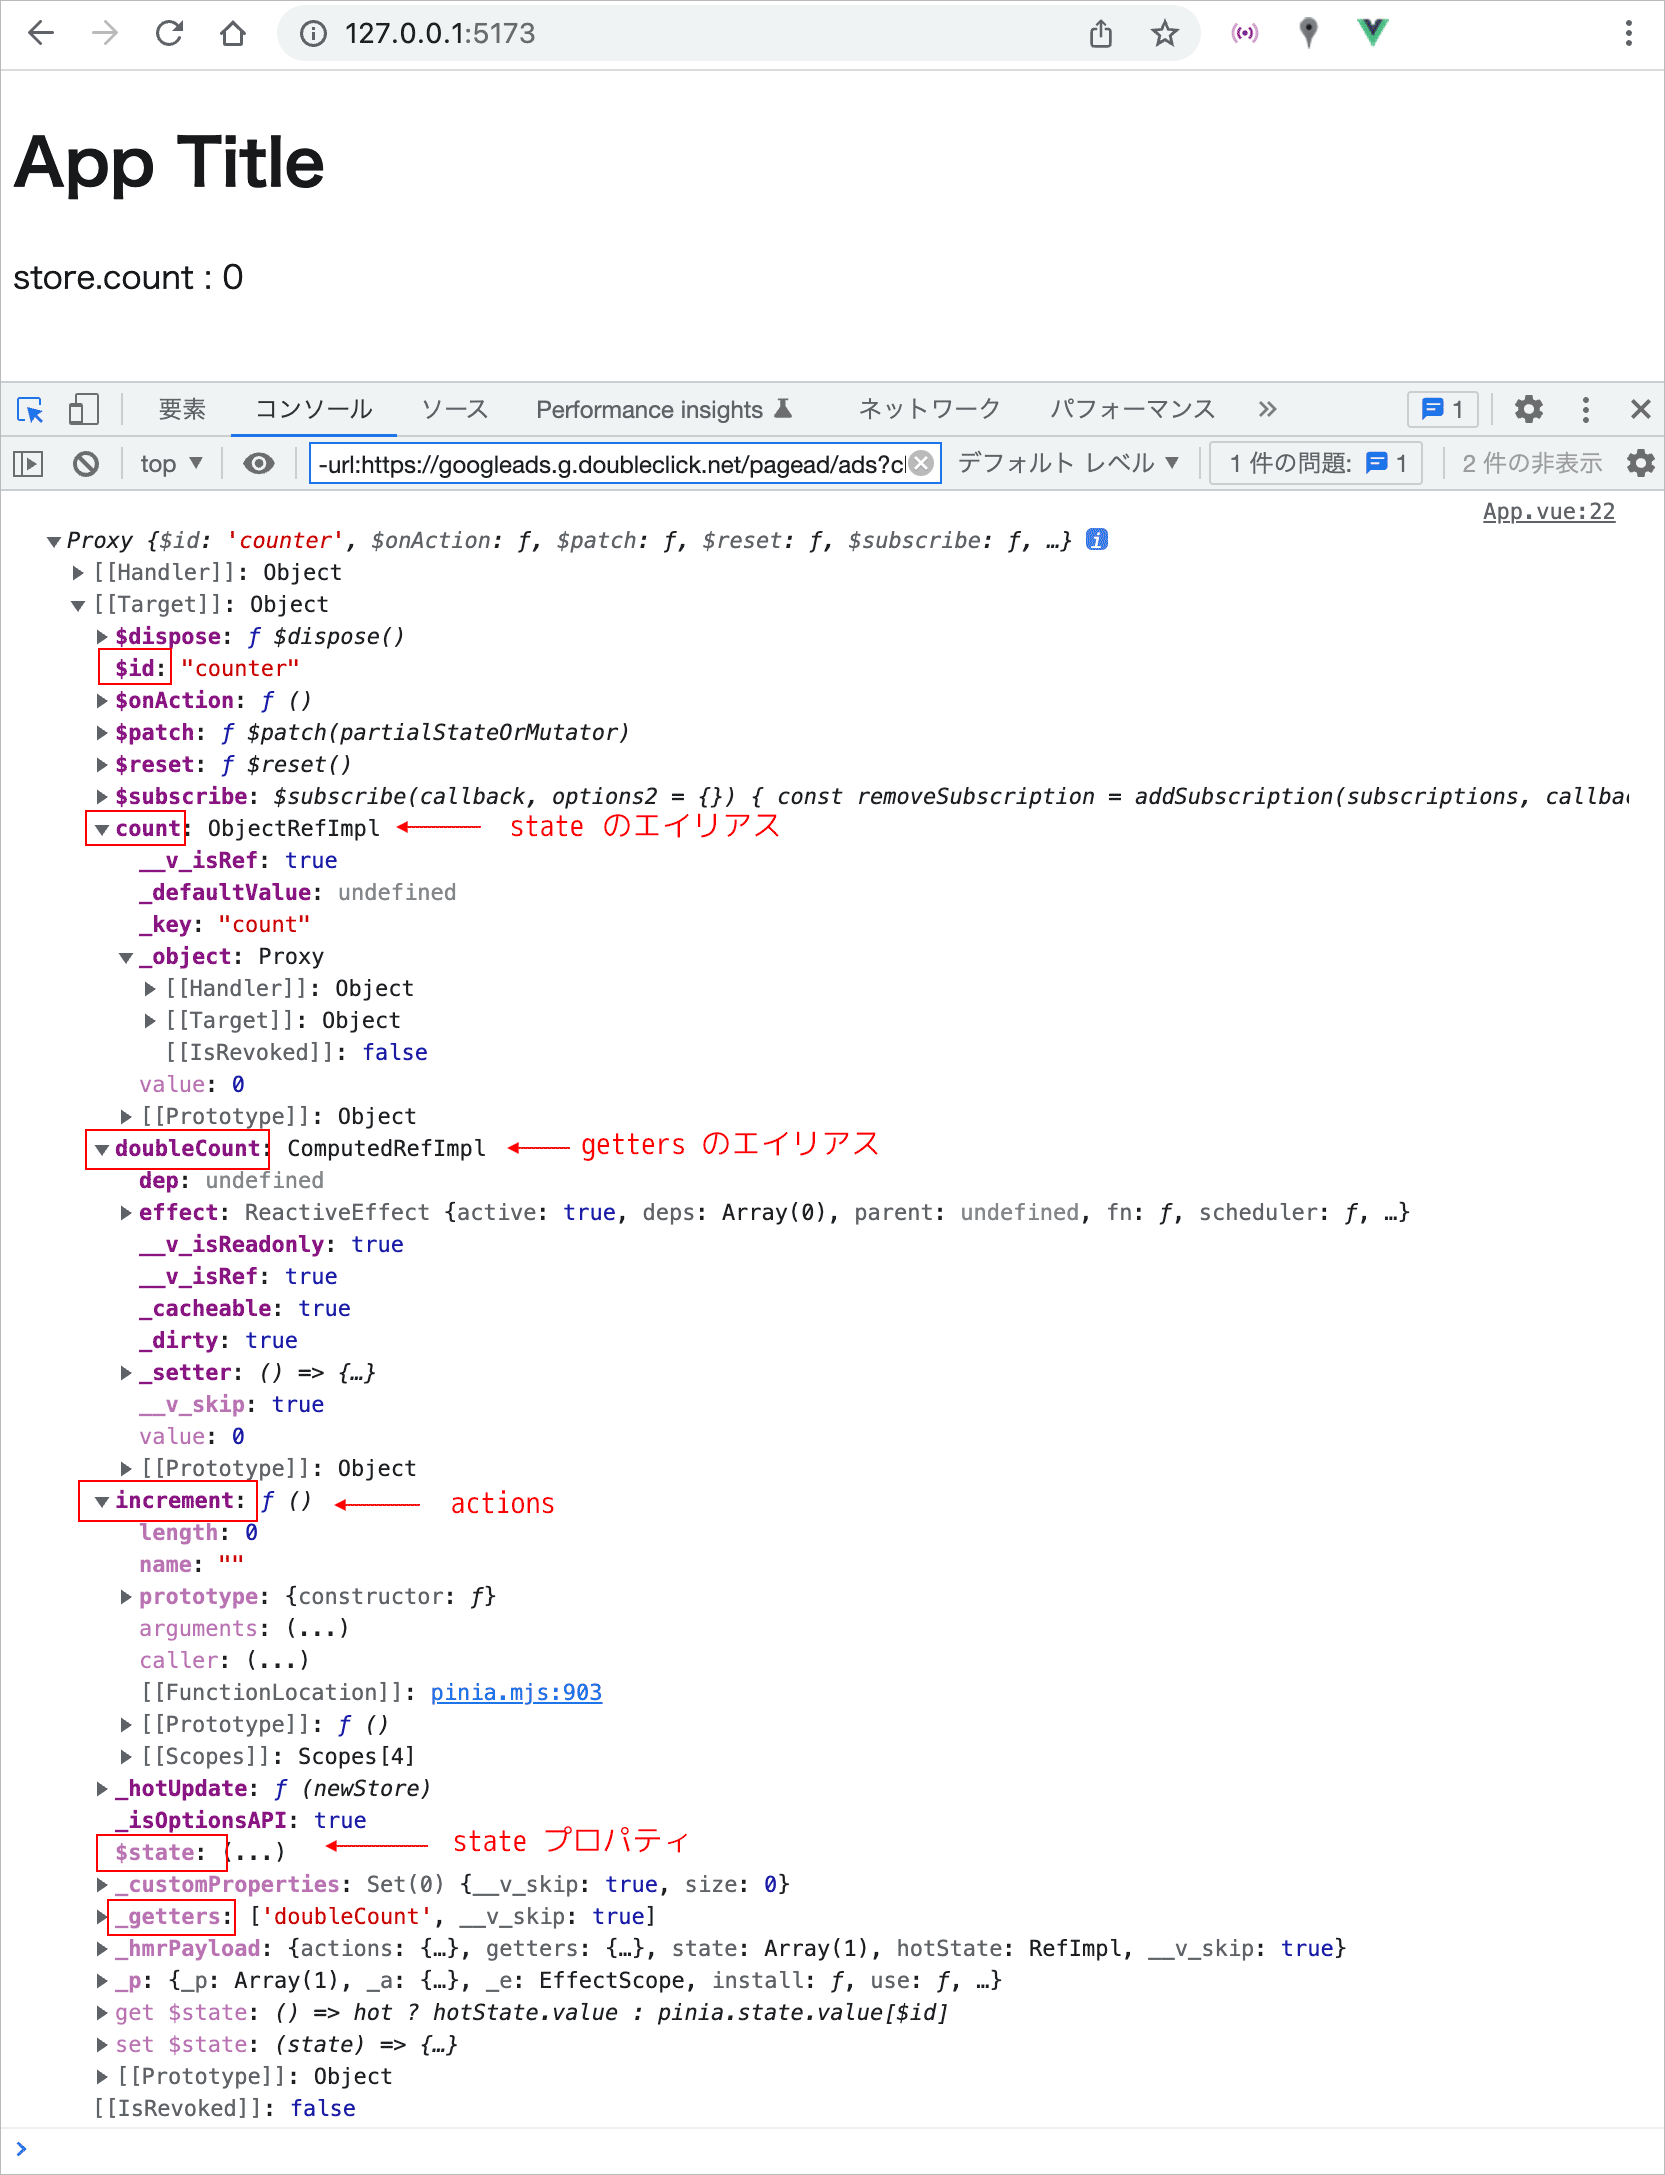
ストアのインスタンスはプロキシオブジェクトです。
$id はストアの ID です。全ての組み込みメソッドやプロパティは $ から始まります。
また、ストアに定義した state や getters、actions のエイリアスもストアインスタンスのルートレベルに確認できます。
別のコンポーネントからアクセス
ストア上に定義したデータは全てのコンポーネントからアクセスできます。
import { defineStore } from 'pinia'

export const useCounterStore = defineStore('counter', {
  // 初期状態(初期値)を返す関数として定義
  state: () => ({
    count: 0, //名前:初期値
  }),
  // 算出プロパティ
  getters: {
    // 第1引数に state を受け取る
    doubleCount: (state) => state.count * 2,
  },
  // state の値を更新する関数
  actions: {
    //this を利用するのでアロー関数は使えない
    increment() {
      // ストアのインスタンスに this でアクセス
      this.count++
    },
  },
})
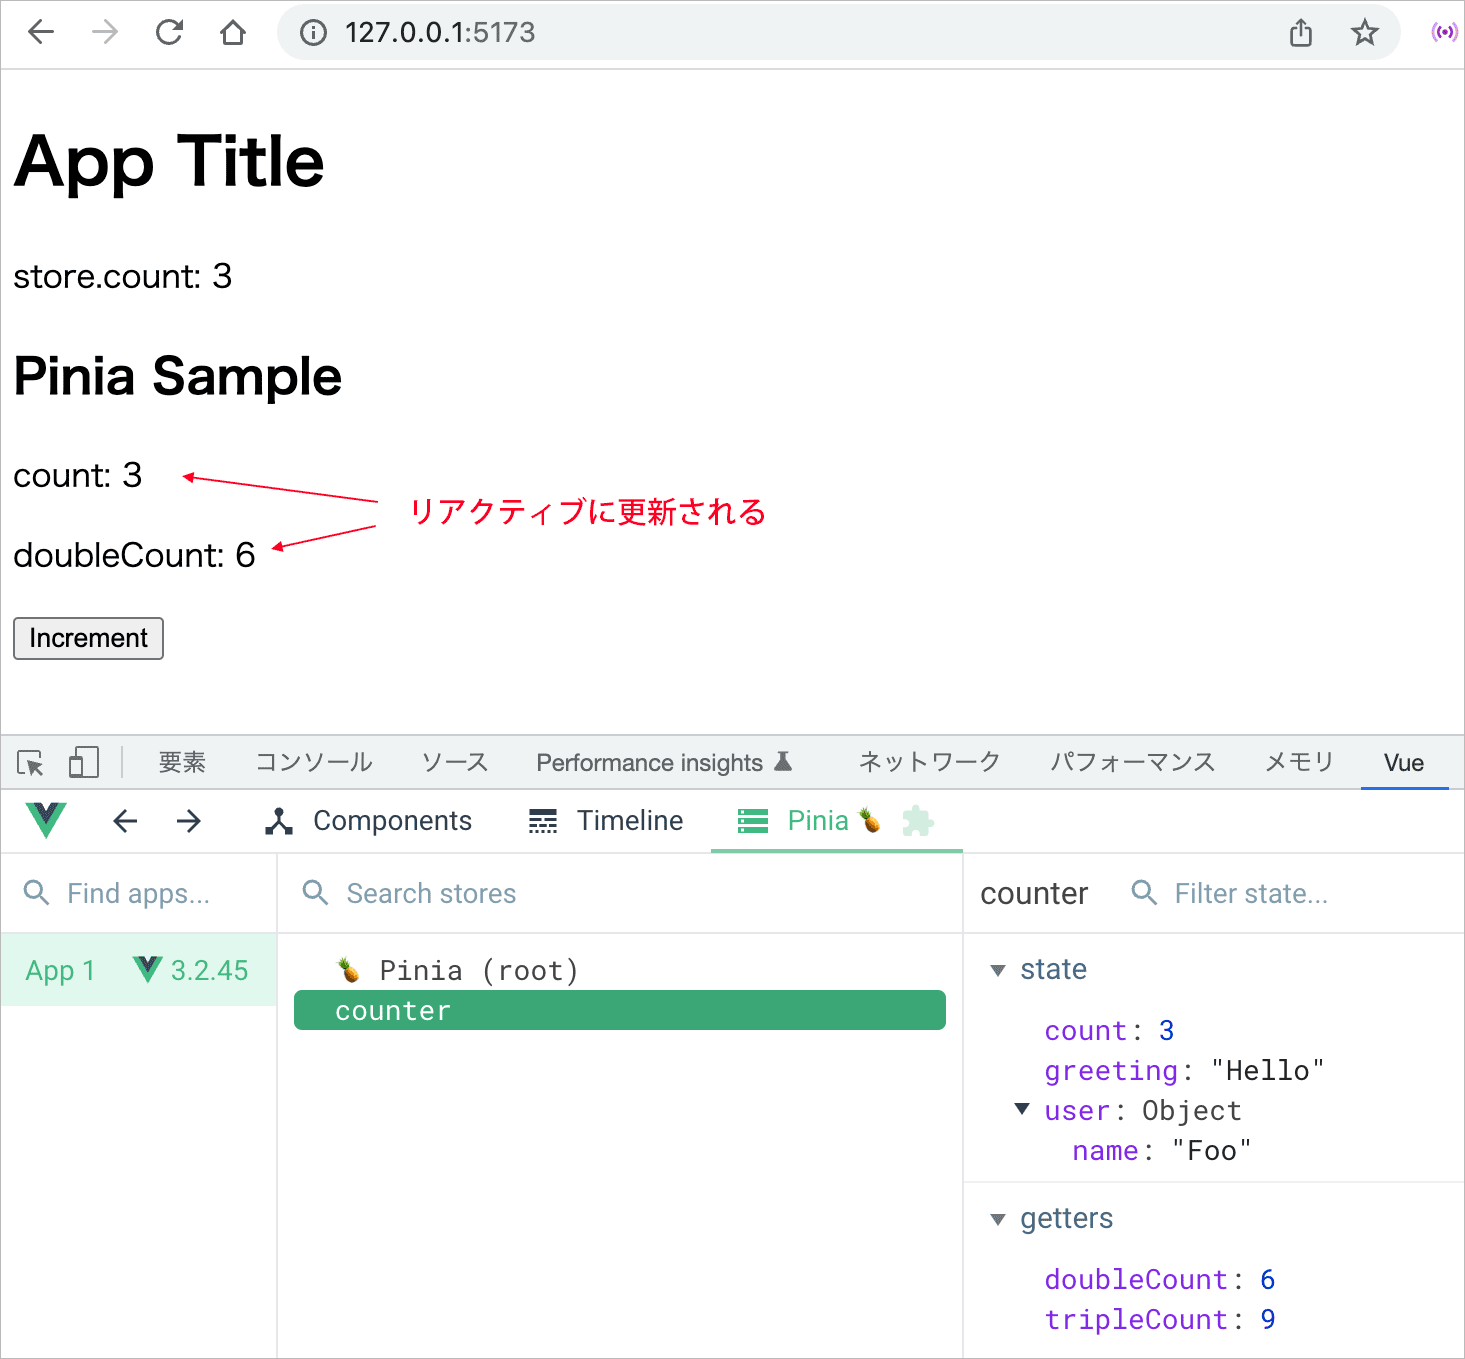
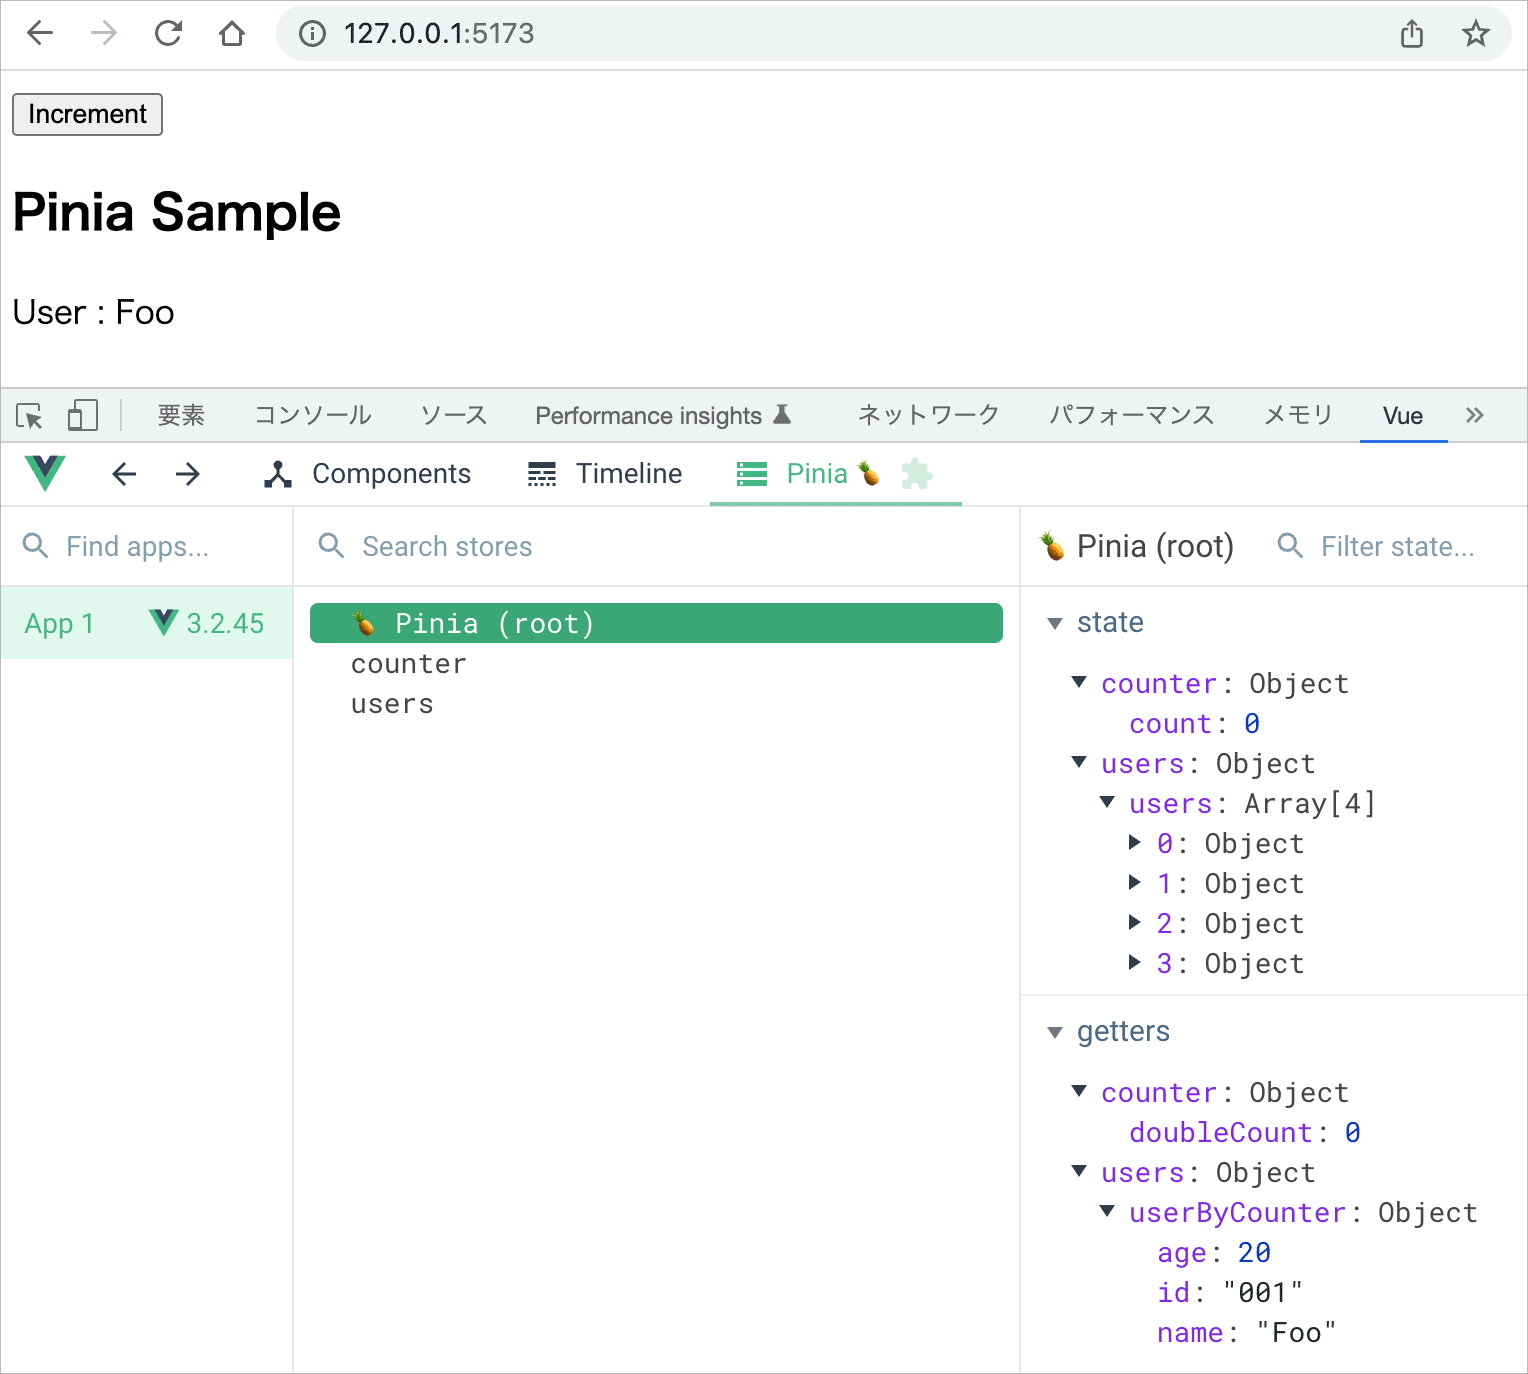
例えば、以下のようなコンポーネント PiniaSample を components ディレクトリに作成して確認することができます。
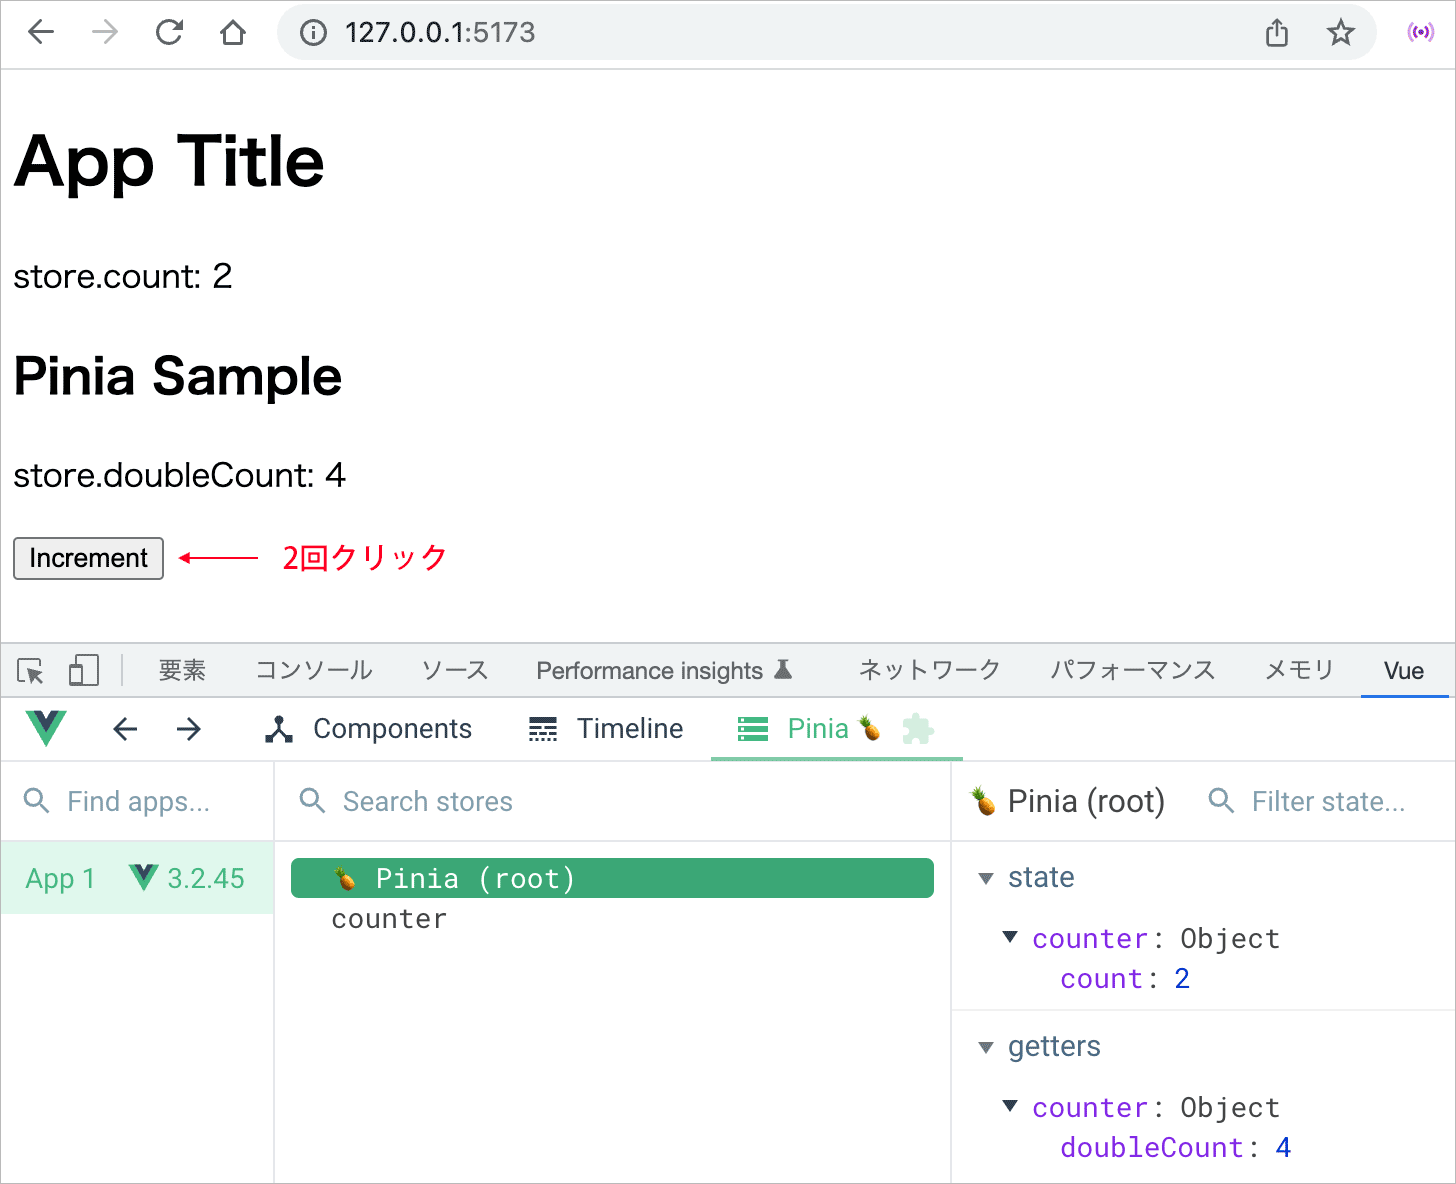
このコンポーネントでは、算出プロパティ(getters)の値 doubleCount とメソッド(actions)の increment にアクセスしています。
<script setup>
import { useCounterStore } from '@/stores/counter'
//インポートした関数を呼び出してストアをインスタンス化して変数に代入
const store = useCounterStore()
</script>

<template>
  <h2>Pinia Sample</h2>
  <p>store.doubleCount: {{ store.doubleCount }}</p>
  <div>
    <button @click="store.increment">Increment</button>
  </div>
</template>
<script>
import { useCounterStore } from '@/stores/counter'

export default {
  setup() {
    //インポートした関数を呼び出してストアをインスタンス化して変数に代入
    const store = useCounterStore()
    return {
      store,
    }
  }
}
</script>

<template>
  <h2>Pinia Sample</h2>
  <p>store.doubleCount: {{ store.doubleCount }}</p>
  <div>
    <button @click="store.increment">Increment</button>
  </div>
</template>
App.vue では、作成したコンポーネント PiniaSample をインポートして template に追加します。
<script setup>
import { useCounterStore } from '@/stores/counter'
// 作成したコンポーネントをインポート
import PiniaSample from '@/components/PiniaSample.vue'
const store = useCounterStore()
</script>

<template>
  <h1>App Title</h1>
  <p>store.count: {{ store.count }}</p>
  <PiniaSample /><!-- 追加したコンポーネント -->
</template>
<script>
import { useCounterStore } from '@/stores/counter'
// 作成したコンポーネントをインポート
import PiniaSample from '@/components/PiniaSample.vue'

export default {
  setup() {
    const store = useCounterStore()
    return {
      store,
    }
  },
  components: {
    PiniaSample
  }
}
</script>

<template>
  <h1>App Title</h1>
  <p>store.count: {{ store.count }}</p>
  <PiniaSample /><!-- 追加したコンポーネント -->
</template>
ブラウザで確認し、例えば、ボタンを2回クリックすると以下のように表示されます。
state に複数のデータを設定
state には複数のデータを必要なだけ設定することができます。
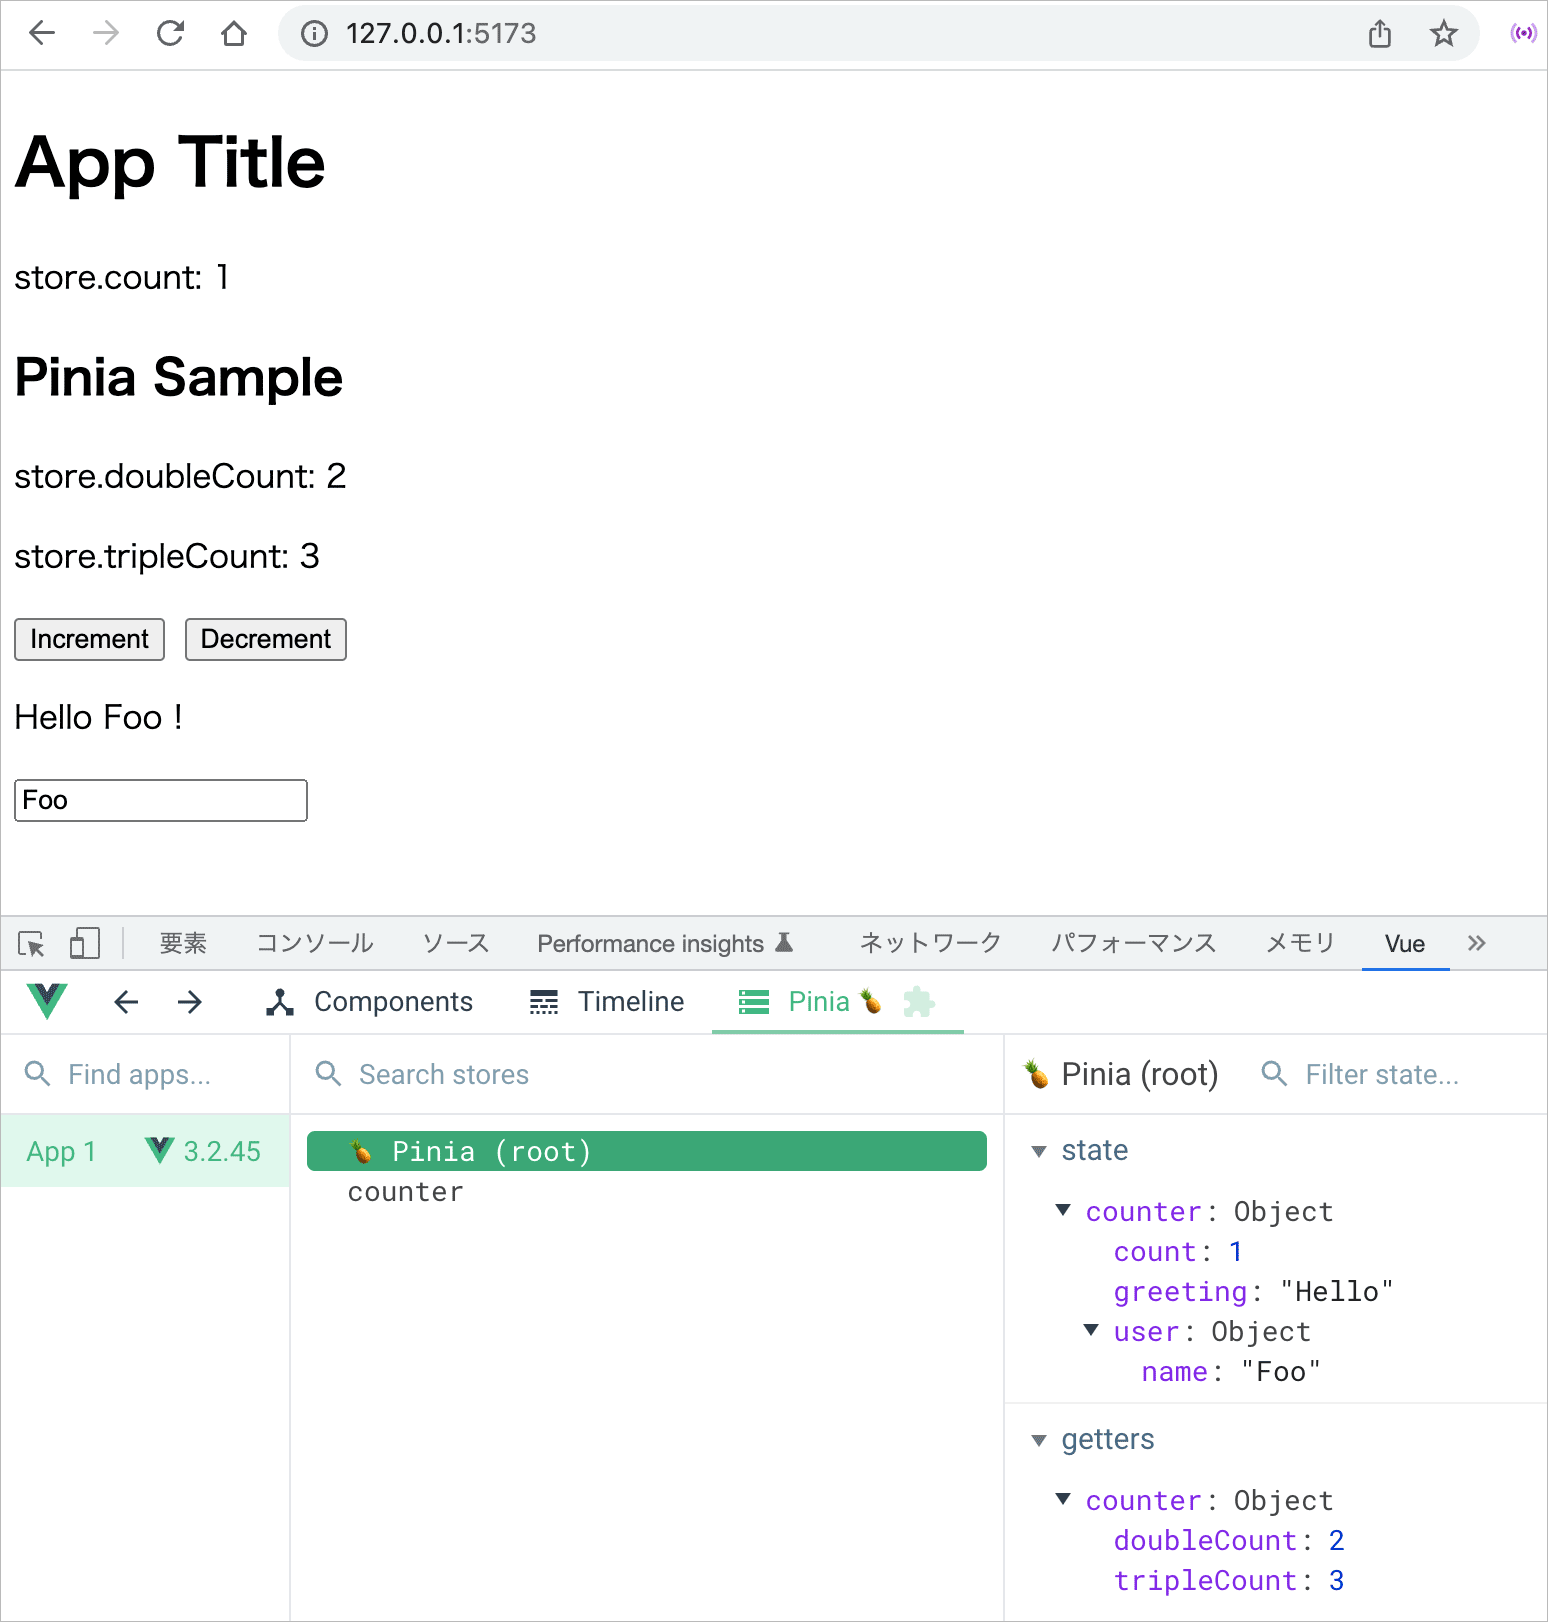
以下はストア counter.js の state にデータを追加した Option Stores の例です。
import { defineStore } from 'pinia'

export const useCounterStore = defineStore('counter', {

state: () => ({
  count: 0,
  //以下のデータを追加
  greeting: 'Hello',
  user: {
    name: 'Foo',
  },
}),

getters: {
  doubleCount: (state) => state.count * 2,
  //以下の算出プロパティを追加
  tripleCount: (state) => state.count * 3,
},

actions: {
  increment() {
    this.count++
  },
  //以下の関数を追加
  decrement() {
    this.count--
  },
},
})
以下は上記を Setup Stores で書き換えた例です。
import { ref, computed } from 'vue'
import { defineStore } from 'pinia'

export const useCounterStore = defineStore('counter', () => {
  const count = ref(0)
  // ref() を使ってリアクティブに
  const greeting = ref('Hello')
  // ref() を使ってリアクティブに
  const user = ref({ name: 'Foo' })
  const doubleCount = computed(() => count.value * 2)
  const tripleCount = computed(() => count.value * 3)
  function increment() {
    count.value++
  }
  function decrement() {
    count.value--
  }

  return { count, greeting, user, doubleCount, tripleCount, increment, decrement }
})
追加したデータを確認するために、PiniaSample.vue を以下のように変更します。
Pinia では双方向バインディングを実施する場合、そのまま state を v-model に渡すことができます。
<script setup>
import { useCounterStore } from '@/stores/counter'
const store = useCounterStore();
</script>

<template>
  <h2>Pinia Sample</h2>
  <p>store.doubleCount: {{ store.doubleCount }}</p>
  <p>store.tripleCount: {{ store.tripleCount }}</p>
  <div>
    <button @click="store.increment">Increment</button>
    <button @click="store.decrement">Decrement</button>
  </div>
  <p>{{ store.greeting }} {{ store.user.name }} !</p>
  <input v-model="store.user.name"/>
</template>
以下は Increment のボタンを1回クリックした状態の例です。テキストフィールドの値を変更すると user.name の値(初期値は Foo)が更新されます。
分割代入の利用
ストアはリアクティブなオブジェクトなので、分割代入したりスプレッド構文を使用するとリアクティブではなくなります(リアクティビティが失われます)。
そのため、ストアに定義したプロパティの一部を利用する際に分割代入を使う場合は注意が必要です。
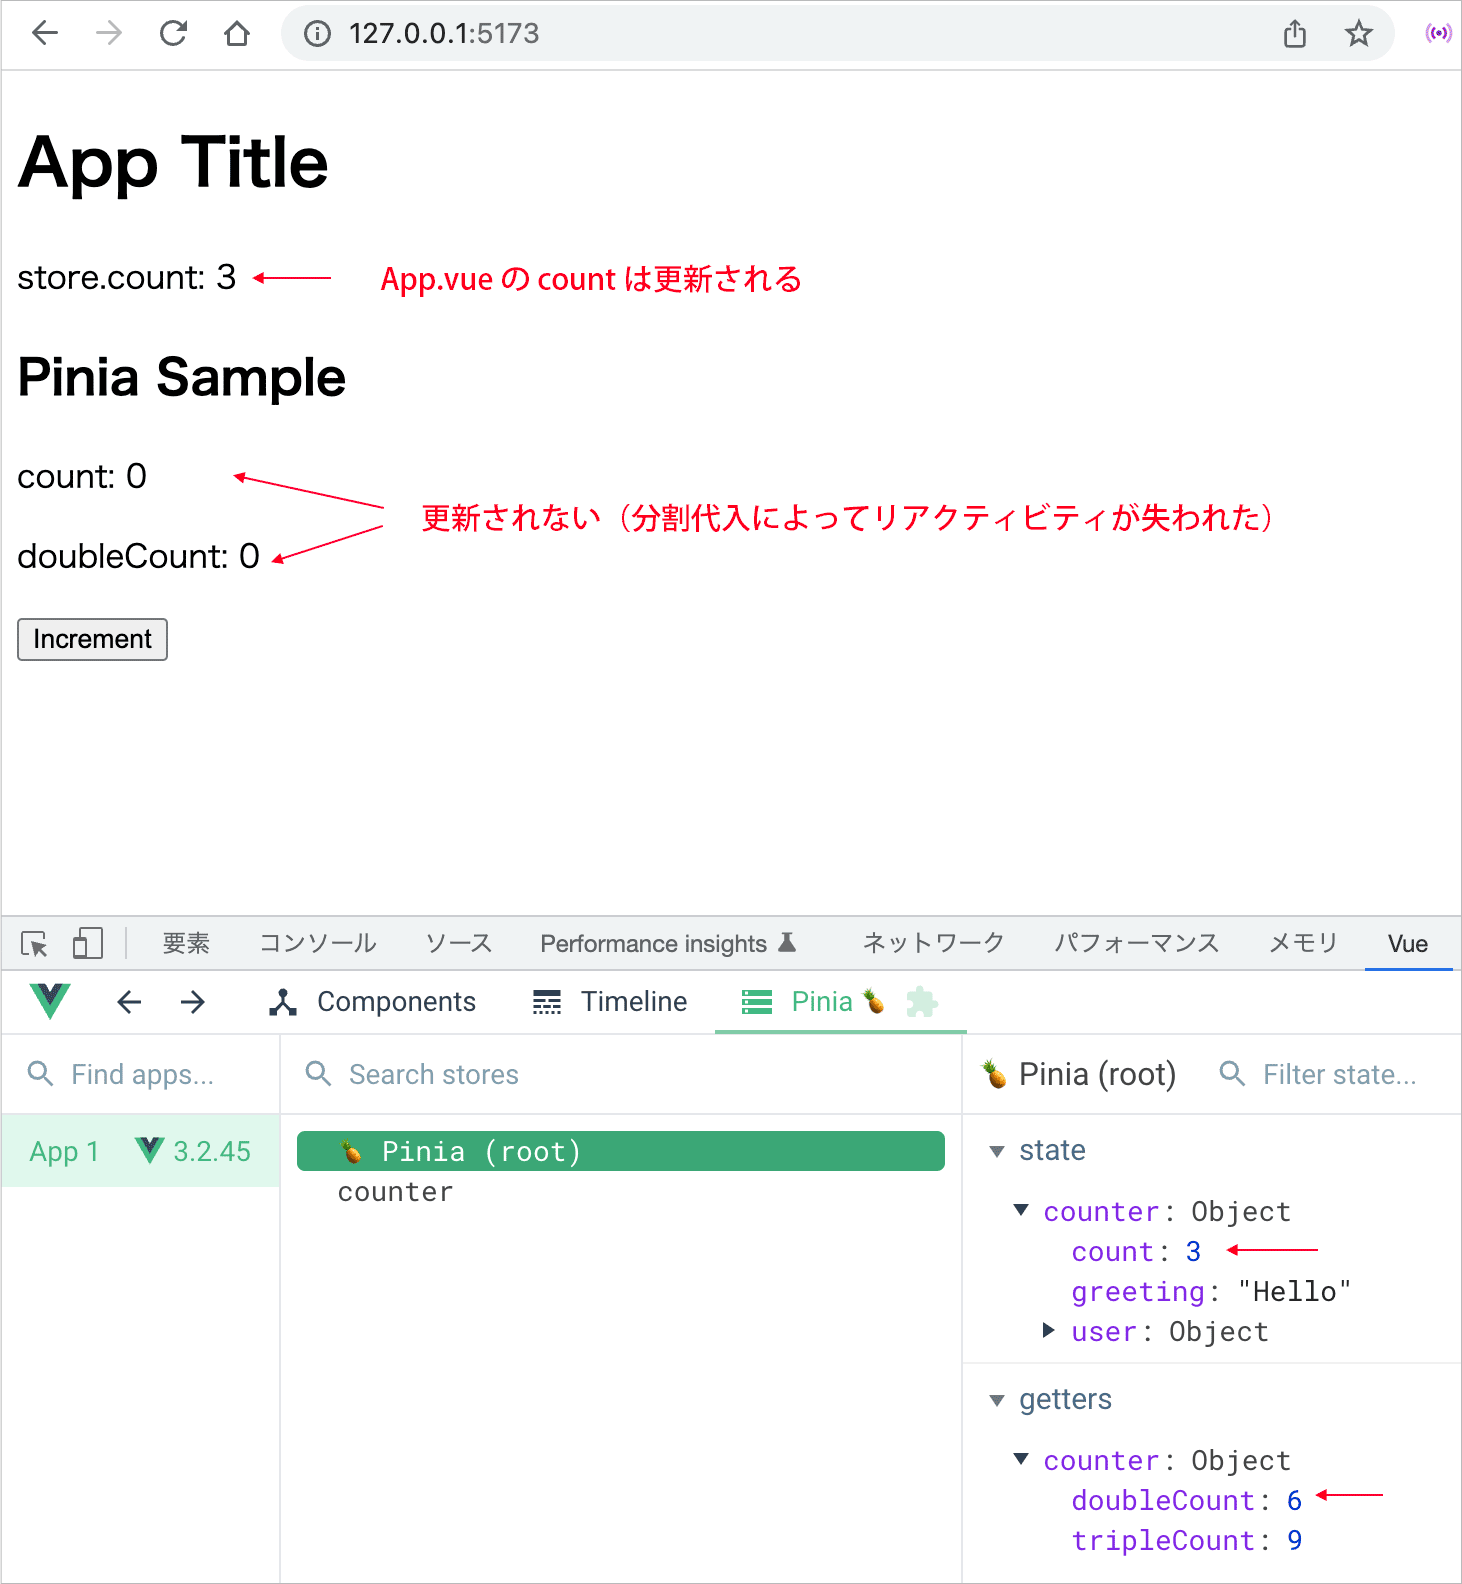
例えば、以下のように PiniaSample.vue でストアに定義したプロパティを取得する際に分割代入を使用するように書き換えて、
<script setup>
import { useCounterStore } from '@/stores/counter'
//分割代入を使ってプロパティを取得
const { count, doubleCount, increment } = useCounterStore()
</script>

<template>
  <h2>Pinia Sample</h2>
  <p>count: {{ count }}</p>
  <p>doubleCount: {{ doubleCount }}</p>
  <div>
    <button @click="increment">Increment</button>
  </div>
</template>
ブラウザで確認すると、App.vue の count は分割代入を使ってないのでボタンをクリックすると値が更新されますが、PiniaSample.vue で分割代入して取得した count と doubleCount はリアクティブでなくなってしまったため 0 のまま更新されません。
storeToRefs()
分割代入を行ってもリアクティビティを保持するには storeToRefs() を利用します。
toRefs() に似ていますが、storeToRefs() は Pinia ストア用に特別に設計されています。
※ actions(state の値を更新する関数)はストアから直接分割代入することができます。
前述の例は storeToRefs() を使って以下のように書き換える必要があります。
<script setup>
import { useCounterStore } from '@/stores/counter'
// storeToRefs をインポート
import { storeToRefs } from 'pinia'
// storeToRefs() を使って分割代入
const { count, doubleCount } = storeToRefs(useCounterStore())
// actions はそのまま分割代入できる
const { increment } = useCounterStore()
</script>

<template>
  <h2>Pinia Sample</h2>
  <p>count: {{ count }}</p>
  <p>doubleCount: {{ doubleCount }}</p>
  <div>
    <button @click="increment">Increment</button>
  </div>
</template>
script setup 構文ではなく setup() を使う場合は以下のようになります。
<script>
import { useCounterStore } from '@/stores/counter'
// storeToRefs をインポート
import { storeToRefs } from 'pinia'

export default {
  setup() {
    // storeToRefs() を使って分割代入
    const { count, doubleCount } = storeToRefs(useCounterStore());
    // actions はそのまま分割代入できる
    const { increment } = useCounterStore();
    return {
      count, doubleCount, increment
    }
  },
}
</script>
storeToRefs() を使って分割代入した場合は、リアクティビティが保持されているのが確認できます。
以降はそれぞれのオプションなどの詳細です。
State
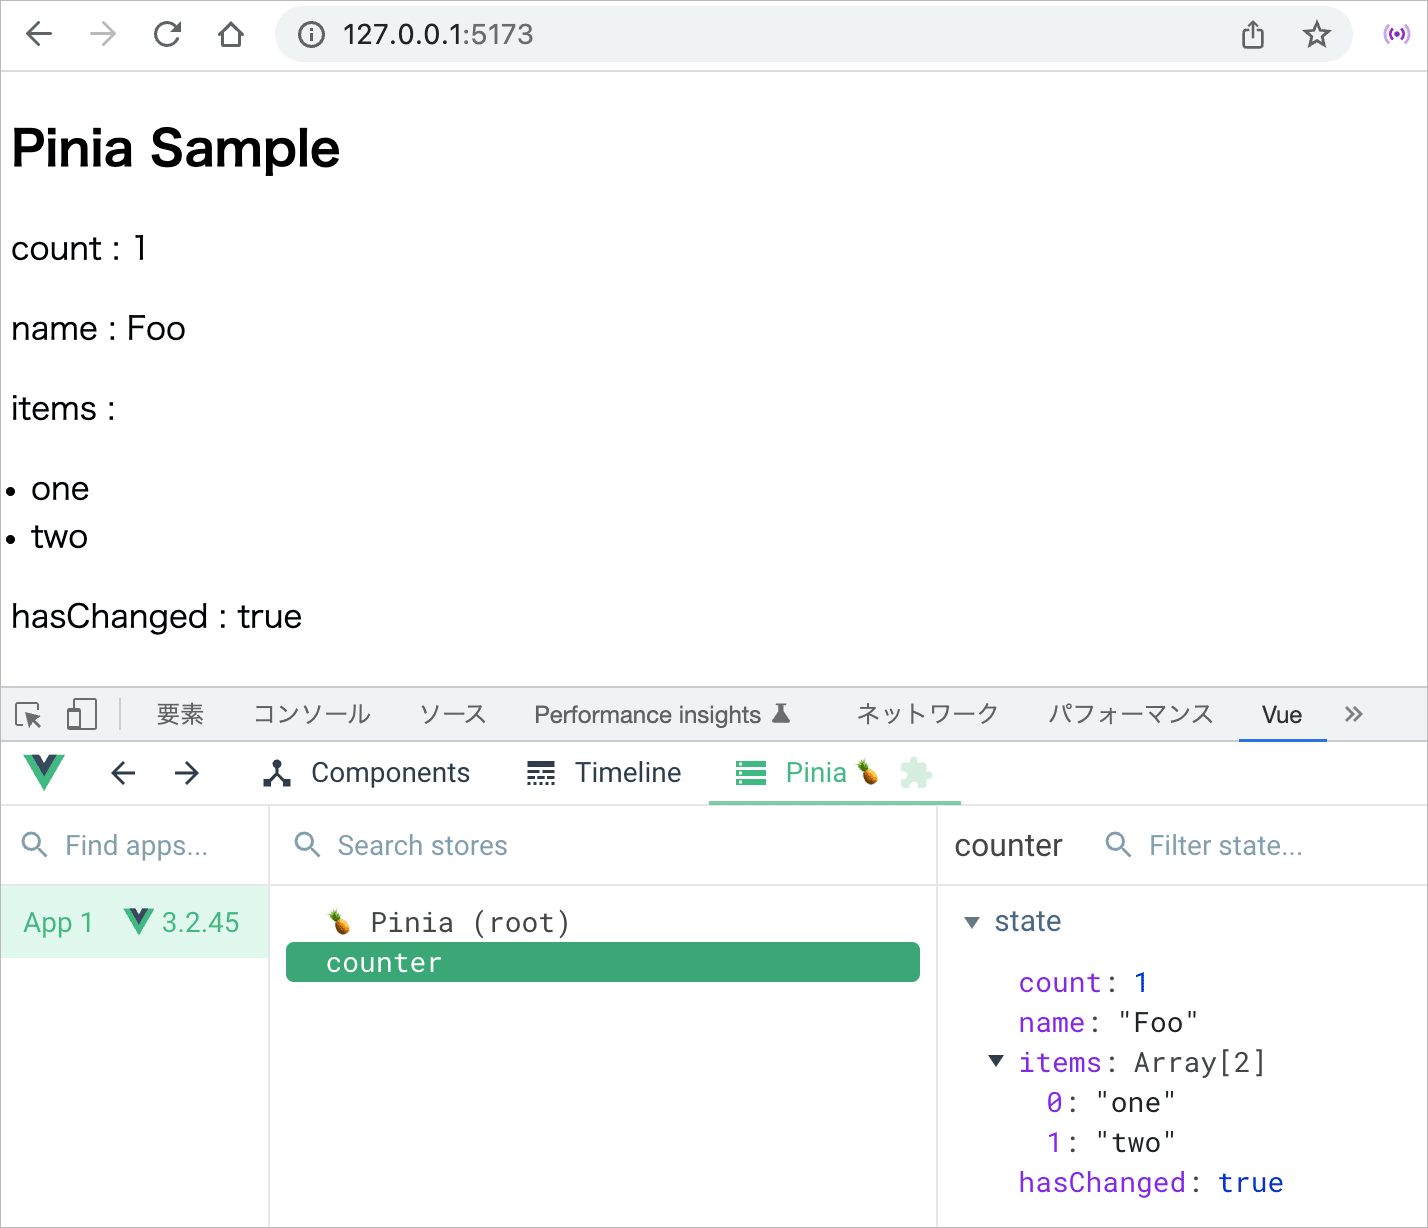
ステート(state)はストアを構成する要素の中心部分で、データ本体を表します。
Option Stores の構文では、state は初期状態(データの初期値)を返す関数として定義します。(Typescript の場合、アロー関数を使うことで自動的にプロパティの型を推測してくれます)。
import { defineStore } from 'pinia'

export const useCounterStore = defineStore('counter', {
  // 初期状態(データの初期値)を返す関数として定義(アロー関数を使用)
  state: () => {
    return {
      //「プロパティ名: 初期値」の形式で定義(Typescript の場合、自動的にプロパティの型を推測)
      count: 0,
      name: 'Eduardo',
      items: ['one', 'two', 'three'],
      hasChanged: false,
    }
  },
})
以下は上記を Setup Syntax 構文で書き換えた例です。
Setup Syntax 構文では、ref() を使ってリアクティブなプロパティ(state に相当)の初期値を定義し、公開したいプロパティを含むオブジェクトを返す関数を渡します。
import { ref } from 'vue'
import { defineStore } from 'pinia'

export const useCounterStore = defineStore('counter', () => {
  // ref() を使ってリアクティブなデータを定義(state に相当)
  const count = ref(0)
  const name = ref('Eduardo')
  const items = ref(['one', 'two', 'three'],)
  const hasChanged = ref(false)

  //公開したいプロパティとメソッドを含むオブジェクトを返す
  return { count, name, items, hasChanged}
})
state へのアクセス
コンポーネント側では、ストアをインポートして setup の中で useXxxxSotre() を実行してストアのインスタンスを生成します。
生成したストアのインスタンスを介して、state を直接読み書きすることができます。
<script>
//定義したストアをインポート
import { useCounterStore } from '@/stores/counter'

export default {
  setup() {
    //ストアのインスタンスを生成
    const store = useCounterStore()
    //ストアのインスタンスを介して state にアクセスして直接プロパティを操作可能
    store.count++
    store.name = 'Foo'
    store.items.pop()
    store.hasChanged = true

    //テンプレートで使用するストアのインスタンスを返す
    return {
      store,
    }
  },
}
</script>

<template>
  <h2>Pinia Sample</h2>
  <!-- ストアのインスタンスを介して state にアクセス -->
  <p>count : {{ store.count }}</p>
  <p>name : {{ store.name }}</p>
  <div>items :
    <ul>
      <li v-for="item in store.items">{{ item }}</li>
    </ul>
  </div>
  <p>hasChanged : {{ store.hasChanged }}</p>
</template>
<script setup>
//定義したストア(の関数)をインポート
import { useCounterStore } from '@/stores/counter'
//インポートした関数を呼び出してストアをインスタンス化(ストアを生成)して変数に代入
const store = useCounterStore()
//ストアのインスタンスを介して state にアクセスして直接プロパティを操作可能
store.count++
store.name = 'Foo'
store.items.pop()
store.hasChanged = true
</script>

<template>
  <h2>Pinia Sample</h2>
  <!-- ストアのインスタンスを介して state にアクセス -->
  <p>count : {{ store.count }}</p>
  <p>name : {{ store.name }}</p>
  <div>items :
    <ul>
      <li v-for="item in store.items">{{ item }}</li>
    </ul>
  </div>
  <p>hasChanged : {{ store.hasChanged }}</p>
</template>
<script setup>
import PiniaSample from '@/components/PiniaSample.vue'
</script>

<template>
  <PiniaSample />
</template>
コンポーネントでストアにアクセスして state を変更したので、それらの値は更新され、以下のように表示されます。
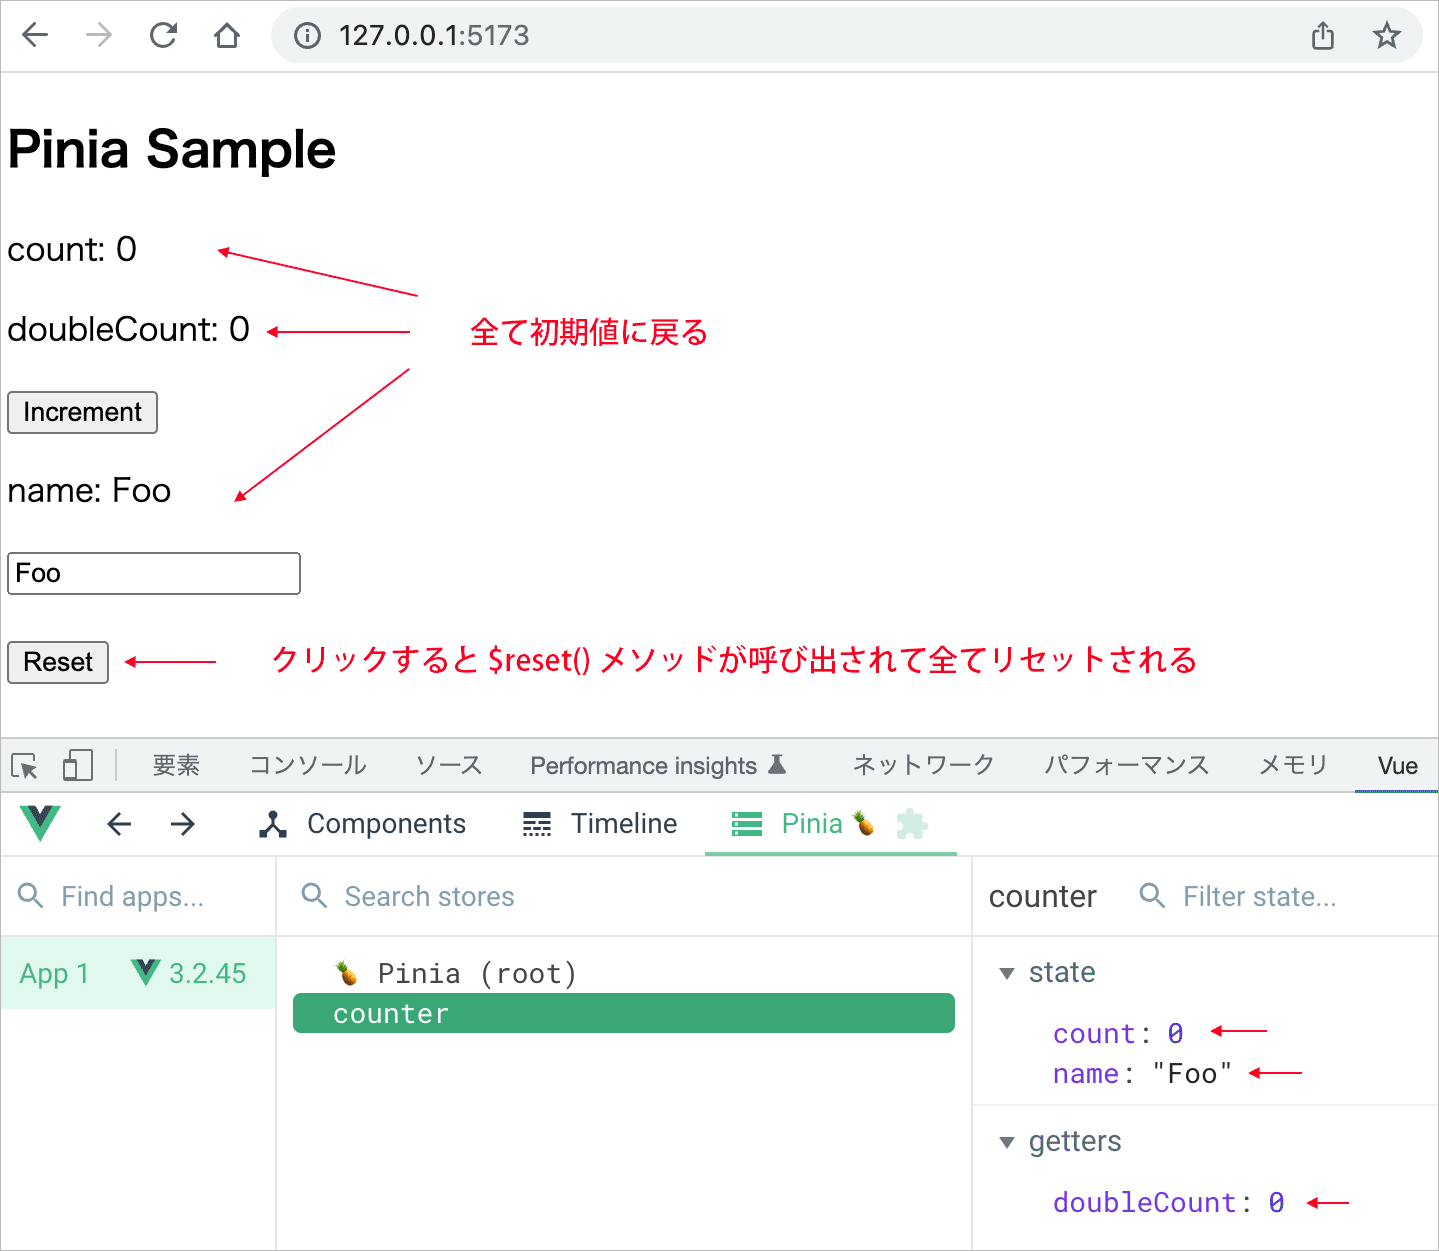
state のリセット $reset()
ストアの $reset() メソッドを使うと、そのストアの state の値を全てリセットする(初期値に戻す)ことができます。
//ストアのインスタンスを生成
const store = useStore()
//$reset() メソッドを使って state の値を全て初期値に戻す
store.$reset()
以下のように Options オブジェクトを渡してストアを定義した Option Stores の場合、
import { defineStore } from 'pinia'

export const useCounterStore = defineStore('counter', {
  state: () => ({
    count: 0,
    name: 'Foo',
  }),
  getters: {
    doubleCount: (state) => state.count * 2,
  },
  actions: {
    increment() {
      this.count++
    },
  },
})
$reset() メソッドを使って state の全ての値を初期値に戻すことができます。以下の場合 Reset ボタンをクリックすると、$reset()メソッドを呼び出します。
<script setup>
import { useCounterStore } from '@/stores/counter'
const store = useCounterStore()
</script>

<template>
  <h2>Pinia Sample</h2>
  <p>count: {{ store.count }}</p>
  <p>doubleCount: {{ store.doubleCount }}</p>
  <div>
    <button @click="store.increment">Increment</button>
  </div>
  <p>name: {{ store.name }}</p>
  <input v-model="store.name"/>
  <div>
    <button @click="store.$reset">Reset</button>
  </div>
</template>
<script setup>
import PiniaSample from '@/components/PiniaSample.vue'
</script>

<template>
  <PiniaSample />
</template>
確認するため、Increment ボタンをクリックし、テキストフィールドの値を変更すると、例えば以下のように表示されます。

その後、Reset ボタンをクリックすると $reset() メソッドにより、全ての state がリセットされ、初期状態に戻ります。
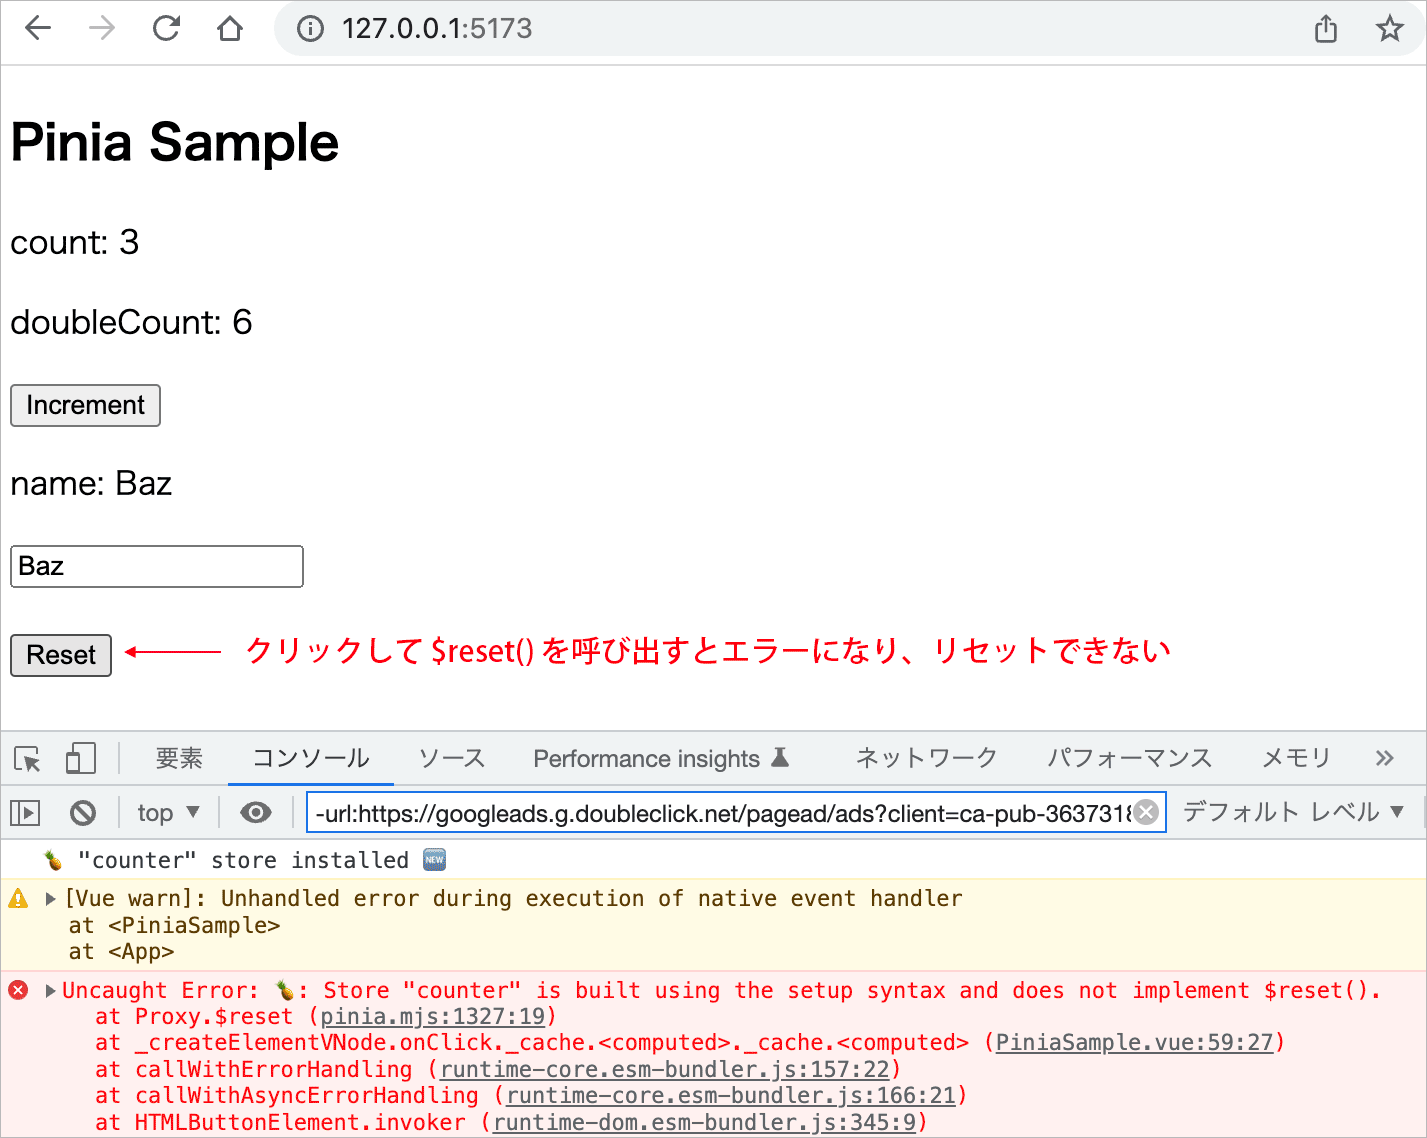
Setup 構文 では $reset() は使えない
ストアを Setup 構文(Setup Syntax)で定義している場合は $reset() は使えません。
以下は前述のストアを Setup 構文で定義したものです。
import { ref, computed } from 'vue'
import { defineStore } from 'pinia'

export const useCounterStore = defineStore('counter', () => {
  const count = ref(0)
  const name = ref('Foo')
  const doubleCount = computed(() => count.value * 2)
  function increment() {
    count.value++
  }

  return { count, name, doubleCount, increment }
})
この場合、前述のコンポーネント の Reset ボタンをクリックして $reset() を呼び出すと以下のようにエラーになります。
Uncaught Error: Store "counter" is built using the setup syntax and does not implement $reset().
この場合、例えば以下のようにストアで別途リセットする関数を用意することができます。
import { ref, computed } from 'vue'
import { defineStore } from 'pinia'

export const useCounterStore = defineStore('counter', () => {
  const count = ref(0)
  const name = ref('Foo')
  const doubleCount = computed(() => count.value * 2)
  function increment() {
    count.value++
  }
  // count をリセットする関数を定義
  function resetCount() {
    count.value = 0;
  }

  return { count, name, doubleCount, increment, resetCount }
})
以下は、ストアを利用するコンポーネントで $patch() メソッドを使って値をリセットする例です。
<script setup>
import { useCounterStore } from '@/stores/counter'
const store = useCounterStore()
// $patch を使ったメソッドを定義してテンプレートで呼び出す
const reset = () => {
  store.$patch({
    count: 0,
    name: 'Foo',
  })
};
</script>

<template>
  <h2>Pinia Sample</h2>
  <p>count: {{ store.count }}</p>
  <p>doubleCount: {{ store.doubleCount }}</p>
  <div>
    <button @click="store.increment">Increment</button>
  </div>
  <p>name: {{ store.name }}</p>
  <input v-model="store.name"/>
  <div>
    <button @click="reset">Reset</button> <!-- 定義したメソッド -->
  </div>
</template>
$patch の代わりに、$state に初期値を設定しても同様にリセットすることができます。
<script setup>
import { useCounterStore } from '@/stores/counter'
const store = useCounterStore()
// $state を使ったメソッドを定義してテンプレートで呼び出す
const reset = () => {
  store.$state = {
    count: 0,
    name: 'Foo',
  };
};
</script>
または、Pinia にプラグインを定義してリセットする方法もあるようです。以下は関連のリンクです。
state を変更 $patch()
ストアののデータ(state の各プロパティの値)は store.count++ のように直接変更することができますが、$patch メソッドを呼び出して同時に複数の変更を適用することができます(Mutating the state)。
$patch() メソッドには、オブジェクトで変更する形式と関数を使って変更する形式があります。
store.$patch({
  count: store.count + 1,
  age: 120,
  name: 'DIO',
})
store.$patch((state) => {
  state.items.push({ name: 'shoes', quantity: 1 })
  state.hasChanged = true
})
例えば、以下のようなストアが定義されている場合、
import { defineStore } from 'pinia'

export const useCounterStore = defineStore('counter', {
  state: () => ({
    count: 0,
    name: 'Foo',
    age: 33,
  }),
  getters: {
    doubleCount: (state) => state.count * 2,
  },
  actions: {
    increment() {
      this.count++
    },
  },
})
import { ref, computed } from 'vue'
import { defineStore } from 'pinia'

export const useCounterStore = defineStore('counter', () => {
  const count = ref(0)
  const name = ref('Foo')
  const age = ref(33)
  const doubleCount = computed(() => count.value * 2)
  function increment() {
    count.value++
  }

  return { count, name, age, doubleCount, increment }
})
利用するコンポーネントで、以下のように $patch() メソッドに変更後のオブジェクトを渡して、まとめて複数のデータを変更することができます。以下では全てのプロパティを変更していますが、一部のみを変更することもできます。
<script setup>
import { useCounterStore } from '@/stores/counter'
const store = useCounterStore()
//$patch() にオブジェクトを渡してまとめて複数のデータを変更
store.$patch({
  count: 100,
  name: 'Bar',
  age: 55
})
</script>

<template>
  <h2>Pinia Sample</h2>
  <p>count: {{ store.count }}</p> <!-- 100 -->
  <p>doubleCount: {{ store.doubleCount }}</p><!-- 200 -->
  <div>
    <button @click="store.increment">Increment</button>
  </div>
  <p>name: {{ store.name }}</p><!-- Bar -->
  <p>age: {{ store.age }}</p><!-- 55 -->
  <input v-model="store.name"/>
</template>
また、例えば、まとめて値を変更する関数を定義することもできます。以下の場合、Change ボタンをクリックすると、$patch() メソッドを使って値をまとめて変更します。
<script setup>
import { useCounterStore } from '@/stores/counter'
const store = useCounterStore()
//まとめて複数のデータを変更する関数
const changeState = () => {
  store.$patch({
    count: 100,
    name: 'Bar',
    age: 55
  })
}
</script>

<template>
  <h2>Pinia Sample</h2>
  <p>count: {{ store.count }}</p>
  <p>doubleCount: {{ store.doubleCount }}</p>
  <div>
    <button @click="store.increment">Increment</button>
  </div>
  <p>name: {{ store.name }}</p>
  <p>age: {{ store.age }}</p>
  <input v-model="store.name"/>
  <div>
    <button @click="changeState">Change</button><!-- 定義した関数を呼び出すボタン -->
  </div>
</template>
$patch() に関数を渡して変更
$patch() メソッドは state を引数とする関数を受け取ることもでき、その関数内でデータを変更することができます。前述の複数のデータを変更する関数は、以下のように書き換えることもできます。
const changeState = () => {
  //$patch() メソッドに state を引数とする関数を渡す
  store.$patch((state) => {
    state.count = 100
    state.name = 'Bar'
    state.age = 55
  })
}
配列への要素の追加などの場合は、こちらの方法が便利です。
例えば以下のようなオブジェクトの配列からなるデータを持つストアの場合、
import { defineStore } from 'pinia'

export const useUsersStore = defineStore('users', {
  state: () => ({
    users: [
      { name: 'foo', age: 20 },
      { name: 'bar', age: 30 },
    ],
    hasChanged: false,
  }),
})
import { ref, computed } from 'vue'
import { defineStore } from 'pinia'

export const useUsersStore = defineStore('users', () => {
  const users = ref([
    { name: 'Foo', age: 20 },
    { name: 'Bar', age: 30 },
  ])
  const hasChanged = ref(false)

  return { users, hasChanged }
})
以下のように配列に要素を追加することができます。$patch() メソッドに渡す関数では state を引数に受け取るので、それぞれのプロパティを操作することができます。
<script setup>
import { useUsersStore } from '@/stores/users'
const store = useUsersStore()

//state を引数に受け取る関数を渡す
store.$patch((state) => {
  //state の users の配列にオブジェクトを追加
  state.users.push({ name: 'Baz', age: 40 })
  //state の hasChanged の値を変更
  state.hasChanged = true
})
</script>

<template>
  <h2>Pinia Sample</h2>
  <ul>
    <li v-for="user in store.users">
      name : {{ user.name }} / age : {{ user.age}}
    </li>
  </ul>
  <p> hasChanged : {{ store.hasChanged }}</p>
</template>
<script setup>
import PiniaSample from '@/components/PiniaSample.vue'
</script>

<template>
  <PiniaSample />
</template>
上記の例の場合、users の配列にオブジェクトが追加され、hasChanged の値が変更されたので以下のように表示されます。

state の置き換え $state
ストアの $state プロパティを使って state を置き換えることができます。
//$state にオブジェクトを代入してまとめて複数のデータを変更
store.$state = {
  count: 7,
  name: 'Qux',
  age: 3
}
「置き換える」といっても、本当に置き換えてしまうわけではなく、内部的には $patch() が呼ばれています(Replacing the state)。上記は以下と同じことです。
store.$patch({
  count: 7,
  name: 'Qux',
  age: 3
})
内部的には $patch() が呼ばれているので、 $state に一部のプロパティのみを指定してそれらの値を更新することもできます。その場合、他のプロパティに影響を与えません。
$state プロパティ
コンポーネントでストアを利用する際にストアのインスタンスをコンソールに出力して、$state プロパティを確認する例です。
以下のようなストアが定義されている場合、
import { defineStore } from 'pinia'

export const useCounterStore = defineStore('counter', {
  state: () => {
    return {
      count: 0,
      name: 'Eduardo',
      items: ['one', 'two', 'three'],
      hasChanged: false,
    }
  },
})
import { ref } from 'vue'
import { defineStore } from 'pinia'

export const useCounterStore = defineStore('counter', () => {
  const count = ref(0)
  const name = ref('Eduardo')
  const items = ref(['one', 'two', 'three'],)
  const hasChanged = ref(false)

  return { count, name, items, hasChanged}
})
以下のコンポーネントで上記のストアのインスタンスをコンソールに出力します。
<script setup>
import { useCounterStore } from '@/stores/counter'
const store = useCounterStore()
//ストアのインスタンスを出力
console.log(store)
</script>

<template>
  <h2>Pinia Sample</h2>
  <p>count : {{ store.count }}</p>
  <p>name : {{ store.name }}</p>
  <div>items :
    <ul>
      <li v-for="item in store.items">{{ item }}</li>
    </ul>
  </div>
  <p>hasChanged : {{ store.hasChanged }}</p>
</template>
<script setup>
import PiniaSample from '@/components/PiniaSample.vue'
</script>

<template>
  <PiniaSample />
</template>
コンソールタブを開くとストアのインスタンスを確認できます。
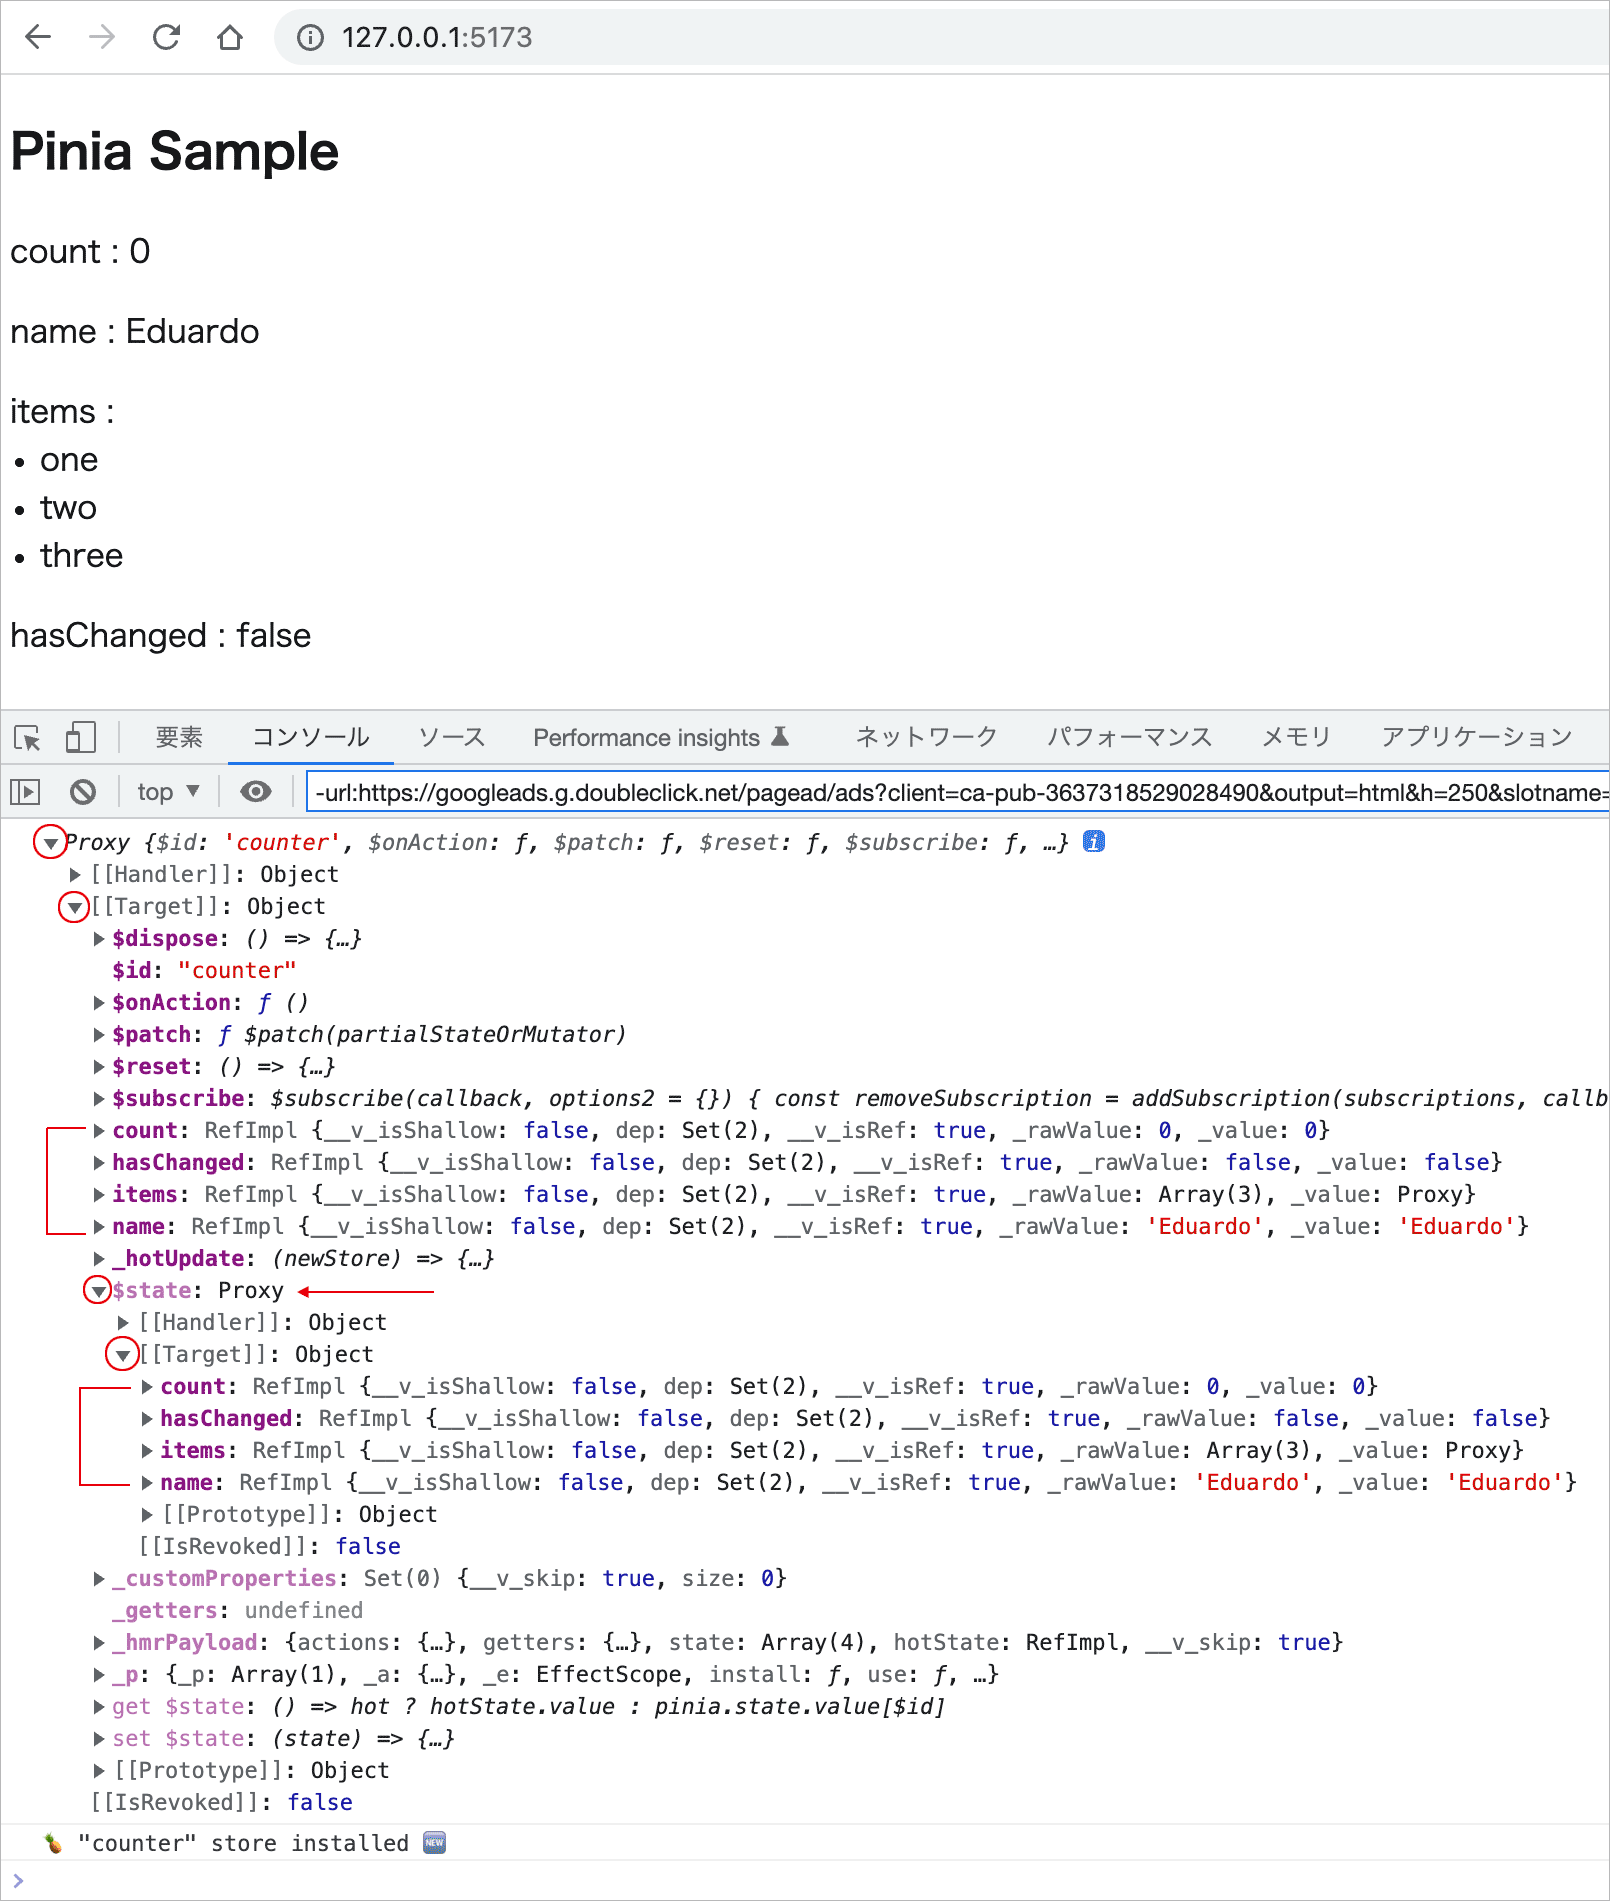
出力されたストアのインスタンスの Proxy オブジェクトを展開すると、$ から始まるストアの組み込みのプロパティやメソッドと共にストアで定義した state のプロパティがルートレベルに確認できます。
また、実際の state のプロパティが保存されている $state もルートレベルにあり、展開するとストアで定義した state のプロパティが確認できます。
すべての state プロパティは $state に保存されます。また、state プロパティにアクセスするのに $state を経由する必要がないように、すべての state プロパティには、ストアインスタンスのルートレベルでエイリアスがあります。
state プロパティとそのエイリアスはどちらもリアクティブで常に同期しています。 そのため、通常はエイリアスを直接操作します(store.$state.count ではなく、store.count を操作)。
$state を使った変更
通常は state プロパティ(エイリアス)を操作して値を変更しますが、state の置き換えのように $state のプロパティにオブジェクトを指定して変更することもできます。
<script setup>
import { useCounterStore } from '@/stores/counter'
const store = useCounterStore()
// name を変更
store.$state = { name: 'Foo' }
</script>
上記は store.name = 'Foo' での変更と同じ結果になりますが、内部的には少し異なっています。
以下は $subscribe を使って state の変更を検知したら、変更操作に関する情報のオブジェクトをコンソールに出力します。
<script setup>
import { useCounterStore } from '@/stores/counter'
const store = useCounterStore()

//state の変更を監視
store.$subscribe((mutation) => {
  //変更操作に関する情報をコンソールに出力
  console.log(mutation)
})

// $state を使った変更
store.$state = { name: 'Foo' }
</script>
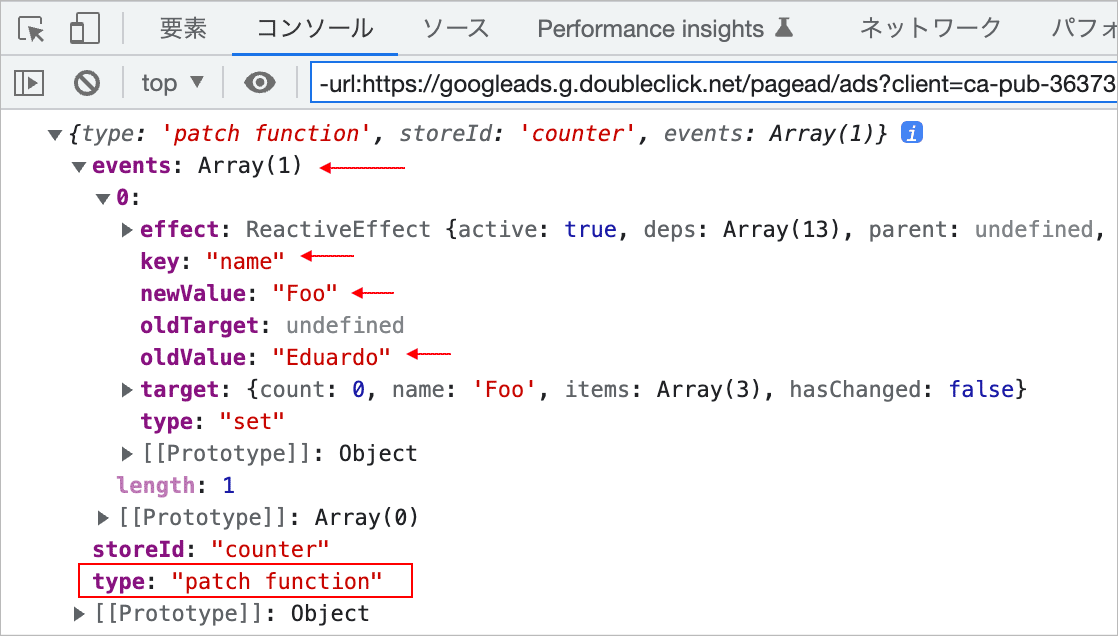
$state を使った変更の場合、変更操作の詳細情報を表すオブジェクトの events は配列で、変更操作の種類を表す type は patch function になっています。
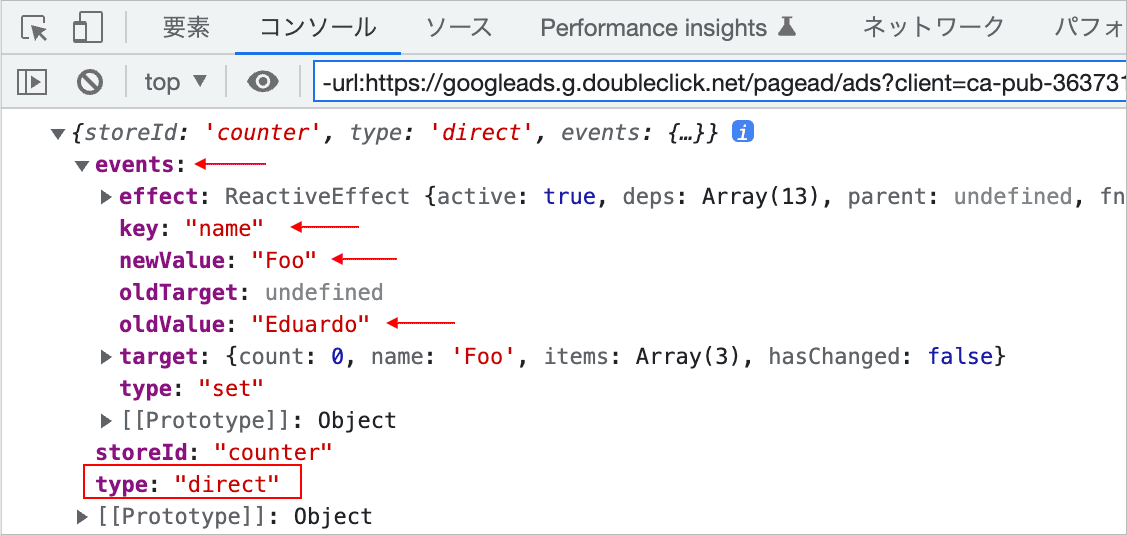
state プロパティ(エイリアス)を使った変更の場合は、
<script setup>
import { useCounterStore } from '@/stores/counter'
const store = useCounterStore()

store.$subscribe((mutation) => {
  console.log(mutation)
})

//エイリアスを使った変更
store.name = 'Foo'
</script>
events は配列ではなく1つのオブジェクトで、type は direct になっています(その他は同じ)。
state プロパティの列挙
以下は、$state のプロパティに対して v-for を使って反復処理して、すべての state プロパティの名前と値を出力する例です。
<script setup>
import { useCounterStore } from '@/stores/counter'
const store = useCounterStore()
</script>

<template>
  <h2>Pinia Sample</h2>
  <div>
    <ul>
      <li v-for="(value, prop) in store.$state" :key="prop">
        {{ prop }} : {{ value }}
      </li>
    </ul>
  </div>
</template>
state を監視 $subscribe()
ストアの $subscribe() メソッドは、state の変化を監視して何らかの処理を行うために使用できます。
アクションとその結果を監視して処理を実行するにはストアのメソッド $onAction を使用します。
// state の変化を監視
store.$subscribe((mutation, state) => {
  // state の変化を検知したときに実行する処理(コールバック)
})
$subscribe() メソッドは mutation と state の2つの引数を受け取ります。
- mutation : 変更操作に関する情報を含むオブジェクト
- state : 変更後の state オブジェクト
mutation は以下のようなプロパティを持つオブジェクトです。
| プロパティ | 説明 |
|---|---|
| storeId | ストアを定義(作成)した際に設定した ID |
| type | 変更操作の種類。以下のいずれか
|
| events | 変更操作の詳細に関する情報のオブジェクト(type が patch object または patch function の場合は、その配列)。以下のプロパティを持ちます。
|
| payload | $patch メソッドで state を変更するオブジェクト(type が patch object の場合) |
以下は変更操作の際に第2引数の mutation オブジェクトをコンソールに出力した例です。

戻り値
現在の $subscribe による監視をキャンセルするための関数。以下では戻り値の変数名を unsubscribe としていますが、関数の名前は任意の名前を指定できます。
$subscribe による監視は複数設定することができ、それぞれの監視を戻り値のキャンセル用の関数で個別にキャンセルすることができます。
const unsubscribe = store.$subscribe((mutation, state) => {
  //...
})

//関数を実行して監視をキャンセル(停止)
unsubscribe()
$subscribe の引数の確認
以下のようなストアが定義されている場合、
import { defineStore } from 'pinia'

export const useCounterStore = defineStore('counter', {
  state: () => ({
    count: 0,
    name: 'Foo',
    age: 33,
  }),
  getters: {
    doubleCount: (state) => state.count * 2,
  },
  actions: {
    increment() {
      this.count++
    },
  },
})
以下のコンポーネントで、state に変更があった際に $subscribe メソッドを使って渡される引数の内容を確認すると、
<script setup>
import { useCounterStore } from '@/stores/counter'
const store = useCounterStore()

//$subscribe メソッドを使って、state の変化を監視
store.$subscribe((mutation, state) => {
  //$subscribe が呼び出されたら、引数の内容を出力
  console.log(mutation)
  console.log(state)
})

// state を $patch() で変更する関数
const changeStateFunction = () => {
  // $patch() に関数を渡して変更
  store.$patch((state) => {
    state.count = 100
    state.name = 'Bar'
    state.age = 55
  })
}
// state を $patch() で変更する関数
const changeStateObject = () => {
  // $patch() にオブジェクトを渡して変更
  store.$patch({
    name: 'Baz',
    age: 7
  })
}
</script>

<template>
  <h2>Pinia Sample</h2>
  <p>count: {{ store.count }}</p>
  <p>doubleCount: {{ store.doubleCount }}</p>
  <div>
    <button @click="store.increment">Increment</button>
  </div>
  <p>name: {{ store.name }}</p>
  <p>age: {{ store.age }}</p>
  <input v-model.lazy="store.name"/>
  <div>
    <button @click="changeStateFunction">Patch (Function)</button>
    <button @click="changeStateObject">Patch (Object)</button>
  </div>
</template>
<script setup>
import PiniaSample from '@/components/PiniaSample.vue'
</script>

<template>
  <PiniaSample />
</template>
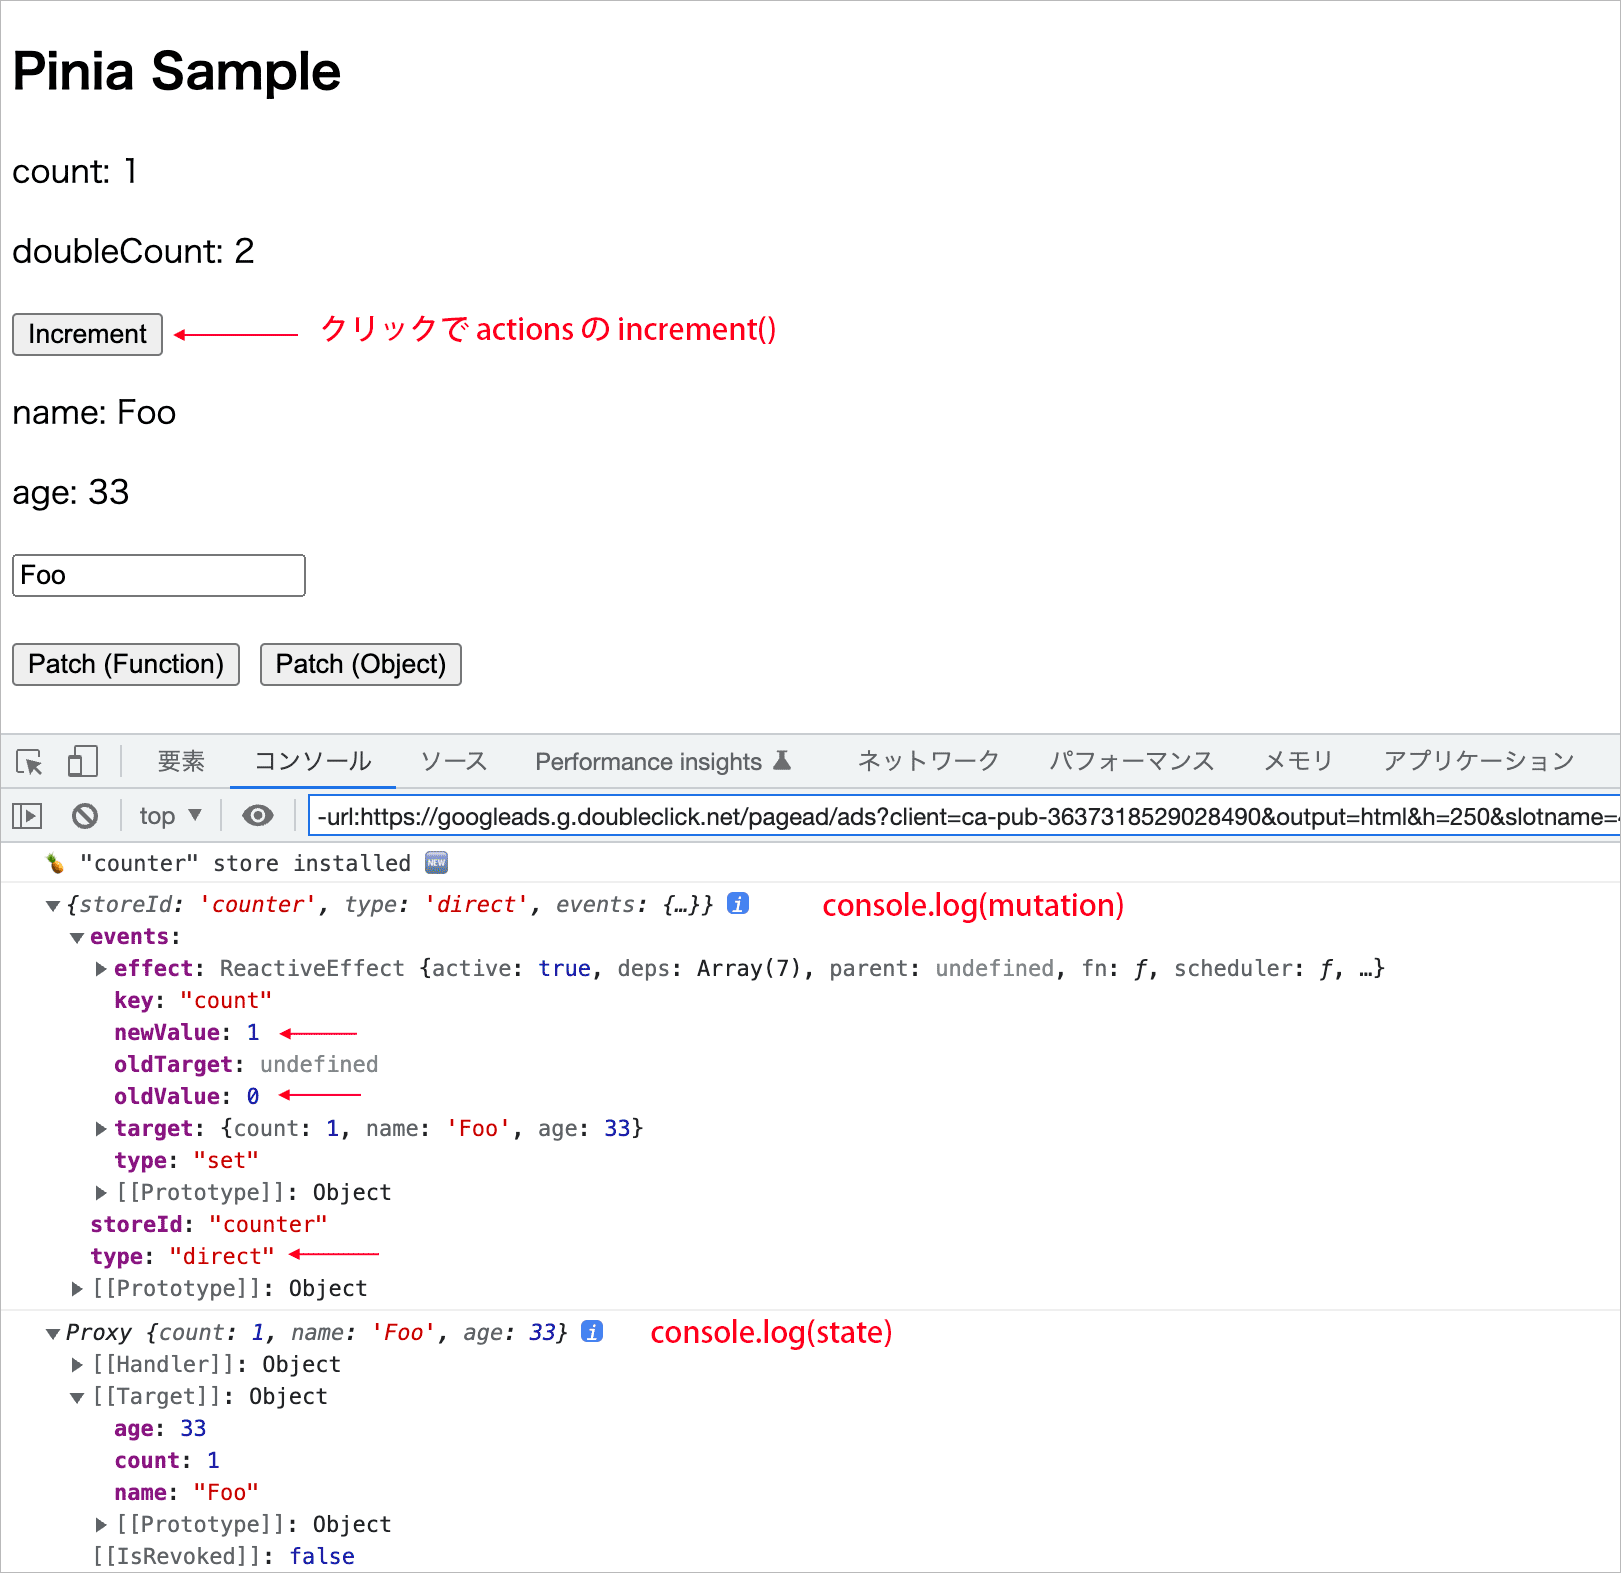
Increment ボタンをクリックすると、ストアの actions に定義した increment() が呼び出されて count の値が増加する(state が変化する)ので、$subscribe() に指定した処理が実行され、コンソールに引数(mutation と state)の値が出力されます。
この場合、引数 mutation の storeID は counter、 type は direct、events はオブジェクトで、そのプロパティには newValue や oldValue の値が確認できます。
変更後の値には mutation.events.newValue でアクセスできますが、events プロパティは開発モードでのみ利用可能です。
引数 state は、変更後の state のオブジェクトになっています。
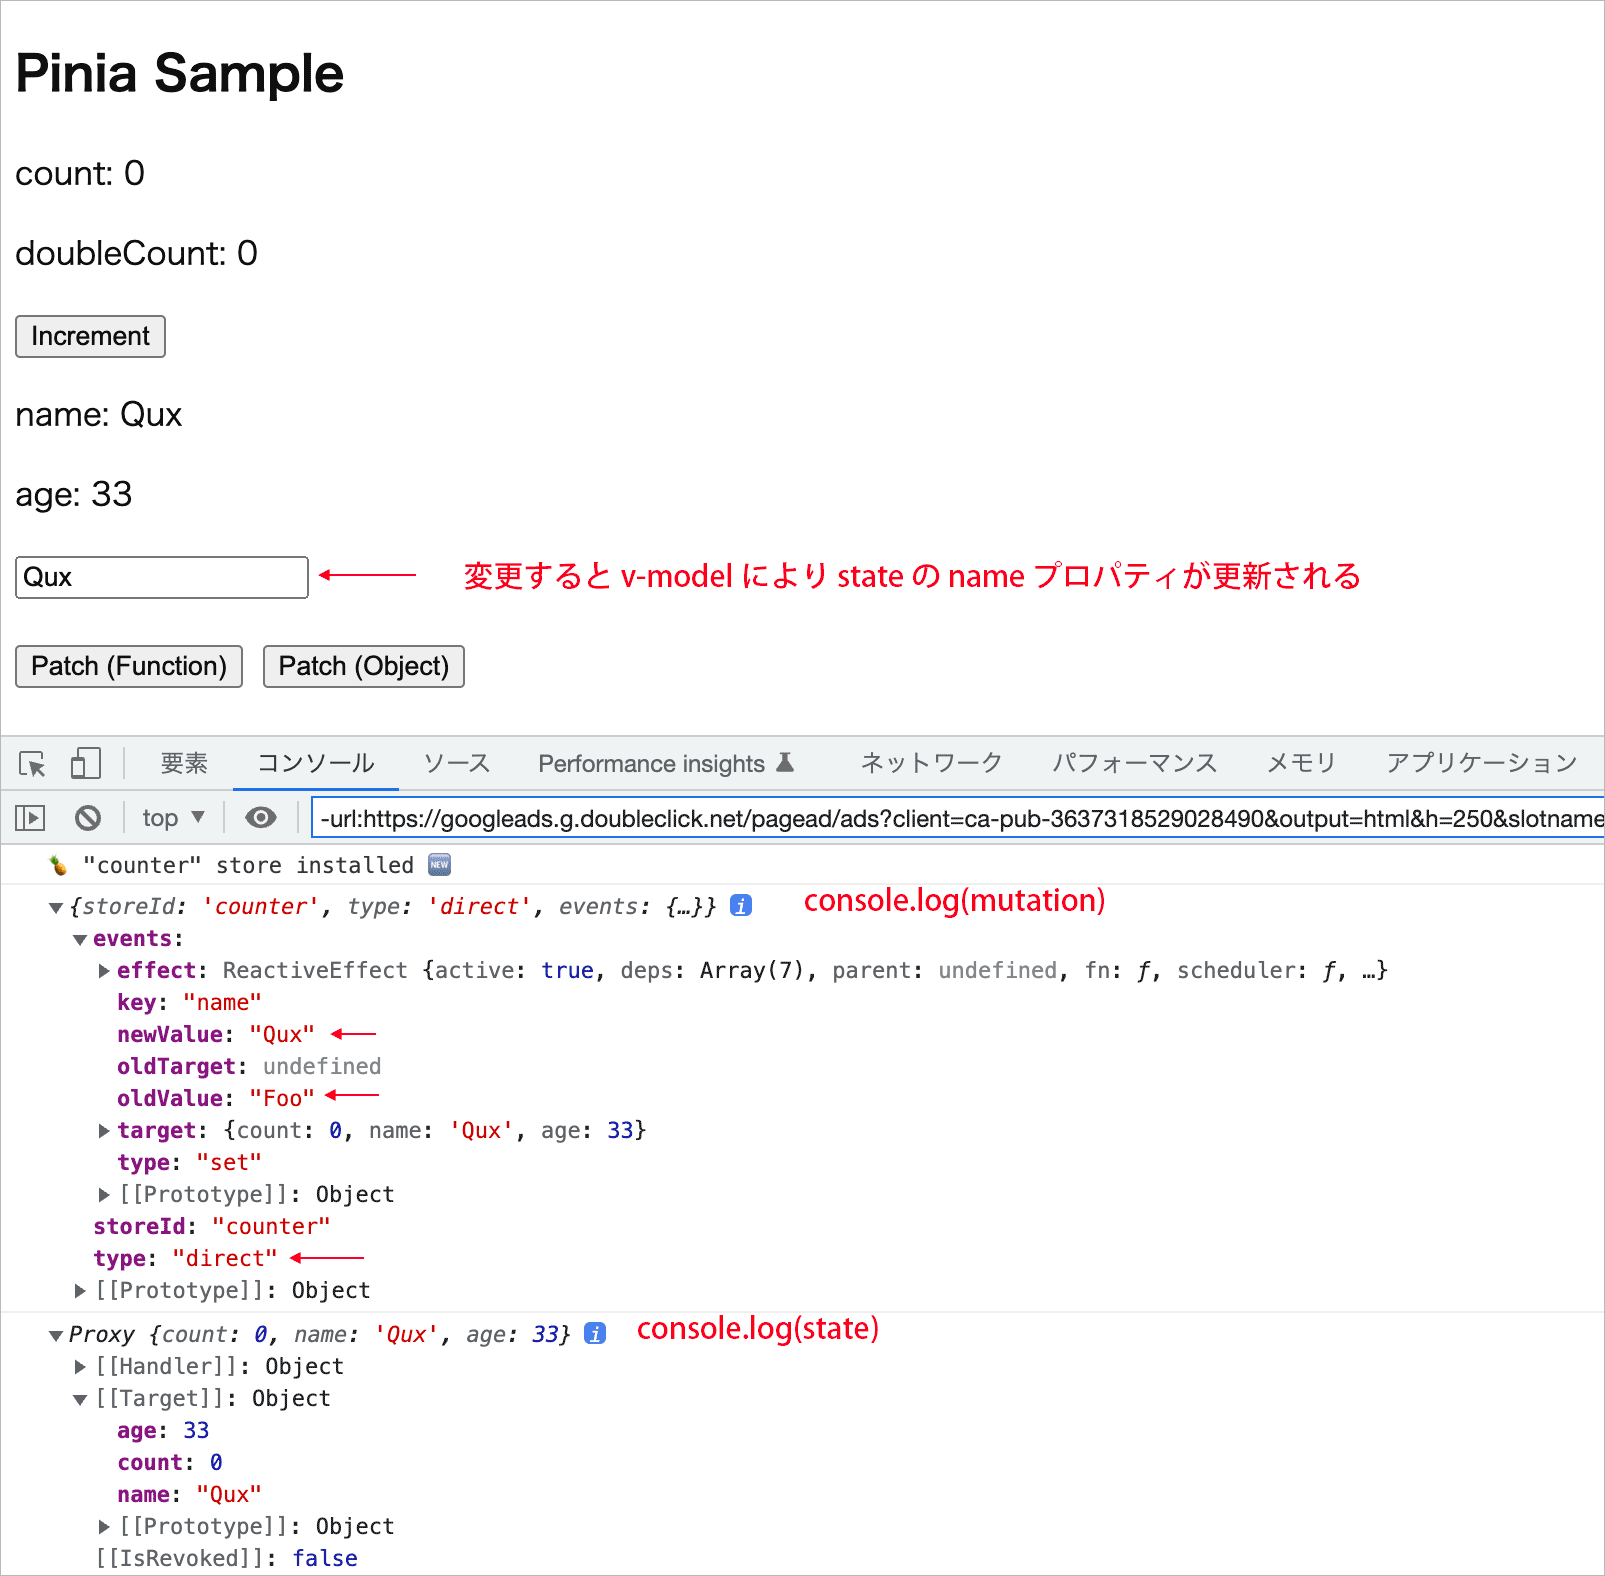
テキストフィールドの値を変更すると、v-model により state の namae プロパティが変更されるので $subscribe() によりコンソールに出力されます(v-model には動作オプション .lazy を指定)。
この場合も、mutation の type は direct となっています。
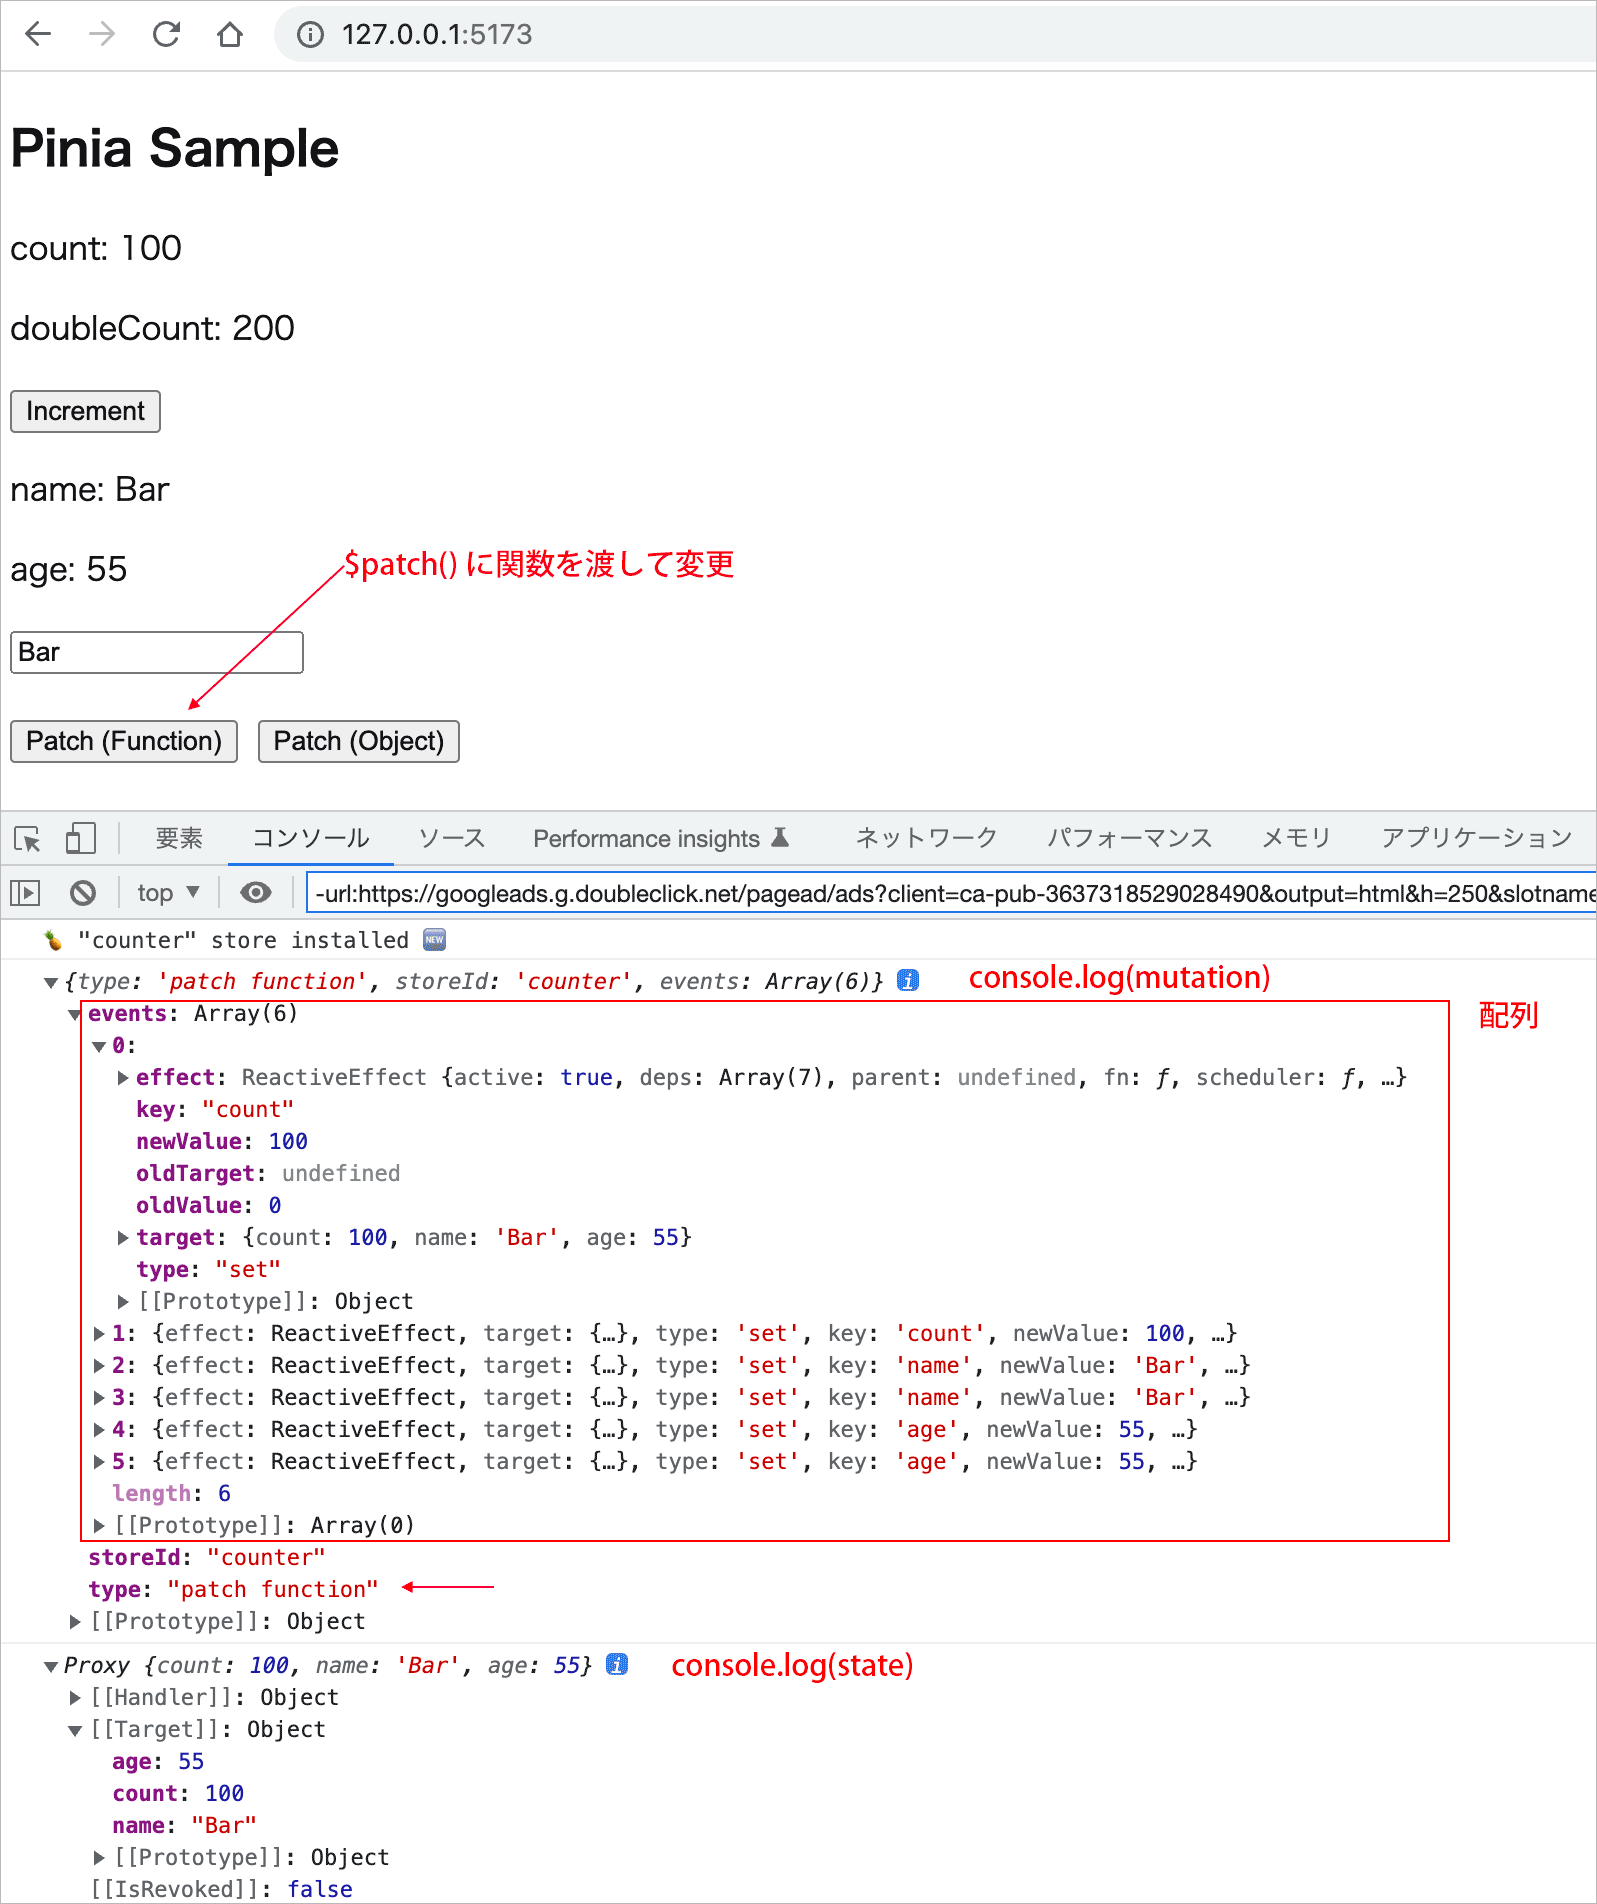
Patch (Function) ボタンをクリックすると、コンポーネントに定義した changeStateFunction という関数が呼び出され、$patch() に関数を渡して複数の state を変更します。
この場合、mutation の type は patch function になっています。
また、events は配列で、変更された state のプロパティごとのオブジェクトが確認できます。
events が配列なので、例えば、変更後の値には mutation.events[0].newValue のように配列のインデックスを指定する必要があります(※ events プロパティは開発モードでのみ利用可能)。
Patch (Object) ボタンをクリックすると、コンポーネントに定義した changeStateObject という関数が呼び出され、$patch() にオブジェクトを渡して複数の state を変更します。
この場合、mutation の type は patch object になっていて、payload プロパティも確認できます(その値は $patch() に渡したオブジェクト)。
また、events も前述の例同様、配列で、変更された state のプロパティごとのオブジェクト(同じ内容のペア)の配列が確認できます。

公式ドキュメントのサンプル
ドキュメントの Subscribing to the state には、以下のようなサンプルのコードが掲載されています。
state が変化するたびに、Storage の setItem メソッドで state 全体をブラウザのローカルストレージに保存しています(Web Storage API )。
store.$subscribe((mutation, state) => {
  // state が変化するたびに、state 全体をローカルストレージに保存して持続化
  localStorage.setItem(mutation.storeId , JSON.stringify(state))
  // 保存した内容をコンソールに出力(こちらで追加した部分)
  console.log('Local Storage: ' + localStorage.getItem(mutation.storeId))
})
detached: true
ストアがコンポーネントの setup() 内にある場合、デフォルトでは、state の監視(サブスクリプション)は追加されたコンポーネントにバインドされているので、コンポーネントがアンマウントされると自動的に削除されます。
コンポーネントがアンマウントされた後も保持したい場合は、$subscribe() の2番目の引数として { detached: true } を渡して、現在のコンポーネントから state のサブスクリプションを切り離します。
import { useSomeStore } from '@/stores/counter'

export default {
  setup() {
    const store = useCounterStore()

    // このサブスクリプションは、コンポーネントがアンマウントされた後も保持されます
    store.$subscribe(callback, { detached: true }) //callback は別途定義する場合

    // ...
  },
}
<script setup>
import { useCounterStore } from '@/stores/counter'
const store = useCounterStore()

store.$subscribe((mutation, state) => {
  // callback の処理
  },
  { detached: true }
)
// ...
</script>
watch で全ての state を監視
watch を使って、 pinia インスタンスの state 全体を監視することもできます。
<script setup>
import { useCounterStore } from '@/stores/counter'
import { pinia } from '@/main.js'  //main.js で pinia をエクスポート
import { watch } from 'vue'
const store = useCounterStore()

watch(
  // pinia インスタンスの state
  pinia.state,
  (state) => {
    // state が変化するたびに、state 全体をローカルストレージに保存
    localStorage.setItem('piniaState', JSON.stringify(state))
    //console.log('Local Storage: ' + localStorage.getItem('piniaState'))
  },
  { deep: true }
)
// ・・・
</script>
Getters
Getters はストアの state の値をもとに算出した結果を取得するゲッター(算出プロパティ)で、defineStore() の getters プロパティで定義し、ゲッターの定義では第1引数に state を受け取ります。
言い換えると、getters の個々のプロパティは、第1引数に state を受け取り、値を返す関数(ゲッター)として定義します。
import { defineStore } from 'pinia'

export const useCounterStore = defineStore('counter', {
  state: () => ({
    count: 1,
  }),
  getters: {
    // state の count を2倍した値を取得(第1引数に state を受け取る)
    doubleCount: (state) => state.count * 2,
  },
})
Setup Syntax の場合は、computed メソッドを使用してゲッター(算出プロパティ)を定義し、最後に他のプロパティとともに return します。
ref() で定義したリアクティブなデータ(state のプロパティ)の値には .value でアクセスします。
import { ref, computed } from 'vue'
import { defineStore } from 'pinia'

export const useCounterStore = defineStore('counter', () => {
  const count = ref(1)
  // computed メソッドを使用してゲッター(算出プロパティ)を定義
  const doubleCount = computed(() => count.value * 2)

  return { count, doubleCount }
})
コンポーネントでは、生成したストアのインスタンス(を格納した変数)を介してゲッターに直接アクセスできます。
<script>
import { useCounterStore } from '@/stores/counter'

export default {
  setup() {
    //ストアのインスタンスを生成して変数に格納
    const store = useCounterStore()
    //テンプレートで使用するストアのインスタンスを返す
    return {
      store,
    }
  },
}
</script>

<template>
  <h2>Pinia Sample</h2>
  <!-- ストアのインスタンスを格納した変数を介してゲッターに直接アクセス -->
  <p>store.doubleCount : {{ store.doubleCount }}</p>
</template>
<script setup>
import { useCounterStore } from '@/stores/counter'
//ストアのインスタンスを生成して変数に格納
const store = useCounterStore()
</script>

<template>
  <h2>Pinia Sample</h2>
  <!-- ストアのインスタンスを格納した変数を介してゲッターに直接アクセス -->
  <p>store.doubleCount : {{ store.doubleCount }}</p>
</template>
他のゲッターを参照
他のゲッターを参照して使用する必要がある場合は this を介して他のゲッターにアクセスできます(ストアのインスタンス全体に this でアクセスできます)。但し、this を使う場合は、アロー関数は使えません(以下ではメソッド定義の短縮構文を使用しています)。
import { defineStore } from 'pinia'

export const useCounterStore = defineStore('counter', {
  state: () => ({
    count: 0,
  }),
  getters: {
    doubleCount: (state) => state.count * 2,
    // 他のゲッターを利用するゲッター(メソッド定義の短縮構文)
    doublePlusOne() {
      // 他のゲッターを this を介して参照
      return this.doubleCount + 1
    },
  },
})
TypeScript では、戻り値の型を定義する必要があります。
getters: {
  // automatically infers the return type as a number
  doubleCount(state) {
    return state.count * 2
  },
  // TypeScript の場合は、明示的に戻り値の型を指定
  doublePlusOne(): number {
    return this.doubleCount + 1
  },
},
TypeScript を使っていない場合は、JSDoc コメントを使って型の情報を記述することもできます。
getters: {
  // 以下は this を使用していないため、型は自動的に推測されます
  doubleCount: (state) => state.count * 2,
  // JSDoc で型を示す
  /**
    * Returns the count value times two plus one.
    *
    * @returns {number}
    */
  doubleCountPlusOne() {
    return this.doubleCount + 1
  },
},
以下は Setup Syntax で書き換えた例です。
Setup Syntax では this が使えませんが、算出プロパティ自体を参照できるので、その値を .value で取得して computed メソッドを使用しています。
import { ref, computed } from 'vue'
import { defineStore } from 'pinia'

export const useCounterStore = defineStore('counter', ()=> {
  const count = ref(10)
  const doubleCount = computed(() => count.value * 2)
  // doubleCount の値を doubleCount.value で参照
  const doublePlusOne = computed(() => doubleCount.value + 1)
  return { count, doubleCount, doublePlusOne }
})
getters にパラメーターを渡す
getters にパラメーターを渡すことはできませんが、任意の引数を受け取る関数をゲッターから返すことができます(Passing arguments to getters)。
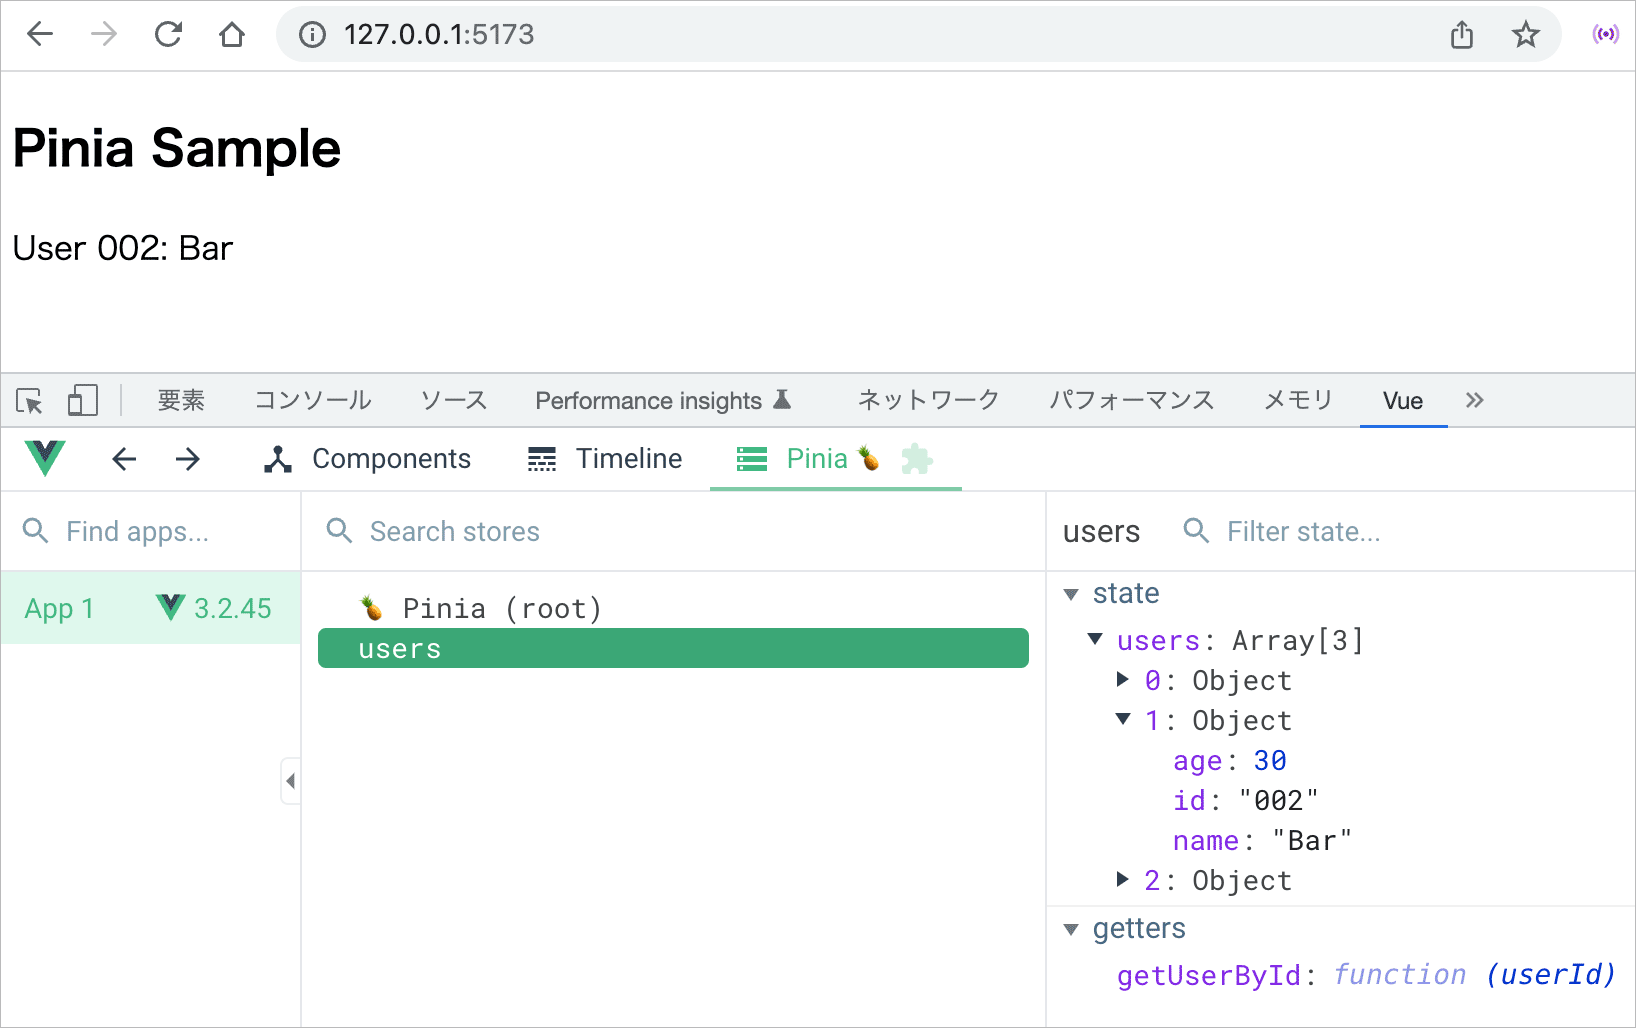
例えば、以下のようにストアの定義で getters プロパティにユーザー ID を受け取る関数 getUserById を定義して返し、
import { defineStore } from 'pinia'

export const useUsersStore = defineStore('users', {
  state: () => ({
    users: [
      { id: '001', name: 'Foo', age: 20 },
      { id: '002', name: 'Bar', age: 30 },
      { id: '003', name: 'Baz', age: 10 },
    ],
  }),
  getters: {
    getUserById: (state) => {
      //引数を受け取る関数を返す
      return (userId) => state.users.find((user) => user.id === userId)
    },
  },
})
import { ref, computed } from 'vue'
import { defineStore } from 'pinia'

export const useUsersStore = defineStore('users', () => {
  //ref メソッドでリアクティブに
  const users = ref([
    { id: '001', name: 'Foo', age: 20 },
    { id: '002', name: 'Bar', age: 30 },
    { id: '003', name: 'Baz', age: 10 },
  ])

  //computed メソッドを使用して関数を返すゲッターを定義
  const getUserById = computed(() => {
    //users は refs なので .value でアクセス
    return (userId) => users.value.find((user) => user.id === userId)
  })

  return { users, getUserById }
})
コンポーネント側では、setup の中で直接ゲッターから関数を取得して使用することができます。
<script setup>
import { useUsersStore } from '@/stores/users'
const store = useUsersStore()
//ゲッターから関数を取得
const getUserById = store.getUserById
</script>

<template>
  <h2>Pinia Sample</h2>
  <!-- ゲッターから取得した関数 getUserById() に引数を渡す -->
  <p>User 002: {{ getUserById('002').name  }}</p>
</template>
<script>
import { useUsersStore } from '@/stores/users'

export default {
  setup() {
    const store = useUsersStore()
    const getUserById = store.getUserById
    return {
      getUserById,
    }
  },
}
</script>

<template>
  <h2>Pinia Sample</h2>
  <p>User 002: {{ getUserById('003').name  }}</p>
</template>
但し、ゲッターは単に呼び出す関数なのでキャッシュされません(ゲッター自体の内部に結果をキャッシュすることはできるようです)。
export const useStore = defineStore('main', {
  getters: {
    getActiveUserById(state) {
      const activeUsers = state.users.filter((user) => user.active)
      return (userId) => activeUsers.find((user) => user.id === userId)
    },
  },
})
別のストアのゲッターにアクセス
別のストアの getters を使用するには、ゲッターの定義内で別のストアを useXxxStore() で生成して別のストアのゲッターを参照できます(同様に別のストアの state も参照できるようです)。
良い例ではありませんが、例えば、以下のようなストアが定義されていた場合、
import { defineStore } from 'pinia'

export const useCounterStore = defineStore('counter', {
  state: () => ({
    count: 0,
  }),
  getters: {
    doubleCount: (state) => state.count * 2,
  },
})
import { defineStore } from 'pinia'
//別のストアをインポート
import { useCounterStore } from './counter'

export const useUsersStore = defineStore('users', {
  state: () => ({
    users: [
      { id: '001', name: 'Foo', age: 20 },
      { id: '002', name: 'Bar', age: 30 },
      { id: '003', name: 'Baz', age: 10 },
      { id: '004', name: 'Qux', age: 7 },
    ],
  }),
  getters: {
    //別のストアのゲッターを利用するゲッター
    userByCounter(state) {
      //使用する別のストアを生成
      const counterStore = useCounterStore()
      //別のストアのゲッターを利用
      return state.users[counterStore.doubleCount]
    },
  },
})
import { ref, computed } from 'vue'
import { defineStore } from 'pinia'
//別のストアをインポート
import { useCounterStore } from './counter'

export const useUsersStore = defineStore('users', () => {
  //ref メソッドでリアクティブに
  const users = ref([
    { id: '001', name: 'Foo', age: 20 },
    { id: '002', name: 'Bar', age: 30 },
    { id: '003', name: 'Baz', age: 10 },
  ])

  //別のストアのゲッターを利用するゲッター
  const userByCounter = computed(() => {
    //使用する別のストアを生成
    const counterStore = useCounterStore()
    //別のストアのゲッターを利用(users は refs なので .value でアクセス)
    return users.value[counterStore.doubleCount]
  })

  return { users, userByCounter }
})
<script setup>
import { useCounterStore } from '@/stores/counter'
import PiniaSample from '@/components/PiniaSample.vue'
const store = useCounterStore()
</script>

<template>
  <button @click="store.increment">Increment</button>
  <PiniaSample />
</template>
<script setup>
import { useUsersStore } from '@/stores/users'
const store = useUsersStore()
</script>

<template>
  <h2>Pinia Sample</h2>
  <p>User : {{store.userByCounter.name }}</p> <!-- User : Foo -->
</template>
この場合、初期状態では counterStore.doubleCount は0なので以下のように表示され、ボタンを1回クリックすると counterStore.doubleCount は2になるので、state.users[2] の Baz が store.userByCounter.name に出力されます。それ以上クリックすると、該当するデータがないのでエラーになります。
Actions
アクション(actions)はコンポーネントのメソッド(methods オプション)に相当し、defineStore() の actions プロパティで定義することができます。
また、アクションに定義する関数では必要な引数を自由に設定して、何でも返すことができます。
アクションは、いわゆるビジネスロジックを書くための(処理を記述するための)部分になります。
以下は Option Stores 構文の例です。この構文ではストア全体に this でアクセスできます。
また、actions に定義する関数は this に依存するため、アロー関数は使用できません。
import { defineStore } from 'pinia'
export const useCounterStore = defineStore('counter', {
state: () => ({
count: 0,
}),
actions: {
// this に依存しているため、アロー関数は使用できません
increment() {
this.count++
},
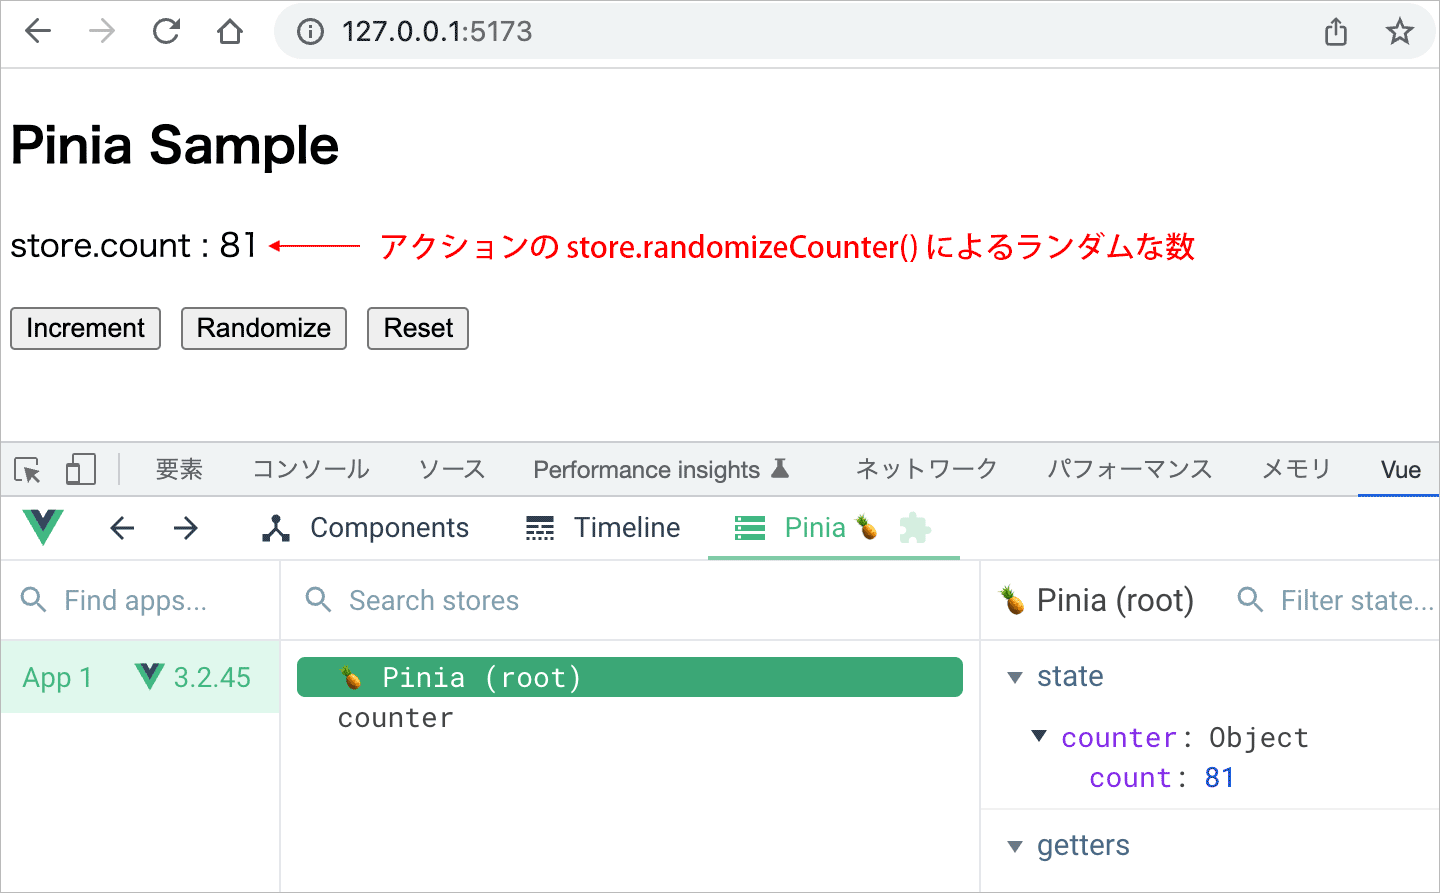
randomizeCounter() {
this.count = Math.round(100 * Math.random())
},
resetCounter() {
this.count = 0
},
},
})
Setup Syntax 構文の場合は、アクションを関数として定義し、最後に他のプロパティと共にまとめて return します。この構文の場合は this は使えません。
ref() で定義したリアクティブなデータ(state のプロパティ)の値には .value でアクセスします。
import { ref } from 'vue'
import { defineStore } from 'pinia'

export const useCounterStore = defineStore('counter', () => {
  // ref() を使ってリアクティブなデータを定義(state に相当)
  const count = ref(0)
  // メソッド(関数)を定義(actions に相当)
  const increment = () => {
    // count の値は .value でアクセス
    count.value++
  }
  const randomizeCounter = () => {
    count.value = Math.round(100 * Math.random())
  }
  const resetCounter = () => {
    count.value = 0
  }
  // 公開したいプロパティとメソッドを含むオブジェクトを返す
  return { count, increment, randomizeCounter, resetCounter }
})
コンポーネント側では、アクションは生成したストアのインスタンスのメソッドとして呼び出します。
<script setup>
import { useCounterStore } from '@/stores/counter'
//ストアのインスタンスを生成
const store = useCounterStore()
//アクションを実行(生成したストアインスタンスのメソッドとして呼び出す)
store.randomizeCounter()
</script>

<template>
  <h2>Pinia Sample</h2>
  <p>store.count : {{ store.count }}</p>
  <div>
    <!-- イベントリスナにアクションを指定 -->
    <button @click="store.increment">Increment</button>
    <button @click="store.randomizeCounter">Randomize</button>
    <button @click="store.resetCounter">Reset</button>
  </div>
</template>
<script>
import { useCounterStore } from '@/stores/counter'

export default {
  setup() {
    const store = useCounterStore()
    //アクションを実行
    store.randomizeCounter()
    //テンプレートで使用するストアのインスタンス全体を返す
    return {
      store,
    }
  },
}
</script>

<template>
  <h2>Pinia Sample</h2>
  <p>store.count : {{ store.count }}</p>
  <div>
    <!-- イベントリスナにアクションで定義した関数を指定 -->
    <button @click="store.increment">Increment</button>
    <button @click="store.randomizeCounter">Randomize</button>
    <button @click="store.resetCounter">Reset</button>
  </div>
</template>
<script setup>
import PiniaSample from '@/components/PiniaSample.vue'
</script>

<template>
  <PiniaSample />
</template>
上記の場合、初期状態では store.randomizeCounter() により count の値にランダムな数値が設定されて、例えば以下のように表示されます。
ボタンをクリックすると各ボタンのイベントリスナ(アクションに定義した関数)が呼び出され、count の値が更新されます。
他のアクションを参照
getters と同様、他のアクションを参照して使用する必要がある場合は this を介して他のアクションにアクセスできます(ストアのインスタンス全体に this でアクセスできます)。但し、this を使う場合は、アロー関数は使えません。
以下は、定義してある別のアクションを使って、アクションを定義する例です。
import { defineStore } from 'pinia'

export const useCounterStore = defineStore('counter', {
  state: () => ({
    count: 0,
  }),
  actions: {
    increment() {
      this.count++
    },
    getRandomNumber(num) {
      return Math.round((num -1) * Math.random()) + 1
    },
    //上記のアクション getRandomNumber を利用して定義
    randomizeCounter() {
      this.count = this.getRandomNumber(100)
    },
    resetCounter() {
      this.count = 0
    },
  },
})
import { ref } from 'vue'
import { defineStore } from 'pinia'

export const useCounterStore = defineStore('counter', () => {
  const count = ref(0)
  const increment = () => {
    count.value++
  }
  const getRandomNumber = (num)=> {
    return Math.round((num -1) * Math.random()) + 1
  }
  //上記のアクション getRandomNumber を利用して定義
  const randomizeCounter = () => {
    count.value = getRandomNumber(100)
  }
  const resetCounter = () => {
    count.value = 0
  }
  return { count, increment, getRandomNumber, randomizeCounter, resetCounter }
})
非同期処理
getters と異なり、actions は非同期処理も扱えます(非同期アクションを作成できます)。
Promise を返す限り、アクション内で任意の API 呼び出しや fetch() によるデータの取得、他のアクションを待機できます。
以下は FetchAPI を使って JSONPlaceholder(テスト用の JSON データを返してくれる API )から投稿のリソースを取得して、state に定義した posts に格納する非同期アクションの例です。
import { defineStore } from 'pinia'

export const usePostsStore = defineStore('posts', {
  state: () => ({
    posts: [],
    error: null,
  }),
  actions: {
    //非同期アクション
    async fetchPosts() {
      this.posts = []
      // レスポンスを取得
      const response = await fetch('https://jsonplaceholder.typicode.com/posts')
      if (response.ok) {
        // response が ok であれば、取得したレスポンスを json に変換して this.posts へ
        this.posts = await response.json()
      } else {
        // response が ok でない場合
        this.error = response.status
        console.warn(`リクエスト失敗 status code:${response.status}`)
      }
    },
  },
})
import { ref } from 'vue'
import { defineStore } from 'pinia'

export const usePostsStore = defineStore('posts', () => {
  const posts = ref([])
  const error = ref(null)

  //非同期アクション
  const fetchPosts = async () => {
    posts.value = []
    // レスポンスを取得
    const response = await fetch('https://jsonplaceholder.typicode.com/posts')
    if (response.ok) {
      // 取得したレスポンスを json に変換して posts へ
      posts.value = await response.json()
    } else {
      error.value = response.status
      console.warn(`リクエスト失敗 status code:${response.status}`)
    }
  }
  // 公開したいプロパティとメソッドを含むオブジェクトを返す
  return { posts, error, fetchPosts }
})
以下は App.vue で、上記のストアを使って、取得した投稿(100件)のタイトルを表示する例です。
v-if を使って投稿が取得できれば、タイトルをリスト表示し、エラーの場合はステータスを表示します。
<script setup>
import { usePostsStore } from '@/stores/posts'
const store = usePostsStore()
//非同期アクションを実行して投稿のリソースを取得
store.fetchPosts()
</script>

<template>
  <h2>Post Titles</h2>
  <p v-if="store.error">Error: {{ store.error }}</p>
  <ul v-if="!store.error">
    <li v-for="post in store.posts" :key="post.id">
       {{ post.title }}
    </li>
  </ul>
</template>
例えば、以下のように表示されます。

ローディング状態の表示
リソースをフェッチするような非同期処理に時間がかかる場合、state にローディング状態を定義して、データの取得中は「Loading post(ロード中)...」などと表示することができます。
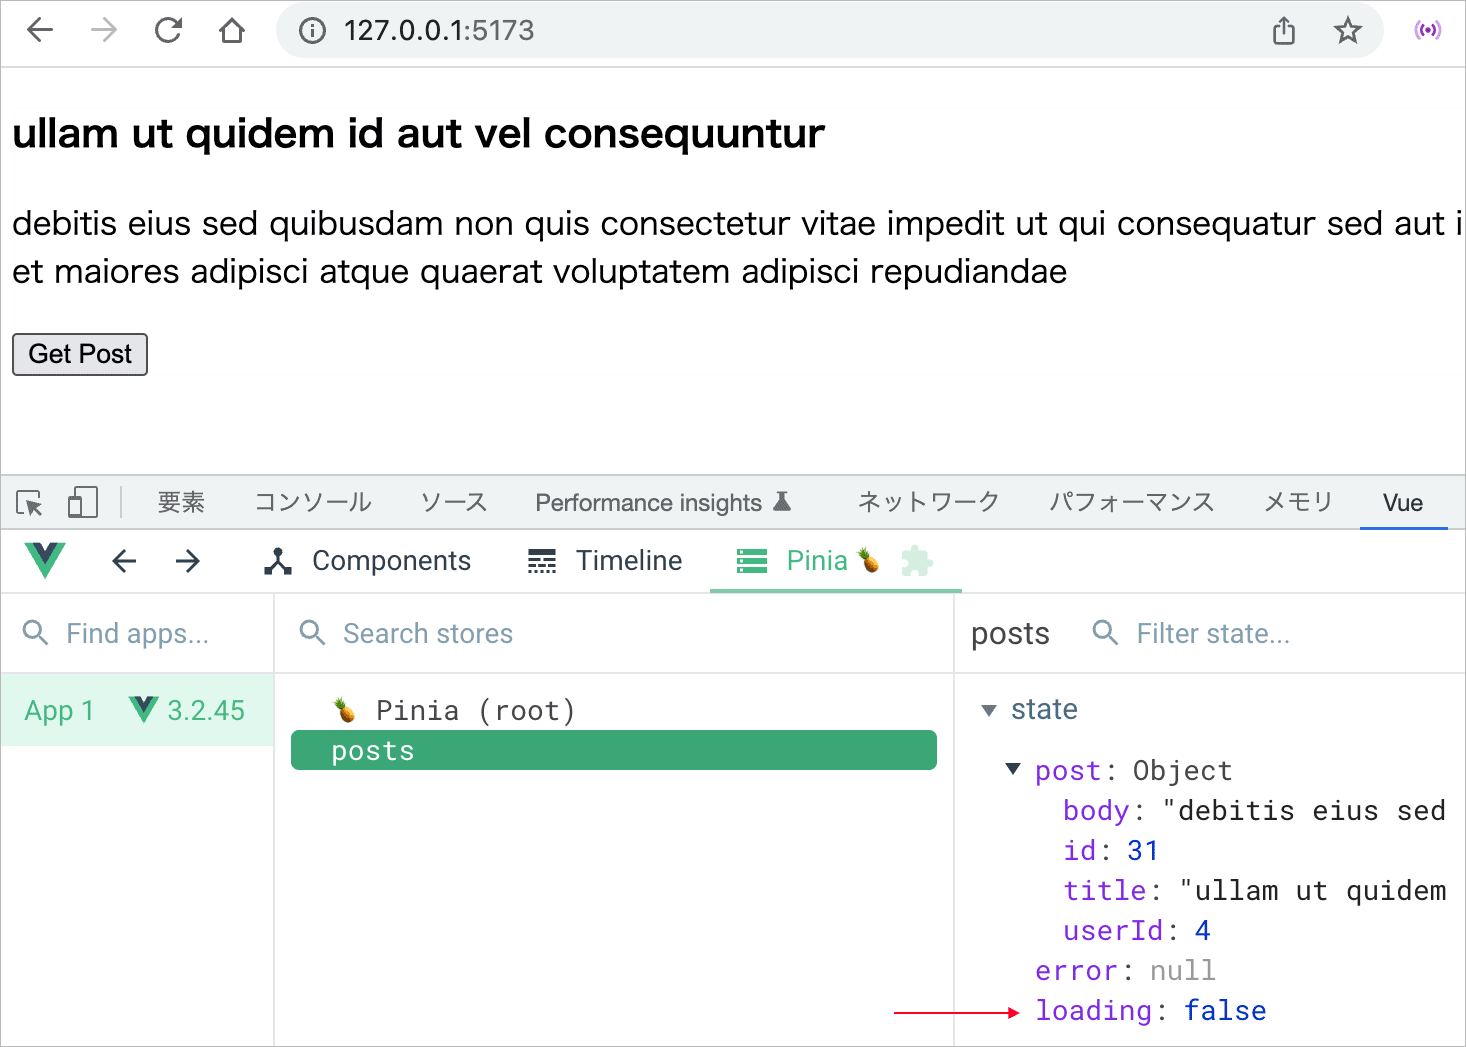
以下は、JSONPlaceholder から個々の投稿のリソースを取得する非同期アクションの定義で、loading という真偽値のステートを定義し、その値を使ってロード中かどうかの表示を切り替える例です。
import { defineStore } from 'pinia'

export const usePostsStore = defineStore('posts', {
  state: () => ({
    post: null,
    error: null,
    //ローディング状態
    loading: false,
  }),
  actions: {
    //非同期アクション
    async fetchPost(id) {
      this.post = null
      //ロード中
      this.loading = true
      const response = await fetch(`https://jsonplaceholder.typicode.com/posts/${id}`)
      if (response.ok) {
        this.post = await response.json()
      } else {
        const errorMessage = `リクエスト失敗 status code:${response.status}`
        this.error = errorMessage
        console.warn(errorMessage)
      }
      //ロード終了
      this.loading = false
    }
  },
})
import { ref } from 'vue'
import { defineStore } from 'pinia'

export const usePostsStore = defineStore('posts', () => {
  const post = ref(null)
  const error = ref(null)
  const loading = ref(false)

  const fetchPost = async (id) => {
    post.value = null
    loading.value = true
    const response = await fetch(`https://jsonplaceholder.typicode.com/posts/${id}`)
    if (response.ok) {
      post.value = await response.json()
    } else {
      const errorMessage = `リクエスト失敗 status code:${response.status}`
      error.value = errorMessage
      console.warn(errorMessage)
    }
    loading.value = false
  }
  return { post, error, loading, fetchPost }
})
以下は上記を try catch finally と then を使って書き換えた例です。
import { defineStore } from 'pinia'

export const usePostsStore = defineStore('posts', {
  state: () => ({
    post: null,
    error: null,
    //ローディング状態
    loading: false,
  }),
  actions: {
    //非同期アクション
    async fetchPost(id) {
      this.post = null
      //ロード中
      this.loading = true
      try {
        this.post = await fetch(`https://jsonplaceholder.typicode.com/posts/${id}`)
        .then((response) => {
          if (response.ok) {
            return response.json()
          } else {
            throw new Error(`リクエスト失敗: ${response.status}`);
          }
        })
      } catch (error) { //reject した Promise が返された場合
        this.error = error
        console.warn(error.message)
      } finally {
        //ロード終了
        this.loading = false
      }
    }
  },
})
import { ref } from 'vue'
import { defineStore } from 'pinia'

export const usePostsStore = defineStore('posts', () => {
  const post = ref(null)
  const error = ref(null)
  //ローディング状態
  const loading = ref(false)

  const fetchPost = async (id) => {
    post.value = null
     //ロード中
    loading.value = true
    try {
      post.value = await fetch(`https://jsonplaceholder.typicode.com/posts/${id}`)
      .then((response) => {
        if (response.ok) {
          return response.json()
        } else {
          throw new Error(`リクエスト失敗: ${response.status}`);
        }
      })
    } catch (rejectError) {
      //catch() の引数が error だと変数 error とかぶってしまう
      error.value = rejectError
      console.warn(error.message)
    } finally {
      //ロード終了
      loading.value = false
    }
  }
  return { post, error, loading, fetchPost }
})
コンポーネント側では、ストアのインスタンスを生成して、定義したアクションにランダムな値を指定して呼び出します。
この例では、イベントリスナーとしても同じアクションを呼び出すので、アクションの呼び出しを関数として定義しています。
ロード中を表す「Loading post...」の表示は、ステートの store.loading の値を使って v-if で切り替えています。
<script setup>
import { usePostsStore } from '@/stores/posts'
//ストアのインスタンスを生成
const store = usePostsStore()
//非同期アクションを実行してランダムな投稿を取得する関数
const getRandomPost = () => {
  store.fetchPost(Math.round((99) * Math.random()) + 1)
}
//ランダムな投稿を取得
getRandomPost()
</script>

<template>
  <p v-if="store.loading">Loading post...</p>
  <p v-if="store.error">{{ store.error }}</p>
  <div v-if="store.post">
    <h3> {{ store.post.title }}</h3>
    <p>{{ store.post.body }}</p>
  </div>
  <button @click="getRandomPost">Get Post</button>
</template>
例えば、以下のように表示され、ボタンをクリックしてランダムな投稿を読み込んでいる間は「Loading post...」と表示されます。投稿のロード中は、Vue Devtools では loading は true となっています。
別のストアのアクションにアクセス
別のストアのアクションなどをアクション内で直接使用することができます。
アクションの定義内で、別のストアのインスタンスを生成して、アクションなどにアクセスできます。
以下は非同期アクション fetchRandomPost の定義の中で別のストアを生成して、そのストアのメソッドを呼び出して利用する例です。
import { defineStore } from 'pinia'
//別のストアをインポート
import { useCounterStore } from './counter'

export const usePostsStore = defineStore('posts', {
  state: () => ({
    post: null,
    error: null,
  }),
  actions: {
    //アクションの定義
    async fetchRandomPost() {
      this.post = null
      //使用する別のストアを生成
      const counterStore = useCounterStore()
      //別のストアのアクションを利用して ID を生成
      const id = counterStore.getRandomNumber(100);
      const response = await fetch(`https://jsonplaceholder.typicode.com/posts/${id}`)
      if (response.ok) {
        this.post = await response.json()
      } else {
        this.error = response.status
        console.warn(`リクエスト失敗 status code:${response.status}`)
      }
    }
  },
})
import { ref } from 'vue'
import { defineStore } from 'pinia'
//別のストアをインポート
import { useCounterStore } from './counter'

export const usePostsStore = defineStore('posts', () => {
  const post = ref(null)
  const error = ref(null)
  const fetchRandomPost = async () => {
    post.value = null
    //使用する別のストアを生成
    const counterStore = useCounterStore()
    //別のストアのアクションを利用して ID を生成
    const id = counterStore.getRandomNumber(100);
    const response = await fetch(`https://jsonplaceholder.typicode.com/posts/${id}`)
    if (response.ok) {
      post.value = await response.json()
    } else {
      error.value = response.status
      console.warn(`リクエスト失敗 status code:${response.status}`)
    }
  }

  return { post, error, fetchRandomPost }
})
import { defineStore } from 'pinia'

export const useCounterStore = defineStore('counter', {
  state: () => ({
    count: 0,
  }),
  actions: {
    // ・・・中略・・・
    getRandomNumber(num) {
      //与えられた引数をもとにランダムな整数を返す
      return Math.round((num -1) * Math.random()) + 1
    },
  },
})
<script setup>
import { usePostsStore } from '@/stores/posts'
const store = usePostsStore()
//非同期アクションを実行して投稿のリソースを取得
store.fetchRandomPost()
</script>
<template>
<h2>Random Post</h2>
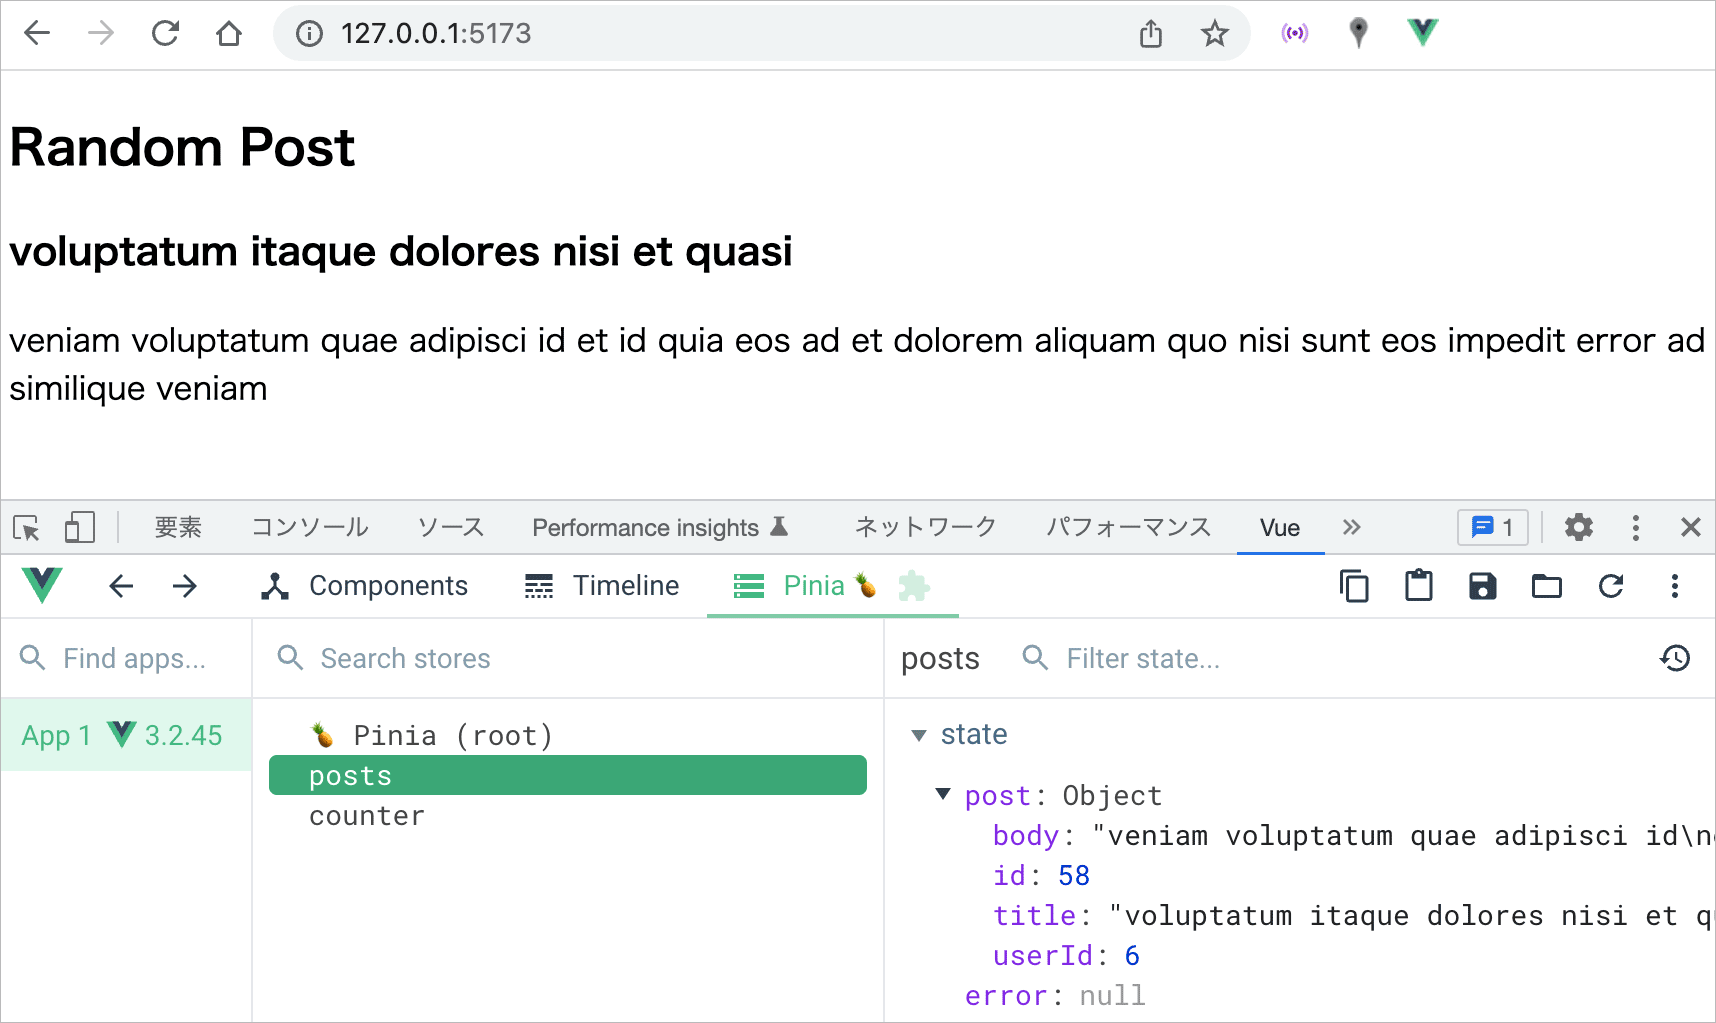
<div v-if="store.post">
<h3> {{ store.post.title }}</h3>
<p>{{ store.post.body }}</p>
</div>
</template>
上記の場合、例えば以下のように表示されます。
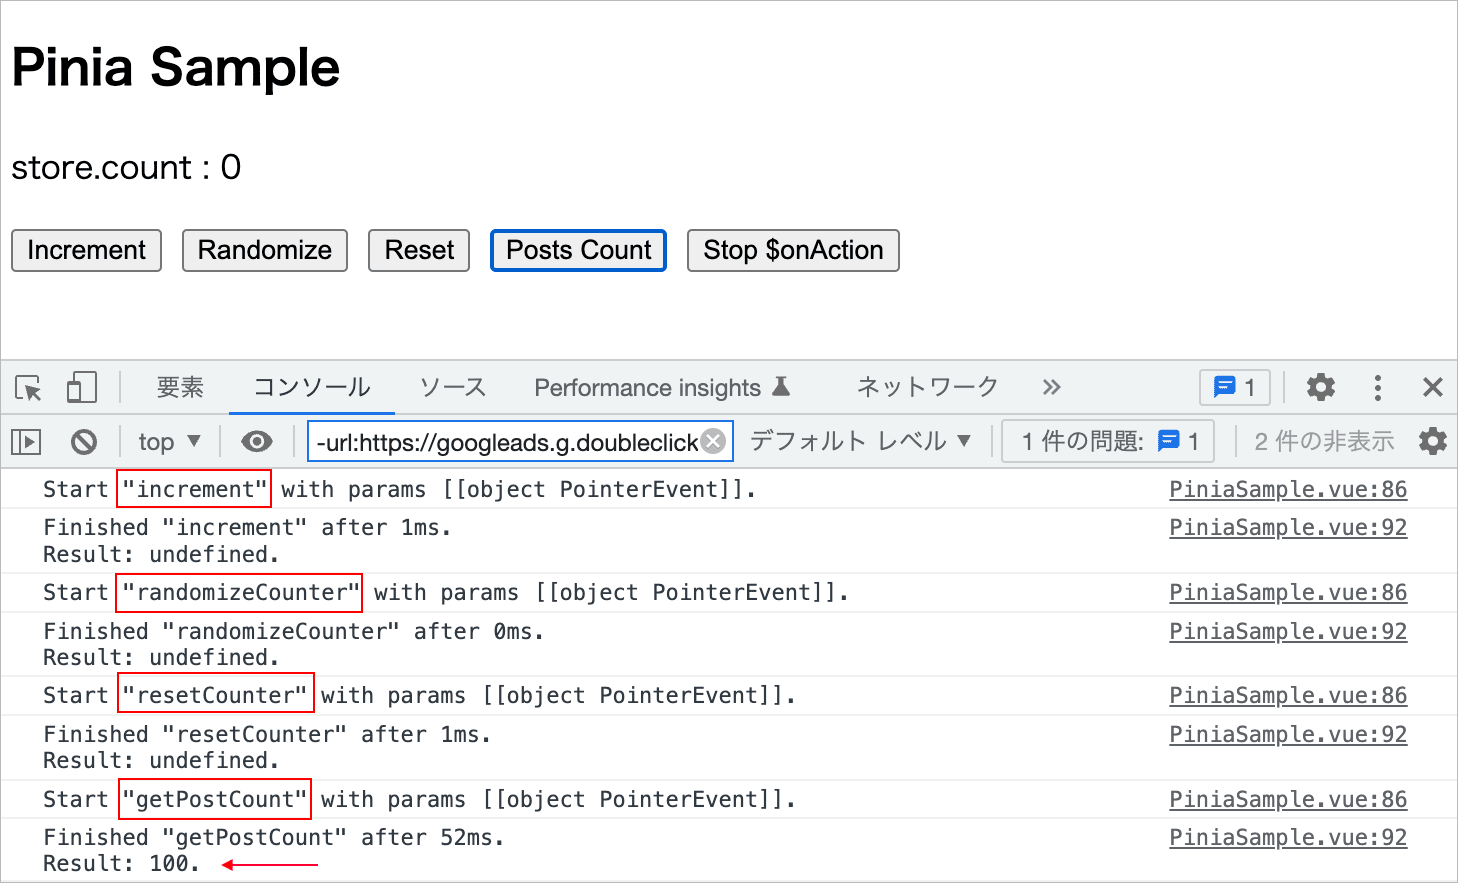
アクションを監視 $onAction
ストアの $onAction() メソッドを使って、アクション(actions)とその結果を監視することができます。
$onAction() はコールバックを受け取り、コールバックの引数には以下のプロパティを持つオブジェクトが渡されます。通常、分割代入を使ってそれぞれのプロパティを取得して使用します。
| プロパティ | 説明 |
|---|---|
| name | アクションの名前 |
| store | ストアのインスタンス |
| args | アクションに渡されたパラメータの配列 |
| after | アクション完了時に実行される関数(after フック) |
| onError | アクションがエラーになった場合に実行される関数(onError フック) |
const unsub = store.$onAction( ({ name, store, args, after, onError, }) => {
    // コールバックを定義
    //アクションが実行される前に実行される処理(例えば、ローダーの表示など)

    // 引数の after を使ってアクション完了時に実行される関数を定義
    after((result) => { // result はアクションの戻り値
      //アクションが完了した場合に実行される処理
    })

    // 引数の onError を使ってエラーになった場合に実行される関数を定義
    onError((error) => {
      //アクションがエラーになった場合に実行される処理
    })
  }
)
name や store を使ってどのアクションかを判定することができます。
渡されたコールバックはアクション自体の前に実行されます。
after を使用すると、アクションの完了・解決後に実行する関数を定義できます。
onError を使用すると、アクションがエラーをスローするか、reject された場合に実行する関数を定義できます。
また、state を監視する $subscribe() 同様、$onAction() は監視を停止するための関数を戻り値として返します。
<script setup>
import { useCounterStore } from '@/stores/counter'
const store = useCounterStore()

store.$onAction((params) => {
  //コールバックが受け取る引数を出力
  console.log(params)
})
</script>
以下は上記を実行してコールバックが受け取る引数をコンソールに出力した例です。

以下はアクションの実行の前と後でログを出力する例です(Subscribing to actions より)。
<script>
import { useCounterStore } from '@/stores/counter'

export default {
  setup() {
    //ストアを生成
    const store = useCounterStore()

    //アクションを監視(監視を停止する関数を変数 unsub に格納)
    const unsub = store.$onAction(
      ({
        name, // アクションの名前
        store, // ストアのインスタンス
        args, // アクションに渡されたパラメータの配列
        after, // アクション完了時に実行されるフック
        onError, // アクションがエラーになった場合に実行されるフック
      }) => {
        // この監視で使う変数を定義
        const startTime = Date.now()
        // ここに記述された処理はアクションが実行される前に実行されます
        console.log(`Start "${name}" with params [${args.join(', ')}].`)

        // 以下の after フックに記述された処理は、アクションが成功(完了)した場合に実行されます
        // プロミスが返される場合は待ちます
        // 引数の result はアクションの戻り値です
        after((result) => {
          console.log(
            `Finished "${name}" after ${
              Date.now() - startTime
            }ms.\nResult: ${result}.`
          )
        })

        // 以下の onError フックはアクションがエラーになった場合に実行されます
        onError((error) => {
          console.warn(
            `Failed "${name}" after ${Date.now() - startTime}ms.\nError: ${error}.`
          )
        })
      }
    )
    //監視を停止する関数を使用する場合は unsub も返します
    return {
      store, unsub
    }
  },
}
</script>

<template>
  <h2>Pinia Sample</h2>
  <p>store.count : {{ store.count }}</p>
  <div>
    <button @click="store.increment">Increment</button>
    <button @click="store.randomizeCounter">Randomize</button>
    <button @click="store.resetCounter">Reset</button>
    <button @click="store.getPostCount">Posts Count</button>
    <button @click="unsub">Stop $onAction</button>
  </div>
</template>
<script setup>
import { useCounterStore } from '@/stores/counter'
//ストアを生成
const store = useCounterStore()

//アクションを監視(監視を停止する関数を変数 unsub に格納)
const unsub = store.$onAction(
  ({
    name, // アクションの名前
    store, // ストアのインスタンス
    args, // アクションに渡されたパラメータの配列
    after, // アクション完了時に実行されるフック
    onError, // アクションがエラーになった場合に実行されるフック
  }) => {
    // この監視で使う変数を定義
    const startTime = Date.now()
    // ここに記述された処理はアクションが実行される前に実行されます
    console.log(`Start "${name}" with params [${args.join(', ')}].`)

    // 以下の after フックに記述された処理は、アクションが成功(完了)した場合に実行されます
    // プロミスが返される場合は待ちます
    // 引数の result はアクションの戻り値です
    after((result) => {
      console.log(
        `Finished "${name}" after ${
          Date.now() - startTime
        }ms.\nResult: ${result}.`
      )
    })

    // 以下の onError フックはアクションがエラーになった場合に実行されます
    onError((error) => {
      console.warn(
        `Failed "${name}" after ${Date.now() - startTime}ms.\nError: ${error}.`
      )
    })
  }
)
</script>
以下は上記で使用しているストアの定義です。
import { defineStore } from 'pinia'

export const useCounterStore = defineStore('counter', {
  state: () => ({
    count: 0,
  }),
  actions: {
    increment() {
      this.count++
    },
    randomizeCounter() {
      this.count = Math.round(99 * Math.random()) + 1
    },
    resetCounter() {
      this.count = 0
    },
    //Promise を返す関数
    async getPostCount() {
      const response = await fetch(`https://jsonplaceholder.typicode.com/posts`)
      const userPosts = await response.json()
      const postCount = userPosts.length
      return Promise.resolve(postCount);
      //return postCount
    }
  },
})
import { ref } from 'vue'
import { defineStore } from 'pinia'

export const useCounterStore = defineStore('counter', () => {
  const count = ref(0)
  const increment = () => {
    count.value++
  }
  const randomizeCounter = () => {
    count.value = Math.round(99 * Math.random()) + 1
  }
  const resetCounter = () => {
    count.value = 0
  }
  const getPostCount = async () => {
    const response = await fetch(`https://jsonplaceholder.typicode.com/posts`)
    const userPosts = await response.json()
    const postCount = userPosts.length
    return Promise.resolve(postCount);
  }
  return { count, increment, randomizeCounter, resetCounter, getPostCount }
})
<script setup>
import PiniaSample from '@/components/PiniaSample.vue'
</script>

<template>
<PiniaSample />
</template>
この例の場合、各ボタンにリスナーとしてアクションを設定してあるので、それぞれのボタンをクリックするとログが出力されます。
アクションの中で戻り値のある getPostCount は after() の result にその値が出力されていますが、その他は undefined になっています。
また、「Stop $onAction」ボタンをクリックすると、$onAction() の戻り値の「監視を停止するための」関数が呼び出され、それ以降はアクションの監視は停止されます。
$onAction の利用例
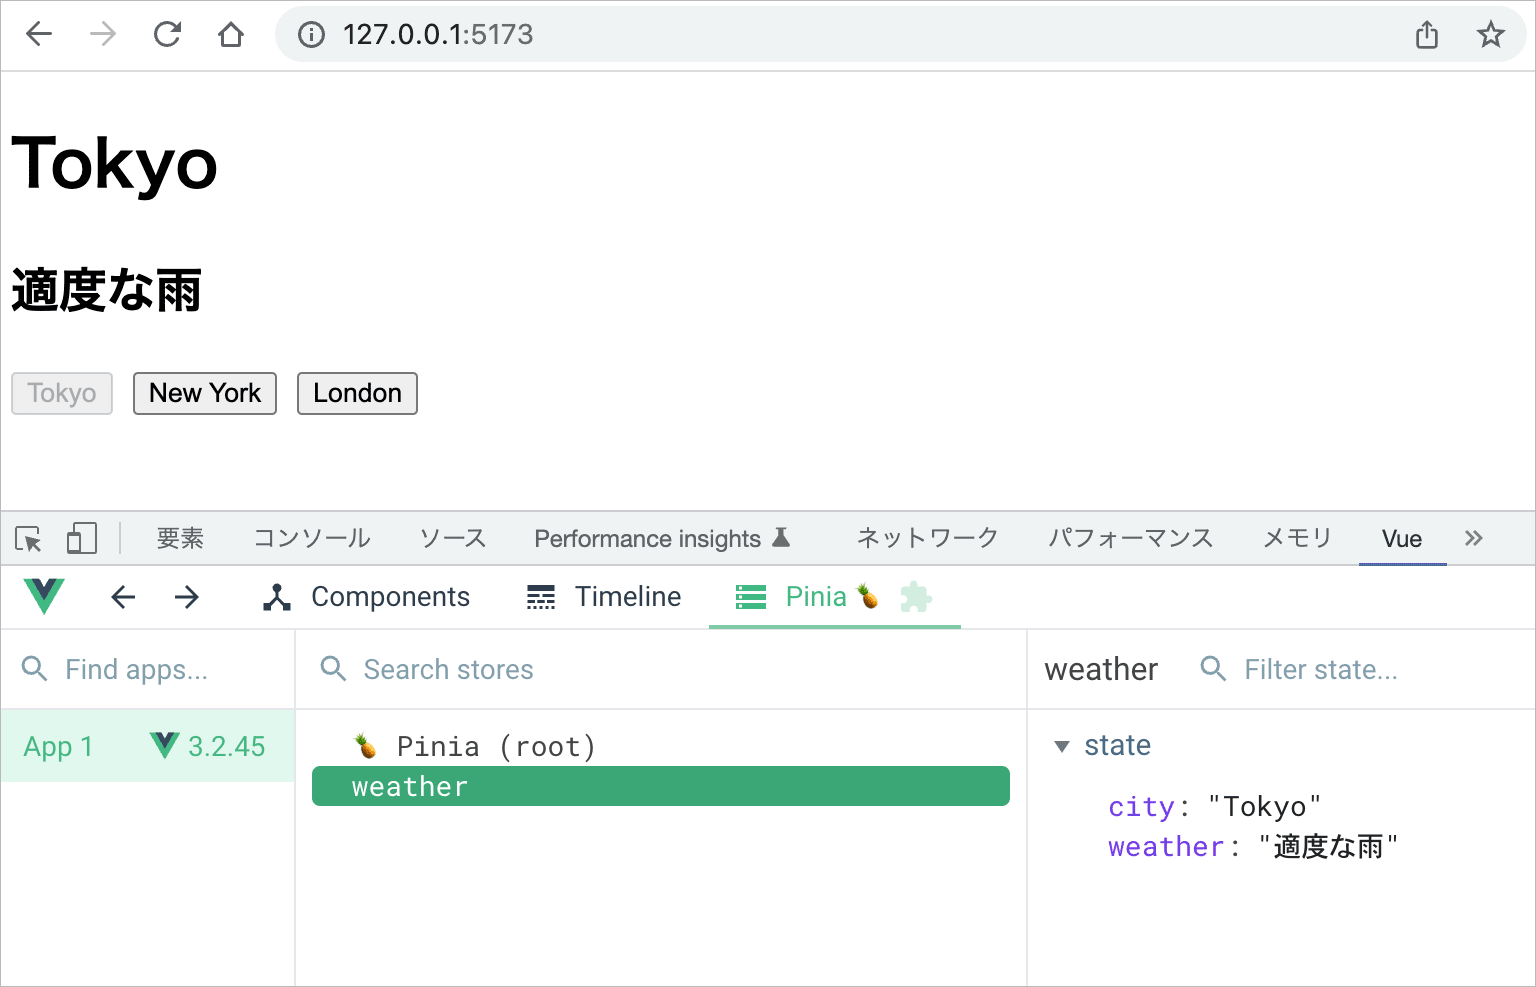
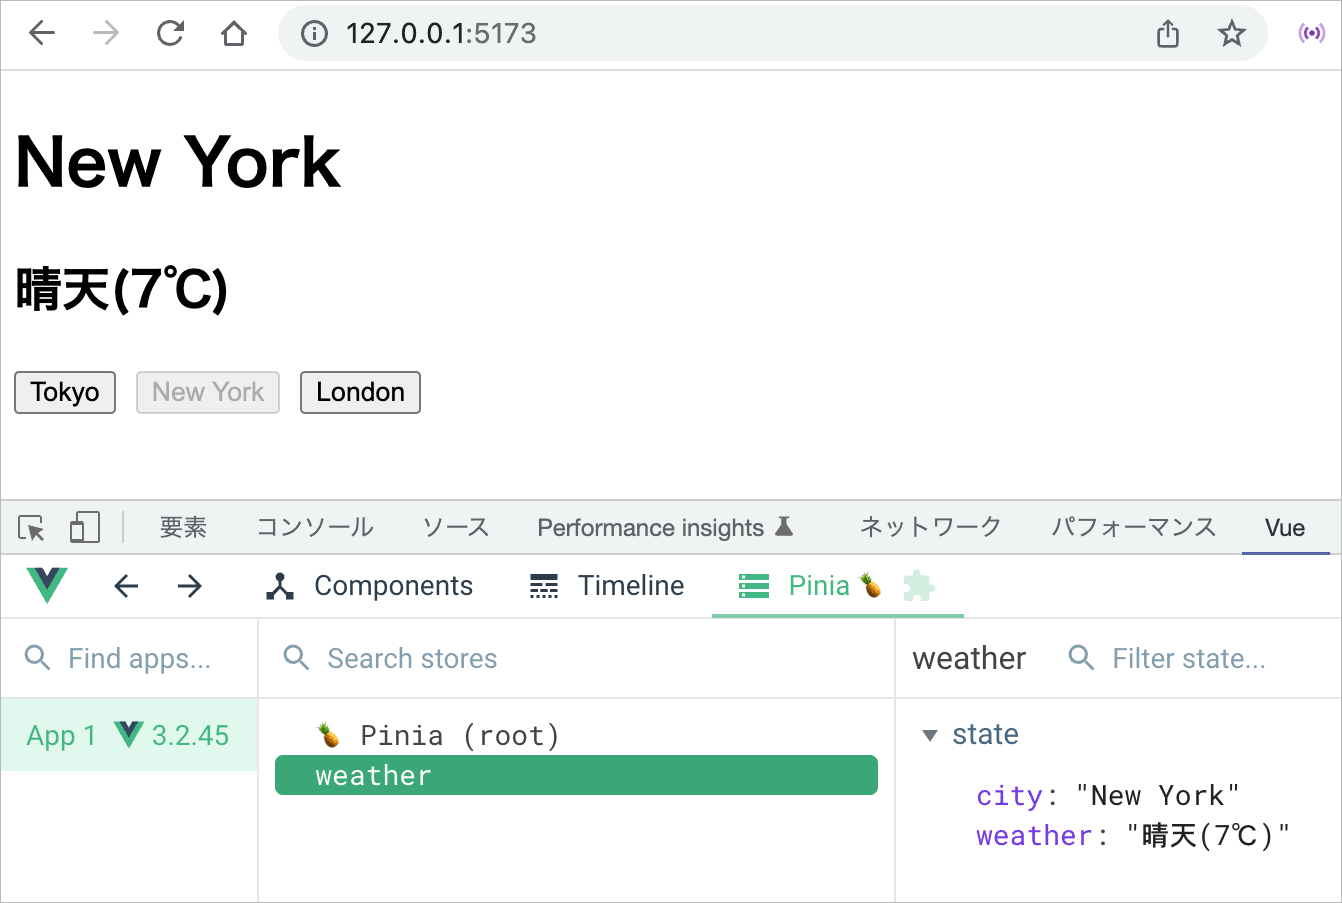
以下は引数に指定された場所の天気を取得して表示するアクション getWeather() を持つストアです。
天気の情報は OpenWeather から fetch() で取得します。OpenWeather はユーザー登録して API key を取得すれば無料で利用できます(関連項目:OpenWeather API から天気情報を取得)。
このストアは city(場所)と weather(天気の情報)という2つの state 持ち、初期状態ではどちらも決まっていないので「unknown」と「not available」としています。
actions には天気の情報を取得するための非同期関数 getWeather() を定義してあります。この関数は場所の名前を引数に受け取りますが、引数が省略された場合は Tokyo としています。
state の city は呼び出し側で指定すると即座に更新されますが、weather は非同期に fetch() で取得するため時間がかかるので、取得が完了するまでの間は「loading data...」と表示します。
天気の情報は fetch() で取得したレスポンスを JSON に変換したデータの weather(配列)の [0] の description プロパティから取得しています。
import { defineStore } from 'pinia'

export const useWeatherStore = defineStore('weather', {
  state: () => ({
    city: 'unknown',
    weather: 'not available'

  }),
  actions: {
    async getWeather(location) {
      if(!location) location = 'Tokyo'
      // API Key
      const key = 'be30381xxxxxxxxxxxxxxxxb0370b76b68'
      // フェッチ先の OpenWeather API の URL(引数の location と上記 key で作成)
      const api = 'https://api.openweathermap.org/data/2.5/weather?q=' + location + '&units=metric&lang=ja&appid=' + key
      // state の city を引数の location の値に更新
      this.city = location
      // state の weather をロード中を表す以下の文字列に更新
      this.weather = 'loading data...'
      try {
        let response = await fetch(api)
        if(response.ok) {
          const data = await response.json();
          //天気の情報は上記 data の weather[0] の description プロパティから取得
          this.weather = data.weather[0].description
        }else {
          throw new Error(`リクエスト失敗 status code ${response.status} `);
        }
      }catch(error){
        this.weather = error.message
      }
    }
  }
})
import { ref } from 'vue'
import { defineStore } from 'pinia'

export const useWeatherStore = defineStore('weather', () => {

  const city = ref('unknown')
  const weather = ref('not available')

  const getWeather = async (location) => {
    if(!location) location = 'Tokyo'
    const key = 'be30381xxxxxxxxxxxxxxxxb0370b76b68'
    const api = 'https://api.openweathermap.org/data/2.5/weather?q=' + location + '&units=metric&lang=ja&appid=' + key
    city.value = location
    weather.value = 'loading data...'
    try {
      let response = await fetch(api)
      if(response.ok) {
        const data = await response.json();
        weather.value = data.weather[0].description
      }else {
        throw new Error(`リクエスト失敗 status code ${response.status} `);
      }
    }catch(error){
      weather.value = error.message
    }

  }
  return { city, weather, getWeather }
})
以下はストアを利用するコンポーネントの例です。
ボタンをクリックすると、ラベルの文字を引数に渡してアクションの getWeather() を呼び出します。
<script>
import { useWeatherStore } from '@/stores/weather'
export default {
  setup() {
    //ストアを生成
    const store = useWeatherStore()
    //アクションの getWeather() を実行して天気情報を取得して初期状態を更新
    store.getWeather('Tokyo')
    return {
      store
    }
  }
}
</script>

<template>
  <h1>{{ store.city}}</h1>
  <h2>{{ store.weather}}</h2>

<div>
  <button @click="store.getWeather('Tokyo')" :disabled="store.city=='Tokyo'">
    Tokyo
  </button>
  <button @click="store.getWeather('New York')" :disabled="store.city=='New York'">
    New York
  </button>
  <button @click="store.getWeather('London')" :disabled="store.city=='London'">
    London
  </button>
</div>
</template>
<script setup>
import { useWeatherStore } from '@/stores/weather'
const store = useWeatherStore()
store.getWeather('Tokyo')
</script>
以下のように表示され、ボタンをクリックすると、一瞬「loading data...」と表示された後にその場所の天気の情報が表示されます。
$onAction を利用
この例の場合、ストア側でローディング状態の表示や表示するデータの形式の選択、エラーの表示を行っているため、再利用しにくい構造になっています。
以下は $onAction を利用して、上記のアプリをもう少し再利用しやすくした例です。
import { defineStore } from 'pinia'

export const useWeatherStore = defineStore('weather', {
  state: () => ({
    city: 'unknown',
    weather: 'not available'

  }),
  actions: {
    async getWeather(location) {
      if(!location) location = 'Tokyo'
      const key = 'be30381xxxxxxxxxxxxxxxxb0370b76b68'
      const api = 'https://api.openweathermap.org/data/2.5/weather?q=' + location + '&units=metric&lang=ja&appid=' + key
      this.city = location
      // this.weather = 'loading data...'  //$onAction のコールバックで処理
      try {
        let response = await fetch(api)
        if(response.ok) {
          const data = await response.json();
          //this.weather = data.weather[0].description
          // data を返して、$onAction の after フックで処理
          return data
        }else {
          throw new Error(`リクエスト失敗 status code ${response.status} `);
        }
      }catch(error){
        //this.weather = error.message
        // error を返して、$onAction の onError フックで処理
        throw error
      }
    }
  }
})
import { ref } from 'vue'
import { defineStore } from 'pinia'

export const useWeatherStore = defineStore('weather', () => {

  const city = ref('unknown')
  const weather = ref('not available')

  const getWeather = async (location) => {
    if(!location) location = 'Tokyo'
    const key = 'be30381xxxxxxxxxxxxxxxxb0370b76b68'
    const api = 'https://api.openweathermap.org/data/2.5/weather?q=' + location + '&units=metric&lang=ja&appid=' + key
    city.value = location
    try {
      let response = await fetch(api)
      if(response.ok) {
        const data = await response.json();
        return data
      }else {
        throw new Error(`リクエスト失敗 status code ${response.status} `);
      }
    }catch(error){
      throw error
    }
  }
  return { city, weather, getWeather }
})
コンポーネント側では、setup() 内で $onAction() を使って、コールバック、after フック、onError フックを定義します。
この例では after フックで、getWeather() の戻り値から天気情報に加え、温度も表示するようにしています。getWeather() の定義で、引数を増やせば、コンポーネント側で更にカスタマイズできるようにもなります。
<script>
import { useWeatherStore } from '@/stores/weather'
export default {
  setup() {
    const store = useWeatherStore()
    store.$onAction(({after, args, name, onError, store}) => {
      // アクション名が getWeather の場合
      if(name=='getWeather') {
        // コールバックでローディング状態の表示
        store.weather = 'ロード中・・・'
        // フェッチが成功した場合
        after((val) => {
          //getWeather() の戻り値を使って天気情報と温度を表示
          store.weather = val.weather[0].description + '(' + val.main.temp + '℃)'
        })
        // エラーの場合
        onError((error)=> {
          store.weather = error.message
        })
      }
    })
    //アクションを実行して(天気情報を取得して)初期状態を更新
    store.getWeather('Tokyo')
    return {
      store
    }
  }
}
</script>
<script setup>
import { useWeatherStore } from '@/stores/weather'
const store = useWeatherStore()
store.$onAction(({after, args, name, onError, store}) => {
  if(name=='getWeather') {
    store.weather = 'ロード中・・・'
    after((val) => {
      store.weather = val.weather[0].description + '(' + val.main.temp + '℃)'
    })
    onError((error)=> {
      store.weather = error.message
    })
  }
})
store.getWeather('Tokyo')
</script>
Plugins
Pinia のプラグイン(Plugins)は、全てのストアのインスタンスに適用される関数で、この機能を使って全てのストアをまとめて操作することができます。
Pinia のプラグインは、Pinia の use() メソッドに関数を渡すことで、全てのストアのインスタンスにその操作を適用する機能です。また、use() は Pinia インスタンスを返すので、複数の use() をチェインさせることもできます。
例えば、以下のような3つのストアが定義されている場合、プラグインを使って全てのストアをまとめて操作することができます。
import { defineStore } from 'pinia'

export const useCityStore = defineStore('city', {
  state: () => ({
    title: 'City Store',
    cities:['Tokyo', 'Osaka', 'Kyoto'],
    nation: 'Japan'
  }),
  getters: {
    upperCaseTitle: (state) => state.title.toUpperCase()
  },
  actions: {
    addCity(city) {
      if(!city) return
      this.cities.push(city)
    }
  }
})
import { defineStore } from 'pinia'

export const useGuitarStore = defineStore('guitar', {
  state: () => ({
    title: 'Guitar Store',
    brand: 'Gibson',
    models:['ES-175', 'L-5', 'ES-335'],
  }),
  getters: {
    modelsCount: (state) => state.models.length
  },
  actions: {
    addModel(model) {
      if(!model) return
      this.models.push(model)
    }
  }
})
import { defineStore } from 'pinia'

export const usePianoStore = defineStore('piano', {
  state: () => ({
    title: 'Piano Store',
    brand: 'Steinway',
    models:['D-274', 'A-188', 'K-132'],
  }),
  getters: {
    modelsCount: (state) => state.models.length
  },
  actions: {
    addModel(model) {
      if(!model) return
      this.models.push(model)
    }
  }
})
以下のようにルートコンポーネントで定義した3つのストアを生成して使用しているとします。
<script>
import { useCityStore } from '@/stores/city'
import { useGuitarStore } from '@/stores/guitar'
import { usePianoStore } from '@/stores/piano'
export default {
  setup() {
    const cityStore = useCityStore()
    const guitarStore = useGuitarStore()
    const pianoStore = usePianoStore()
    return {
      cityStore,
      guitarStore,
      pianoStore
    }
  }
}
</script>

<template>
  <h1>App</h1>
  <h2>{{ cityStore.title}}</h2>
  <h2>{{ guitarStore.title}}</h2>
  <h2>{{ pianoStore.title}}</h2>
</template>
プラグインの追加
Pinia のインスタンスを生成しているファイル(main.js)で、プラグインに渡すコールバック(プラグイン関数)を定義して、use() を使って Pinia のインスタンスにプラグインを追加することができます。
プラグイン関数はストアに追加するプロパティ(や処理)を返す関数です。
import { createApp } from 'vue'
import { createPinia } from 'pinia'
import App from './App.vue'

// Pinia のインスタンスを生成
const pinia = createPinia()

// プラグインに渡すコールバック(プラグイン関数)を定義
const MyPiniaPlugin = () => {
  console.log('My Pinia Plugin!')
}

/* 上記のコールバックの定義は以下と同じこと
function MyPiniaPlugin() {
  return console.log('My Pinia Plugin!')
} */

// Pinia のインスタンスにプラグインを追加
pinia.use(MyPiniaPlugin)

const app = createApp(App)
app.use(pinia)
app.mount('#app')
コールバックを別途定義せず、以下のように直接 use() メソッド内に記述することもできます。
// Pinia のインスタンスにプラグインを追加
pinia.use( () => {
  console.log('My Pinia Plugin!')
})
この例の場合、3つのストアがあるため、プラグイン関数はストアごとに1回ずつ、合計3回実行されます。
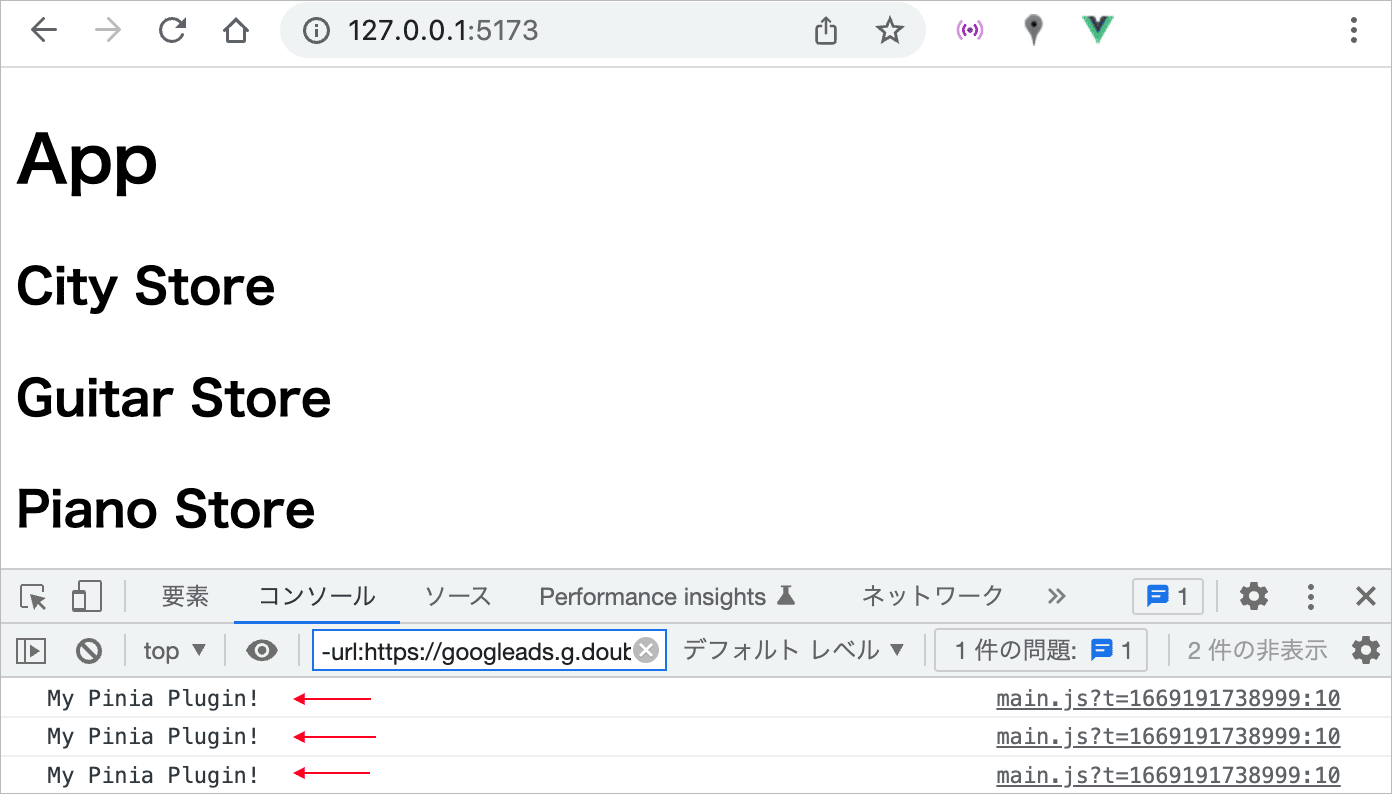
以下はオブジェクトを返すことによってすべてのストアに静的プロパティを追加する例です(カスタムプロパティの追加)。
import { createApp } from 'vue'
import { createPinia } from 'pinia'
import App from './App.vue'

const pinia = createPinia()

// プラグインに渡すコールバック(プラグイン関数)を定義
const MyPiniaPlugin = () => {
  console.log('My Pinia Plugin!')
}

// プラグインに渡すコールバック(プラグイン関数)を定義(追加)
const SecretPiniaPlugin = () => {
  //オブジェクトを返すことによってすべてのストアに静的プロパティを追加
  return { secret: 'the cake is a lie' }
}

//上記の定義は以下のいずれでも同じ
/*
const SecretPiniaPlugin = () => ({ secret: 'the cake is a lie' })

function SecretPiniaPlugin() {
  return { secret: 'the cake is a lie' }
}
*/

// Pinia のインスタンスにプラグインを追加(チェイン)
pinia.use(MyPiniaPlugin).use(SecretPiniaPlugin)

const app = createApp(App)
app.use(pinia)
app.mount('#app')
プラグイン関数を別途定義せずに、以下のように記述することもできます。
import { createApp } from 'vue'
import { createPinia } from 'pinia'
import App from './App.vue'

const pinia = createPinia()

pinia.use(() => {
  console.log('My Pinia Plugin!')
})
.use( () => {
  return { secret: 'the cake is a lie' }
})

const app = createApp(App)
app.use(pinia)
app.mount('#app')
<script>
import { useCityStore } from '@/stores/city'
import { useGuitarStore } from '@/stores/guitar'
import { usePianoStore } from '@/stores/piano'
export default {
  setup() {
    const cityStore = useCityStore()
    const guitarStore = useGuitarStore()
    const pianoStore = usePianoStore()

    //各ストアの静的プロパティ secret をコンソールに出力
    console.log('cityStore.secret: ' + cityStore.secret)
    console.log('guitarStore.secret: ' + guitarStore.secret)
    console.log('pianoStore.secret: ' + pianoStore.secret)
    return {
      cityStore,
      guitarStore,
      pianoStore
    }
  }
}
</script>
全てのストアに secret という共通のプロパティが設定されています。
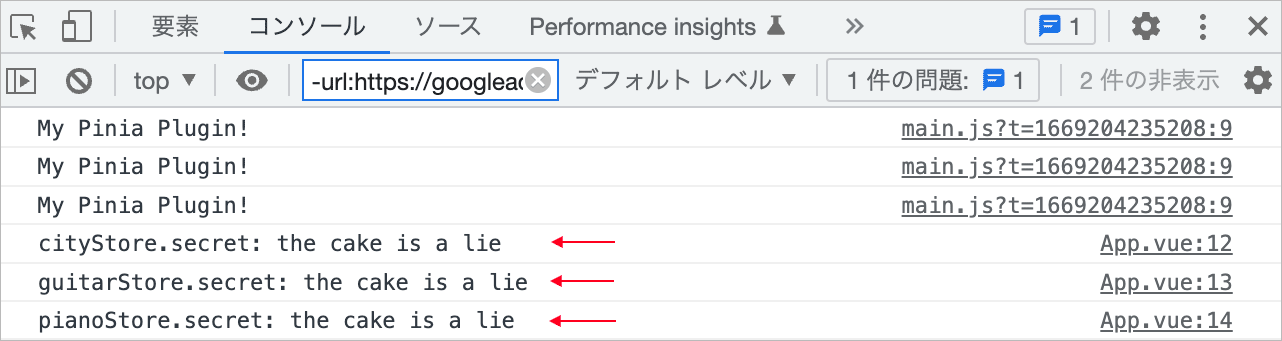
プラグイン関数に渡される引数
use() メソッドはコンテキストオブジェクトをプラグイン関数に渡します。つまり、プラグイン関数は引数としてコンテキストオブジェクトを受け取ることができます。
import { createApp } from 'vue'
import { createPinia } from 'pinia'
import App from './App.vue'

const pinia = createPinia()

//プラグイン関数が受け取るオブジェクトをコンソールに出力
pinia.use((context) => {
  console.log(context)
})

/* 上記は以下と同じこと
const func = (context) => {
  console.log(context)
}
pinia.use(func) */

const app = createApp(App)
app.use(pinia)
app.mount('#app')
main.js を上記のように変更すると、プラグイン関数はストアごとに1回ずつ実行されるので、以下のようにそれぞれのストアに対して渡されたコンテキストオブジェクトが出力されます(App.vue の secret プロパティのコンソールへの出力の記述は削除します)。
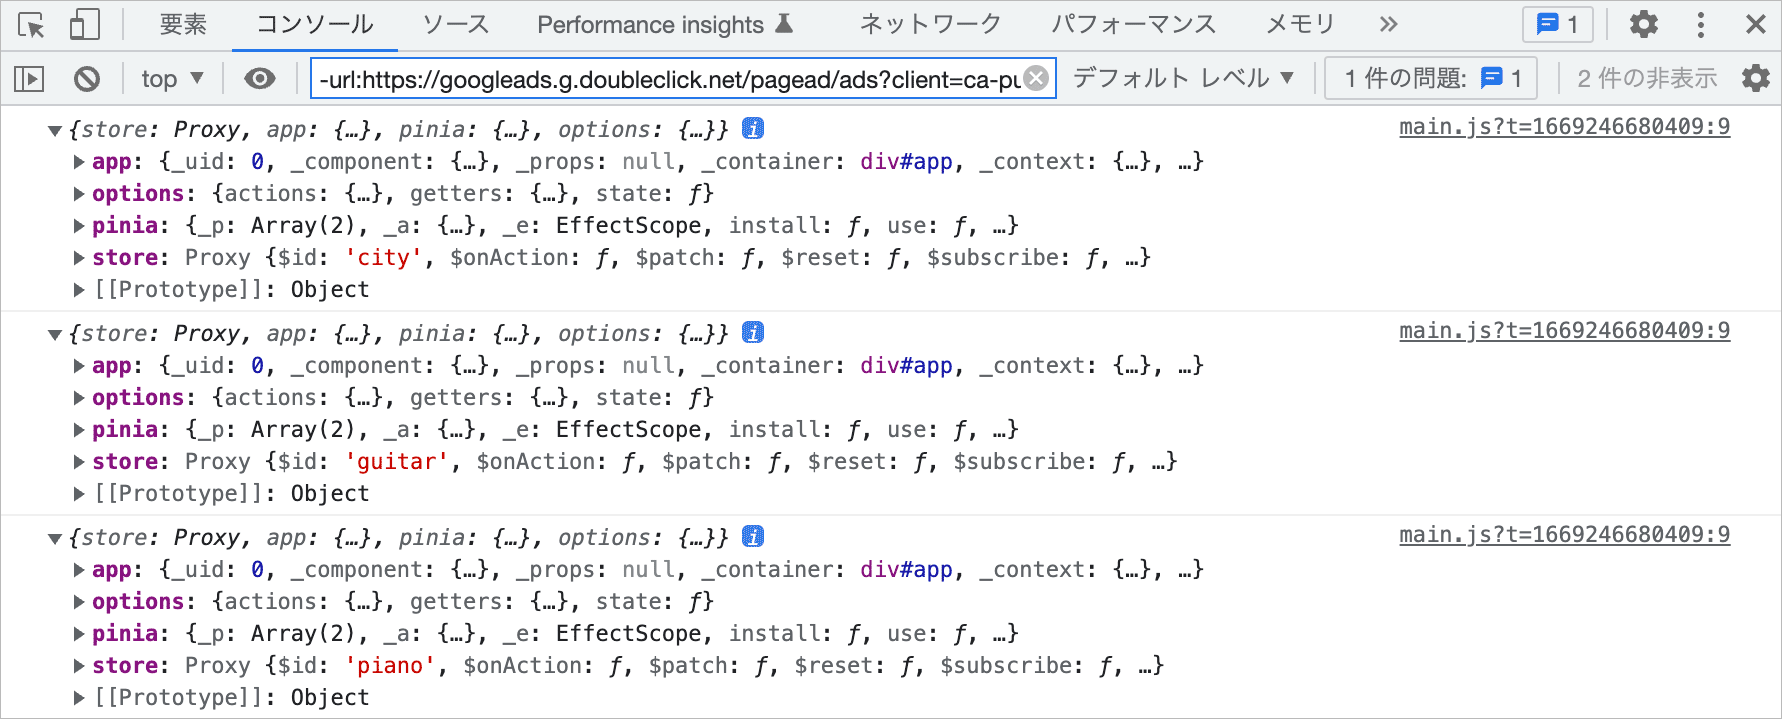
プラグイン関数に渡されるコンテキストオブジェクトには4つのプロパティがあります。
| プロパティ | 説明 |
|---|---|
| app | Vue アプリのインスタンス |
| options | defineStore() メソッドに渡すオプションオブジェクト(options object)。Option Stores の場合は actions, getters, state プロパティが含まれますが、Setup Stores の場合は actions プロパティのみが含まれます。 |
| pinia | Pinia のインスタンス |
| store | ストアのインスタンス |
分割代入を使って任意のプロパティを受け取ることができます。
//分割代入を使って options と store を受け取る
pinia.use(( { options, store }) => {
  console.log(options)
  console.log(store)
})
カスタムプロパティの追加
プラグインでプロパティのオブジェクトを返すことで、すべてのストアにプロパティを追加できます。
pinia.use( () => {
  return { hello: 'world' }
})

//または pinia.use(() => ({ hello: 'world' }))
Vue Devtools で確認すると、それぞれのストアで customProperties に追加したプロパティが表示されています。
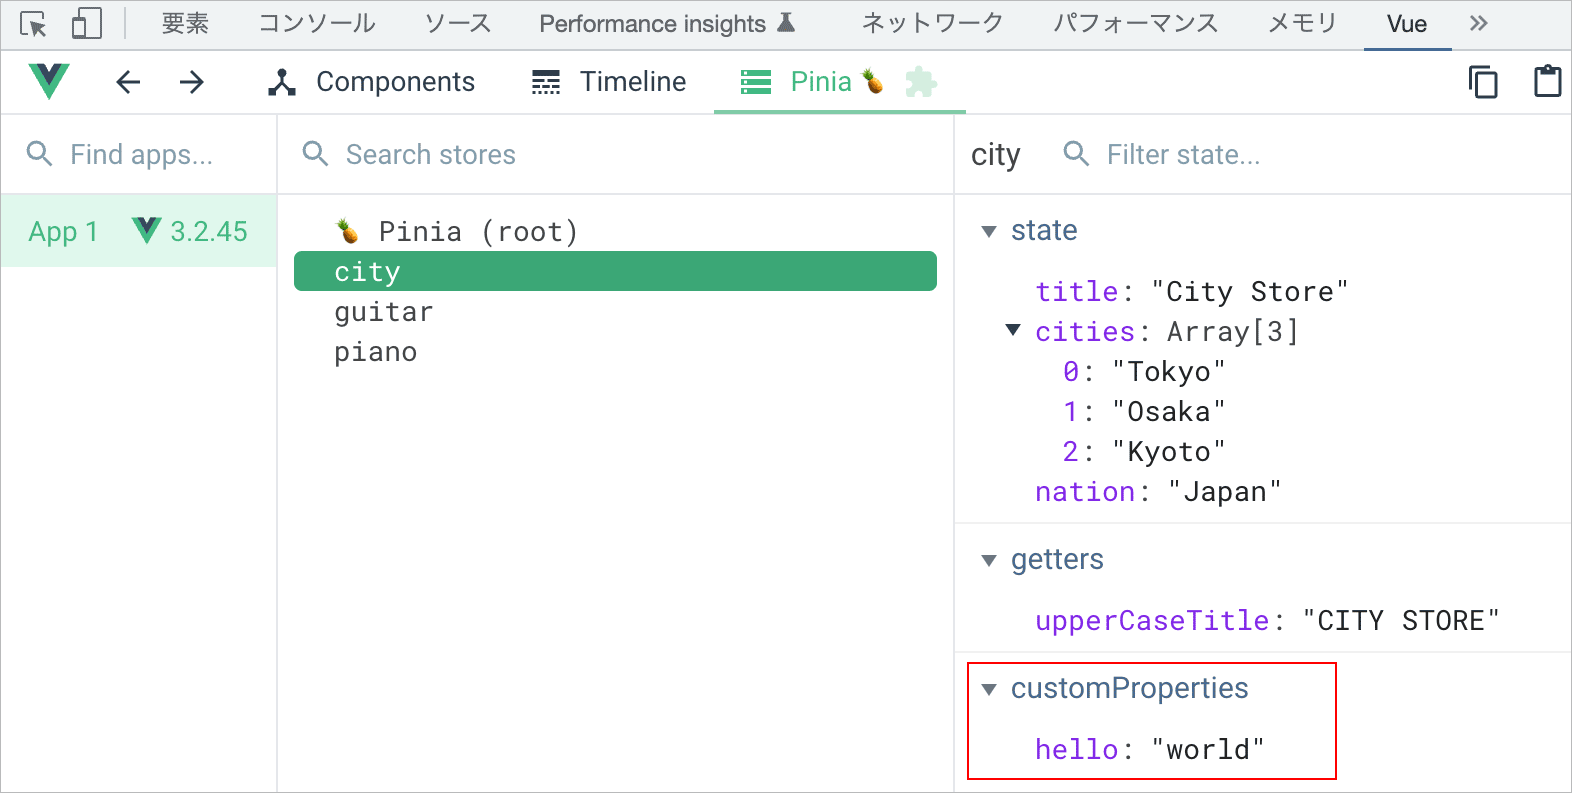
ストアに直接プロパティを設定することもできます。
//分割代入でストアを引数に受け取り、ストアに直接プロパティを設定
pinia.use(({ store }) => {
  store.hello2 = 'universe'
})
但し、この場合、Vue Devtools には表示されません。Devtools でデバッグするには、dev モード(開発モード)の場合にのみ、Devtools に表示されるように、以下のように store._customProperties に add() でキーを追加します。
pinia.use(({ store }) => {
  store.hello2 = 'universe'
  // dev モードの場合
  if (process.env.NODE_ENV === 'development') {
    store._customProperties.add('hello2')
  }
})
例えば、以下のように記述すると、
import { createApp } from 'vue'
import { createPinia } from 'pinia'
import App from './App.vue'

const pinia = createPinia()

//カスタムプロパティを追加
pinia.use( () => {
  return { hello: 'world' }
})
//ストアに直接カスタムプロパティを追加(Devtools で表示)
pinia.use(({ store }) => {
  store.hello2 = 'universe'
  if (process.env.NODE_ENV === 'development') {
    store._customProperties.add('hello2')
  }
})
//ストアをコンソールへ出力
pinia.use(({ store }) => {
  console.log(store)
})

const app = createApp(App)
app.use(pinia)
app.mount('#app')
Vue Devtools で確認すると、それぞれのストアで customProperties に追加したプロパティが表示されています。
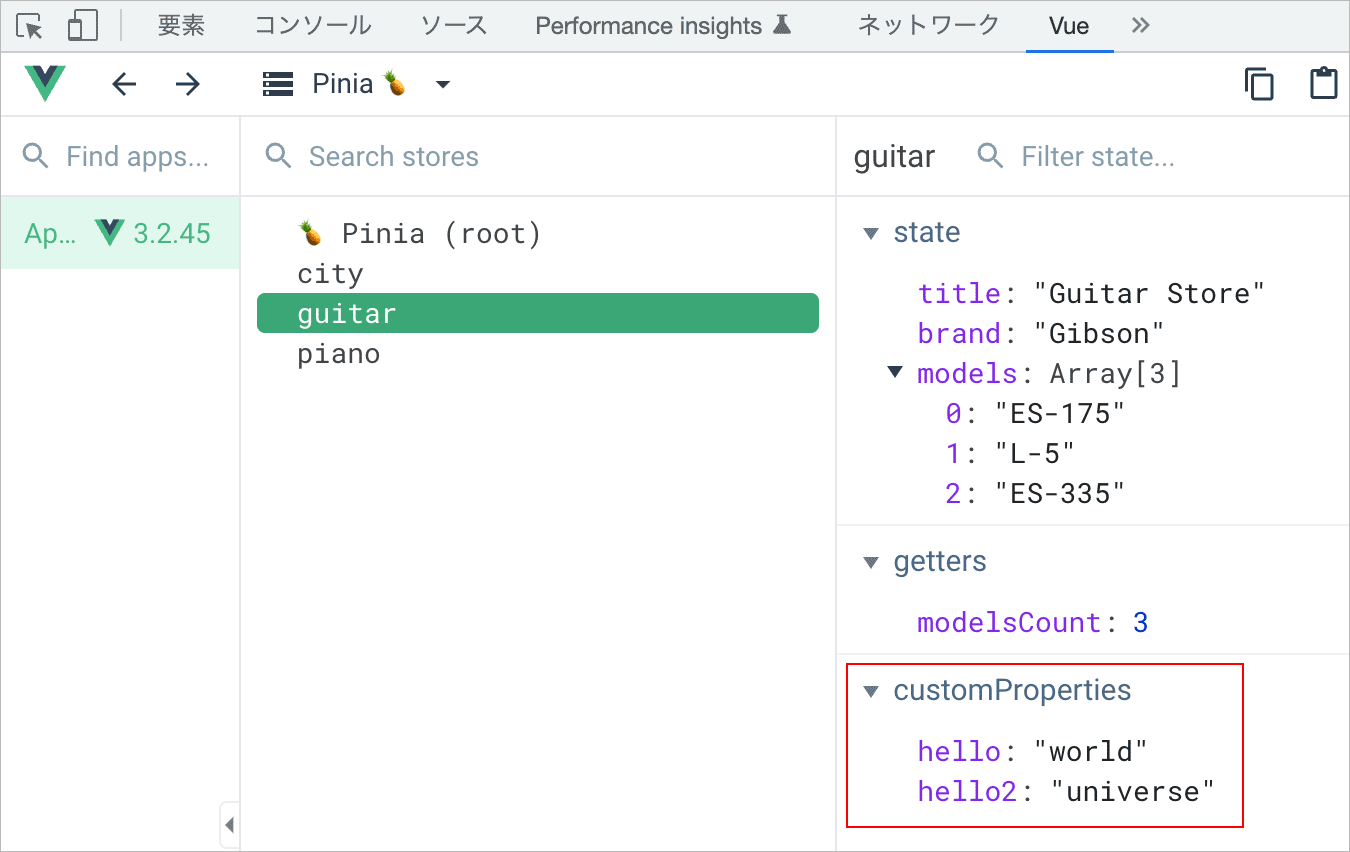
追加したプロパティは両方ともストアのプロパティとして確認できます。また、ストアのインスタンスのプロパティ(例 cityStore.hello)としてアクセスできます。
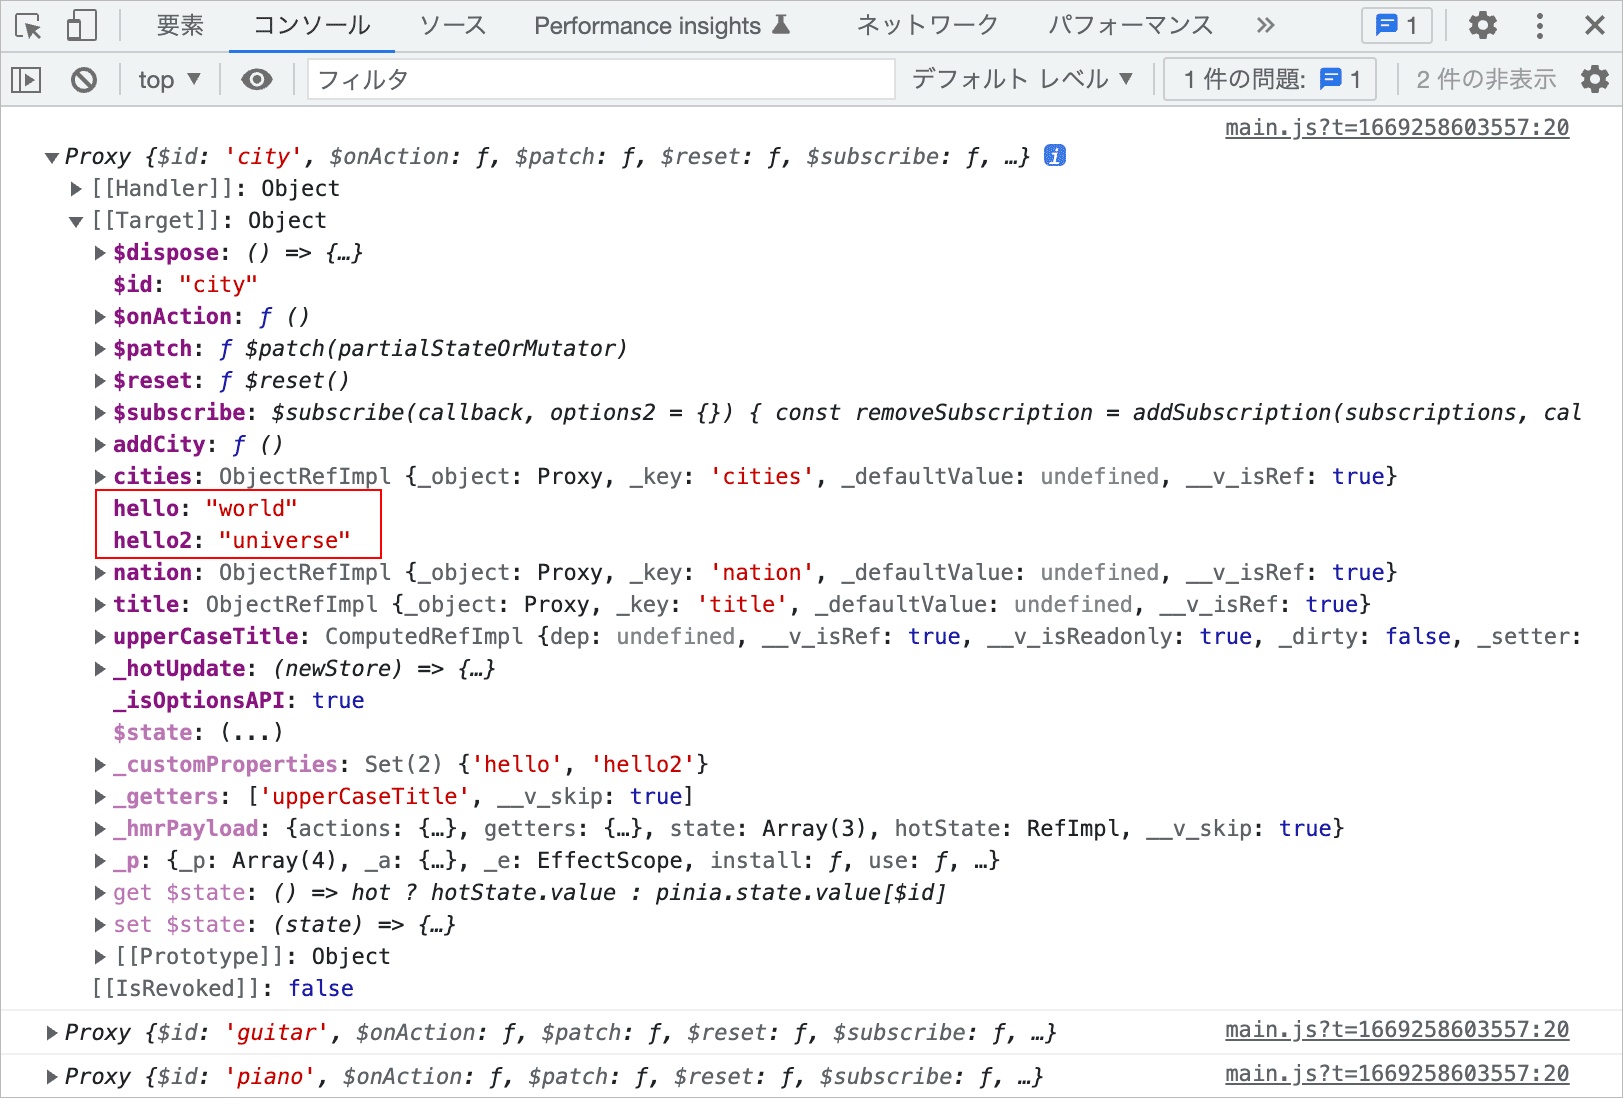
state の操作
プラグインはストアインスタンスごとにトリガーされるフック関数なので、ストアインスタンスにアクセスして state を操作することもできます。
以下を main.js に記述すると、この例の場合、全てのストアの state に title が定義されているので、全てのストアの state の title が上書きされます。
//全てのストアのステートの title を変更(上書き)
pinia.use( ({ store }) => {
  store.title = 'Title by plugin'
})
但し、ストアの state に title が定義されていない場合は、state としてではなく、静的なプロパティとして追加されてしまいます。
この例では3つのストアの中の2つのストアで models という値が配列の state が定義されていますが、以下を記述すると、1つのストアでは models という state が定義されていないのでエラーになります。
//全てのストアのステートの models の最後の要素を取り除く
pinia.use(({ store }) => {
  store.models.pop()
})
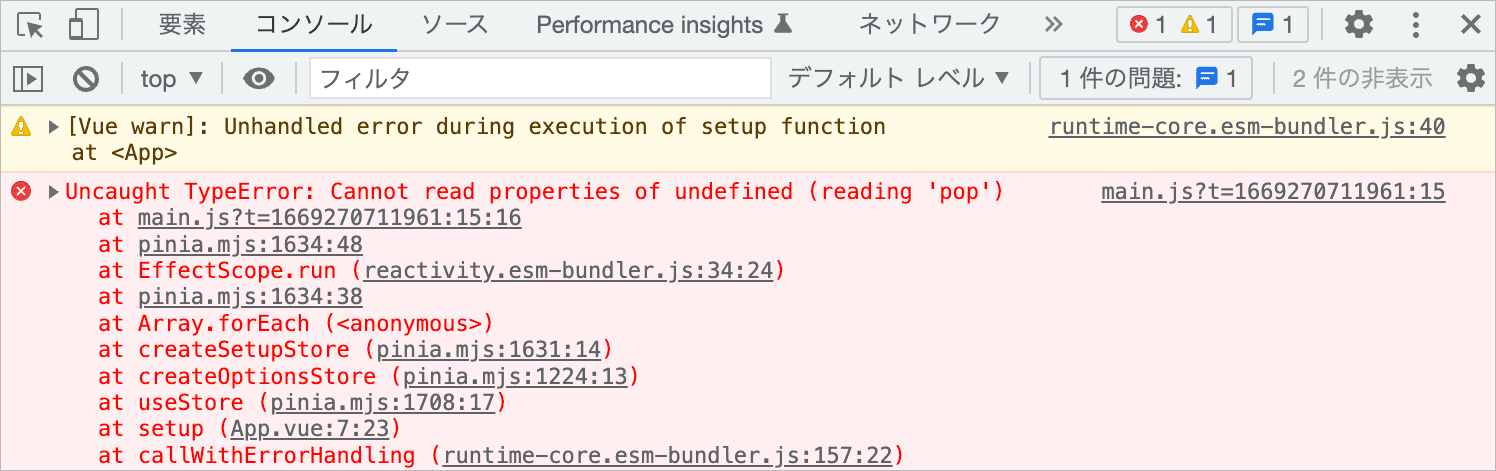
以下のようにプロパティの存在を確認してから操作することができます。
pinia.use(({ store }) => {
  //models プロパティが存在すれば
  if(store.models) {
    store.models.pop()
  }
})
※ プラグインでステートを操作する場合は、全てのストアの state をまとめて操作することになるので注意が必要です。
state の追加
state にプロパティを追加するには、store と store.$state の両方にプロパティを追加します。
また、異なるアクセス間で値を共有するために ref() または reactive() メソッドなどを使って追加するプロパティをリアクティブにする必要があります。
以下は全てのストアの state に message というプロパティを追加する例です。
16行目は、toRef() メソッドを使って store.$state に追加した message プロパティを ref として取り出す方法です。
// ref と toRef を追加でインポート
import { createApp, ref, toRef } from 'vue'
import { createPinia } from 'pinia'
import App from './App.vue'

const pinia = createPinia()

pinia.use( ({ store }) => {
  // ref() で設定する値をリアクティブに
  const message = ref('The message from Plugin')
  // store.$state にプロパティを追加してリアクティブな値を設定
  store.$state.message = message
  // store にも同様にプロパティを追加してリアクティブな値を設定
  store.message = message
  // 上記は以下のように記述することもできます
  // store.message = toRef(store.$state, 'message')

  //以下は確認用のためのコンソールへの出力
  console.log(store)
})

const app = createApp(App)
app.use(pinia)
app.mount('#app')
<script>
import { useCityStore } from '@/stores/city'
import { useGuitarStore } from '@/stores/guitar'
import { usePianoStore } from '@/stores/piano'
export default {
  setup() {
    const cityStore = useCityStore()
    const guitarStore = useGuitarStore()
    const pianoStore = usePianoStore()
    return {
      cityStore,
      guitarStore,
      pianoStore
    }
  }
}
</script>

<template>
  <h1>App</h1>
  <h2>{{ cityStore.message}}</h2>
  <h2>{{ guitarStore.message}}</h2>
  <h2>{{ pianoStore.message}}</h2>
</template>
例えば、以下のように表示されます。確認用のコンソールへのストアの出力を見ると、ストアのルートレベルと $state に message プロパティが確認できます。
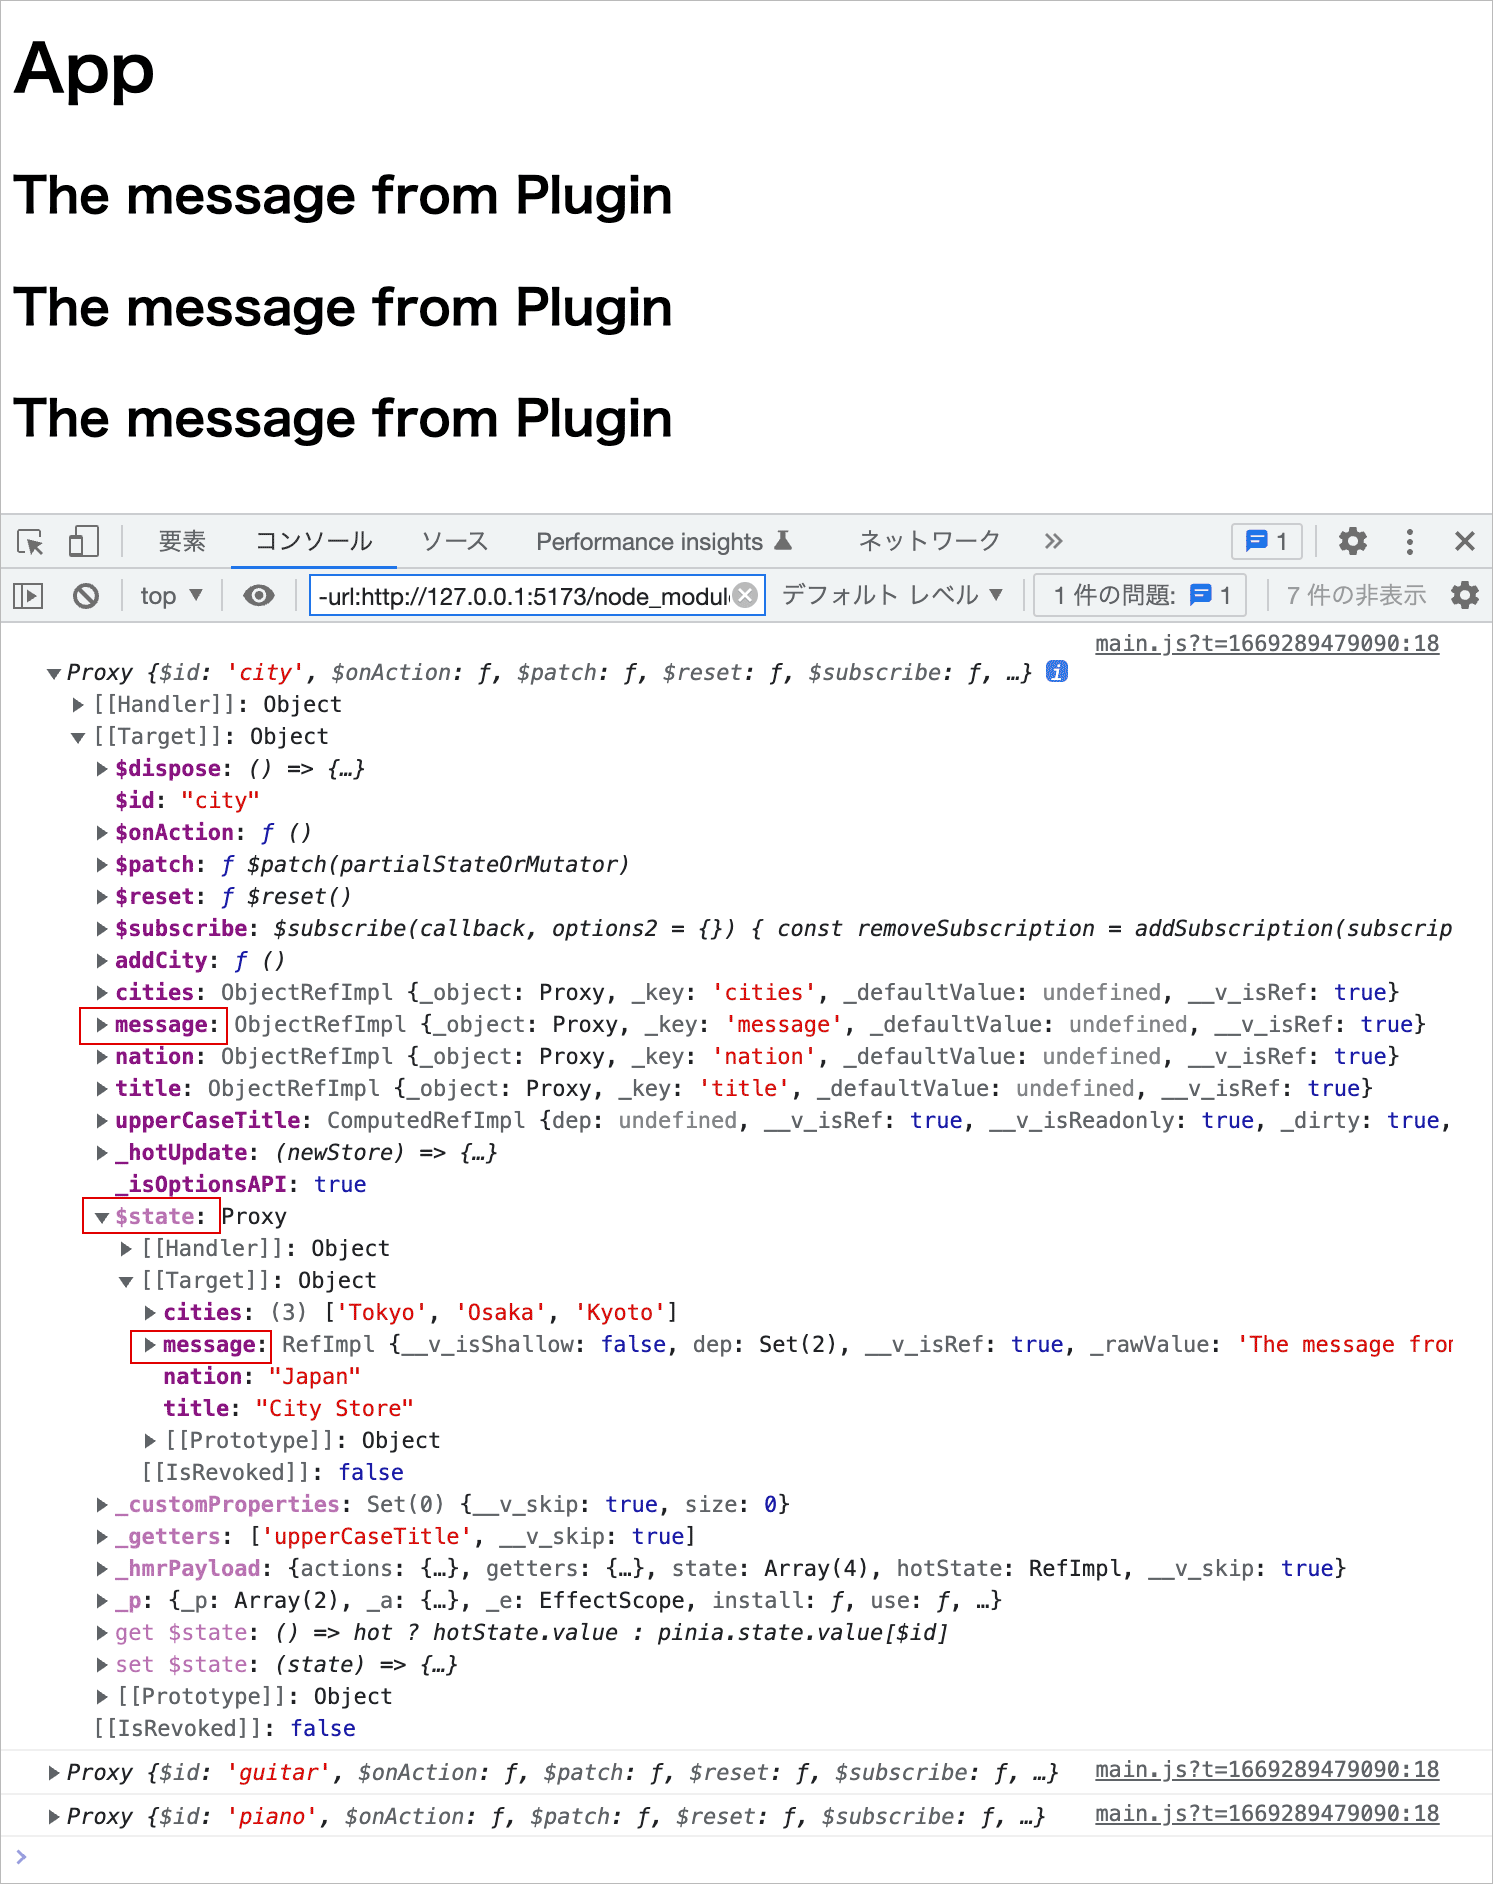
追加された message はそれぞれのストアで個別に(独立して)更新することができます。
但し、defineStore() で初期値を定義していないので、 $reset() をしてもリセットできません。
また、ストアにすでに同じ名前のプロパティがあれば上書きされてしまいます。上書きされないようにするには、例えば以下のようにそのプロパティが存在しない場合に追加するようにすることもできますが、
pinia.use( ({ store }) => {
  if(!store.message) {
    const message = ref('The message from Plugin')
    store.$state.message = message
    store.message = message
  }
})
追加するプロパティと同じプロパティがすでにストアに存在すれば、エラーにすることもできます。
pinia.use( ({ store }) => {
  if(store.message) {
    throw new Error(`${store.$id} store already has "message" property`)
  }else{
    const message = ref('The message from Plugin')
    store.$state.message = message
    store.message = message
  }
})
options の追加
defineStore() でストアを定義する際に新しいオプション(options)を作成して、後でプラグインから使用することができます。
オプション(options)は、defineStore() メソッドに渡すオプションオブジェクト(options object)のことです。
例えば以下のようにストアの定義で新たにオプションオブジェクトを作成(設定)することができます。
import { defineStore } from 'pinia'

export const useCityStore = defineStore('city', {
  state: () => ({
    title: 'City Store',
    cities:['Tokyo', 'Osaka', 'Kyoto'],
    nation: 'Japan',
  }),
  getters: {
    upperCaseTitle: (state) => state.title.toUpperCase()
  },
  actions: {
    addCity(city) {
      if(!city) return
      this.cities.push(city)
    }
  },
  //新たにオプションオブジェクトを作成(追加)
  usePlugin: true,
})
プラグインで以下のようにオプションオブジェクトをコンソールに出力させると、
pinia.use( ({ options }) => {
  console.log(options)
})
追加したオプションが確認できます。
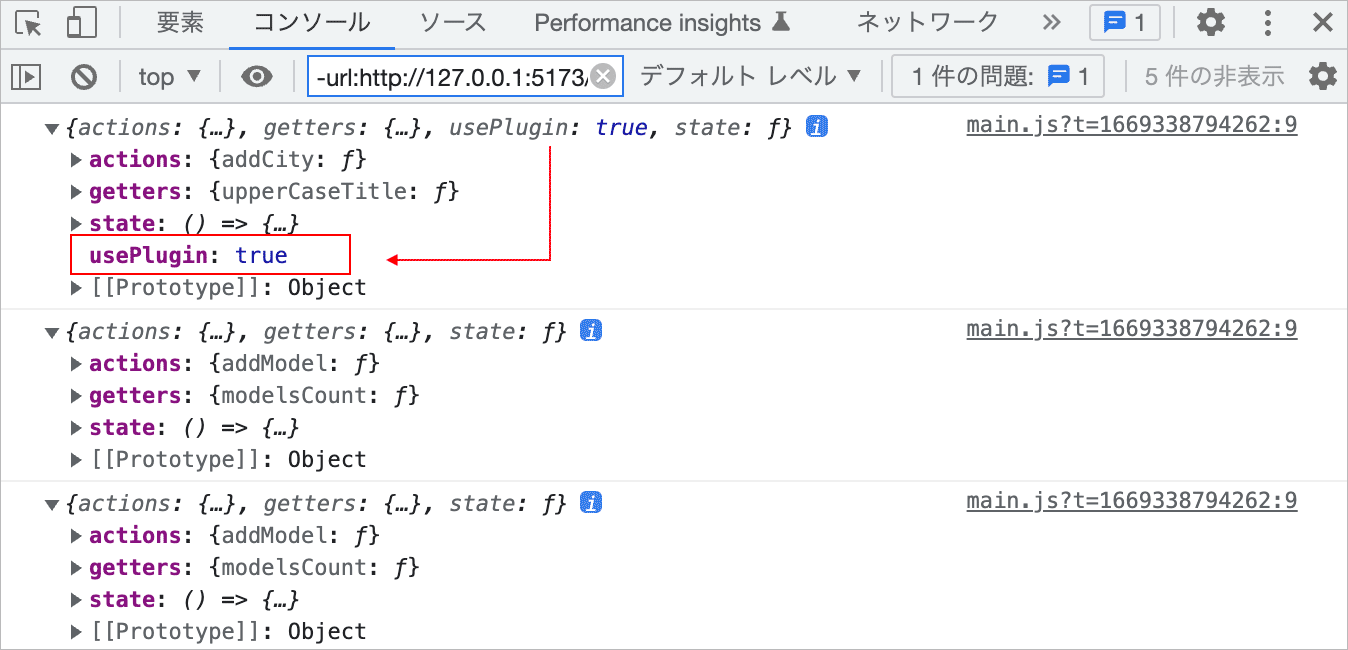
※ Setup Stores(Setup Syntax)の場合は、オプションは defineStore() の第3引数に指定します。
import { ref, computed } from 'vue'
import { defineStore } from 'pinia'

export const useCityStore = defineStore('city', () => {
  const title = ref('City Store')
  const cities = ref(['Tokyo', 'Osaka', 'Kyoto'])
  const nation = ref('Japan')
  const upperCaseTitle = computed(() => title.value.toUpperCase())
  const addCity = (city) => {
    if(!city) return
    cities.value.push(city)
  }
  return { title, cities, nation, upperCaseTitle, addCity }
},
//新たにオプションオブジェクトを作成(追加)
{ usePlugin: true, }
)
プラグインでは、オプションオブジェクトからの情報に基づいて処理することができるので、それぞれのストアで異なる処理を行うことができます。
import { createApp, ref, toRef } from 'vue'
import { createPinia } from 'pinia'
import App from './App.vue'

const pinia = createPinia()

pinia.use( ({ store, options }) => {
  //オプションの usePlugin が true の場合 message を追加
  if(options.usePlugin) {
    const message = ref('The message from Plugin')
    store.$state.message = message
    store.message = message
  }
})

const app = createApp(App)
app.use(pinia)
app.mount('#app')
$subscribe と $onAction の追加
プラグインを使って全てのストアに $subscribe や $onAction をまとめて設定することができます。
//全てのストアに $subscribe と $onAction を設定
pinia.use(({ store }) => {
  store.$subscribe((mutation, state) => {
    console.log('$subscribe by Plugin: store = ' + mutation.storeId)
  })
  store.$onAction(({ name, store }) => {
    console.log('$onAction by Plugin: store = ' + store.$id + '| action = '+name)
  })
})
この例の場合、上記を main.js に記述して、App.vue のテンプレートに以下のアクションを呼び出すボタンを設置してクリックすると、
<button @click="cityStore.addCity('Nagano')">Add City</button>
<button @click="guitarStore.addModel('Les Paul')">Add Model</button>
この場合、呼び出されるアクションは state を変更するので、$subscribe と $onAction により以下のようにコンソールへ出力されます。
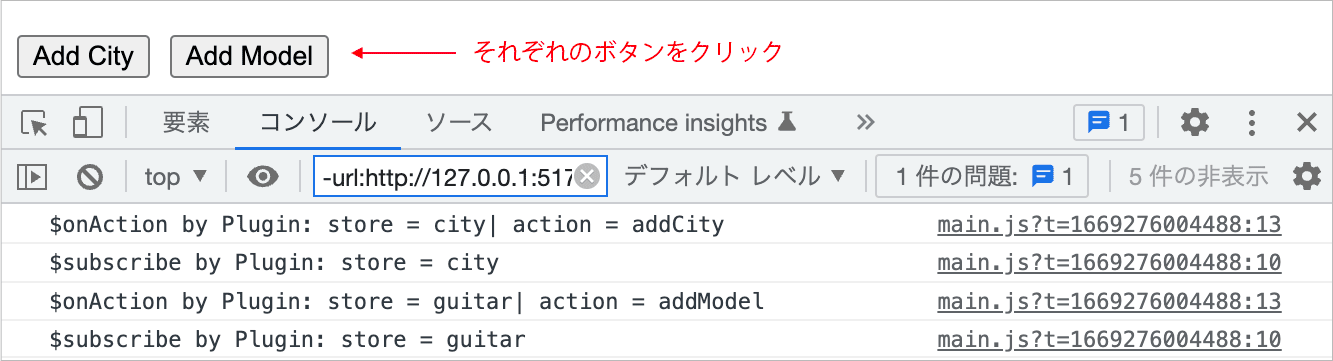
サブスクリプションのトリガー
プラグイン内で発生する state の変更または追加 (store.$patch() の呼び出しを含む) は、ストアがアクティブになる前に発生するため、各ストアで設定したサブスクリプション($subscribe と $onAction)はトリガーされません。
プラグイン内で設定したサブスクリプションの場合は、その記述の後に発生する state の変更や追加はサブスクリプションをトリガーします。
参考サイト: